After screeding the floor, various defects may appear on its surface, for example, unevenness, depressions, cracks or bulges. But such coating violations can appear after a long time.
In such a situation, it is possible to level the floor in a very economical way - using tile adhesive. The procedure for leveling the floor does not require a lot of time, but it still allows you to get an ideal floor covering.
Leveling the floor with tile adhesive
General information
Tile adhesive is used to install the following floor coverings:
- thermal insulation tiles;
- mosaic canvas;
- porcelain stoneware;
- natural stone;
- ceramic tile;
- heavy stones.
When choosing a material, you should take into account the characteristics described below.
Typically, tile adhesive is used to fix tiles and stones.
Adhesion
This is one of the main qualities on which the adhesion of materials depends. The heavier the floor covering, the more adhesion the adhesive used should have.
For example, for standard tiles, adhesion should be 5 kg per 1 square meter. cm. This way the product will stick without problems and will not suffer from vibrations and stress for a long time. This is what distinguishes tile adhesive from the usual mixture of sand and cement.
Recommendation! For porcelain stoneware, you need to use a hardening base, the adhesion of which is 10 kg/sq. cm. Porcelain tiles are heavy, so if the fixing force is insufficient, the surface can quickly collapse.
It is important that the tiles adhere well to the adhesive
However, excessively strong glue, which is used to attach heavy and large stones, can also cause destruction of the ceramic surface after hardening.
ceramic floor tiles
The basis
The base for the coating can be:
- plaster;
- concrete;
- brick.
It is also worth considering the type of surface. Glue with increased elasticity and good adhesion must be used for the following surfaces:
- glass-magnesium coating;
- used tiles;
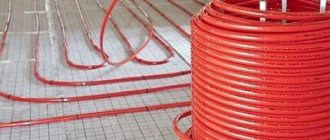
- warm floor;
- self-leveling floor;
- drywall;
- glass.
New tile covering can be laid over old tiles
Warm floors are often used in the bathroom. This system involves temperature changes, so simple glue cannot be used, as it will simply dry out and disintegrate. In this case, you need to choose elastic compounds with high heat resistance.
Recommendation! To make the right choice and purchase glue with the desired characteristics, you need to carefully read the text on the packaging. Manufacturers are required to specify for which surfaces and materials it can be used. Especially when it comes to a warm field or complex surfaces.
Pay attention to the glue packaging: all recommendations and characteristics are indicated there.
Beautiful solutions in the interior
The overall appearance of the floor covering in the future will depend on how well and correctly the floor was leveled under the laminate. With the right choice of all materials and competent execution of the work, you can achieve amazing results.
- The perfectly smooth glossy surface of the rich walnut colored floor looks very stylish and beautiful. Even with a detailed examination it is impossible to find the slightest tubercle. This floor really is a real decoration of the room. In addition, it beautifully and harmoniously coexists with the overall color scheme of the room.
- Laying such a laminate, made by designers to a special order, requires especially careful preparation of the floors. Otherwise, there will be not just clear lines, but zigzag stripes that will ruin the appearance. Here, thanks to the correctly leveled surface, the laminate panels are laid evenly, which made it possible to add a special twist to this interior.
- As in the previous case, such standard panels require particularly careful preparation of the floor before laying the laminate. Otherwise, they will begin to swell, rise from the base, or crack. Thanks to the fact that all the preparatory work was done correctly, the laminate looks as if it had always been there. This flooring can decorate any room. The ideal combination of colors, both laminate panels and furniture in the room, allowed us to create the ideal interior style.
- Another wonderful example of correctly installed laminate flooring that became a real decoration of the room. Gloss gives a special charm to the room, it allows you to expand the room itself and make it special, but this can only be achieved with proper preparation of the floor for further work.
- This wood-look laminate is ideal for any interior and will make it more presentable and expensive. But it is these panels that require the most even surface for installation, otherwise the floor covering will look terribly old and untidy. In this case, you can see perfectly leveled floors covered with laminate.
All these examples clearly prove that laminate flooring is ideal for any room. It is stylish, modern and of high quality, but only if it is laid on a flat floor. Therefore, there is certainly a need to level the floor before laying such a floor covering, and it is quite large. And to achieve the same beautiful result as in the photographs presented, you just need to follow the advice of professionals and choose the right materials.
To learn how to level a laminate floor, see the following video.
About work in general
In modern floor installations, the base for constructing the covering is usually a concrete screed or slabs. This way you can create floors for different types of premises: apartments, houses, offices, garages, etc. The purpose of the room will determine what type of coating will be used as a base: linoleum, parquet, carpet, ceramic tiles or PVC tiles, laminate. The lifespan of the exterior coating, which is often very expensive, often depends on how level the concrete base is laid.
To create a strong and even base, ready for the final coating, a screed is made or the surface is filled with solutions of special mixtures that help level the floor surface. This preparation helps create noise and waterproofing.
Usually the final layer of the subfloor is a screed that levels the floor. Floor covering is placed on it
When choosing a method, take into account the difference between the height of the planned surface and the material of the old floor. When the difference between these values is not higher than 3-4 cm, the surface is leveled using a concrete screed. If the surface is smooth, but there are a small number of cracks, you can fill the floor with self-leveling solutions or tile adhesive.
Experts distinguish several types of screed, which differ in the installation method: it can be dry or with the addition of special liquids.
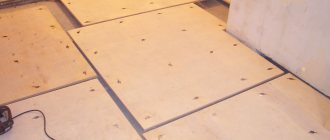
Even a person unrelated to construction can perform the dry method. This method is quite economical and insulates the room well. Expanded polystyrene, expanded clay and dry quartz sand can play the role of filler. On top of these materials you can put wood boards (for example, fiberboard, chipboard), plywood, and moisture-resistant gypsum fiber sheets. Dry screed is best used for residential premises.
The clean floor surface is treated with a soil solution, which protects it from moisture and makes it more durable. When the primer dries, the surface is covered with plastic film (at least 50 microns), connecting the canvases with an overlap of 20 cm and fastening them with tape. An overlap of about 12-15 cm is left along the walls, and then it is glued to the walls with damper tape.
The floor screed may be dry
If the person who took on the installation of the floor does not have enough experience, you can lay U-shaped profiles, turning them upside down with their edges. After the filler is poured into the resulting cells, it needs to be leveled, and the sheets of the planned floor should be laid on top. The joints need to be glued with PVA or GVL glue or fixed with self-tapping screws every 18-20 cm.
Along the walls, excess strips of gypsum fiber sheets are cut off. If at the same time the first sheets seem unstable, then when they are connected into one whole, a good, strong floor will be obtained.
When choosing a floor filler, most prefer the option based on cement and sand, which provides a strong base for the final layer. It must be taken into account that the thickness of such a layer must be thicker than 3 cm, otherwise its strength will decrease several times.
cement
The concrete base must be cleaned, primed and dried. Using a building level, beacons are placed. Instead, you can use T-shaped profiles, durable metal slats, wooden beams, metal pipes or edged boards.
Many people prefer to pour cement and sand screed
The slats are placed on a thick solution, every meter. The solution must harden, otherwise the even screed can be displaced, then the whole work will be ruined.
The following actions require not so much skill as endurance: pouring the mixture from a distant corner, carefully level the surface according to the rule. The solution must be distributed along the slats, performing movements in a circle. The mixture thus spreads from side to side, becoming denser and clogging the voids.
Wet screed
Leveling the floor with plywood 4 ways
Wet screed is performed using a variety of solutions. This method is more suitable for leveling a concrete base.
Currently, cement-sand mortars, a mixture of sawdust and PVA, and self-leveling mixtures are used.
A mixture of sawdust and PVA glue for leveling the floor
The cheapest option is a screed made from a sawdust-glue mixture. It can be used to level large areas. Before leveling the floor under the laminate, it must be cleaned of dirt and dust. Then, you need to make markings on the walls using a level and install beacons
Before making markings, you need to take into account the fact that such a screed gives a slight shrinkage
A mixture of sawdust and PVA glue soaked in water is prepared. If you use dry sawdust, they will take moisture from the glue, which will negatively affect the final result. The prepared composition should resemble thick sour cream in its consistency.
The prepared solution is poured into the space between the slats. The sawdust-adhesive screed is not applied in a thick layer (maximum 2 cm). If the floor is very uneven, then you need to apply the mixture in several layers. The second layer is applied only after the first has dried. The work must be controlled by level. If there are minor irregularities, they can be smoothed out with putty.
It will not be possible to level the floor using a sawdust-adhesive screed in a short time. Each layer takes a certain amount of time to dry. In addition, you will have to wait until the screed shrinks.
Use of self-leveling compounds
Self-leveling compounds are extremely popular today. They are a powder that must be diluted with water before use. Instructions for preparing the solution are on the packaging. Using such compositions, even a novice master can level the floor. Self-leveling mixtures are leveled under their own weight.
If there are significant defects in the base, they must be repaired before pouring the floor. You can use putty for this. Subsequent work should begin after the putty has dried. The base must be cleaned of dirt and filled with self-leveling mixture.
Since the mixture is quite liquid, it should be laid on a layer of waterproofing. As insulation, you can use polyethylene film, which is laid overlapping or coating waterproofing. The joints between the floor and walls must be additionally taped with damper tape. To prevent the self-leveling mixture from leaking outside the room, it is worth installing a bar on the threshold.
To make the base more durable, a reinforcing mesh is used. It needs to be fixed to the subfloor. To do this, use a construction stapler. The reinforcing mesh strips should overlap each other slightly.
Mix the solution with a construction mixer. An alternative to a mixer is a drill with a special attachment. It is almost impossible to knead the mixture to the desired consistency by hand. In this state, the solution should be left for 15 minutes. After the time has passed, the solution is mixed again and poured onto the floor.
The mixture is distributed over the surface with a needle roller. This prevents air bubbles from forming. You can begin laying the laminated board after the composition has completely dried.
Cement-sand screed
This is one of the oldest methods of leveling the floor. It is advisable to use it if there are significant defects or large differences in height. Only experienced craftsmen can mix a solution of the required consistency. The percentage of mortar components varies depending on the quality of sand and cement.
The technology for laying cement-sand screed is similar to the technology for laying self-leveling mixture. The difference is that the cement-sand screed needs to be leveled independently.
Tile adhesive for leveling floors - can it be used for this purpose?
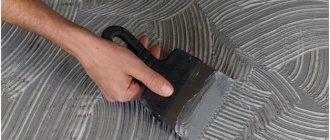
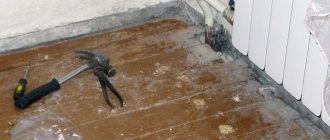
To eliminate small cracks or unevenness in the concrete screed, as well as simply make the floor smoother, use tile adhesive. This method is slow and economical, but it does an excellent job of finishing leveling. Among the working tools, in addition to the glue itself, the choice of which is huge, a special wedge is needed. It should be 3 m long. This device, which has a diagonal direction to the coating, is necessary to level the floor screed. This makes it much easier and faster to get a perfectly even coating.
Using tile adhesive, you can level the floor, eliminate various irregularities and recesses
Important! Tile adhesive works well if there are minor irregularities or small holes in the screed.
When constructing a floor, there are often situations when even beacons placed on the rough floor surface do not give the expected result. This happens due to the following reasons: excess water in the solution, poor quality mixture, illiterate installation of beacons, etc. When the floor surface is uneven, and there is no possibility or need to raise it, then tile adhesive will best help in such a situation. Also, using glue is considered the most economical way.
These same problems can be solved by using self-leveling mixtures, but sometimes this method is impractical and does not justify itself. Usually, to level the surface you just need to get rid of minor chips and cracks; in such cases, tile adhesive is the best way out of the situation. But it is worth taking into account that even glue from one of the best brands - Ceresit - can become cracked if the glue layer is 0.3 cm. When working with glue, there is no need to be distracted. Tile adhesive is not recommended for completely leveling the floor surface, even though it is very inexpensive.
Tile adhesive is an excellent choice if you need to level the floor. This method is not too complicated and does not require much expense.
How to make a concrete plane level?
Under linoleum
The concrete floor must be carefully prepared before leveling.
- All protruding irregularities are removed from its surface. If there are gaps, they are deepened and cleaned well.
- The surface is cleaned with a construction vacuum cleaner and primed well.
- The leveling layer is applied strictly along the beacons located along the wall, and leveled with a rule and a spatula.
- After drying, sometimes it is necessary to do the work again and apply an additional layer of adhesive.
Attention
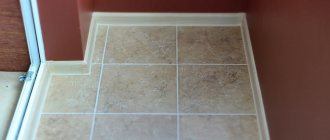
It is very advisable to level the floor with tile adhesive under linoleum. A well-dried layer is an ideal durable surface for the base. On such a floor, linoleum holds firmly and does not show flaws even over a long time.
Under laminate
- The surface must be thoroughly cleaned of any remaining dirt and construction debris. There should not be a single element left on it. To do this, sweep out all the corners and cracks with a broom. If necessary, loose particles are removed from cracks.
- The surface is dried and coated with a primer. It is enough to apply one layer to get good adhesion of the base to the laminate.
- According to the exposed beacons, they begin to fill the floor so that all small cracks are covered with the composition.
- If necessary, repeat the procedure.
- The laser level is used to check elevation differences. To prevent them, use the rule of appropriate length and a trowel.
Tile adhesive is an excellent option for performing work on leveling the floor for final tiling. Based on the type of glue and its characteristics, you can select a composition for different needs depending on the material of the finishing surface.
Possibilities of tile adhesive
Even a perfectly made screed in a residential area can lose its properties after some time. Typically, reconstructing a screed on your own is considered a mandatory step, because violating its operating parameters can cause very bad consequences.
The principle of operation is very simple: glue is poured into all holes and depressions, and then evenly distributed over the floor with a spatula
It is necessary to select options for leveling the floor surface, taking into account the material for the final floor covering and the level of height difference. If this value does not exceed 4-5 cm, then it is worth using a leveling screed. However, if the base is fairly smooth and there are only minor defects on it, then it would be best to use spreading compounds or adhesive solutions adapted for ceramic coatings.
In a situation where the top floor covering needs to be replaced, you may find the following problems, which you can get rid of using tile adhesive:
- slight deviation of the screed from the base layer;
- the appearance of small cracks, depressions and pits;
- the appearance of a large amount of dust may be the result of loss of strength of the material due to working with low-quality cement or improper preparation of the solution.
The glue will help get rid of even small cracks on the floor screed
If any of the identified problems appear, they need to be eliminated as quickly as possible. Timely repairs will save you from a thorough reconstruction. You can restore the screed with tile adhesive in a short time and without spending additional money.
Typical characteristics of cement adhesive
What kind of base is needed for laying the floor?
Leveling the base for the final coating should always be done. When this work is done efficiently, the foundation will last longer.
The need for a screed appears when a new foundation is formed or to level out outdated foundations that have become unusable. After drying, the floor plane may no longer meet the requirements only after a while.
The reason may be initial violations in the method of creating the mixture or failure to follow the sequence of actions. When self-leveling solutions are used, they cover the plane evenly, closing all the cracks, but there is a possibility that they will not fill less deep holes.
Recommendation. An adhesive mixture for tiles, applied with a ball with a difference of 25 mm to the zero mark, can help here. Other adhesive mixtures cover defects of 4 to 5 cm without affecting smaller ones.
Reasons why this type of work needs to be done
Let's list the main reasons.
| Reason 1 | The appearance of the rough coating became worse after the screed hardened. Defects include cracking, uneven shrinkage due to non-compliance with technology, that is, a high water content in the solution, poor-quality composition, and inaccurately positioned beacons. |
| Reason 2 | It may not be possible to perform leveling with other solutions due to the remaining gap along the height of the screed and the bottom of the door opening. The use of self-leveling mixtures can be effective if you need to get rid of a difference of 4 or 5 cm. Tile adhesive can create a transition layer thickness from 24 mm to 0, even in a limited space. |
| Reason 3 | Peeling of flat pieces of the previous screed from the floor slab in a limited area. |
| Reason 4 | Loss of strength of the screed material, which provokes severe dust formation and crumbling of the outer layer. |
It is worth using tile adhesive to level the floor if other materials are not suitable for this purpose.
What damage can be repaired?
As mentioned earlier, large depressions in the material cannot be filled with tile adhesive. However, it demonstrates effectiveness when it is necessary to remove relatively small defects.
It is suitable for use when:
- there are some gaps between the screed and the first layer;
- the top layer crumbles (the most common reason for this is excess liquid in the mixture);
- it is necessary to make a transition layer (maximum thickness - up to 25 millimeters);
- there are shortcomings regarding previously installed beacons (they could have moved during operation);
- detachment of individual pieces of the previous base surface can be observed;
- unsatisfactory overall quality of the screed after hardening.
Types of glue
To make a thin screed from tile adhesive, use mixtures that come in 3 types. When choosing an adhesive with certain properties, you need to study the manufacturer's characteristics.
Dispersion glue is a ready-made composition sold in packaged containers. This composition does not need to add water - you just need to mix the contents of the bucket. Quality, as well as the corresponding properties of the composition, are reflected in the price of the product.
Dispersion adhesive is a ready-made composition that does not require adding water.
Interesting! If someone wants to level the floor surface with more economical compounds, but without losing quality, then they need to select brands that contain cement.
To level the floor with ceramic tile adhesive, you do not need to completely fill the area - just combine the materials of the base screed and the poured compound. All this will be an additional advantage in the future use of the floor.
You can prepare the solution using a construction mixer, putting a suitable attachment on it. The prepared volume of glue must be used within the time frame recommended on the packaging.
You can use cheaper glue, but you will have to prepare the solution yourself
The glue comes with instructions indicating the dosage, which must be followed exactly. If the volume of water is exceeded during dilution, the frozen solution will not be strong enough. A lack of water will reduce fluidity and will not allow the thick solution to be evenly distributed over the surface.
What type of adhesive is better to choose?
There are 3 types (reactive, cement, dispersion) and several classes of tile adhesives suitable for screeding.
More information about classes:
- first (common name - basic);
- second (endowed with additional useful features);
- additional classes (they are characterized by: quick drying, elasticity, resistance to “sliding”).
It is dispersion compositions that perform especially well. They are available for purchase at any large construction department store. Ready-to-use mixtures are sorted in closed containers. Reactive adhesives require the addition of water and thorough mixing.
An important point - you will need to get a special mixer with a suitable attachment; it is impossible to manually bring the composition to the desired consistency. You should also calculate the volume of the prepared composition in advance, because It must be used within one day.
Features of the work
The poured screed must be treated the next day. It is recommended to carry out preparation before preparing the solution.
Preparatory activities consist of the following actions.
- Using a spatula, you need to manually cut off all existing irregularities and clean up any peeling. It is not difficult to process a freshly poured screed yourself if you wait a day. But after the screed has completely dried and become strong, you will have to use grinding tools.
- The glue should stick firmly to the base. Taking into account the small thickness of the layer, a construction vacuum cleaner must be used to collect dust. At the same time, it is worth cleaning the entire room, since after leveling you can proceed to assembling the floor covering.
It is necessary to carefully prepare the surface before using tile adhesive to level the floor.
- To improve the adhesive properties of the concrete coating, the maximum amount of primer must be applied to it. The base for the floor covering must stand for at least a day.
Preparatory stage
Preparation work is carried out in the following order:
- Use a spatula to level the surface. Bulges, peelings, and protruding areas are removed. After a day, it is very convenient to treat the surface yourself, because the strength of the screed is only gaining strength. It is worth using a grinding tool.
- The base should adhere firmly to the supplied layer. To do this, you will need to vacuum the floor well, and if necessary, wash it with a rag.
- After the cleaned surface has dried, a layer of primer is applied. This process increases the adhesive properties of concrete. If necessary, priming is carried out several times.
Leveling process
When leveling the floor surface with tile adhesive, you need to follow the exposed beacons and use the rules. For working in narrow areas or doorways, short options that can reach 2 nearby beacons are better suited.
If there is a need to create a stepwise transition of levels, then use a pre-prepared template with an already planned difference.
The process is performed in the following sequence.
- The mixture is used to fill the deepest defects (if the places are small, you can use a trowel).
All defects must be carefully filled with tile adhesive.
- Using the rule, the solution is distributed across the direction of the beacons, from a thicker layer to a layer with zero thickness.
- If any defects still remain, they can be corrected with a second pass when the mixture has set. In this case, the rule will need to be directed from along the beacons, relying on the already set mixture.
- Small sagging can be sanded off when the layer becomes stronger.
If not all defects have been eliminated after applying the first layer, you can apply a second
To get rid of defects with a layer of adhesive when laying ceramic tiles, you must take into account that its consumption will exceed those indicated in the reference books. This is due to the fact that the final coating, which acquired defects during installation, will be leveled.
Recommendation! To level wood flooring, use a mixture of glue and sawdust. The thickness of such a layer applied at a time should not exceed 1 cm.
The next layer should be applied after the first one has dried.
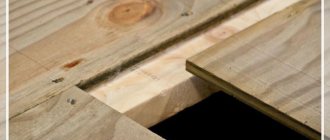
When performing a leveling screed on wood, you cannot make a lining from fiberboard sheets. This material perfectly absorbs water, which provokes the destruction of the self-leveling layer, causing the load-bearing function of the entire structure to be lost.
You can level the floor directly while laying ceramic tiles, but then the glue consumption will be greater than usual
Is it possible to correct screed defects using adhesive?
Leveling the screed with tile adhesive is a common procedure for professional builders. The better the work is done, the longer the service life of the floor covering.
It is permissible to fill the screed, at your choice: directly when forming a new foundation; when leveling old foundations that have lost their useful characteristics over time.
Old coatings most often become unusable due to manufacturing errors made in the past. Self-leveling compounds are applied to the surface again. Their purpose is to seal large cracks. They are often unable to cope with smaller defects.
Tile adhesive helps. It should be applied in an even layer with a transition from 2.5 cm to a level of zero difference. This allows other mixtures to work effectively, sealing the cracking parts to a depth of 5-6 cm.
Leveling wood flooring
Using a special adhesive composition, you can make any wooden surface smooth. Such compositions are good not only for their low cost, but also for their high strength and resistance to use. Materials required for the work:
- wooden planks;
- glue;
- sawdust.
The initial stage is the construction of guides that help determine the level of the layer. You need to hammer in rows of wooden planks at a distance of half a meter from the vertical plane. Straight lines can be checked using a building level.
Wood flooring can also be leveled using glue and sawdust
The next stage is mixing the leveling composition: sawdust and glue are mixed to a thick consistency. Leveling can be done when the surface is already cleaned of dust and dirt. Even better - if it is possible to degrease the floor.
The leveling compound must be applied in layers. It is necessary to take into account that the mixture of glue and sawdust may settle, so you need to wait until the first 10 mm thick layer dries out, and only then apply the next one.
The main rule for such work is to act carefully and without haste. Although the process is very long, the result is worth it. The result will be not only a flat surface, but also with a margin of safety.
The next layer should be applied only after the first one has dried.
The main advantage when using tile adhesive is the simplicity of the work, which even a person inexperienced in construction can handle. You need to remember that all the details need to be thought out in advance. Thus, the screed noticeably raises the floor level, which means this will affect the elevation of the doors inside the room.
Step-by-step instruction
Leveling the floor must be based on a certain procedure. Otherwise, violations of the technology for applying the composition cannot be avoided. The work will be done poorly. Next, the reader is presented with step-by-step instructions to help you comply with all aspects of floor leveling.
Preparatory stage
Before leveling the floor with tile adhesive, you should carefully inspect the starting coating for any unevenness.
Next, you need to clean the site, removing dust, dirt and other construction debris. Ideally, use a construction vacuum cleaner, but a simple broom and dustpan will do. In some cases, additional sanding is required.
After cleaning, you can begin placing the guide beacons. The highest level of the treated area is noted and the thread is pulled. It is necessary to note the level of filling the floor along the walls, it’s easier this way.
Priming the floor helps you avoid problems with premature drying of the solution in the future. Plus, it provides antibacterial impregnation that prevents the formation of fungal compounds.
For this purpose, mixtures for sand-cement mortars are purchased. The application rate should be calculated based on the information located on the packaging (it is individual for each individual product).
It would be a good idea to provide a small margin; porous surfaces are characterized by increased absorbency. The preparatory work before leveling with tile adhesive for laminate and linoleum is similar.
Leveling for tiles
Leveling the floor with tile adhesive under the tiles is practiced in two ways. In the first method, ceramic tiles are installed simultaneously with the application of an adhesive layer, the thickness of which will need to be manually adjusted each time.
Specialists recommend starting installation from the top level. This allows you to easily adjust height differences of up to 1.5 cm.
The second method assumes that the entire floor is leveled before laying the tiles. It is more suitable for beginners and non-professional repairmen who have only recently been involved in tiling.
Rules for laying tiles on a rough surface:
- First, the lowest and highest points of the floor are determined. A laser pointer and the method indicated above will help. A control beacon should be placed in the center of the measured base.
- The next step is the preliminary layout of the tiles. The one that will be placed at the lowest point of the base is selected.
- The thread is pulled parallel to the base wall along the extreme part of the first tile. This will allow you to follow the correct laying direction in the future. In this way, progress is gradually made to a point located at the very “bottom” of the room.
Leveling the wood coating
Is it possible to use tile adhesive to level floor screeds under a wooden covering? Of course yes. Moreover, you do not need to consume a large amount of the mixture. The reason is that it is not necessary to carry out work with particular precision.
You should begin the final cladding only after completing the preparatory stage - sealing the cracks and subsequent priming. The further operation algorithm is completely similar to that described above.
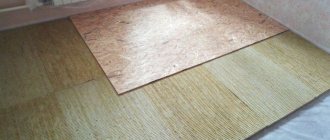
An important point: after applying the glue, it is not recommended to lay particle boards. It's all about their ability to absorb moisture, which causes the destruction of the top layer. An alternative is waterproofing plates. There will be no such problems with them.
Cladding work
Algorithm for laying facing tiles:
- Upon completion of the preparation of the screed, a thorough cleaning is carried out. Afterwards - marking the floor level.
- The glue is diluted in accordance with the manufacturer's instructions and recommendations. The main thing is to monitor the accuracy of the proportions of the components. For example, exceeding the permissible amount of liquid inevitably leads to increased fragility of the structure and fragility. On the contrary, a lack of water provokes problems with polymerization, which will not provide the required “tenacity.”
- The diluted composition must be used all at once and cannot be stored.
- A trowel is suitable for applying the mixture; it is convenient to work with. You can also immediately pour the mixture into the bucket and then level it with a notched spatula.
- It is reasonable to adhere to standard installation technology, i.e., start work from the highest point.
- Cut tiles should not be placed at the entrance or on the side open to view. Otherwise, the entire aesthetics will be ruined.
- The final stage is to wait until the surface dries properly. Complete drying time varies greatly and depends on ambient humidity, temperature and type of mixture. On average, it takes 1-3 days to dry completely.
Helpful advice: after finishing work, the room should be regularly ventilated. Forced drying is also unacceptable. Additional heating only worsens the quality of the coating.
It is wise to let the mixture dry naturally, without external intervention. Otherwise, the result of the work will be disastrous.
Walking on facing materials until polymerization is complete is contraindicated. You should also not place heavy objects on it.
Loads deform the layer; they must be prevented. Correcting unsatisfactory work results will subsequently become an extremely difficult task. It's easier to avoid mistakes.
Can tile adhesive be used instead of screed and putty?
The tile adhesive packages contain information about what differences can be leveled with the composition. Usually this difference is 2-3 cm, but this is only if preliminary preparatory manipulations have been carried out. In our country, some craftsmen have adapted to using tile adhesive to level walls. In fact, this is quite justified, since traditional tile adhesive in its composition resembles the same mixture of sand and cement, only with impurities. Using the latest formulas with epoxy or dispersion composition is even easier.
In some cases, leveling the surface using tile adhesive is the best way out of the following problems:
- if the bathroom is simply tiny, and the walls are so crooked that if you apply plaster along the beacons, this will significantly reduce the area and installing a standard bathtub will become impossible;
You can also level the walls with tile adhesive
- there is no desire or opportunity to raise the floor level with a screed. In addition, it will then be covered with tiles anyway;
- if a limited amount of time is allotted for repairs, which is not enough to completely dry the mixture. The glue can dry in a few days;
- when all the surfaces in the room are fairly smooth, and only in a few places there are minor differences and unevenness.
The tile adhesive will completely harden in a day or two.
Leveling using facing material
When laying ceramic tiles together with tile adhesive, a significant amount of time is saved. In this case, work is carried out as follows:
- It is necessary to determine the highest and lowest points on the surface. The best way to do this is to use a laser level. Otherwise, you will need to spend more time defining them by rule and construction level. A control beacon should be installed in the middle of the identified distance.
- Next, you need to preliminary lay out the tiles to determine the product that will be located above the lowest point. In this case, you need to take into account the rules for placing elements and distribute them in such a way that there is no narrow undercut along the length of the open wall or entrance.
- Along the edge of the first product, parallel to the base wall, it is necessary to stretch the thread for convenience and correct adherence to the direction of the laid tiles, gradually moving towards the highest point.
Without good installation skills, this task may prove to be too difficult, taking up a significant amount of time and effort. Inexperienced craftsmen are better off using the first method, performing preliminary leveling with tile adhesive before laying the tiles.
Subtleties of work
When leveling the floor, you cannot use water-permeable materials, such as fiberboard or gypsum fiber board sheets. When choosing a suitable material, you need to take into account not only the quality of the product, but also the reputation of the manufacturer itself. Tile adhesive plays an important role, since it determines whether it can be used for different floor surfaces.
Working with glue is quite simple - even a beginner can handle it. It perfectly levels the floor if the difference is not too large, and also if you need to fill various holes. If the floor needs to be improved in a room with a high level of humidity, then this should be done using moisture-resistant compounds.
How to level a wooden floor under laminate
If the wooden floor has obvious dips, it must be disassembled and the joists adjusted. It might even be possible to replace some joists or boards. If the floor is relatively flat, it is enough to use one of the methods below.
Scraping is the only leveling method that is suitable exclusively for wooden floors
Scraping a wooden floor will create a smooth surface for laminate flooring. It is done either manually, but this is too complex and time-consuming work, or using a scraping machine.
In order not to damage the machine knives, all heads of nails or screws must be “drowned” deeper into the wood using a hammer.
A sander removes the top layer of wood, creating a smooth subfloor. Then the surface must be thoroughly cleaned of dust and the laminate can be laid.
The same method is used to level the concrete floor, which we have already described above. The design feature is that the logs must be laid on top of the wooden floor and secured with self-tapping screws. It is advisable to lay an additional layer of waterproofing, insulation and sound insulation between the joists.
The method of leveling a wooden floor by puttying with a mixture based on PVA glue and sawdust raises the floor level by an insignificant amount
This method is the cheapest, but can only be used if the floor does not have significant flaws and failures.
Another significant advantage of puttying a wooden floor with a mixture based on PVA glue is that the rise in floor level in this case is insignificant.
Stages of work:
- If the floor boards have become “shrunken” and slightly deformed, bent, then it is necessary to use “beacons”. We install wooden “beacons” using a level. Secure with nails.
- Mix sawdust and PVA glue until the consistency of thick sour cream.
- We fill with the mixture all the space between the “beacons” and all the cracks.
Having assessed the condition of the surface of your floor, you can choose any suitable method of leveling the floor for laminate, given above. The durability of laminate flooring will directly depend on the quality of the work performed.
Strengthen weak coating
It would be ideal, of course, to tear off the entire screed to a clean base and re-install it. But if you are lazy, you can carry out repair work and strengthen the weak screed. To do this you need: every 25 cm, drill holes of 20 mm in diameter to the solid base.
For this work, it is best to use a professional hammer drill with drills that have a small angle of inclination of the working groove. The upper part of the hole should be made expanded in the form of a bowl with a weight twice the diameter of the hole and a depth of up to half the thickness. All openings must be cleaned to a minimum dust state.
After this, take scraps of reinforcing bars 12 mm in diameter. The length of the rod should be equal to the depth of the hole. They should be degreased first.
Now dilute a special epoxy mixture for concrete - Rizopox, it comes in different types, but you need Rizopox 3500. The holes in the floor are filled with Rizopox, a metal pin is inserted there and a bowl is poured on top. To approximate the composition of the epoxy, you need to add quartz sand to it, which will act as a filler.
Once the two-part epoxy has cured, the entire surface will be reinforced with epoxy pins with metal reinforcement.
Looking for the cause of the problem
To solve the problem once and for all, you need to find and eliminate the cause of its occurrence, otherwise it will recur. This also applies to situations where the floor screed is cracked - what to do with the cracks can only be decided after you understand why they appeared.
In general, on a surface finished with cement mortar, cracks often form due to the low plasticity of the material and its ability to expand and contract with temperature changes. Their occurrence can be avoided only by strictly following the technology of mixing the solution, preparing the base, installing the screed and fulfilling the conditions necessary for its uniform drying.
The slightest deviation in any of the above points is likely to cause cracking of the cement coating. Most often this happens in the following cases:
- errors when mixing the solution - excess water or uneven distribution of components in the mixture;
Liquid solution has less strength Source strojlyuks.ru
- insufficient screed thickness;
- weak, sagging or vibrating foundation under the screed;
- absence of damper joints or technological gaps between the screed and the walls;
- uneven drying of the solution due to drafts, temperature changes or as a result of forced drying.
The listed factors refer to gross violations of the manufacturing technology of concrete floor screed, which may lead to the impossibility of restoring the coating using spot repairs. If it is covered with deep cracks over the entire area, crumbles underfoot or “breathes,” the screed must be dismantled and remade.
Dismantling a screed is a dirty, time-consuming and expensive job, so it’s better to do everything right right away Source amazonaws.com
If concrete was poured on an unstable sandy base, on a wooden floor or thermal insulation slabs, and the floor screed cracked, what to do: pour another layer on top with mandatory reinforcement with steel mesh.
Defects in a fresh cement coating may not appear immediately, so after finishing the work you need to wait at least 3-4 weeks and then carry out an inspection. To do this, tap the screed with a rubber mallet, revealing local delaminations of the concrete, and strips of thin paper are glued onto the cracks and left for 10-14 days. If after this time it remains intact, it means that the cracks are stable and will not deepen or expand. If the paper is torn, this indicates that the concrete layer is unreliable - it will continue to deteriorate.
Self-leveling mixtures
The mixture spreads on its own and at the same time it takes much less time for the screed to harden - no more than 3-10 days.
The price of a self-leveling mixture is higher than ordinary cement mortar, which is due to the specific features of the material itself. During its installation there is no need for intensive distribution of the composition over the surface. The mixture spreads on its own and the screed takes much less time to harden - no more than 3-10 days.
The process of pouring a self-leveling mixture consists of the following steps:
- Determining the zero position of the floor using a laser level;
- Before pouring the mixture, it is advisable to prime and waterproof the base;
- In the process of diluting the liquid solution, you must strictly follow the recommendations on the packaging, strictly adhering to the proportions;
- The poured mixture is “rolled” using a needle roller to eliminate air bubbles inside the screed.
You can learn more about the nuances of leveling a concrete base using self-leveling compounds from the video.
Subtleties of floor screed repair
- Malfunctions and their causes
- Repair composition
- How to strengthen?
- How to repair?
- Getting rid of cracks
- Repairing Potholes
- Removing dust
- Features of dry screed restoration
- Tips and tricks
Floor screed repair is a fairly common type of repair work. The subfloor experiences significant loads, as a result of which it gradually wears out and weakens. You can strengthen the concrete base and eliminate defects yourself.
How to prepare a concrete floor for laying laminate
People often ask how to level a concrete floor for laminate flooring. For this procedure you will need to make a screed. Concrete screed must be poured in rooms with reinforced concrete floors.
If the surface is already covered with peeling glue or concrete, then they need to be removed. Otherwise, the floor will bubble and its performance characteristics will deteriorate.
First you need to remove the floor covering to the very base. Then they check how wet the concrete that was under the floor is. We inspect the surface for cracks and irregularities.
Only after this check is the surface covered with soil. Then, on the roughing platform, all existing voids are sealed with a dry compound.
The finished solution is applied to the platform, leveling it using a building level or rule. In a room of normal size (walls 3 or 4 meters long), two signs are enough.
The thickness of the concrete layer at its thinnest point should be more than 7 millimeters.
Once the applied layer has hardened, additional priming is carried out. Next, fill in the self-leveling solution.
Then the room in the apartment is not used until the concrete has completely hardened. This result is achieved within a day. Following this, they create insulation from water and noise.
Screeding is the most popular method of floor adjustment. But you can take note of other ways to properly level the base:
When leveling the floor, only leveling solution can be used. But the thickness of the layer made should be such in different places of the floor that there are no bumps or holes.
To properly prepare the self-leveling mixture, you should pour it into water. It is diluted from 75 percent sand and 25 percent cement. Mixing is carried out with a drill with a special attachment.
The composition is used immediately after preparation, since it will not be possible to dilute the thick mixture with water later.
It is advised to pay attention to the shelf life of the dry product, it can be limited. The mixture is spread in a thin layer, which spreads, forming a mirror-smooth surface.
When mixing and pouring the cement leveling mixture, bubbles often form on its surface. They must be removed, eliminating the risk of poor adhesion to the platform. This is done with a needle roller.
An easy way to level it is to use tile adhesive. This method will help eliminate cracks and errors. In addition, leveling with glue will be cheap.
To level the screed with tile adhesive, you need to use a 3 m long wedge. It is directed diagonally. This glue ideally hides the pits formed in the screed.
It is not recommended to cover the floor with tile adhesive in small quantities. Otherwise, voids will appear.
It is recommended to level the floor with tile adhesive when there are small cracks and bumps. It will not be difficult even for a beginner to perform this work with tile adhesive.
Instead of beacons, you can take commercially available plasterboard guides. They are placed at a distance of 60 to 80 cm. Small pieces of plywood or plastic can serve as a backing for the signs.
In this situation, it is better not to use fiberboard instead of a substrate, as it absorbs moisture, thereby destroying the concrete.
Monolithic concrete floors have a high absorption rate, so it is recommended to treat such surfaces more than once.
To maintain a straight and smooth surface, use a horizontal level. Concrete is poured only after the guides are installed.
Study in detail the technology of leveling a concrete floor with your own hands in the video.
Video:
Necessity, not whim
For those who have already screeded the floor and are now surprised by its unsightly condition, we note that over time, even a perfectly executed screed will in any case become unusable, since it bears the heaviest load. Over time, it is necessary to repair the floor screed, even if it was done by a diligent craftsman, in compliance with all the technology. If the surface intended for the floor is not brought into ideal condition, this can lead to unpredictable consequences. Money invested in the visible part of the repair may be wasted if the screed, “offended” by inattention, makes itself known. An urgent need, not a stupid whim - feel the difference between these two concepts.
Is it possible to level the floor immediately during installation?
On wooden floors, tilers use a mixture of glue and wood sawdust, which allows the floor to be leveled gradually, layering centimeter by centimeter. When laying tiles, experienced craftsmen level the surface along with the cladding. This allows them to save time. Only specialists do this, since they can control the level of installation in various ways. Using an adhesive composition, they can even level walls.
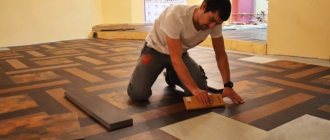
Floor leveled with glue under laminate
It is better to carry out any leveling yourself using the method described above, since it provides a complete guarantee of creating a flat surface for installing any covering, both laminate, linoleum, and tiles. Surface leveling is carried out when repairing and replacing one coating with another, as well as when finishing the floor in a new building.
In the first case, the old floor screed is improved, and in the second, the builders' flaws are removed if the subfloor is not made correctly. In any of these cases, the laminate will not lie flat on the floor, so you will have to solve the problem.