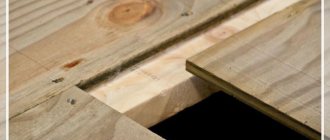
A private home, like the human body, consists of a large number of different systems, materials, liquids, beneficial and harmful microbes. He also has all sorts of ailments that appear and become apparent with age. Fortunately, most of them are easy to identify and treat. The wooden floor in the house is exposed to external influences every day. Time also leaves its traces on it: scratches and cracks appear, gaps between the boards grow, and the creaking of floorboards increasingly irritates the ear. These symptoms indicate an impending repair, which also involves leveling the wooden floor for a new coating.
When is it necessary to level a wooden floor?
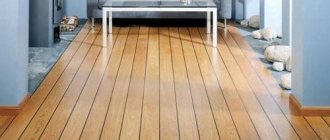
Wooden floors have high performance characteristics. By initially choosing natural wood, the home owner simplifies the task of future renovations. To prepare a wooden floor for a new paint coating, laying laminate or parquet boards, carpeting and linoleum, it is enough to first level the surface of the floorboards.
Sooner or later, even the best wooden floorboards begin to show signs of aging. There are many reasons for this phenomenon:
- Use of low-quality materials for flooring (poorly dried wood for making joists, damp floorboards). Over time, such materials contribute to swelling or sagging of the floor, disruption of the integrity of the coating, and squeaks when walking.
- The natural property of wood to bend when dry. It manifests itself as warping, the formation of unevenness along the length of the board, and, as a result, cracking of the coating.
- Errors when laying the floor and its improper use. They contribute to damage to the coating, peeling of paint, formation of cracks and cracks, and sagging of boards.
The natural desire to correct the shortcomings that have arisen forces us to choose a method for solving the problem. You can make cosmetic repairs to the paintwork or completely change the floors, it all depends on the actual condition of the floors and the amount of finance available.
There are many reasons, besides aging, for replacing or repairing a wooden floor:
- cracks;
- decay;
- recycling of wood by insects to the state of rot.
Any of the reasons requires repair or complete replacement of the plank covering. To identify defects and estimate the amount of work to be done, simply lift the boards and examine the joists on which they lie. The absence of traces of insect activity, as well as the dry and durable surface of the wood, allow you to confidently begin leveling the base, which does not require partial or complete replacement. If there are defects on the inside of the floorboards or joists, first eliminate the problem areas by replacing them with new wood, and only then proceed to leveling the floor.
The next reason for leveling the floor and the stage of assessing its condition is setting the deviation from the horizontal. It is made using a level or a precise laser tool, set according to the highest corner in the house. Afterwards, notes are made on the walls. The information obtained allows us to identify irregularities and determine the leveling method, for which today we use high-tech sheet materials made from wood and its components, characterized by a successful combination of a number of properties.
Sometimes, at first glance at the wavy surface of the floor, sagging boards, tilted floorboards, it is not clear how to level a wooden floor without tearing off the boards, and whether this can be done at all. However, in most cases there is no reason for pessimism. Depending on the nature of the damage to floor structural elements, various technologies for restoring the coating and leveling it are used:
- scraping with preliminary cleaning;
- putty or leveling using self-leveling solutions;
- laying leveling elements - for example, plywood or other similar materials can be used.
How to measure unevenness
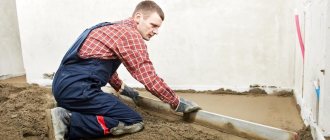
Differences in the floor covering are determined during an external inspection. The most commonly used building rule is a wide aluminum strip with a perfectly straight edge. It is enough to install the device on the surface - and you can see the cracks and measure their height.
Using the rule, it is impossible to determine the collapse of the floor when, despite visual evenness, the zero marks in different parts of the room do not coincide. This defect appears if the logs are not positioned strictly horizontally.
You can determine the blockage using a bubble level, but the most accurate result is given by a laser plane builder. It projects the horizontal line onto the walls using laser beams, and you can immediately find the difference between the heights of all points on the surface.
Materials for leveling floors on joists
The choice of materials for eliminating various unevenness and other defects in a wooden base depends on the leveling technology used, determined by a number of factors. The permissible level of deformation of the floor surface (height differences across the entire area) is dictated by building codes and regulations, and its value serves as the main guideline when choosing a technology:
- If there are small bulges and deflections within 1-2 mm over an area of 1 m2, there is no need to level the surface. This value is acceptable even for covering the floor with a material sensitive to unevenness such as linoleum. Elimination methods:
- leveling the surface with a scraping machine;
- the use of industrial putties based on acrylic or a “folk” remedy - a mixture of PVA glue with sawdust.
- Height differences from 5 mm to 1 cm with uniform distribution over the floor surface for subsequent laying of coatings require leveling of the base. For this purpose, the following technologies are used:
- leveling with sheet materials that can be attached directly to the floor;
- elimination of unevenness and defects using self-leveling floor mixtures.
The most common sheet materials are plywood, OSB or chipboard.
The use of fiberboard is unacceptable, since over time this material follows the shape of the floor, and all irregularities appear on the surface.
Plywood
Optimally suited for fast and high-quality work:
- use of natural veneer of coniferous and hardwood species for the production;
- the surface is flat and smooth;
- has a pleasant, barely perceptible smell of wood;
- simply sawn and treated with protective agents;
- the strength of the sheets is combined with flexibility;
- convenient format - you can cut sheets of the desired size with a minimum amount of waste;
- simple and affordable installation.
In premises used for permanent residence, it is recommended to use FBA and FK brands, which are intended for rooms with low humidity and are suitable for interior work (bedroom, living room). The FSF brand is more resistant to moisture and can be used both outside and indoors (corridor, kitchen).
Materials for waterproofing wooden floors and installation technology
Another way of classification is by variety. The following are quite suitable for leveling and installing a subfloor:
- 2nd grade – smooth surface, small cracks, scratches, traces of glue are acceptable;
- 3rd grade – the number of possible defects is slightly greater than in 2nd grade.
For the purposes of leveling and installing a clean floor you will need:
- E – elite grade, has no defects;
- 1st grade - no visible defects, but small chips and tiny cracks are allowed.
In premises intended for temporary residence (dachas, makeshift buildings), grade 4 can also be used, despite the existing defects, the strength of plywood of this grade is quite high.
Manufacturers also produce sanded (marked Ш1 and Ш2) and unsanded (marked НШ) plywood. To lay plywood on a wooden floor, you should choose one that has been sanded on one side (Ш1) and fasten its unsanded side to the floor. When choosing a material, you should focus on the ratio of cost and quality.
OSB (oriented strand board)
The next leveling material behind plywood in the popularity rankings is better known as OSB. The characteristics are similar to those of plywood. It differs in the manufacturing method - instead of natural wood veneer, natural wood shavings are used.
Advantages of the material:
- environmentally friendly (natural resins are used);
- no surface defects;
- not subject to delamination;
- light weight;
- variety of sizes;
- adequate cost.
Manufacturers produce boards of four grades: from OSB1 to OSB4 (as moisture resistance and strength increase). Another variety found on the market is a tongue-and-groove slab, which has a connecting groove for a tighter joint. Laying OSB on a wooden floor for the purpose of leveling is carried out using tongue-and-groove boards of the OSB3 brand.
Chipboard (chipboard)
A less durable and moisture-resistant analogue of OSB. Low grade wood and wood processing waste are used in production. Quality, strength and resistance to moisture are determined only by the quality of pressing of the boards and the binder.
Benefits include:
- good sound insulation performance;
- excellent thermal insulation properties;
- ease of laying the material;
- low cost.
Chipboard is the best option for a leveling layer under parquet and synthetic coverings for rooms with low humidity levels.
Pay attention to the specifics of how to level a wooden floor in a private house or apartment if measurements show subsidence and uneven differences of more than 1 cm, but less than 8 cm. Only using joist leveling technology.
Unlike laying leveling materials directly on the surface of the floorboard, in this case preliminary preparation is required. First, a base of logs (wooden blocks) is calculated and installed, which makes it possible to compensate for differences in height and form a flat plane for the subsequent installation of a leveling layer on it from a suitable sheet material.
Polyurethane foam
Bonding plywood or OSB boards with foam is a fairly common option for leveling the floor. But you need to know about some features of this installation method:
- firstly, the foam may crumble over time, voids will appear, and the floors will become deformed;
- secondly, the foam is attractive to rodents; they do not feed on polyurethane, but are happy to use it to make nests;
- thirdly, this is a sealing material that does not have sufficient strength; it is elastic and compressible, so the position of the slabs is unstable and they can sag under load.
It is rational to use polyurethane foam to seal joints between sheets, but not as the main leveling material.
Selecting the thickness of the material for leveling
Another parameter of sheet materials that needs to be taken into account when selecting is their thickness. Factors that influence the choice of material thickness:
- type of base for installation;
- type of finishing coating;
- planned load on the floor.
The thickness of plywood for a wooden floor with slight “waviness” should be at least 8-10 mm. If parquet or laminate is to be laid as a finished floor, it is worth increasing the thickness to 10-16 mm. For carpet and linoleum, the thickness is increased to 16-18 mm. Installation of heavy furniture or equipment in an apartment or house will require a thickness of up to 21 mm.
Reasons for the formation of irregularities
Wood is a living material that is sensitive to changes in external conditions. Wood fibers sometimes swell and sometimes decrease in volume. Such vibrations lead to uneven deformations of the boards, cracking, warping, and the appearance of cracks between them. The floors begin to creak, sag, individual floorboards become loose, and in some places the fasteners come out.
This often happens if the quality of the lumber was initially low, the boards were too wet or of unequal cross-section. For flooring, it is recommended to use lumber with a thickness of 40 mm or more, with a moisture content of no more than 18%. Blue discoloration, rot, falling or tobacco knots, and deep end cracks are not allowed. The geometry must be correct, without bending or torsion.
The second reason for the fragility of wooden floors is that the thickness of the board does not correspond to the distance between the joists. Because of this, large deflections occur, the floorboards become unsteady and “shaky.” Even an initially flat wooden floor can become warped due to high humidity in the room, lack of ventilation between the boards, irregular protective treatment, improper installation, and incorrectly selected fasteners.
Technology for laying plywood on a wooden floor
The first step towards a level floor is preparing the wood floor for plywood installation.
If necessary, wobbly boards should be fixed and creaking noise when walking reduced or eliminated. It is best to secure the boards with screws (self-tapping screws). Each nail that secures the old floor boards must be sunk 1-2 mm into the wood.
Materials for processing wooden floors
The next step is to perform calculations for the correct installation and cutting of plywood sheets. What needs to be taken into account in the calculations:
- the type of base on which the plywood will be laid - an old floor or a sheathing of logs;
- installation of sheets according to the principle of brickwork - with an offset of half a sheet;
- linear dimensions of the room;
- gaps for thermal expansion of the material are 1-1.5 cm from each wall and 3-4 mm between sheets of plywood.
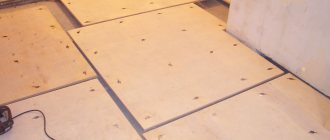
If installation is carried out on top of floor boards, it is recommended to cut the plywood sheets into 4 equal parts, which will facilitate the work, allow you to detect internal defects (delamination), and replace them with undamaged sheets.
In the case of laying sheets on the sheathing, cutting the sheets should be carried out taking into account the sheathing pitch so that the joints of the sheets fall on the center of the joist. Depending on the thickness of the sheets, the lathing pitch is 30 or 40 cm.
Before cutting the sheets, based on the calculations made, a laying diagram is drawn up and the sheets are numbered. This allows you to calculate the number of standard pieces of plywood (quarter sheets), as well as the number and sizes of pieces for cutting.
Before cutting and laying plywood, it is important to keep it indoors for several days, stacking it or placing it on its edge. The curing period depends on the temperature difference between the warehouse from which the plywood was brought and the room in which it will be installed. The greater the difference, the longer you should wait.
After cutting the sheets, you can begin to attach them. It is convenient to start installing sheets from the corner of the room that is closest to the right angle (90 degrees). It is worth using a construction angle to compare the values of each angle.
Self-tapping screws are used as fasteners, the length of which should be 3 times the thickness of the plywood. Before installation begins, perform the following operations:
- in places where screws are attached, holes are drilled in plywood with a diameter 2 mm smaller than the diameter of the working part of the screw;
- countersink holes to fit the diameter of the screw head;
- the fastening pitch between the screws is chosen to be 30-40 cm;
- make an indent from the edge of the sheet of at least 2 cm.
A plywood underlay can be laid on a wooden floor if additional thermal and sound insulation is required. The installation is completed by installing each sheet in its place in accordance with the diagram and securing it with screws.
What can you use for repairs?
Dismantling and reassembling a plank surface is a complex, long, labor-intensive process.
Therefore, not every apartment owner will decide to do this work. But the longer a faulty floor is in use, the more difficult and expensive it is to fix. Among the ways to level the floor in an apartment with your own hands:
- looping;
- local alignment;
- dry screed;
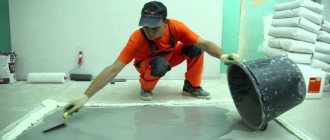
- use of self-leveling compounds;
- leveling with lags or pads.
It is necessary to measure the differences with a 2000 mm long laser level. If their indicator is higher than 2 mm per 1 sq. m, then alignment is required. If it’s less, then you can put up with it. But it’s still not worth delaying the repairs.
Scraping – labor-intensive and efficient leveling
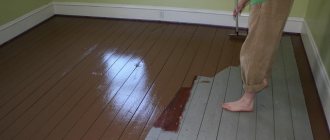
If there are no plans to use the flooring after leveling, it is recommended to do the latter using the mechanical scraping technique. Step-by-step instructions for leveling a wooden floor with a scraping unit are as follows:
- Clearing the room of furniture. If it is not possible to remove the structure, it is covered with plastic film.
- Removing from the plank floor all nails and fasteners that could negatively affect the sanding apparatus, rendering it inoperable.
- Equipping with thick gloves, headphones and a respirator to protect your ears and hands from strong vibrations and noise from the machine, and your respiratory tract from fine wood dust.
- Start the scraping process from the far corner of the room. The first layer is removed carefully, moving around the room like a snake.
- Clogging all cracks and holes in the floor with putty that matches the color of the coating.
- Repeated sanding of the floor after the putty has dried.
- Remove accumulated dust with a powerful vacuum cleaner.
- Wiping surfaces with a lint-free cloth soaked in a degreaser.
- Varnishing a plank floor.
Theoretically, scraping can be done manually. However, a special scraping machine will significantly speed up the process. In this case, we are not talking about units, but tens or even hundreds of times, depending on the area of the room. In addition, manual scraping cannot boast of high quality, which means it will not correspond to the expected result.
Useful tips
- The most important thing is to take into account the instructions of the manufacturers of dry mixtures. The result will depend on the correct use of them.
- Lumber must be chosen of high quality, dry.
- Use clean containers and treat surfaces thoroughly.
- If you have doubts about your skills, it is better to turn to professional craftsmen.
Leveling a wooden floor with your own hands is time-consuming and difficult. The work requires attentiveness, accuracy, and careful implementation of all recommendations. This is the only way to achieve a smooth, strong, durable, beautiful surface.
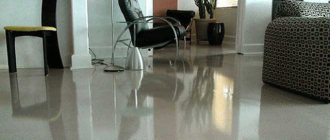
Leveling mixtures
In some cases, special self-leveling compounds can be used. But this can only be done if the rough wooden floors can withstand the additional load.
One of the disadvantages of this method is the different thermal expansion of the leveling mixtures and wood. Therefore, it can only be used for rooms with a small area. It is also important to do the preparatory work correctly. It is not recommended to use a classic concrete composition, as it will have a significant mass. It is best to purchase special mixtures.
Work order.
- Cleaning the base, priming.
- Installation of a putty layer that seals the cracks.
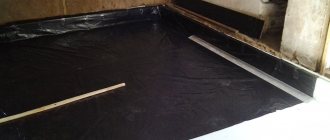
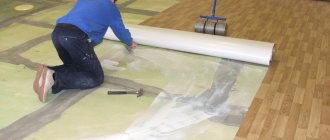
- Installation of waterproofing. 200 micron polyethylene film is used. The strips are overlapped, the joints are sealed using double-sided tape. It is important to secure the waterproofing to the subfloor to prevent movement.
- Installation of reinforcing mesh.
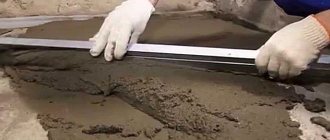
- Pouring self-leveling mixture.
During the last step, remove all air bubbles as much as possible. In this way, you can level curved wooden floors that have sufficient mechanical strength. However, if there are significant level differences, the use of another technology is recommended.
Adjustable joists
Adjustable joists are quite effective, but expensive. These are ordinary logs into which special adjusting pins and support screws are screwed. Insulation is laid between the joists. Horizontal position is ensured by screwing in and out the support screws. Adjustable floors are not always possible. In addition to being expensive, they have a significant drawback - raising the floor height to at least 10 cm, even without taking into account the thickness of the final coating.
The work is performed according to the following algorithm.
- First you should make sure that the level difference depends specifically on the lag. Then the floorboards are dismantled and the condition of the beams is checked. If necessary, replacement of defective ones is made. To level their level, you can use mounting elements. A support is first installed under the joists. Then, using a drill, a hole is drilled into which the screw pin is mounted. After passing through the material, a support and height lock are attached to the bottom of the screw. Using this technology, the wooden floor under the laminate is leveled over the entire plane.
Wood putty levels the floor
A kind of well-known PVA glue and small sawdust can be an excellent material for leveling the floor. It won't cost much, but the results will be excellent.
Slats - beacons - are placed on the floor horizontally. PVA wood glue is mixed with fine sawdust until creamy thick and the space between the slats is filled with this mixture. It is better to first moisten the sawdust and squeeze it a little - this way they will not draw moisture out of the glue very quickly.
Considering that this putty can shrink slightly, it is better to apply thick layers in several layers, no more than one or two centimeters each. If, after drying, the level reveals unevenness, apply some more putty to this place. The leveling material is laid after complete drying.
This is the only method that provides the smallest rise in the floor, up to the “highest board”.