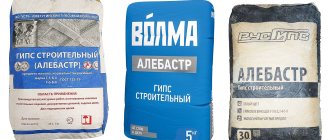
Egg trays are one of the suitable materials for various DIY crafts. There are 3 types of egg cartons: cardboard, plastic and foam. Due to ease of use, standard cardboard trays are most often used for papier-mâché crafts: to create a variety of flowers, animals, and even for decorating rooms.
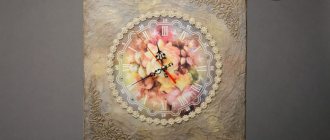
Original crafts for the home, such as lamps, are created from foam and plastic trays.
Papier-mâché from egg cartons
Depending on where and how the products will be used, different instructions for preparing homemade products are used.
Homemade products for being outdoors or in a damp environment
Instruction No. 1
For the first homemade product you will need the following materials:
- Egg trays.
- Large saucepan with hot water.
- Mixer.
- Facade putty.
- PVA glue.
Stages of work:
- Tear the egg trays into pieces and place them in the pan.
- Fill the prepared trays with hot water and place over medium heat. Boil for 20-30 minutes.
- After the time has passed, remove the mass from the heat, cool and beat with a mixer (use a kitchen or construction mixer). A mushy mass should form.
- Put the mixture back on the fire and cook for another 10-15 minutes.
- Beat with a mixer a second time. After the second beating, the mass will become more homogeneous.
- Leave it to cool.
- When the mass becomes warm, approximately the same as body temperature, squeeze it through gauze, mosquito net or cloth.
- Dilute PVA with water in a ratio of 2:1, then add putty in small portions until you obtain the consistency of liquid sour cream.
- Add the squeezed mixture from the egg trays to the putty.
- Mix the mixture well until it is homogeneous.
- After kneading, the papier-mâché mass is ready for use. Use it for one hour, after this time it will become unusable.
Instruction No. 2
The recipe for this papier-mâché mass is used to create crafts with a smooth surface. This mass does not shrink, products made from it are not afraid of moisture and can be used to create dishes and decorative items.
You will need:
- 3 egg trays for 3 dozen eggs.
- Flour 2 tbsp. spoons.
- Corn starch 2 tbsp. spoons.
- PVA glue 2 tbsp. spoons.
- Mineral oil 2 tbsp. spoons.
- White acrylic paint.
- Glue "Bustilat" 2 tbsp. spoons.
Preparation of the mass:
- Tear the trays into small pieces.
- Place them in a saucepan, add hot water and put on fire. Bring to a boil and keep on fire for another 5 minutes.
- Allow the mixture to cool to room temperature.
- Squeeze the mass, but not too much, it must be wet, otherwise the blender will not be able to grind.
- Place in a blender and grind it.
- Squeeze out the mass well.
- Place the mixture in a saucepan and add dry ingredients.
- Mix the liquid ingredients separately and pour them into the mixture.
- Mix the mixture well, first with a mixer, then with your hands. It should be smooth and pliable.
- If the mass turns out to be hard, add PVA glue; if it is too liquid, add starch or flour.
Instruction No. 3
This recipe is easier to prepare and suitable for making various crafts with children.
You will need:
- Egg trays.
- PVA glue.
- Ready putty.
Making mass:
- Tear the trays into small pieces.
- Place them in a container and pour boiling water over them.
- Wait until the water cools and drain it.
- Blend the resulting mass with a blender.
- Add PVA glue.
- Knead the mass well, it should turn out soft and elastic.
- Add 1 tbsp. spoon of prepared putty. Knead well.
- When it is smooth and elastic, you can start making crafts.
How to apply plaster
For reliable adhesion to the plaster on the wall, small notches are made in advance and the surface is primed. The mass is applied in a layer of 0.5-1 cm, smoothed with hands or a spatula, and then leveled with any suitable construction equipment.
Advice! The surface can be left smooth or a relief can be created - it all depends on the desires of the master.
To obtain a rough wall, the still wet plaster is treated with a brush with sparse bristles. If desired, multi-colored pebbles, shells, glass or other decor are pressed into the mass.
From undried plaster, tiles, pebbles, and bricks are formed on the wall using a spatula or trowel. With the use of homemade plaster, the scope for the designer’s imagination is almost unlimited - there is room to show your creative abilities.
Source
Egg Tray Craft Ideas for Home
DIY crafts from egg trays can be varied: from a simple fish to a garden gnome or a chandelier.
Egg Tray Frame
You can make an original photo frame using flowers made from egg trays and cardboard as the base of the product.
To create a frame you will need:
- Thick cardboard.
- Scissors.
- Egg trays – 20 cells.
- Glue (Titanium or glue gun).
- Dye.
- Photo.
Stages of work:
- Cut out a frame from cardboard, the width of which will be 5 cm.
- Take egg trays and cut them into cells.
- Trim the edges of the cell so that you get a smooth edge. Prepare 15 cells.
- Cut the prepared cells into 5 parts, leaving the middle intact.
- Round off the resulting edges of the workpieces.
- Take 5 blanks and assemble a flower. Make the first piece like this: connect the edges of two opposite petals with glue, attach the next petal on top, and glue the remaining two. Do the second layer like this: connect the centers of the blanks, glue the petals to the center of the flower core. All subsequent layers are glued slightly lower than the previous ones, creating the volume of the flower.
- Collect 3 flowers, cut rose leaves from the remaining cells.
- Paint the rose flowers, its leaves and frame.
- When the flowers are dry, glue them to the corner of the frame. Add decorative details: beads, sparkles or others, if necessary.
Christmas wreath of flowers made from egg containers
To create a Christmas wreath you will need:
- Plastic containers for eggs.
- Foam blank for a wreath.
- Red berry beads.
- Green sisal.
- White beads for decoration.
- Glue gun.
- Red ribbon.
- Scissors.
Stages of work:
- Make lots of flowers from plastic egg containers. Do this:
- Cut the trays into cells.
- Trim the corners, the cell should make a small glass.
- Cut the sides of the prepared cell into 4 parts - these will be the petals of the flower.
- Round off the petals. For one flower you need 4 such blanks.
- For the core of the flower, take the prepared cell, cut its walls and cut out the bottom. You will get a plastic ribbon.
- Forming a flower: twist a plastic ribbon, glue its ends; glue the blanks with 4 petals together; Glue the core of the flower into the center of the 4-petal blank. When the flower is ready, glue a bead inside the core.
- When all the flower blanks are ready, glue them onto a foam base, close the gaps between the flowers with sisal and decorate with red berries.
Attach a red ribbon to the base. And the wreath is ready.
Papier-mâché vase
Using papier-mâché from egg trays, you can create an unusually beautiful craft with your own hands - a decorative vase.
For this you will need the following materials:
- Papier-mâché from egg trays.
- A bottle made of glass or plastic with smooth sides and a wide neck.
- Foam plastic 50 mm
- Scissors and stationery knife.
- PVA glue.
- Toilet paper.
- Dye.
- Felt pen.
- Scotch.
Video of a master class on making a vase from cardboard (base) and papier-mâché:
Manufacturing:
- Take a bottle and trace its contours on the foam. Come up with an interesting shape for the vase and draw the missing contours on the foam.
- Cut out additional parts from the foam and attach them with tape to the bottle.
- Cover the resulting structure with papier-mâché in one layer and let it dry.
- When the first layer has dried, cover the bottom of the vase with papier-mâché and form a neck. Correct any imperfections that appeared after the first layer.
- Decorate the vase with papier-mâché molding and paper threads from toilet paper.
- To create paper threads: unwind a piece of toilet paper, fold it in several layers and cut the piece into three parts so that you get three long strips of paper; Next, twist the paper into a thin rope.
- The decor made of paper threads is attached to PVA glue.
Allow the vase to dry thoroughly and only then can you coat it with paint and varnish.
Methods of application
Although the technique was invented quite a long time ago and was used by our ancestors, today there are still adherents of the art, and ancient knowledge is popular among today’s youth.
Note!
Wood burning for beginners: tips and secrets for burning pictures
Plasticineography - interesting options for creating pictures from plasticine on cardboard for children
DIY scrapbooking for beginners: what it is and how to do it. What you need to create a beautiful album or notebook (photo + video)
This is due to the fact that the result of labor is very exclusive and high-quality items that can decorate any corner of the house or decorate existing parts.
Crafts for the garden
DIY egg tray crafts can decorate any garden. You can use them to create decorative figures, garlands, and a decorative lamp for a gazebo.
Decorative figure for the garden “Cat”
To create a decorative garden figure, prepare:
- A lot of papier-mâché from egg trays for street figures.
- Plastic bottle 2 l.
- Newspapers, paper.
- Wire.
- Scotch.
- Cardboard.
- Putty.
- White acrylic paint.
- Caps from plastic bottles.
- Paints of different colors.
- Varnish.
Stages of work:
- We take a plastic bottle - this will be the body, attach a wire to it, from which we form the legs and tail.
- We wrap the entire structure with newspapers or paper, adding volume, and secure everything with tape.
- We form a cat’s head on the narrow side of the bottle and secure it with tape.
- On the head we attach ears cut out of cardboard, eyes and a nose from bottle caps.
- When the cat’s body has been formed, we cover it with a layer of papier-mâché, paying special attention to the face: on it you need to shape the eyes, nose and form the “cheeks” of the cat.
- Let the first layer dry, then apply the second and leave to dry.
- After complete drying, cover the cat with two layers of white paint. Let it dry and you can paint the cat in the intended color.
Coat the finished figurine with wood varnish. When the varnish has dried, place it in your garden and enjoy the work done.
Garland of plastic egg trays
Make a beautiful garland from plastic egg trays and decorate your garden or gazebo with it.
To create a garland you will need:
- Solar-powered or battery-powered LED garland.
- Plastic tray for eggs.
- Scissors.
- Glue gun or any universal glue.
- Awl.
To create a garland you need to make flowers from plastic egg trays. You will need as many flowers as there are LEDs on the garland.
Flowers are made like this:
- Cells are cut out from an egg tray.
- Each cell needs to be “refined”, all sharp corners must be removed, leaving a neat “cup”. One flower will require 5 cells.
- On each of the 4 cells we make 4 cuts to the center of the bowl - these are blanks for the petals. Round each of the petals - cut off sharp corners. From cell 5 we make a plastic tape - cut out the bottom, this will be the core of the flower.
- Assembling the flower: twist the plastic tape into a spiral and secure it with glue; We glue the remaining 4 blanks together in the middle and glue the core inside.
Crafts made from egg trays can become a real home decoration and add zest to the overall interior.
When the flowers are finished and the glue has dried, you need to make holes with an awl through which the LED can pass. Insert the LEDs from the garland into the middle of the flower and secure them with a glue gun. When all the flowers are attached, the garland is ready.
It can be used to decorate a veranda, trees or gazebo.
Wind chimes from egg trays
You can create original and unusual wind chimes from cardboard egg trays.
To create it you will need:
- The basis. This could be an ordinary twig, an old hanger, or the bottom of a plastic bottle.
- Egg trays.
- Threads. You can use twine, yarn of bright saturated colors.
- Paints of different colors.
- Shiloh (as needed).
- Needle.
- Bells-balls for the collar.
- Scissors.
- Varnish
How to do:
- Cut out cells from egg containers. Trim all the corners and cut the walls of the cells to the middle - you will get petals.
- Trim the petals of the blanks so that they are pointed and the blank resembles tulips.
- Paint the flowers in different colors, when the paint is dry, cover the flowers with varnish.
- If the wind chime base needs painting, paint it.
- When the flower blanks are dry, use an awl to make holes in the middle of the flower.
- Cut the threads so that they are of different lengths.
- Attach a bell to the end of the thread and use a needle to pull the thread through the flower.
- Secure all the threads based on wind chimes.
Pull several threads attached to the base upward so that you can attach it to a tree branch or hang it in a gazebo.
Useful devices
The main purpose of the tray is to store eggs compactly and protect them from external damage. But when the eggs run out, the house does not run out of things that require storage and order. The patch can be used as an organizer for creative little things: threads, buttons, yarn. The lid can be used as a stationery tray; the size is ideal for pencils, markers and scissors. It is enough to paint the patch or cover it with fabric, and it will fit into any interior.
Package
An egg tray can be used as a box with individual compartments for portioned treats and sweets. It is enough to repaint it, add a bow or other decorations. If you simply cover the tray with a towel or table napkin, it can become a fruit stand to prevent them from rolling around.
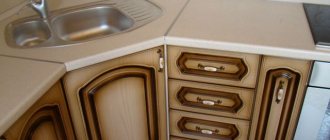
Pouf and furniture
Egg packages will be stable, if there are a lot of them accumulated, you can make a small ottoman or a table this way. The tray can be painted, a soft seat can be added, there is even designer furniture with complex shapes. Cats like the ribbed surface; old trays will help organize a corner for your pet.
Modern design promotes recycling, as we have seen today; a creative approach to things can find use in what was just trash a moment ago.
Subscribe to our Social networks
Crafts for children for kindergarten, school
Even small children can create crafts from egg trays with their own hands; they are often asked to make such crafts for an exhibition in kindergarten.
Panel with tulips from egg trays
It will be interesting to create such a panel for both mother and child.
Materials:
- Cardboard for the base.
- Paints, brushes and sponges.
- Scissors.
- Glue.
- Egg trays.
- Buttons of different colors.
- Decorative cord of green color (can be replaced with a chain of air loops).
- Satin ribbon.
How to do:
- Prepare the base of the panel: take cardboard for the base and paint it with a sponge, so the paint will lay down in a beautiful texture on the base.
- Cut out the cells from the egg trays, trim all the corners.
- Divide the walls of the cell into 4 parts, make each part sharp - you get tulip petals.
- Paint the flower blanks in different colors.
- Cut the cord into 5 equal parts, fasten them with tape and glue them to the base.
- When the flowers are dry, glue them on top of the “stems” from the cord, creating a voluminous bouquet of tulips.
Glue a button of a contrasting color into the middle of each tulip and your panel is ready.
Crocodile from egg trays
To create a crocodile you will need:
- 2 egg trays with 10 cells each.
- Colored paper.
- Green paint.
- Glue.
- Cardboard tubes.
- Scissors.
How to do:
- Separate the top covers from the egg trays.
- One of the trays will be the body, the second needs to be cut into 4 and 6 cells - this will be the jaw of the crocodile.
- Glue 4 legs made from cardboard pipes to the crocodile's body. Leg height 5-7 cm.
- Glue the jaws to the body: from 4 cells - the upper one, from 6 - the lower one.
- Paint the crocodile green, let it dry and glue on the eyes, eyebrows and tongue.
Egg tray crafts can be completely original and impressive. When making such items, a piece of the author’s soul is put into each of them, so they turn out interesting and are able to please others with their individuality.
Author: Dobriana
Article design: E. Chaikina
Features of plaster
To decorate your walls beautifully, you don’t have to spend money on expensive materials. Using egg cartons is a real opportunity to save money and decorate surfaces with your own hands from literally what is garbage.
Cardboard egg packaging
The use of “cardboard plaster” has many advantages:
Important! In essence, the technology for applying plaster is reminiscent of papier-mâché, but after drying the finish will be more durable, reliable and beautiful.
Bedroom lamp
Connect 4 good trays together, make small holes for light. Attach to a metal frame, select a color that matches the design and the lamp is ready.
Online store of lighting products for home and landscape: buy ceiling chandeliers, track lights, curved floor lamps.
Souvenir stand
By gluing a picture of an animal to a cell and placing an Easter egg in it, you can give an original souvenir for the Easter holiday.
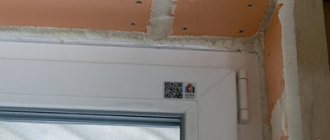
Decorative brick
The imitation of light and light brick looks impressive and does not require large expenses for production.
- 3 cardboard cassettes for eggs;
- water;
- a large piece of plastic film;
- paper towels;
- 3 tbsp. l. gypsum mixture;
- putty for finishing work;
- any color of acrylic paint.
Step-by-step algorithm of actions:
- Mark the size of future bricks on the film with a ruler and draw with a marker.
- Tear the trays into pieces, put them in a bucket, add warm water to soak for 2-3 hours.
- After the water is absorbed into the mass, add gypsum and mix until smooth.
- Turn the film over with the markings facing down and attach it to the surface with tape.
- Form bricks according to the size of the cells using a spatula, wipe off any remaining water from the surface of future bricks with paper napkins.
- Leave the workpieces to dry for 4 hours at room temperature, apply a thin layer of putty diluted in water on top.
- Dry the workpieces for 12 hours, cover with acrylic paint for brightness.
Bricks can be made in portions, and after preparing the required quantity, begin installing the products on the wall with a glue gun.
Stages of work
- Cut out as many cells from the tray as you need flowers.
- Using scissors, cut the petals so that they are connected.
- Cover the surface with gouache or paint and let dry.
- Pierce the middle of the flower with an awl or large needle, place the stem on the wire and secure.
- Drip glue into the middle and sprinkle semolina on it - this is the middle. Cover it with yellow gouache. Apply varnish or glue on top to secure it and let dry.
You will get a nice bright gatsaniya. A whole bunch of such flowers, placed in a beautiful pot and filled with putty, will delight you for a long time and remind you of warm days in cold times.
Exclusive vases and baskets
Exclusive vases and baskets constructed from trays will be a wonderful gift for a holiday or birthday.
In fact, good owners use such containers for other purposes: they line the ceiling in rooms, insulate houses, mulch the soil and do much more.
The main thing is that there is a desire to create, and tips and ideas can always be heard and found.