How to glue a plastic corner to a concrete wall?
There are special adhesive compositions for joining plastic panels and concrete slabs. The best option is spot-on, using liquid nails. A reliable connection will be ensured by adhesive and sealant; fungicidal antifungal elements allow the composition to be used in damp rooms.
Interesting materials:
What happens as a result of the Earth's rotation around its axis? What happened in Kerch at college? What is made from beets? What is produced in Kostroma? What do architects go through in their first year? What did Nietzsche preach? What is easier iOS or Android development? What does a psychiatrist check? What destroys ascorbic acid? What's the biggest thing a snake can eat?
Scope of use and additional information
The framing corner is made by hot bending a PVC sheet. The decorative element allows you to choose colors that will suit any interior. Application area:
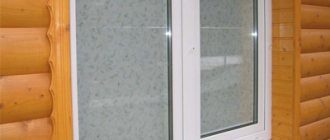
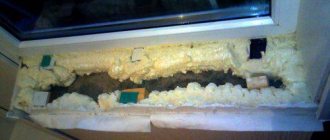
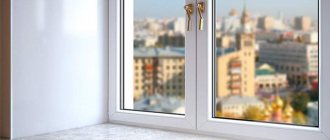
- Window slope inside a house or apartment.
- As an external material to protect external or internal corners.
- Door or arched opening.
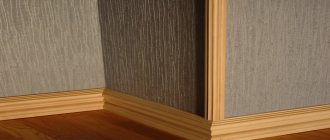
- To protect the corner of the wall when decorating with wallpaper.
- Protection of corners when finishing with plastic in the bathroom.
- Draping the joint when decorating external siding.
The plastic element is a good protector from mechanical stress, but, like any material, it has advantages and disadvantages:
- The installed corner is used as a finishing seam at the junction of finishing materials.
- Long service life - up to 25 years.
- Installation is carried out independently; you can glue the corner without prior preparation.
- The plastic element is easy to trim and comes in different colors.
- Acceptable price.
Why are plastic corners needed on slopes
? Among the disadvantages, the following turned out to be significant:
- Plastic is a fragile material, so it must be cut with special tools - cracks may appear.
- The flammable finishing element does not tolerate high temperatures.
Comparing types and sizes
Framing always begins with choosing the type and size of the plastic element. The table shows data about plastic corners, their sizes and types for slopes:
| View: | Size: |
| Equilateral: | 20*20 - 50*50 mm, standard length, attached to give strength. |
| Not equilateral: | 5*17 and 20*25 mm, lining of arch openings, usually installed on curved compositions. |
| T-shape: | 12*10, 18*10, 20*10, 22*10 mm, installation is necessary to hide the seams. |
| Removable (with latch): | Standard, the shelf bends for dismantling. Easy to install, no need to stick. |
During installation, it is necessary to cut the corner to form the desired length. A sharp utility knife will help with this. If you need to cut at a clear angle, you will need to prepare a miter box and a hacksaw.
Important! The colored plastic corner for internal slopes is available in lengths of 2.6 m, 2.7 m, 2.8 m, 3.0 m.
How to glue plastic corners onto slopes (video)
Arch finishing
The design of the arch often becomes a problem. In general, there are not so few external corners in the apartment, but on the arch there are certainly some. And in the aisle they very often get touched. Either furniture, or other cargo, or simply an inhabitant who did not fit into the gap. And if there are no questions with the straight part, then the round part may be a problem.
And not only in the doorway can there be an arched vault
In general, you can use universal corners for the arch. They are flexible, which is very comfortable. There are flexible, non-universal ones - plastic, made from a special polymer with high elasticity.
But in general, corners with different shelf widths are used to design arches. They are even called arched. They have one shelf of 10 mm (external) and the second - internal - 30 mm or more. They simply bend. You can’t twist it into a donut, but it’s not difficult to get at least some curvature in the arc. You will only need to use a secure hold while the glue dries.
If you want to bend an ordinary corner, you can do this by heating the plastic. For this work you need a hair dryer. Ordinary one - for hair - will not work, because its temperature is very low. We also need a template according to which we will bend the plastic corner. Take a piece of fiberboard, tighten the screws or drive in nails, forming the profile that you require.
This way you can decorate the corners of the arch with protective corners
They start bending from the middle. Warm up the area, constantly pressing on the middle, and using a hairdryer, moving from the center to the edges. So you need to bring the corner to a suitable curvature and leave it in this position to cool. To prevent it from straightening out, along with a number of screws, holes are made for the 2nd row. The distance between the rows is equal to the width of the corner shelf. After the plastic has bent, insert and tighten the screws a little. After the plastic has cooled, remove them.
Features of choosing glue
Quite often, novice home craftsmen wonder how to properly glue corners to wall slopes. To do this, you can use three types of compositions:
- silicone sealant;
- liquid Nails;
- polyurethane glue.
Liquid nails have increased strength characteristics. They are easy to apply, especially on plastic surfaces. It is better to do this in a zigzag or dotted manner. The material does not dissolve plastic and leaves no residue. The glue holds the elements together well, the adhesive strength does not decrease for two decades. The final adhesive force is achieved after hardening and is 40 kg/m2. When choosing glue, it is better to give preference to a colorless composition.
If you are still thinking about how to glue the slopes, then you can choose silicone sealant. It does an excellent job not only of gluing to wallpaper, but also to ceramic tiles, as well as tiled surfaces. Silicone sealant has an acrylic component, so it is ideally suited for these purposes.
Polyurethane glue is in no way inferior to the mixture described above. Its characteristics can be compared with liquid nails. But plastic corners for walls are produced completely self-adhesive. In this case, you only have to take accurate measurements, remove the protective film and press the element against the protruding corner.
To apply the composition, if you plan to use it in your work, it is better to purchase a glue gun. Before gluing plastic corners, you should study the characteristics of the glue to see if it is suitable for the wallpaper. Before you start gluing the plastic corners, you should clean the surface of dust.
DIY installation of a decorative PVC corner
Plastic (PVC) corners are very widely used in interior decoration; they are installed on the slopes of plastic windows, they frame the outer corners of walls and the slopes of doorways. In this article we will take a detailed look at the process of installing a PVC corner on the slope of a plastic window, and also consider how to make a neat joint between two corners.
Step 1. Make the markings. We need to attach the PVC corner to the slope and make a mark along the edge of the vertical slope:
The minimum length of the applied corner (L) must be greater than the height of the slope (a), by the width of the corner (b), taking into account a small margin (c):
For example, if the height of the slope is a = 1500 mm, and the width of the corner is b = 30 mm, then the length of the corner must be at least a + b + c = 1500 + 30 + 15 = 1545 mm.
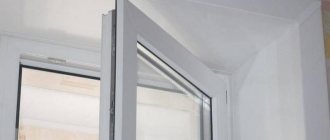
Step 2. Make a cutout on the PVC corner, removing one edge, as shown in the photo below:
We apply the corner to the slope:
The corner fits perfectly, you can proceed to the next step.
Step 3. The plastic corner is glued only to the slope, this is enough for fixation, so we apply glue only to one of the edges.
“How to glue the PVC corner?”
As glue you can use “Moment Montazh”, “QUELYD Masterfix” and their analogues. It is not recommended to use super glue, as it will be almost impossible to correct mistakes.
Glue is applied to the inner surface of the corner either pointwise or in a thin strip:
We fix the PVC corner with masking tape (while the glue dries):
Step 4. Repeat steps 1-3 for the right slope:
Step 5. Mount the corner on a horizontal slope. The length of the corner is taken with the same margin as for the vertical one, but taking into account two sides. Markings are also made, and then cuts are made and the corner is glued to the slope:
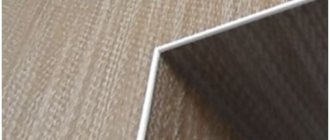
Step 6. Mark the cutting location. The corners will be joined at an angle of 45°:
Step 7. Carefully cut two corners at once. It is very important that the knife is sharp:
Step 8. Seal the joint between the corners with white acrylic sealant. After the glue has dried, remove the masking tape. The installation of the PVC corner is completed.
Correct cutting
Regardless of where you need to glue the corner - on a door or window, inside or on the outside, you need to take measurements and correctly cut the raw material along its length.
It is optimal to carry out the work of cutting plastic with a hacksaw with fine teeth.
First, the length of the opening is measured, then marks are applied to the corner so that the piece is consistent with this value. Then the plot that will be adjacent to the slope is cut clearly according to the marks, and the one that sticks to the wall at an angle of 45 degrees.
Recommendations from professionals
Useful tips will help beginners with DIY installation.
- Be precise when marking so that there are no gaps between the joints. To prevent this, you can increase the length of the workpiece by 0.5-1 mm. They will still fall into place due to the elasticity of the material.
- It is not recommended to fill the joints with silicone, as over time it will darken and it will stand out against the background of the slope.
- To be on the safe side, do not glue the corners right away, but first attach them with tape and take the necessary measurements.
- To create the correct shape for the arch, use a hair dryer.
- When processing areas in openings where the angle is not 90°, but more or less, it is necessary to take measurements locally and cut them with a knife.
Plastic corners serve as reliable protection for slopes from damage, and also add aesthetic completeness to the entire interior. Among the wide range of shapes, sizes and colors, it is easy to choose the best option for a specific design. And it’s also easy to attach them yourself, having all the necessary tools and work skills. Reinforce your knowledge by watching the video.
Plastic corners for slopes are the logical conclusion of home renovations. They act as a protective and aesthetic design for doorways, window slopes and corners.
Installation of corners on window or door slopes
Having figured out what such products are made of, what their features are and having decided on the choice, you should learn how to install corners on slopes. Detailed instructions are given below.
What glue to use
In addition to the corners themselves, we will also need an adhesive composition with which we will attach the selected element. When choosing it, it is worth remembering that quite often, especially if it is necessary to glue a narrow product, the glue seeps out from under it and, naturally, ends up on the walls. As a result, the latter may be damaged, which, accordingly, will negatively affect the appearance of the room as a whole. Therefore, you should choose an adhesive composition whose excess can be removed from the surface.
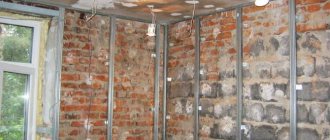
Basically, corners are glued to new slopes, but nevertheless, check that the surface is relatively flat, since large bumps cannot be hidden by any decoration. It should be free of foreign objects such as nails, screws, etc. It also needs to be degreased; white spirit is suitable for this purpose.
Preparing tools
Before you start gluing the corners, you should prepare some tools and materials, among them the following should be highlighted:
- stationery knife;
- roulette;
- metal scissors;
- metal square;
- glue;
- scotch.
Scissors can be replaced with a hacksaw. In order to cut the workpiece at an angle of 45˚, you should use a miter box. However, you can do without it if you follow the technology and have a certain skill.
Plastic, wood or MDF - which one to choose?
Having made sure that installing corners is not just a whim, but a necessity, we will study the construction market in order to make the right choice. These products are divided into types depending on the material from which they are made. So, the corner can be plastic, wooden, bamboo, made of cork or MDF. Absolutely each type has its own pros and cons; let’s look at them in more detail.
Plastic corners are made by hot bending a sheet of polyvinyl chloride. Basically, they have the same shelf width - from 10 to 40 mm in increments of 5 mm. However, there are asymmetrical specimens, for example, 10x25 mm, but regardless of this parameter, the angle between the sides is 90 degrees. If it is necessary to transform an arched opening, this is done using a special flexible profile. Their advantages include their relatively low cost; they do not require painting, unlike wood.
The next type is cork corners. Such decorative elements are quite often used for arched openings, but this does not mean at all that their use is limited only to this area. They can also be used to finish slopes of various shapes. Cork has a number of advantages, including strength, fire resistance, practicality and environmental friendliness. In principle, this material has practically no disadvantages, except that if your pet wants to sharpen its claws on it, this will damage the surface.
It is also worth noting wooden and bamboo products, which will always be signs of excellent taste and will fit into almost any interior. In addition, we must not forget about their environmental friendliness. True, such elements are somewhat more expensive than their counterparts made from other materials, and besides, they often require painting. A material such as MDF can also be compared to natural wood, but it costs significantly less, because wood dust is used to create it.
Photo gallery: finishing materials
It can be seen that the range is quite extensive, and there is plenty to choose from. But what should be guided by this? Of course, no matter how much we would like to, the budget is almost always limited. Therefore, first of all, we have to proceed from our financial situation. As mentioned above, plastic products have a very reasonable price, while their appearance is not much inferior to their counterparts made from natural materials. But, in addition to the price, you should also pay attention to the fact that these decorative elements fit harmoniously into the design of the room.
For arches, you should purchase special arched corners of different sexes; they ideally maintain their position when bent. Please note that the wider the sides of this element, the greater the load it can withstand.
Adhesive mixtures
Installation steps begin with the selection of an adhesive mixture. Polyurethane-based adhesive perfectly secures PVC elements and makes it possible to frame the planes on which the load will be placed.
- Provides the opportunity to glue parts in the bathroom when ceramic tiles are being glued.
- Silicone sealant is used for fasteners with less load.
The corner is glued using liquid nails; when the border is dark in color, it can be glued using a black compound; for light and whitish options, a colorless look is suitable.
Details about gluing
Before fastening, you need to apply the part, leaning it against the installation site in the window or door opening.
- When it is cut correctly, then glue is applied to the inner section of the corner every 10 cm, also at the junction of the planks.
- During this phase it will be good to use a mounting gun.
- Then you need to quickly press the object to the plane and secure it in this state with masking tape.
- The process starts from the transverse slope, and then the turn of the side elements comes.
Use a damp cloth to remove excess sealant from the surface of the walls and give it time to dry completely. The tape can be removed after 24 hours.
Why do you need to attach corners to slopes?
Let's start with the most important thing - why is this necessary? What role do the corners play - only decorative or do they have more serious functions? Let’s not argue with the fact that if you frame the slopes of doors or windows with special decorative elements that fit perfectly into the design of the room, then the interior will immediately change for the better.
But besides this, they also perform a very important protective function. Sooner or later you have to carry large items through the opening, which can damage the corners, and you can simply accidentally touch the outer corner and damage it. There can be a lot of situations, the main thing is that the result is the same - a damaged surface and, accordingly, a damaged appearance. In addition, as practice shows, most often the wallpaper begins to peel off in these places. So it is best to protect the outer corner of the slope with the help of a decorative element, which will also transform the interior.
Corners are not only protection, but also a neat aesthetic appearance