After installing the door, the walls adjacent to it - the slopes - have a deplorable appearance. Perhaps the fastest way to put them in order is to decorate them with laminated panels. It can be MDF or laminated chipboard (LDSP). There isn't much difference. The main task is to choose a pattern and shade to match the door or other decoration in the room, and making door slopes from MDF or laminated chipboard is not difficult. Moreover, there is a method that requires a minimum of time.
Laminate slopes are made quickly, and the appearance is at least good. No special skills are required, you just need to be able to use a saw or jigsaw to cut fragments of the required size. The rest of the work is simple and straightforward: glue, polyurethane foam, wooden planks, and self-tapping screws are used. You don’t even need plaster as when finishing drywall slopes.
The easiest way
The easiest way to seal a door slope is to use “L”-shaped additional strips. They are usually made from MDF. All that is required in this case is to cut to the required depth and make a 45° cut correctly and clearly. Then you need to coat the end part with liquid nails, apply mounting foam to the inside and press everything against the wall.
The easiest way to design a slope is to use “L”-shaped panels
And, as always, there are “buts”, and serious ones at that. First, these platbands are expensive. Secondly, they are only available in large cities and in specialized retail outlets. Third, there are usually only a few colors in stock, all others are supplied to order. Therefore, other methods of cladding MDF door slopes are often used.
Shapes and sizes
Finished corners usually have an angle of 90°. The corner itself is not always sharp; there are options with a rounded one. By type, corners for protecting wall corners are divided into:
- hard external;
- internal;
Universal corner made of MDF
Questions can only be about universal ones. These are two strips of plastic or MDF connected by a thin strip of flexible material of the same color. Thanks to this connection, you can create an obtuse or acute angle, internal or external - without much difference. But in terms of reliability of protection, it is inferior to rigid ones - after all, the flexible part is quite thin.
It is also worth knowing that corners can have shelves of the same or different widths. More often they are found with the same ones, but it is quite possible to find those in which one is wider, the other is narrower.
Types, shapes, sizes
The width of the shelf varies from manufacturer to manufacturer. Plastic ones, for example, can have shelves from 10 mm to 50 mm. MDF corners are made with a minimum shelf width of 20 mm, metal ones - from 10 mm, but the maximum shelf length is 90 mm (aluminum). So there is plenty to choose from.
Installation of a slope using liquid nails and foam
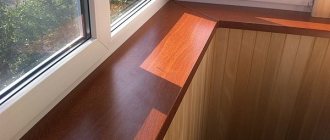
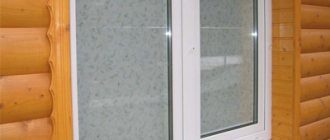
If the width of the slope does not exceed 20-25 cm, the laminated panel can be installed using liquid nails and polyurethane foam. The method requires a minimum of time, and the result is good.
Preparing the slope elements
Laminate door slopes consist of three parts: two side parts and one top part. If the slopes are made at an angle, then one edge of the sidewalls will be beveled.
This is what the “pattern” for a slope made of MDF or laminated chipboard looks like:
Measure the distances from the door jamb to the corner in several places, cut the strip to the required width and height. The cut out sides should be a couple of centimeters higher than the required length - just in case they missed the dimensions. You can cut it off, but you can’t build it up.
You try on the sides, insert the top. If the edge is flush with the main wall, and the gaps near the door frame are minimal, everything is done correctly. If there are mistakes, we correct them.
After cutting off the parts, try them on on the spot.
Then the outer edge of the chipboard or MDF is trimmed - a trim film is glued on: you do not nail the platbands to the very edge, so that some part will be visible. That's why it needs to be decorated. You can do without trimming if you trim the edge with a matching decorative corner. But it is made of plastic, and how good it will look is a question.
It is easy to apply the trim film. It is on an adhesive basis. Only the edge should be smooth and clean - free of dust and dirt. Glue the trim strip evenly onto it, then take a dry cotton fabric that does not fade, and iron the end through it with an iron (at medium power). Then it sticks tightly, but all the irregularities are visible, so saw off evenly.
If you can choose a plastic corner to match, it looks good, and there is less work: it is glued with liquid nails or silicone
If a telescopic platband is used at the final stage of finishing the slope, a groove is made under it using a milling cutter in the laminated end. The width is exactly for the tenon of the platband, the depth is a little more than required so that it “fits” well. For a regular MDF platband you don’t need anything. It simply sticks onto liquid nails.
Installation of slopes
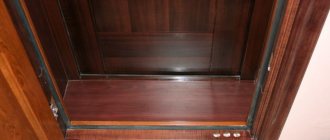
Having completed all the preparations, we begin to install slopes made of MDF (laminated chipboard). The end facing the door is coated with liquid nails. It is better to take a transparent composition - it will not be visible. The jamb to which the MDF is glued is degreased. Having pressed the sidewall, it is placed in the desired position, checking the verticality and maintaining the same indentation. Then peel it off and wait until the glue dries a little. After 5-7 minutes, the fragment is installed in place, checking the position relative to the walls.
The second side panel is installed in the same way, and then the upper part. The top expands additionally: spacer wedges are installed above the place where it joins the sidewalls. This will prevent the trim from bending and additionally “pinches” the sidewalls.
Having installed all parts of the MDF slope, place wedges at the top
Fixation
After the wedges are inserted, check whether everything is aligned correctly and evenly. If everything is fine, take the foam and place “patches” in the gap between the panel and the wall - apply a small amount of foam in islands. They should be full depth, but not wide. There is no need to fill the entire volume: a lot of foam will be required, and it may bend. Therefore, make islands.
After polymerization of the applied foam, the slope fragments are held rigidly. Now you can start filling the empty space. It is also more convenient to seal it with foam, but not to the full depth, but only in front.
The procedure for fixing slopes made of laminated fiberboard
After the foam has hardened, its excess is cut off with a knife. You can start finishing.
Installation of platbands
This part of the work is carried out in a standard way: first, one side panel is measured and cut, then the top one, then the second side panel. After trying on everything folded and checking the accuracy of the joining, the platbands are installed on foam or liquid nails, depending on the situation.
How to plaster slopes is described here.
Corners for protecting wall corners: selection options
This technique for decorating wall corners - protective corners - is not liked by everyone, but there are no special alternatives. In any case, on walls covered with wallpaper, a corner is still better than sticking out and torn canvases.
There is only one solution available for the integrity of the wallpaper without the use of decorative corners - to make a rounded corner rather than a sharp one. In this case, there will be no problem with finishing it. You can simply roll up the wallpaper without cutting it. But the corner must be drawn out perfectly, otherwise you will have to cut it again, which means that the question of protecting the wallpaper joint at the corner will again arise.
It is important to choose the right decorative corner so that it does not look alien. There are special techniques for this.
The interior looks good in the appropriate style
You need to select corners to protect the corners of the walls based on the overall design of the room. There are several standard solutions:
- To match the wall decoration. A complete color match is desirable, and even better if the texture is similar.
Either match the wall trim or match the doors
One of the options is quite logical
In general, you need to select corners to protect the corners of the walls depending on the design of the room. This can be done after the furniture has been arranged and textiles have been hung. In this case, it is easier to imagine the end result. Because the picture in our head can be very different from reality.
One of the transparent protective corners
If you just can’t find an acceptable color, and you need to protect the corners in your apartment, pay attention to the transparent plastic corners. They are of different types - rigid, flexible, with different wall thicknesses.
Door slopes made of MDF on slats
If the width of the slope is large (more than 25 cm), additional supports are required for rigidity: the foam may not be dense enough. In this case, the planks are secured. These can be lumber or metal profiles. The planks can be attached vertically or horizontally. The installation diagram for a slope made of MDF panels with vertical slats is shown in the photo below.
How to attach wide MDF slopes
The planks are attached to dowels (they are used more often) or self-tapping screws, depending on the wall material. After the supports are secured, the slopes are cut to size, the procedure is similar. First, the ends and places where the slope is adjacent to the planks are coated with liquid nails, and the panels are peeled off for a few minutes. Further all actions are exactly the same.
If, as in the figure, the junction of the panel and the wall is ideal, you can do without foaming the cracks and installing platbands. In this case there is not much work at all.
Door slopes made of MDF can be installed on horizontal strips. They are aligned so that they are all in the same plane. On the sides, four supports are enough, at the top - three (10-15 cm away from the edges and in the middle). Further, all the technology is the same.
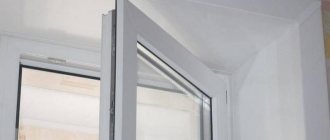
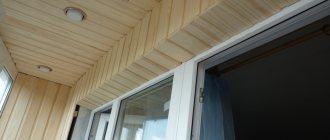
How to make slopes on PVC windows from plastic.
Tools for work
To perform the job of gluing PVC wall corners onto wallpaper efficiently, you will need the following tools:
- glue gun;
- metal scissors (convenient for cutting plastic profiles; simple scissors will not cope with the load);
- a hacksaw or grinder with a metal disc (for cutting wide corners used to frame arches);
- miter box (used for cutting and adjusting the joints of slats at an angle of 90° and 45°);
- painting knife;
- masking tape;
- square;
- roulette;
- pencil;
- sponge, cloth or rag.
Laminate slopes
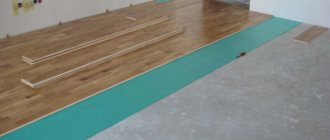
Often, after repairs, a certain amount of building materials remains. Why not adapt them? When making slopes on a door made of MDF, you need to buy the material. If, after laying the laminate, you have a certain amount of planks left, you can also make slopes from them. There will be more work than using a whole fragment, but the material is free.
Assemble the sidewalls from laminate boards. They need to be joined with a shift, the joints from the inside must be secured with strips - it can be made from an aluminum profile - it is lighter in weight. If necessary, the edge can be trimmed. How to make slopes on a laminate door, see the photo below.
You can make prefabricated door slopes from laminate strips
They can be installed on mounting foam. To make it more rigid, apply it to the back side with a snake and press it well against the wall: in this case, large gaps cannot be left: the material will sag.
In the video below, laminate door slopes are made in a panel house. The width of the slope is small - 7-8 cm, the sequence of work is described clearly. Useful video tutorial.
In general, it is better not to install homemade laminate slopes on entrance doors: large items are often carried there, and the laminate can be easily damaged even by a heavy bag. This type of door is best used for interior doors. The load there is much less. At the entrance, it is better to make door slopes from MDF or laminated chipboard; slopes made from plasterboard have performed well, but the most reliable are plastered ones.
Glue selection
There are several types of glue for gluing decorative corners to wallpaper corners, which differ in chemical composition, purpose, method of application, and setting time. The most common adhesives for such work are:
- liquid Nails;
- polyurethane glue;
- silicone sealant.
Liquid Nails
The main advantages of this type of glue are: a high degree of strength, quick adhesion and good adhesion properties to the surface, which allows you to reliably attach plastic profiles to any material: wallpaper with a convex pattern, concrete, wood. It is possible to choose either colorless glue, which can be used to glue white corners to the wallpaper, or different colors. The disadvantages of the white adhesive mass include the fact that over time it begins to turn yellow and becomes visible at the seams and joints of the plastic.
Liquid nails vary in purpose and composition. They are universal, suitable for working with any materials, and special, which are used for gluing the materials specified in the instructions on the packaging.
Liquid nails may contain synthetic rubber and solvent-based mineral components or water-based acrylic. The first type is characterized by fast setting, moisture resistance, frost resistance, and good adhesion. Allows you to glue not only light plastic slats and profiles in wet rooms to moisture-resistant wallpaper, but also heavier materials. The downside is the strong unpleasant odor, which takes up to 48 hours to dissipate.
The second type is environmentally friendly and does not emit a strong odor, but its use is permissible only at temperatures above 0°C in dry rooms.
Liquid nails are easily applied to the surface using a special syringe.
Polyurethane glue
Advantages: strength, elasticity, excellent adhesion to the surface, rapid hardening, no contamination. Disadvantages: pungent odor and higher cost compared to other adhesive mixtures.
Polyurethane adhesive for plastic corners can be one-component, ready-to-use, or two-component, which requires mixing the components in the required proportion immediately before use.
However, when choosing a polyurethane adhesive, you should pay attention that not all adhesives of this type are suitable for gluing decorative plastic products to wallpaper. This information is indicated on the packaging.
Silicone sealant
This glue can be used not only for attaching plastic products to wallpaper, but also to facing panels made of PVC, MDF, and ceramic tiles.
However, silicone sealant is not the best choice for attaching plastic slats, since in some places they may not adhere tightly to the wallpaper, which will shorten its service life. Silicone with the highest adhesion rates can be used in places with low traffic intensity, where the likelihood of damage and chips is low. For plastic corners in high traffic areas, it is recommended to choose acrylic sealant.
The main advantage of silicone sealant is a durable and elastic seam, which is suitable for places subject to vibration (doorways, light partitions). Thanks to this, this adhesive mixture does not chip.
Installation of PVC panels
This material is rarely installed on the slopes of the front door and if possible, it is better to replace it with other options, but if not, then you can start fixing the panels with glue.
First, the panels are cut according to the measurements obtained. They are laid with glue, so before proceeding with installation, it is worth pre-treating the surface with a primer and rubbing the panels on the reverse side with sandpaper to improve adhesion.
The glue is applied to the surface of the panels in the form of a snake, but it is better to remove the excess immediately so as not to damage other decorative elements. The panel is pressed to the place where they are installed and immediately torn off; after a few minutes they are installed again, only this time it is final.
How to cover the outside of a street door?
Moreover, you need to understand that not every material can be used to process the external or internal part of the structure.
To update a box located from the street with your own hands, you can use:
- Steel sheets. Their structure can be smooth or embossed with an imitation of an interesting pattern. Good sheets of steel will protect the room from drafts entering the room, but they must have a backing made of polymer or cork.
- Viniplast. It may consist of fiberboard or PVC. This material is not resistant to sunlight, and therefore it must be coated with a special varnish with an ultraviolet filter.
Fastening decorative stone or brick
First you need to draw up a diagram for laying out brick or stone. If when laying a brick the entire diagram can be drawn on a piece of paper, then with stone everything is more complicated. First, you need to mark the entire surface and immediately think about how the stone elements will be placed: in the opening and along the outer part, or they will only frame the outer part.
On the floor, it is worth completing the detailing of the future layout, which should be as accurate as possible, after which you can begin lining. The stone is attached to the slopes using glue or a special mixture. After all the elements are attached, the stone is varnished.
Thus, by following all the technologies for installing this or that finishing material, you can give the interior a style and create a unique design, without hiring a master, but doing everything yourself.
General information
Advantages and disadvantages of MDF
Installing a doorway is a rather labor-intensive process in which accuracy is important. However, this work can be done with your own hands.
The following advantages of this material are highlighted:
- Affordability;
- ease of installation;
- aesthetics;
- the material has good density, which contributes to additional heat and sound insulation;
- environmentally friendly and safe material. Can be used for finishing both external and interior doors;
- Large range of colors;
- Resistant to rotting and mold deposits;
- are durable. The panels are not able to deform and swell;
- suitable for finishing doorways of any thickness.
Unfortunately, there are disadvantages here too. Firstly, this is not resistant to strong mechanical impact, but it is quite resistant to moderate impact. Once damaged, the panel cannot be repaired. Also, the material is not able to withstand high humidity.
DIY slope installation
Any work begins with preparation. It is necessary to remove all contamination from the surface to be finished, eliminate and repair all chips and cracks in the walls. If there is such a need, install waterproofing.
Then you need to take measurements and calculate the required amount of materials.
MDF panels come in two types: L-shaped finishing and wall.
The nuances of marking and sawing MDF
In order to most accurately mark the required fragments, it is better to use a square and patterns in addition to a tape measure. You need to start with the top panels. Basically, slopes have uneven edges at a slight angle. This needs to be displayed on MDF. After installing the first panel, apply the following elements. Marking and cutting are carried out during the installation process.
MDF is cut with a hacksaw, saw or jigsaw. The last one produces the most ideal cut without any burrs or chips.
Important: When installing side elements, do not forget about the presence of a threshold, as this will affect the height of the side bar.
Buy MDF overlay in Moscow and the Moscow region
To make an entrance metal or armored door aesthetically attractive and harmonize with the interior design, many office owners and company representatives use door trims. has been providing its services in the door lining manufacturing market in Moscow and the Moscow region for more than 17 years, providing its customers with unsurpassed quality products at affordable prices. Our designers are always aware of all the new fashion trends in the production of MDF overlays. An individual approach, as well as the constant expansion of the range of samples, allow us to provide our clients with the widest variety of ready-made design solutions. Huge production capacity and the use of modern, high-tech equipment allow us to complete even the most complex orders without significant time delays.
You can always order the production of a door lining of any shape and size by calling our managers.
A technician’s visit to take measurements in Moscow and the Moscow region costs 1,000 rubles (free of charge when concluding an agreement to replace the door trim).
Conclusion
To finish a door using MDF panels, you need to select the right panels in style and color. It is important to take into account the interior of the rooms that are in contact with this doorway.
It is necessary to achieve harmony between the door leaf and the opening, as well as their integrity. You need to try so that the heads of the screws do not protrude. They must be covered with special covers.
MDF panels, due to their combination of many advantages, variety of colors and stylistic solutions, and low cost, are considered the best solution for decorating door slopes.
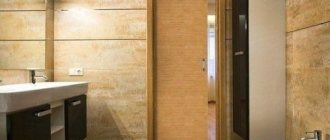
Decorating corners in an apartment: places of application
Corner profiles are used when repairing the following elements:
Door and window slopes
Traditionally, double-glazed windows are equipped with special corners that complete installation. The door kit also includes fittings and platbands. These elements protect the slopes from damage and have an aesthetic function.
If the corners are not closed, then selecting these elements yourself is not difficult. A suitable option is plastic corners. By choosing the required profile color, you will make the transition of a door or window opening smooth and less noticeable.
Horizontal joints of ceilings, floors and walls Corners for ceilings and floors are usually called plinths, and they are practically the same as corners for walls. Ceiling profiles can also be called baguettes, fillets or moldings.
A foam ceiling baguette is the easiest to install in an apartment
Such an L-shaped plinth necessarily has two flat and smooth surfaces that are attached to the ceiling and wall, and two front surfaces with a relief or ornament m. The fillets are fastened in different ways depending on the material; the foam baguette is, for example, glued to silicone or liquid nails.
One of the popular floor models is a plastic plinth with a collapsible design. The base of such a plinth is attached to a dowel-nail to the wall, then the front colored part is attached to the base using a special lock. Floor and ceiling profiles are made from various materials: PVC, polyurethane, dupolymer, wood, metal. Ceiling corners are also produced in gypsum and foam.
Corners of decorative partitions, openings, including arches
Popular doorways in apartments are semicircular arches. The contours of this design can be repeated by corners made of flexible plastic, veneer, MDF or bamboo.
Skirting boards for the bathroom are ceramic marble, plastic, acrylic, and there is also a self-adhesive border made of PVD and silicone profiles.
The easiest to work with and cheapest option is a self-adhesive border. Its only drawback is its service life, since such a corner needs to be changed after 1-2 years.
Joints of countertops and aprons or countertops and other objects.
Installation of any kitchen set is completed by installing corners at the joints of the countertop and apron. The plinth here not only has a decorative function, but also prevents water and food residues from getting behind the countertop, and also hides defects and damage that occurred during installation. new kitchen.
Kitchen profiles can be plastic, aluminum, wood, stone. Aluminum plinths are resistant to temperatures and chemical influences, plastic ones come in a variety of colors and designs, wooden and stone ones are environmentally friendly. The choice depends on various factors.
The shape of the borders is also varied: flat, curly, rounded, convex, or vice versa.
Vertical wall joints - internal or external
Wall corners, especially in walk-in rooms or narrow corridors, are often susceptible to accidental contact, friction or even impacts. They can be damaged by moving furniture, children or animals playing. This is why designers and/or owners decide to decorate the wall joints with decorative corners. However, corners are used not only for this purpose.
A transparent acrylic profile with ornamentation will complement the wallpaper design and make it sophisticated
Tile products
Colored corners for tiles are made of aluminum and its alloys.
They arrange a coating on it and polish it to a mirror shine. Varnish is applied on top or laminated. Thanks to this technology, the protrusions receive reliable protection. The decorative characteristics of the room are improved. On one side of the profile there is a perforated strip equipped with slits. Lay on the surface of the wall or on steps. The opposite side is decorative. On the opposite side it has a small internal protrusion. The side end of the tile is inserted here when the corners are laid. It is important that it fits tightly.
The tiled profile is not only intended for decorative purposes. It makes surfaces smooth during finishing work. Three-sided elements are provided for protruding corners. They allow you to close connections in three planes. They are placed at the junction of finishing profiles located at right angles.