What material to choose as the final roofing covering
The choice of topcoat for a garage roof depends on a number of factors.
It is important to take into account not only technical parameters, but also your own requirements for the appearance and installation of the roof. The most common options are:
- Ceramic tiles. The material is resistant to corrosion and temperature changes, but is expensive.
- Ondulin. The coating is valued for its practicality and long service life. The color variety of ondulin allows you to choose the option that suits your design.
- Profiled sheeting. Metal sheets are valued for their ease of installation and the presence of a polymer coating that provides protection from climatic influences.
- Ruberoid. Roll material is often used to construct a flat type of roof. The coating is very cheap and durable, but has an unaesthetic appearance.
- Polycarbonate. The material is suitable for roofing open garages. Polycarbonate bends easily, is resistant to damage and has a long service life.
Ruberoid
Practical, lightweight, convenient rolled material is equally well suited for re-roofing in a private house, outbuildings and other objects. How to properly cover a roof with soft rolled material:
Important! Covering roofs in a private house with roofing felt requires double laying of rolls: the first layer is bedding, the second is the finishing coating. In this way, a continuous surface is created that protects the structure from leakage, and tearing off a couple of layers by the wind will be problematic, as well as pushing through it with snow and ice
After laying out, the surface is leveled with a roller to remove possible air bubbles - they then turn into condensation and deform the coating.
To make work easier, you can take euroroofing felt - a material equipped with a protective film that serves as a temperature indicator. The laying rule is simple: do not overheat the sheets, otherwise the coating will deform.
How to properly cover a roof with metal tiles ↑
Main stages of implementation
First of all, preparatory work is carried out, which, if necessary, includes the dismantling of old roofing material and sheathing. That is, the workspace is being prepared.
As a result, beams and rafters that make up the supporting structure may remain on the roof.
Further, if, after measuring the plane of the slopes, distortions are detected, they are leveled. This is necessary to protect the metal tile roof from the formation of cracks and, accordingly, from possible leaks.
Then waterproofing is laid, protecting the structure from moisture penetration from the outside and from condensation from the inside, and a counter-lattice is sewn on.
The next step is to assemble the sheathing of the future roof from boards 10*2.5 cm and beams 5*2.5 cm. The pitch of the sheathing can vary between 35–45 cm. It is installed in such a way that the sheathing protrudes slightly beyond the walls, forming an overhang that protects building from the rain.
Do you need thermal insulation?
Correctly covering a roof with metal tiles involves laying insulation. This solution is aimed at limiting heat loss, which is difficult to avoid completely, given the high level of thermal conductivity of this material. Typically, mineral wool or tile insulation is used for this.
Thermal insulation material is installed between the rafters with an overlap of 5-8 cm, especially carefully strengthening the corners of the sheathing. Thermal insulation simultaneously also plays the role of a sound insulator and compensates for the main shortcomings of the roofing material: high sound and thermal conductivity.
Therefore, covering the roof with metal tiles without laying insulation is impractical.
It is also necessary to consider the ventilation system, otherwise the service life will be significantly reduced, since accumulated condensate will cause failure of not only the insulation and the tiles themselves, but also the rafter system.
Preparing the roof for overlapping
Dismantling is carried out from top to bottom
Since the roof is a complex structure consisting of a system of rafters, insulation, waterproofing, internal cladding and external covering, all components need to be given time and attention. After the completion of the overlap, access to the “roofing cake” will be closed, and it will be difficult to correct errors.
Preparatory work consists of the following stages:
- Removing roof-mounted products: antennas, weather vanes, lighting fixtures and wiring.
- Dismantling the flooring. This should be done in the opposite order of installation. First, the ridge profile is removed, then the covering elements from top to bottom. Finally, additional parts are removed.
- Removing the vapor membrane laid on top of the sheathing. Studying the condition of the insulation. If it is satisfactory, the material can be retained.
- Checking the rafter system for cracks, fungus and rot, carrying out minor or major repairs with the replacement of individual elements. If this is provided for by the project, the frame is completely dismantled.
Finally, the wood is treated with an antiseptic, and insulation and waterproofing are installed.
Characteristics of corrugated sheets
Corrugated sheeting is a sheet material made of steel with a zinc coating. Sheets often have a polymer coating, giving the material additional protection from external factors. A characteristic feature of corrugated sheets is the presence of a profile, due to which the sheets acquire greater rigidity. Since the rigidity of the material is achieved without increasing its weight, it ultimately turns out to relieve the entire roof structure.
Covering the roof with corrugated sheeting is carried out in several stages, proceeding in the following sequence:
- Choosing the right material;
- Taking measurements;
- Transportation;
- Preparation of tools;
- Preparatory roofing work;
- Direct installation of the coating.
The procedure for dismantling the old roof and preparatory work
Dismantling the old roof begins from the ridge. Using a pry bar or a nail puller, the roofing nails are undermined by their wide heads. The ridge, gutter and other roof components are removed. The top row of the old roof, freed from nails, is tied and smoothly lowered to the ground on cables.
- The following rows can be dismantled while in the attic. The skeleton of the rafter structure, freed from the old roof, is carefully inspected. Damaged or rotten skeleton beams are replaced with new ones.
- The mauerlat, rafter legs, ridge and sheathing are checked for flatness and, if necessary, leveled. A waterproofing film and insulation are installed on the skeleton.
- The waterproofing film not only protects against condensation, but also prevents rain and melt water from reaching the insulation. Modern materials for waterproofing are equipped with a micro-perforated coating, which ensures free circulation of steam and moist air throughout the attic, thus, the presence of a water barrier contributes to the formation of a dry and “breathable” atmosphere under the roof.
- The waterproofing film consists of three layers. The middle mesh reinforcement layer consists of interwoven polyethylene fibers. On both sides of which lamination layers and micro-perforations are applied to ensure free air movement.
A properly equipped roof with insulation and a full range of protective equipment prevents the appearance of icicles and snow slides from a steep pitched roof. To combat landslides, special stoppers are used; they not only break up snow layers, but also separate storm flows into small streams.
Laying a new roof over the old one
If a new roof covering is installed on top of the old one, then a second sheathing will need to be installed.
If the repair work does not involve dismantling the old covering, this will lead to an increase in the total weight of the roof due to the installation of a second sheathing, a thermal insulation layer and a roofing covering. In this regard, it is necessary to take care of strengthening the rafter system so that it can withstand the increased load.
Important! If the rafter system is rotten and there is a danger that it will not be able to withstand such weight, you will need to resort to dismantling the old roof.
To avoid a significant increase in the weight of the roof, it is necessary to use lightweight materials for a new roof - euro slate, corrugated sheets or metal tiles.
It should be taken into account that installing a new roof over the old one without the use of additional heat and waterproofing is less labor-intensive, and allows you to reduce the weight of the roof, as well as save the cost of purchasing insulating materials.
Video about replacing a roof without dismantling the old one:
Roof protection from cold and heat
In the low-rise sector, mostly flat roofs without attics are in demand, because the attic requires additional costs and disrupts the architectural proportions of the house. This means that the roof must protect against winter cold and summer heat. A common feature of flat roofs is that the heat-insulating layer is located on top of the supporting structure (in pitched roofs it is usually located between the rafters). If you insulate the room from below, the dew point may shift into the thickness of the ceiling, which will lead to a reduction in the service life of the latter.
Photo: TYTAN
Mastics should be used primarily on roofs of complex configurations
As for roofing options, there are dozens of them. Suffice it to say that more than 40 “recipes” are given in SP 17.13330.2011 alone. At the same time, companies producing coatings and insulation materials are offering more and more new engineering solutions. However, they are always based on one of two fundamental schemes - traditional or inversion.
TechnoNIKOL roof installation diagrams
Photo: TechnoNIKOL
“TN-ROOF Terrace”: 1 – ceiling; 2 - vapor barrier; 3–5—EPS (including the slope-forming layer); 6 — fiberglass; 7 — LOGICROOF V-GR membrane; 8 — geotextile; 9 - tiles on supports
The traditional design in general terms is as follows: a vapor barrier film (polypropylene, polyethylene, butumen-polymer) is laid on top of the load-bearing base, followed by insulation, for example, mineral wool slabs, which have a compressive strength at a ten percent deformation of at least 30 kPa, one or two layer with a total thickness of 200 mm. Above is a separating layer (for example, made of polyethylene film), along which a reinforced slope-forming screed is poured (a flat roof must be given a slope of 2-3% towards the center or edges to ensure water drainage). The dried screed serves as the basis for a roll or mastic waterproofing coating.
Photo: TechnoNIKOL
"TN-ROOF Green": 1 - overlap; 2 — ramp made of expanded clay; 3 - reinforced screed; 4 — bitumen primer; 5 — “Technoelast EPP”; 6 — “Technoelast Green”; 7 - geotextile; 8 — EPPS; 9 — PLANTER GEO membrane; 10 - fertile layer
Other options are also possible. For example, a slope-forming screed can be located at the very bottom of the pie; in this case, the roofing waterproofing is fixed with gravel ballast, paving slabs on supports or special dowels. Some materials, say the “RUF SLOPE” system (Rockwool) or “TechnoNIKOL Slope” allow you to do without a screed altogether: the slabs have variable thickness, and with their help it is not difficult to create smooth changes in level to ensure water drainage.
An inversion roof is designed differently: it has insulation resistant to constant exposure to water (usually extruded polystyrene foam - EPS) located on top of the waterproofing. At the same time, the latter is reliably protected from mechanical damage and is located in the positive temperature zone (freezing-thawing cycles are destructive for almost any material). It is easy to turn an inversion roof into a usable one, for example, by covering the insulation with a drainage layer of sand and gravel and laying paving slabs. The disadvantages of the design include more complex drainage. However, we need to talk about gutters separately.
There are special requirements for thermal insulation for flat roofs. The material must not only have a low thermal conductivity coefficient, but also have good resistance to mechanical loads - both distributed (pressure from the overlying layers of the roofing pie, equipment, snow) and local ones that arise during installation
In addition, it is important that the material has hydrophobic properties and is non-flammable. At the moment, there are several ways to install thermal insulation: using mechanical fasteners, adhesive and free laying
In addition to traditional two-layer insulation, single-layer installation is becoming an increasingly popular solution. Rockwool offers unique dual-density slabs that consist of a rigid top layer and a lightweight bottom layer, which speeds up work and improves its quality.
Grigory Gromakov
Specialist in development of the “Flat roofing” direction of the ROCKWOOL company
Corrugated roofing: components
Even when installing a conventional gable roof, there are several difficult sections that usually form at the junction of different planes and/or parts of the system. These areas are usually called “nodes”. We examined one such unit in the previous paragraph - the design of the front board and the fastening of gutters. But this is far from the only node where detailed explanation is required.
Installation and sealing of the ridge
The under-roof space under the corrugated sheeting should be well ventilated. This material heats up quickly and cools down just as quickly, which promotes the formation of condensation. Therefore, when installing a metal profile on the roof, in the upper part the sheets on both sides are not joined tightly, but leave a gap of several centimeters - so that the air can freely escape, taking with it water vapor.
The principle of installing a ridge with ventilation
If there are special ridges with ventilation (in the photo), but even if you just install a regular ridge element between the corrugated sheet and its edge, you get a large number of holes - in each depression of the corrugation. The size of this gap depends on the height of the wave - the higher the wave, the larger the gaps are. On the overhang, where the front board is nailed, there are also similar holes. Air movement usually goes from bottom to top - from the overhang, through the under-roof space (for this purpose, when installing the roofing material, it is necessary to leave ventilation gaps, which are formed by the sheathing), to the cracks in the ridge. This is how ventilation and moisture regulation of the insulation occurs, condensation evaporates and is carried away.
Large gaps are good for ventilation, but when it rains/snows with the wind, precipitation clogs them, and dust and leaves get into the attic through them. It is much worse if the holes become clogged with leaves - ventilation will immediately deteriorate. To avoid getting into a similar situation, previously approximately 2/3 of the gap height was filled with sealant, applying it in layers to the roofing material. Crawling back and forth with sealant on the top of the roof, waiting for the previous layer to polymerize a little, is not very convenient. This solution is also incorrect from the point of view of ventilation - the gap decreases and air movement worsens. But there was no other solution. Now it is there - a sealant for corrugated sheets. It is made from polyurethane foam, polyethylene or wood composite. The structure of these materials is porous and allows air to pass through well, but not dust, water or leaves. In shape it either repeats the shape of the corrugation - there is one for different types of corrugated sheets, and there is also a universal tape that is simply pressed in the right places.
Sealing holes in corrugated roofing using a sealant
The seal “sits” on sealant, double-sided tape, glue, there are options with self-adhesive tape. With this compaction, air passes freely, and precipitation remains in the outer layers, from where it later evaporates.
Finishing the overhang with corrugated sheets
In order to cover the overhang with corrugated sheets, a special profile is attached to the front board. A profiled sheet cut into strips of the required width is inserted into its groove. The second edge of the hem is attached to a board nailed to the ends of the rafters. The joint between the filing and the board is closed with two droppers - one is nailed from below, covering the lower half of the board, and the second - from above. The edge of the waterproofing film is then placed on it.
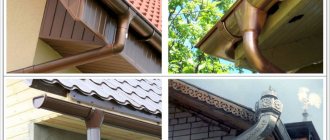
If a drainage system is to be attached, then the hooks for the gutters are nailed after installing the lower drip line. The top dropper is nailed after installing all the hooks.
How to hem a roof overhang with corrugated sheets
See how to make a roof valley here.
Connecting corrugated sheeting to the wall
In some cases, a roof made of metal profiles is adjacent to the wall of a structure. How to make a connection so that there are no leaks? There are two options (see picture). Both use a corner strip, only it has a different size and a different profile.
How to connect a corrugated sheet roof to a wall
You can take a corner strip with shelf dimensions of 150*200 mm. The shorter side is placed on the wall, the longer side is placed on the roof. They are attached to the wall using fasteners depending on the material from which it is made (nails or self-tapping screws if it is wood, dowels if it is brick and building blocks). The joint between the planks and the wall is sealed with silicone sealant. From the roof side, the plank is attached to the crest of the wave, installing special self-tapping screws with rubber washers. Their length is determined in the same way as when connecting adjacent sheets of corrugated sheets (wave height + 20 mm for entering the sheathing board).
The second option is more labor-intensive: a groove (groove) is made in the wall, into which a corner strip with shelves bent at 45° is inserted. The fastening in this case is similar, the difference is in the size of the bar - it can be 100*100 mm or so.
Pipe passage
Many questions arise when sealing the passage of a chimney pipe or ventilation through a corrugated roof. The cross-section of pipes is round and rectangular; each type has its own solution.
For the passage of round pipes through the roofing material, there are special steel or polymer aprons. Their upper part is made in the form of a cone, the lower part - the skirt - is made of elastic material that can take a given shape. The apron is placed tightly on the pipe and lowered so that the “skirt” rests on the roofing material. Next, you need to give the elastic skirt a corrugated shape. Use a hammer for this (regular or rubber - depends on the type of apron). To prevent water from flowing under the skirt, coat the joint with sealant and press it well.
After securing the skirt, fix the neckline. If the apron is metal, cover the top with a clamp, tighten it, and coat the joint with sealant. When using a polymer apron (master flush), it is put on the pipe with considerable effort (sometimes you even need to lubricate the pipe with soapy water), but the joint, nevertheless, is sealed with sealant for reliability.
With a rectangular (brick) pipe, everything is somewhat more complicated. Elements are cut out of metal sheets to cover the joint with the roofing pie.
Organization of a rectangular pipe bypass on the roof
How to fix a roof with your own hands
It happens that after a certain period of time, the roof covering may leak or sag, and other problems may appear that you can solve yourself.
How to raise a roof from different materials
In order to raise the roof of the garage, you must follow the basic rules:
- Structures made of wood, brick, foam blocks must be lifted only with an installed frame made of metal channel grade 14U.
- If the roof weight is less than 12 tons, then using one hydraulic jack will be sufficient.
- You can lift the structure no more than 5 cm at a time.
Lifting a wooden frame
To raise a wooden garage roof you need to:
- Prepare a rigid frame for the base. To do this, a frame is made from a channel, which is bolted to the inner walls of the roof.
- If the foundation inside the garage is unreliable, then it should be strengthened in the corners of the room.
- Using a jack, raise one corner of the roof to a height of no more than 5 cm. If you do not follow this rule, the structure may move to the side.
- Place a support from a channel or thick log. The base should be strengthened with bevels.
- Raise the remaining corners of the roof and install supports.
- Make brickwork with cement mortar.
- After a few days, you can remove the supports and seal the joints.
If desired, the height of the garage can be changed
Lifting the metal frame
To raise a roof with a metal frame you must:
- Make sure that the rafter system is not damaged by corrosion. If this happens, then its base must be strengthened with channels, making a metal frame.
- Using a jack, raise the sides of the roof one by one to a height of 5 cm.
- Insert bricks into the resulting openings, which will serve as temporary stops.
- Using a circular saw, cut strips from metal sheets 8–10 mm thick. Their width should correspond to the height of the opening.
- Using a welding machine, weld these strips to the base of the roof and the wall of the garage.
- As an additional strengthening of the entire garage structure, install profile square pipes in the corners.
You can raise a metal roof using jacks
Concrete roof
To raise a concrete garage roof you need to:
- Make sure that the foundation where the support is installed is quite strong. Install them starting from the corner. To do this, it is convenient to use formwork jack stands or telescopic spacer posts.
- Raise the ceiling to a height of 5 cm and fix the jack on the stand.
- Do the same steps with the remaining sides of the roof.
- Fill the resulting openings with brickwork and cement mortar.
- After a few days, when the masonry has hardened, remove the stops and jacks.
How to Re-Lay and Seal a Rotten Roof
To repair a rotten roof, you will first need to remove the old covering. To do this, it is convenient to use a scraping knife.
The procedure for repairing a damaged roof is as follows:
- Remove coating.
- Replace any damaged plywood or wood sheathing components.
- Use a grinding machine to sand problem areas of the frame.
- Apply antifungal impregnation to the wooden elements of the roof structure.
- Lay a layer of felt consisting of paper, polyester impregnated with asphalt over the entire surface. Secure the edges of this material with nails.
- Using a gas roofing torch, lay the roofing material on the roof surface.
- Make a lathing from the slats in increments of no more than 50 cm.
- Install profiled material on a wooden frame.
Using the recommendations received, you can install a pitched roof without outside help, cover it with a roof, increase the height of the garage and protect its premises from humidity and temperature changes.
Roof reinforcement
To reduce the impact of the expansion force on the Mauerlat and increase the strength of the roof, the rafter legs must be fastened together using beams whose cross-section is 5x15 cm.
This design detail is called a “crossbar”.
So, the size of the crossbar and the distance between the rafter beams that need to be connected correspond to each other. Fastening should be done using nails.
It is also necessary to take care of attaching a filly to each rafter leg, which is a board with a cross-section of 50x100 cm. It is secured with metal brackets and screws to one side of the rafter leg.
Its length is calculated in the following way: add 50 cm to the length of the overhang.
To avoid difficulties, you need to think about preparing the filly in advance. To do this, a cutout is made on the board, the width of which is 15 cm, with which it is attached to the Mauerlat.
Particular attention must be paid to ensuring that the boards and rafters fit together exactly. It is better to complete all this work before the construction of the rafter system begins, so that then you can simply assemble the entire structure.
At this stage, you also need to choose the angle of inclination of the roof. To make the right choice, it is necessary to take into account the specifics of the area. For example, in the presence of heavy rainfall and a fairly cold climate, an inclination angle of 40 to 45 degrees is considered ideal.
Snow does not accumulate on such a roof, which avoids increasing pressure on the floors. The distance between the rafter legs should be 1 meter.
In hot and dry climates, the minimum tilt angle is 3 degrees.
In areas with frequent strong winds, the optimal tilt angle is considered to be 20 degrees.
For an accurate calculation, you should use the rules used by professionals.
Builders measure this value using a special tool - an inclinometer. Before starting measurements, you need to calculate the required angle.
For this, a special formula is used: the angle of inclination is equal to the height of the ridge divided by the figure obtained by dividing the length of the roof by two.
Construction of a roof for a garage
How to make a pitched roof with your own hands? We will consider this issue using the example of the construction of such a popular object as a garage with a pitched roof.
Before you start building the roof, you need to do some preparatory work.
As a rule, you need to start with choosing the material for its arrangement. The following options are possible:
- tiles;
- metal profile;
- metal tiles;
- ondulin;
- roofing felt
Each material has its own characteristics and advantages, which must be taken into account in each specific case. The next thing to do is calculate the angle of inclination of the pitched roof. Typically a 25 degree tilt will be more than enough. The minimum slope may be different, it all depends on the design features. The slope affects the ability of the roof to remove accumulated snow and precipitation from the surface. As a rule, water will be retained on a metal profile more than on other materials
Also, when calculating the angle of inclination, you need to take into account the location of the building, it does not matter whether it will be a pitched roof of a garage or a house. If the area is windy, then the angle can be made a little smaller
Well, if the building is located in a quiet, shady forest, where there is almost no wind, the angle is made larger.
For construction you will need:
- rafters (the rafter system of a pitched roof has its own characteristics);
- beams;
- sheathing, possibly even ceilings.
Then you can move on to the process itself. The construction of such an object as a pitched roof with your own hands will step by step look like this:
Particular attention is paid to the construction of beams. The design is such that they should be at a distance of 0.7-0.8 m from each other
Installation is carried out on a seismic platform or mauerlat. A shed roof for a garage is designed in such a way that its lower part is located on the leeward side. Next, rafters are mounted to the beams, which provide support for the highest part of the roof. The number of rafters and beams should be the same. As a result, you should get a right triangle of beams and a vertical rafter board. After this, a rafter leg is installed, which will later serve as a support for the sheathing. One edge of it is on the edge of the beam at the bottom of the roof, the other is on the vertical rafters.
For each beam, all actions from the above points are repeated. Upon completion, installation of the sheathing begins. It is organized using 50x50 mm bars, which need to be nailed across the rafters. The step between them should be such that the slate sheet (as an option, using this material) can cover with a margin the standing slats on each side by 15 cm.
Having gone through all these stages, you can only get an incomplete answer to the question of how to make a pitched garage roof, because at this stage only the construction of the frame has been completed. After this you can move on to the roof. If slate is used, then installation should begin from the bottom rows. Fastening is carried out with special slate nails at the joints of four slate sheets. In addition, 2 more such nails are nailed to each sheet along the edges, which will prevent it from being lifted by gusts of wind. After which the roof can be insulated.
Flexible bitumen shingles
To make it easier to overlap and distribute the tiles evenly, the process should start from the middle of the eaves. Remove the protective film from the shingles and glue it to the base.
Then they are nailed along the edges. The best option is galvanized nails with fairly wide heads. The joints of the shingles should be covered with tabs.
If the design assumes the presence of pipes, then special passage elements are attached along the perimeter of the shingle cutout. The tiles should be glued overlapping where the ridge is.
If you have a brick chimney that gets hot, it would be better to place a triangular shaped block at the corner of the chimney and the roof. At a distance of approximately 20 cm from the pipe, a lining carpet is laid, and a special connector is put on the pipe. The cracks should be sealed with sealant.
Advantages of corrugated roofing
Compared to other roofing materials, corrugated sheeting has the following advantages:
- light weight and possibility of dense packing. Both factors facilitate the delivery of material to the site, including in areas difficult to reach by conventional transport. The light weight of the sheets allows them to be lifted onto the roof of a building without lifting and transport equipment or with minimal use of it. Only the windage of the panels can hinder the rise;
- no temperature or weather restrictions during installation. To install the roof, there is no need to wait for the warm season or dry weather; with a prepared base (roofing “pie” with hydro, heat and sound insulation), the roof can be laid at any time. To avoid inconvenience and getting the base wet, experts still advise not to carry out roofing work during prolonged rains or snowfall;
- high resistance of the material to atmospheric precipitation (including aggressive ones when the building is located in an industrial area), durability. These parameters are maintained provided they are installed correctly, without damaging the protective layer on the steel sheets;
- the possibility of any color scheme for the roof (most manufacturers offer a wide range of shades of protective coating on corrugated sheets);
- ease of installation and the absence of strict requirements for tools and construction skills of performers;
- reasonable price.
It is also worth mentioning the attractive and modern appearance of the house, in which the roof of the house was finished with corrugated sheets.
Installation technology
The process of installing new roofing material includes the following steps:
- Installation of sheathing.
- Laying waterproofing and parainsulating layers.
- Installation of insulation.
- Roof installation.
The work is carried out in the following order:
First, the rafters are checked or installed. For their manufacture, dry wood without cracks and knots is used.- Then a layer of insulation is laid between the rafters, and waterproofing material is laid on top of it. Rolled materials must be laid with an overlap of 10-15 cm at the joints.
- At the next stage, the sheathing is filled. It must be level so that the future roof can be installed efficiently and without defects.
The roofing covering is laid starting from the lower slope towards the ridge. In this case, it is necessary, using a level, to control the evenness of the laying of each element.
especially important to properly install the valley, as well as elements adjacent to ventilation shafts and pipes . Upon completion of the above work, the roof ridge is installed.
Photos of works
Covering the roof of a house with an attic with corrugated sheeting Cost: 26,000 Area: 43 sq.m. Duration of work: 6 days. Covering the roof of a shopping center with corrugated sheets Cost: 51400 Area: 108 sq.m Duration of work: 12 days. Covering the roof of the gazebo with corrugated sheeting Cost: 5800 Area: 12 sq.m Duration of work: 2 days.
Covering the roof of a business center with corrugated sheeting Cost: 43600 Area: 85 sq.m Duration of work: 9 days.
Covering the roof of a house in the garden with corrugated sheeting Cost: 30400 Area: 67 sq.m Duration of work: 9 days.
Covering the roof of the cottage with corrugated sheets Cost: 29800 Area: 58 sq.m Duration of work: 10 days.
Slate
This is one of the most popular coverings for the roof of a house. Good performance qualities, large-format elements and an affordable price have recommended slate as an ideal option for budget construction. But there are a few points:
Advice! If, in the process of covering a roof with slate, you need to cut a piece, the easiest way is to use a grinder with a trimming disc
Laying the corrugated sheet
The final stage is installation of corrugated sheeting. It is desirable that the sheets be equal in size to the length of the slope - the distance from the ridge to the edge of the rafters, with a margin of 5-8 cm.
During the production process, we do not forget about careful handling of sheets. Each sheet is carefully removed from the stack and conveyed along wooden guides to the roof of the old house.
Important! Careful handling of corrugated sheeting will help protect the surface from scratches and dents.
Correct installation of sheets depends on how carefully the preparatory measures are carried out. The crucial moment is the verification and installation of the first sheet of the roof of the old house. It is he who will set the direction for laying the remaining elements of the roof of the old house.
For this purpose, it is necessary to screw limiters onto the roof of the old house to the outer rafters - small slats 20 - 35 cm in length. They must be installed in the same plane with the entire rafter system. Self-tapping screws are screwed into these slats at a distance of 5–7 cm from the cornice so that the head protrudes above the wave of corrugated sheeting.
This is necessary so that a metal string is stretched between the screws. Installing the first row along such a guideline will greatly simplify the work and prevent the material from going to the side.
Each sheet of corrugated sheeting for covering an old house is fastened using special screws - self-tapping screws at the rate of 7 - 9 pcs./m².
Important! The tightening torque of the screw must be pre-adjusted so that the press washer does not deform the iron of the roof of the old house.
It is better to install the wind corners and ridge immediately after installing the top row of sheets. So, there is less risk of scratching or making a dent on them. The ridge is secured with long screws - self-tapping screws with a press washer.
Video. Re-roof an old house.
What else to read on the topic?
Mounting the Mauerlat
The foundation, which takes on the main part of the load, is the Mauerlat.
The entire roof is built on it. Beams with a cross section of 15x15 cm are used. They are installed parallel to the roof ridge.
For the strength of the roof and resistance to adverse weather conditions, the Mauerlat beams should be securely fastened, and care must be taken about this already when laying the walls.
For this purpose, a strong thick rope is laid between the masonry blocks (bricks) at a distance of 1 meter, starting from the fourth floor. It's called wire rod.
The middle part of the wire must be secured in the brickwork, and the ends should be left hanging. Their length should be sufficient for subsequent tying of the timber. If you plan to plaster, then the outer end of the wire will need to be mounted in the solution.
Photo: fastening the Mauerlat with twisted wire
The Mauerlat must retreat from the edge of the wall by at least 10 cm. To protect the beams from rotting, layers of roofing felt must be laid under them.
On a solid foundation
As a rule, in low-rise housing construction, the flat roofing is a prefabricated or monolithic reinforced concrete slab. Reinforced concrete slabs (PB, hollow PC, PV, etc.) are capable of covering a span of up to 9 m in length and can withstand a pressure of 8, 9 or 12.5 kPa (this value is indicated by the last digit in the product labeling). They can serve as a “base” for any roofing pies, including those with a top layer of paving slabs or fertile soil. However, to install the structure, it will be necessary to ensure that a truck crane can enter the site (while steel beams and flooring can be easily lifted using winches). The depth of support of the ceiling on the wall depends on the material of the latter - for example, for brick this parameter should be equal to the thickness of the slab
Before proceeding with the installation of the roof, it is important to seal the joints of the elements with mortar and additionally seal them with elastic polymer tape
Photo: ARBO
The main advantage of membranes based on artificial rubber is that they retain elasticity at low temperatures, that is, they can be installed in winter
A monolithic reinforced concrete floor is erected from heavy concrete using removable (for example, from OSB boards on jack stands) or permanent (from corrugated sheeting) formwork. It is reinforced with a two- or four-level welded frame made of rods with a diameter of 12 mm. The dimensions of a monolithic slab are not regulated (unlike a prefabricated one), which provides the architect with freedom when designing a building; other advantages are the absence of seams, the comparative simplicity of the installation of passage units (chimney, ventilation ducts) and high load-bearing capacity (subject to compliance with technological regulations).
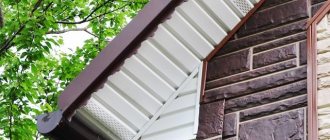
Cornice filing
This work is carried out at the final stage. The walls should already be insulated, since the frame box should fit closely to them. Otherwise, it will be necessary to either break the sheathing or leave a section of the wall uninsulated.
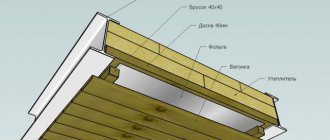
It is preferable to make the lining from wood. This will eliminate the need for additional ventilation. The hem is a kind of box attached to the extension of the rafters and the fillet.
The photo shows the design of the eaves overhang
Its frame is made up of two boards, one of which goes from the end of the overhang towards the wall, while the second goes down from the rafters. The boards are connected at right angles. Self-tapping screws or self-tapping screws are used to secure the connection points.
Metal plates are also used. It is imperative to leave small gaps between the boards. The corners of the box are cut at a certain angle, and they are secured using metal brackets and self-tapping screws.
Then the lower part of the frame is covered with boards along its entire length.
Since they are exposed to the environment, they must be secured very carefully, especially around the edges. It is also necessary to pay attention to the fact that the joints of the rows of adjacent beams do not coincide. The corners need to be filed at 45 degrees.
Question answer
Depending on the chosen coverage and area, turnkey roof installation can take from 25 to 90 days. When contacting us, along with a compiled estimate, the client always receives an accurate calculation of the time frame and a step-by-step work plan. Mandatory safety elements that are installed on the roof include:
- Snow guards: installed on all pitched roofs and protect against the fall of large amounts of snow
- Fencing: installation of these elements on flat roofs of high-rise buildings, such as multi-storey buildings and industrial buildings, is mandatory.
- Seals: used to prevent dust and moisture from getting under the finish coat
- Ladder: placed on all types of pitched roofs in order to be able to safely move along the coating during inspection and repair
There is no definite answer to this question, since both materials have a long service life and beautiful appearance. For simple roofs, both options are suitable, but when installing complex roofs, we recommend giving preference to soft tiles. When choosing from two coating options, it is also worth considering that the total cost of a soft roof (including preparation of the base, the price of material and installation) will be 30% higher than metal tiles. To contact our company, you only need to know the approximate size of the roof, since before drawing up an estimate, a roofing specialist must independently perform all measurements and calculations
Please note that when calculating the area of roofing work, the full area is taken into account, including dormers, pipe outlets and other elements. The main materials used for sound insulation are polystyrene foam, ecowool and mineral wool
In order not to make a mistake with the choice of material, we recommend that you first focus on the noise absorption index, which should not be less than 0.6
It is also important that the insulating material is laid in places adjacent to the rafters and internal cladding and has no gaps between the insulating layer and the enclosing structure. Each type of coating has its own service life.
When installed correctly, the service life is:
- for soft roofing 25 years
- for metal tiles and corrugated sheets 30 years
- for roll materials 20 years
- for bitumen coating 15 years
- for polymer tiles and seam roofing 50 years
Call us or write to [email protected]
We carry out any roofing work: we comply with all technologies and SNIP. We give a guarantee from 6 to 9 years! We will calculate the price per 1 m2 within an hour after your request. ORDER
Is the roof slab made of reinforced concrete or the floor made of wood?
In Russia, wooden materials have long been used to create floors in buildings made of wood or stone. They are still used in the construction of private houses today. To extend the life of wooden materials, modern compounds are used, ranging from antifungal to fire-retardant impregnations. Despite this, reinforced concrete floor slabs are safe, durable, and multifunctional.
To select a contractor who is ready to provide professional assistance in preparing documents on a land plot and a house construction project, we recommend using the company search in the Building Companion catalog. In the contractor’s profile, you can view reviews, portfolios, and request an estimate of the cost of the work. Get advice from specialists on preparation for construction »
The roofing arrangement is carried out using reinforced concrete slabs with a length of 1.5 to 12 meters. It is possible to produce slabs with an accuracy of 1 centimeter. The standard thickness of products is 200 mm, and the width is from 1.2 to 1.5 meters. Inside the reinforced concrete floor slabs, voids are left, thereby reducing the cost of production of products, as well as their weight. Because of this, the installation process is simplified.
Specifics of installing slate and ondulin
Ensure the roof is airtight by performing work according to the following algorithm:
Install the sheathing. Use boards with a thickness of 15 mm for ondulin, and 25 mm for asbestos-cement slate. Maintain a lathing interval of 30 centimeters.
- Install waterproofing using an underlayment type of roofing felt. Glue the layers with bitumen.
- Lay the sheets, ensuring an overlap of half a sheet. Distortions are not allowed.
- Use special nails that have a seal for fixation.
- Secure the ridge and secure the cornice below.
You are convinced that the overlap technology is simple. Get everything you need and be patient.
The cost of roofing with corrugated sheets per 1m2
| Installation service | Simple roofing (price per sq.m.) | Complex roofing (price per sq.m.) |
| Mauerlat (support for rafters) | from 500 rub. | from 650 rub. |
| Rafter system | from 550 rub. | from 750 rub. |
| Counter-lattice | from 80 rub. | from 100 rub. |
| Step lathing | from 120 rub. | from 190 rub. |
| Solid plywood base | from 130 rub. | from 200 rub. |
| Ventilated skates | from 430 rub. | from 600 rub. |
| Cornice frame | from 360 rub. | from 460 rub. |
| Antiseptic wood | from 70 rub. | from 90 rub. |
| Finish coating | Simple roofing (price per sq.m.) | Complex roofing (price per sq.m.) |
| Soft tiles | from 210 rub. | from 350 rub. |
| Metal tiles | from 400 rub. | from 500 rub. |
| Bitumen coating | from 400 rub. | from 500 rub. |
| Ceramic tiles | from 700 rub. | from 900 rub. |
| Corrugated sheet | from 200 rub. | from 420 rub. |
| Seam covering | from 320 rub. | from 500 rub. |
| Ondulin | from 380 rub. | from 500 rub. |
| Sandwich panels | from 450 rub. | from 550 rub. |
| Polymer tiles | from 250 rub. | from 300 rub. |
| Roll coating | from 350 rub. | from 550 rub. |
| Slate | from 350 rub. | from 500 rub. |
| Accessories | Price per sq.m |
| Installation of cornice strips | from 200 rub. |
| Installing a gable strip | from 150 rub. |
| Installation of junctions | from 150 rub. |
| Installation of the valley | from 200 rub. |
| Service | Price per sq.m |
| Waterproofing | from 80 rub. |
| Vapor barrier (with gluing of overlaps) | from 80 rub. |
| Insulation | from 100 rub. |
| Insect net | from 150 rub. |
| Installation | Price per meter |
| Gutters | from 350 rub. |
| Drainpipes | from 300 rub. |
| Service | Price |
| Installing a soffit on a frame | from 200 rub. |
| Installation | Price |
| Petal snow retainer | from 430 rub. |
| Tubular snow retainer | from 350 rub. |
| Window installation | Price |
| In a new roof | from 2500 rub |
| To the finished roof | from 3500 rub. |
| Removing the roof pie | Simple roofing (price per sq.m.) | Complex roofing (price per sq.m.) |
| Roof covering | from 100 rub. | from 200 rub. |
| Insulation | from 10 rub. | from 60 rub. |
| Lathing | from 50 rub. | from 100 rub. |
| Rafter system | from 150 rub. | from 250 rub. |
| Dormer windows | from 1000 rub. | from 2000 rub. |
| Drainage system | from 80 rub. | from 150 rub. |
Read with this
- Beautiful roofs of houses with an attic and a balcony: photos, interesting ideas (103 photos)
- Sloping roof rafter system: nuances of calculations and design + examples of construction
- Roof height in relation to the width of the house and how to calculate the height of the ridge for different types of roofing
- Houses made of kiln-dried profiled timber
- The roof of the Sudykina structure
- Step-by-step process of covering roofs with soft roofing
- Hip roof calculation
- Hanging rafters: overview of structures + installation diagram of hanging rafter systems
- Hut house: review of ready-made design projects and 80 comfortable and modern implementations
- What kind of roof ridge is there, the structure and rules of fastening
