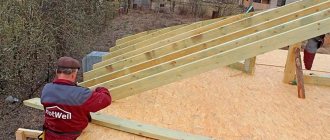
Mauerlat is a wood material used to frame the frame of a building. This is the future basis of the roof structure, taking on all the weight. For this reason, special attention is paid to the choice of durable material, methods of fastening to the base and elements to each other. To control the quality of construction of civil and administrative construction projects, a standard is usually used; for this reason, many private builders and teams are interested in the cross-section of timber for the mauerlat and the types of fastening determined according to GOST.
timber
Choice of material and its features
As a rule, a wooden beam, an I-beam, a channel or other various metal products are used for production:
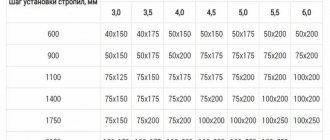
- Wooden beam . When using timber for the Mauerlat, the section dimensions should be as follows: 100×100 mm, 100×150 mm, 80×180 mm, 150×150 mm or 200×200 mm. When laying it, it is placed around the perimeter of the walls. The main factor in choosing timber will be the absence of knots, since the Mauerlat works in tension, and if there is a knot, a break may occur at this place.
- From bonded boards . If the roof is very light, without insulation and has a small area, you can use two nailed together boards of the same cross-section.
- Steel pipes . Often, when organizing a Mauerlat, beams made of steel pipes are used. They are a frame that does not protrude beyond the perimeter of the wall.
Such pipes work very well in bending, and round holes do not reduce the strength of the wooden rafters themselves. The main advantage is that the wooden Mauerlat is hidden under the roof and is not affected by snow, moisture and other factors.
Useful tips
Filling the armored belt is required if the roof area is more than 250 m2. In some cases, however, you can replace it with a concrete beam. Studs are immediately inserted into this beam and placed vertically. The thread of the studs is usually M12. There must be a gap of at least 2 meters between the installation points of the studs; at the same time, they are also attached near the ends, so you can count from the corresponding points.
For medium-sized roofs, pouring the beam is not necessary. Its absence is fully compensated by the use of moderately long hairpins. When arranging the Mauerlat using wire rod, you must plaster it so that the wire does not spoil the appearance. This solution is suitable for roofs of limited size.
You can see one of the ways to attach the Mauerlat in the following video.
Installation and assembly of the structure
To allow air ventilation in the roof space and prevent rotting of the roof elements, the top of the Mauerlat is placed on the wall with a distance of 300 millimeters from the edge of the ceiling.
There are two main ways to install and assemble this structure:
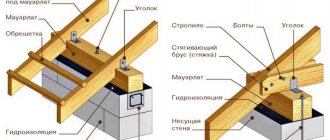
- The mauerlat bars are connected into a single box along the entire length of the external walls of the building. They are connected by an oblique cut, secured with bolts, nails or self-tapping screws. And the corners are additionally pressed with plates or metal corners. As a result, such a rigid frame, running along the entire perimeter of the house, accepts the expansion and compensates for the stretching and bending of the rafter system.
- Along the entire perimeter of the wall, a concrete belt with a protrusion for the anchor is poured. This method is only relevant for walls made of foam concrete blocks and similar materials. The beams, pulled by anchors, distribute the vertical load and lower the thrust to the base of the building.
Installation without reinforced belt
With this method, the rafters are attached directly to the floor beams. Only if the walls and beams have a sufficient level of reliability. The work is carried out in the following order:
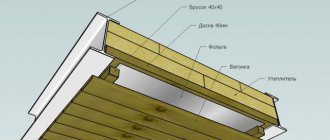
- To erect the roof you will need timber and edged boards.
- The timber is laid out under the beams along the perimeter of the roof. The timber is chosen with a cross-section of 50×150 millimeters.
- To protect the wood from moisture, waterproofing is done with roofing felt.
- The roofing material is bent to the required length and cut.
- Beams are installed at the required distance from the edge of the wall.
- Roofing felt is laid around the beam and secured with a furniture stapler.
Creating a reinforced belt
The most difficult thing about making it yourself is erecting a mauerlat on walls made of aerated concrete. It is recommended to make a brick or concrete structure on top of foam concrete, since the Mauerlat requires a dense base.
To create a solid foundation to avoid pushing through and destroying the walls with timber, a reinforced concrete strapping belt is constructed. It consists of a concrete strip measuring 200 by 150 millimeters. The main factor for correct installation is the calculation of the number and location of stud installation sites, while the number of rafters and fasteners must be equal.
The thickness of the belt is calculated based on the load exerted by the roof, the weight of the rafter system and the roofing material.
The main material of the tape is M400 cement, pouring is done in one layer. The composition of the solution should be in proportions 1: 3: 3, cement, sand and crushed stone. Additionally, you can add various plasticizers to the solution to reduce the percentage of water in the composition.
Assembly and selection of material for formwork
The main thing at this stage is that the armored belt is solid. Formwork can be constructed from OSB boards and edged boards. Throughout the entire work process, the horizontal installation of the formwork is controlled.
Selection of fasteners
On frame walls made of logs, the mauerlat is attached with self-tapping screws or ordinary nails. For better contact, perforated tapes are used.
If the roof has an area of more than 250 square meters, then the Mauerlat is attached only to studs, in increments of 150 centimeters along the perimeter of the wall. First, the concrete screed is poured, and then the studs are installed into it. In this case, their height should be greater than the height of the beam, with a margin of 30 millimeters.
Concrete pouring work
The thickness of concrete pouring must be at least 50 millimeters. As soon as the layer is filled, make sure that no air cavities are formed; they can be detected by the emerging bubbles. Such cavities are dangerous because they reduce the strength of the structure.
The formwork can be dismantled 12 days after pouring, when the solution has completely set.
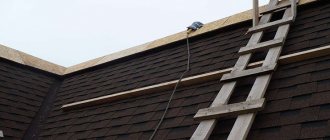
Laying waterproofing materials
Mauerlat without waterproofing will not last long; over time it will become damp and begin to rot. To prevent this process, you need to waterproof it with roofing felt. Laying is done with a tape slightly wider than the beam, the main thing is to prevent the material from tearing during the work in the places of the holes for the studs.
How to make a Mauerlat on your own
To ensure reliable fastening, it is important to mount the beams correctly and ensure a strong connection between the elements. After laying the Mauerlat, you need to secure the roofing structure to it
After laying the Mauerlat, you need to secure the roofing structure to it
Let's consider the sequence of operations for installing a Mauerlat made from a wooden beam with a square profile:
- Thoroughly clean the upper surface of the load-bearing walls from debris and mortar buildup.
- Lay a double waterproofing layer of polyethylene film or roofing felt.
- Cut the support beam into pieces, the total length of which corresponds to the perimeter of the box.
- Cut the corner areas of the joint, as well as the end plane in the areas where the timber is built up.
- Apply an antiseptic composition to the surface of the wood and treat it with fire-resistant impregnation.
- Mark the rafter attachment points using a tape measure or a template in the form of a regular board.
- Drill holes in the beam, ensuring they are perpendicular to the supporting surface.
- Connect the beams of the support frame using threaded connections, an oblique cut or self-tapping screws.
- Reinforce perpendicular beams with metal plates or special brackets.
- Attach the roof plate to the upper tier of the main walls using the selected fixation method.
- Check that the support structure is positioned correctly and is not distorted using a level.
If necessary, you can use shims to correct minor distortions. It is easy to attach rafter beams to a securely fastened Mauerlat using any of your favorite methods.
Options for fastening the rafter system
As mentioned above, the main task of installing a power plate is to distribute the load. Therefore, you also need to pay special attention to the fastenings of the rafters, as they transfer the load to it. It depends on this whether the roof will shift or subsidence over time. And this can happen if one of the rafter legs creates a stronger load than the one standing next to it.
There are two methods for tying rafters to timber:
- Tough. When using this method, any possible displacement of the rafters, bends or shifts is eliminated. For a more stable installation, a hemming block is used, which will not allow the rafter leg to move. And metal corners will prevent the rafters from moving horizontally. In most cases, ordinary wooden boards are used for rafters, but their disadvantage is that they absorb moisture and swell quickly. It is very important to secure them to the Mauerlat to prevent the formation of a thrust force, which can reduce the service life and reliability of the structure. To do this, the saddle of the cutout at the end of the rafter leg rests against the Mauerlat and is firmly secured with nails driven at an angle. The cutouts on the rafters must be strictly identical and not exceed one third of the width of the rafters.
- Sliding. This fastening is used if the main frame of the building was made of logs or timber, which during the first time after laying give rise to sediment due to the drying of the wall material. In this case, the Mauerlat is no longer used; its role is played by the upper crown of the wall. To compensate for the movement of the log house without harm to the roof, sliding angles are used, which allow you to change the height of the rafter leg attachment. This type of fastening is also called hinged. Depending on the type of wall material, they all have different shrinkage rates. Glued laminated timber sags the least, and most of all fresh rounded logs, which during the drying process can lose up to 15% of their height, which will further skew the roofing system. Roof misalignment can also occur during the operation of the building, for example, during periods of high humidity; during prolonged rains, the wood swells greatly, and in winter it loses most of its moisture. Moreover, different parts of the walls and sides, depending on their location, have different shrinkage coefficients. Over the entire period, the technical and dimensional parameters of the log house are constantly changing. And interior walls are no exception, especially in winter, when a large temperature difference is recorded.
Mauerlat connection along the length
This type of structure requires a large length of timber. Most often, you have to splice wooden blocks together.
There are several connection options:
- oblique cut The timber at the joints is sawn obliquely with ends 0.15 of the section height. The length of the connection should not be less than the height of the Mauerlat multiplied by two. The connection point is bolted through and through. This method is perfect for connecting the Mauerlat along the length;
- "in the paw." This method is suitable for corner joints. For one beam, the lower part of the joint is cut at a right angle, and for the second, the upper part is cut out. The connection point, as in the previous case, is tightened with a bolt. Right angles do not allow the Mauerlat to move.
Basic installation details
The Mauerlat beam should be laid no further than 50 millimeters from the outer edge of the wall. In the case of a gable roof, the timber must be laid parallel to the ridge of the roof, along the entire axis of the wall on the load-bearing walls of the house.
But also when installing it, it is important to ensure that the timber is laid horizontally, using a building level. If a deviation occurs, measures must be immediately taken to eliminate this deficiency.
The timber under the Mauerlat needs to be prepared, treated with an antiseptic and a fire retardant. Before fastening, lay the beam in its place and mark where the holes will be located. Individual sections of timber must be connected with a straight lock, additionally secured with nails. And also additionally securing it at the corners with a straight lock or an oblique cut. The Mauerlat can be attached to the boards using corners or metal brackets. Tighten all threaded connections using locknuts or with a groover backing and washer, and trim the excess length of the stud with a grinder.
The cross-section and fastening of the Mauerlat are not defined in GOST
To determine the parameters or check whether the selected section is sufficient for your purposes, you can refer to the standards that determine the dimensions of lumber from different types of wood for the national economy. However, the tolerances for the Mauerlat are not defined in GOST; any can be used, based on construction experience.
In other words, the choice of cross-section, wood and fastening is made for practical reasons, the location of the house, as well as other raw materials, for example, boards for sheathing. If your region has relatively low wind loads and there are no tensile strength requirements, you can rely on natural rigidity and fasten the frame without a lock. This is exactly how many construction crews do their work.
Waterproofing under the Mauerlat
If you plan to have a rather heavy attic structure covered with boards with insulation, laying a reinforcing belt under 5 rows of bricks and fixing the beam with rail anchor bolts will help securely fasten it. It is recommended for large houses to use premium quality hardwood, type 200*200. This design is used in regions where there are frequent gusty winds, and is applicable in mountainous and northern regions.