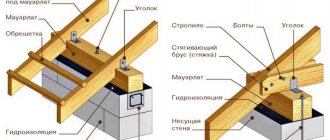
Types of rafter systems
Depending on the design solution, the rafters can be layered, hanging or combined.
When selecting a design, you need to take into account the size of the span and the presence of internal load-bearing walls. Construction of a gable roof rafter system
Layered rafter system
This type of structure consists of rafter legs resting on external and internal walls. The beams seem to “lean”, while in the system there are no horizontal pushing forces, which are perceived only by capital supports.
A variant of the simplest layered system
Due to lower voltages, the “layered” system has a simpler and cheaper design. Mauerlat can be laid both along the perimeter of the building (if the walls are not strong enough) and in separate sections - in short pieces of 60-70 cm in places where the rafters support.
To strengthen the system and reduce deflections, purlins, struts, and racks are used. They redistribute stress, which makes it possible to reduce the cross-section of load-bearing elements.
In the ridge unit, the rafters are connected with an overlap or butt. Additionally, linings on bolts or dowels are installed.
In buildings made of timber or logs, the role of the Mauerlat is played by the upper crown. The lower end of the rafters is cut into it, which is additionally secured with wire twists or staples.
Connecting the rafter leg to the mauerlat using cutting and nails
Layered systems are assembled locally at height. All elements are mounted sequentially. For temporary fixation, various devices are used, such as supports or a board screwed to the facade. Assembly is speeded up by laying the purlin (ridge beam) before installing the rafters.
Movable method of fastening rafters and mauerlat
The advantages of layered structures are the possibility of assembly without lifting mechanisms, less effort in the system and, as a result, the use of small-section lumber. Disadvantage: for spans of 6.5 m or more, an internal load-bearing wall is required.
Hanging rafters
Unlike the layered system, this type is used in the absence of an intermediate capital support and a sufficiently large span (from 6 to 14 m). The forces in the lower belt are significant, so additional elements are introduced - horizontal tie-rods or crossbars, vertical headstocks supported by tie-rods.
Very often, a hanging system combines the functions of a ceiling, that is, the lower beams are used as a basis for the ceiling or floor. For spans up to 5 m, the rafters are connected by tightening, over 6 m - reinforcing crossbars are added, over 9 - the design includes additional inclined and horizontal connections. A separate fragment of a roof made of rafters, ties and ties is called a truss.
Rafter legs fastened with a crossbar
Large sections are assembled on the ground. They are lifted to the roof using mechanized devices and installed on the Mauerlat. A lining of waterproofing materials is first placed on the surface of the wall.
Diagram of a hinged truss with suspension and struts
Since the truss is a rigid element, attachment to the ridge beam is more complex than with the layered version. Here a notch is used, reinforced with wood or metal overlays.
Sometimes both systems are combined. Between the trusses, installed at intervals of 3-4 m, layered rafters are mounted. This somewhat simplifies and reduces the cost of construction.
The advantages of hanging structures are their high load-bearing capacity and the ability to cover large spans without intermediate supports. The disadvantage is that it is difficult to manufacture and install.
What types of roofs are there by design?
Pitched roof of dark color
The choice is very large, since there are many design solutions for the shape of the roof. The simplest option is a pitched roof. The most common is gable. Difficult to construct, but at the same time very convenient to use, is the hip roof.
How to determine which option is best suited for your home? First, you should decide on their main types. There are two of them - flat and sloped.
- Flat roof
Structurally, it is not very convenient, as it requires a large margin of safety. After all, it does not have convenient natural drainage, it is not easy to remove snow from it, and there may be problems with drainage of rainwater. It should be done when the roof is to be used as additional space on which you plan to place something. So in our conditions it is used quite rarely. - Pitched roofs
are available in a number of options and are much more convenient than flat ones. Suitable for a wide variety of architectural designs of houses, they require a smaller margin of safety than flat roofs. Snow comes off easily and water is easily drained. Therefore, they are widespread and exist in a wide variety of versions. They can be made in attic and mansard versions, which differ in the degree of insulation, and most importantly, in the design features. - Attic roof
An attic roof is simpler because it does not involve creating a living space directly under the roof. Therefore, such a roof is often made with one’s own hands, without the help of professional craftsmen. - Mansard roof
Mansard roof requires more complex thermal insulation conditions and other structural solutions. Since its construction creates additional functional living space. It is extremely difficult to build a mansard roof on your own.
The geometric shapes of pitched roofs also differ:
- Single pitch roof.
When the roof slope is directed in one direction throughout the entire length of the building. - Gable roof.
When the slope of the slopes throughout the entire building is directed in two opposite directions from the highest rib in the central part of the roof. This is one of the most common roof options. Effectively removes sediment. It is quite simple to implement, so it is a classic solution when building the roof of a private house with your own hands. It is also convenient that under this roof you can create an attic or attic space. - Hip roof.
The hip roof has four slopes, since instead of gables at the ends of the building there are triangular slopes - hips, which also improve the removal of precipitation from the roof. - Half hip roof.
The half-hip roof (aka Dutch) is an intermediate option between a gable and a hip roof, since the pediment is not completely replaced by hips. Only in the upper part is a small triangular slope above the pediment. It looks very impressive, but is not suitable for building the roof of a private house with your own hands. - Hip roof.
A hip roof consists of three or more triangular slopes that converge at one highest point. It is effective in removing precipitation and removes snow very well. But at the same time it is quite complex structurally and requires the help of experienced builders. Just like hip structures. - Complex types of roofs.
Complex types of roofs are multi-gable and broken. They are used for houses of complex architecture, with outbuildings and other design features. They are more difficult to create than previous designs and require precise calculations and careful markings. They are used much less frequently than the hip roof, and even more so the classic gable roof. - Dome and conical roofs.
A much rarer option are domed and conical roofs, which give houses an original look, but require skill during construction. And most importantly – the impeccable taste of the architect when creating them. Otherwise, they may look primitive and vulgar, despite the complexity of the design. This is what happens with extensions in the form of towers with a conical roof, which have recently become especially popular.
Additional materials on the topic
How to build a flat roof
More details
We are building a hip roof
More details
How to make a semicircular roof
More details
Your feedback, comments, questions
Dear visitors! We will periodically answer your questions in the comments as we are busy. In order for us to respond to you promptly (within an hour), you can: call, write a personal message or leave a request for a free consultation by phone.
Rafter system
Today, a special calculator is already used to calculate rafters. If we talk about general recommendations, then a suitable section is selected according to the following characteristics:
roof load each region has its own standards;- slope
; - type of
covering material; - the length of
the rafters and
the pitch
of their installation.
Rafter system for a frame houseSource 1karkasnydom.ru
The rafters in a frame house are the skeleton of the roof, so great attention should be paid to it; it is extremely important to carry out the calculations correctly. When choosing a section, you can carry out independent calculations, or you can use special construction tables. Below is a table with which you can select rafters
Below is a table with which you can select rafters.
Rafter installation stepSource mdv63.ru
The roof is conical. Essential elements
Installation is carried out on round elements, using a layered rafter system. This means that the rafter legs rest on the purlin in the form of a ring. The purlin is attached to the beam. It is necessary to carry out installation in such a way as to avoid loading on the highest point.
The second most important element of the support is the Mauerlat. Its installation is carried out in a ring. Installation is carried out on the walls. When placing the beam, it is important to consider one point. Where the central support is installed, the load is maximum.
It is impossible to imagine performing work without a ring ridge. Using braces, it is fixed in the central part of the support. The number of units and components must be determined in advance. It is better to delegate this task to specialists. This will avoid ridiculous mistakes when performing calculations.
It is important! One of the best materials for a rafter frame is laminated veneer lumber. It can withstand significant loads. For example, the weight of ceramic tiles is at least 40 kg per 1 sq. meter. In a word, you definitely can’t do without reliable rafters.
The rafter legs play the role of ribs. To calculate the exact quantity, take into account the type of roof and its characteristics.
Conical dome roof
A conical domed roof can be made either over the entire area of a country house, provided that its perimeter is round, or as part of a gable roof. The conical roof design uses only straight rafters. Basically, they use wooden beams with a section of 50x100 or 40x150 mm.
Conical dome roof.
The work begins with drawing up a project and there is such a nuance here. Despite the fact that the roof is conical, it is, first of all, dome-shaped, that is, it does not have a beginning, ridge, pediment and other elements inherent in gable roofs. All this allows for virtually no snow accumulation in the winter. This is where the catch lies for those who don’t know. Having decided that the load on the roof will be insignificant, its height is made small. The thing is that the design of the stops and spacers for the rafters directly depends on the height of the peak - the highest point under the roof. Let's consider two options.
The case when the attic space will not be used
If the attic is not planned to be used, then there is no point in having a high roof cone. The minimum permissible slope of the rafters should not be less than 15 cm per 1 linear meter. The lower ends of the rafters are mounted to the mauerlat with an outlet for further sheathing of the overhang. The upper ends of the rafters are connected to each other using knitting needles or self-tapping screws.
If the roof area is large, given that the roof slope is insignificant, then in order to prevent the rafters from sagging over time under the weight of the entire structure, vertical stops are installed approximately in the middle of their length. The bottom of the vertical stop is mounted to the ceiling beam or simply rests on a metal paw, in the case of a monolithic floor.
The case when you plan to use the attic space
In this case, the lower ends of the rafters are secured in the same way to the Mauerlat with an external outlet. However, the slope angle of the rafters in relation to the Mauerlat can be 70-75°. In the upper part, the rafters are connected to each other with long self-tapping screws, and after that, a sheathing board is placed around the entire roof along the rafters, followed by roofing decking.
Connecting rafters and lintels using metal structures.
As can be seen from the second example, if the slope of the rafters is set too high, then the main load will no longer fall on the middle of the rafters, but on their highest connection point. That is, the installation of supports is no longer required here. However, to prevent the upper connection point of all rafters from “walking,” their pairs are connected to each other with a spacer jumper made of 50x100 mm timber. For example, the design uses only 12 rafters, therefore, there are only 6 pairs - this is every two opposite rafters.
Projects and planning features
It is far from easy to plan a round building in such a way that it is rational, beautiful, and even convenient. There are a few basic techniques that most people follow. The first thing that catches your eye is that there simply cannot be corridors in such a house. They simply have nowhere to lead. This is not bad, but it makes the layout of the house more complicated. Let's start with something simple - how to decorate the entrance to the house.
This is also a house, made using dome technology
Entry group
For our climate, it is desirable that the entrance doors open into a small room, and not into a large room. In this case, a small vestibule helps. O can be allocated from the general area or attached. A covered veranda performs approximately the same tasks. This is a more “civil” way to solve the problem.
Not everyone likes this approach. Today there are other trends in the world - from the front door you enter into a large spacious hall/living room. Such a layout is also possible, but additional measures are needed to cut off cold air - a thermal curtain near the entrance. This is done using convectors built into the floor or by installing several powerful radiators near the door. The first method is more effective, the second is easier to implement. All these nuances are typical for domed houses. The only difference is that you will have to rack your brains to figure out how to fit in the built-in vestibule. The other two methods are easier to solve.
Layout of a domed house: considering ways to organize the entrance group
Let's look at the options for setting up an entrance group using examples. In the picture above, the project on the right, the entrance doors open into the living/dining room. This solution is typical for Europe and America. It is gradually gaining popularity in our country, but due to the harsher climate it often brings inconvenience - each opening of the doors in winter brings a significant portion of cold air, which reduces comfort.
The option on the left is with an attached vestibule. There are two exits from the vestibule - one to the winter garden, the other to the kitchen/dining room. The solution is no less modern, but the problem of cold air entering living spaces has been solved. So this idea is worth adopting.
If you decide to make the vestibule built-in, you will obviously have to allocate some area of the house. The minimum is three squares (on the left project). It would be logical if there would be a living/dining room next.
Two options for built-in vestibule/hallway
Another way is to allocate a large area and use it as a hallway. Place a wardrobe here, a hanger for things “for now” (draft law). If space allows, you can install a small sofa. For a private home, having a hallway is practically a necessity. Dirt and sand are less dragged into the house. And this is another argument in favor of a dedicated entrance group. Attached or fenced off - it’s your choice. But the entrance area is convenient. At least in our realities.
Organization of space
Most often, the central part of the space of a domed house is allocated for common areas. From this central area you can access all the other rooms, which are arranged in a circle. In general, the central room turns out to be inconvenient, since it is “very walkable.”
The central part will be used too actively, so this area cannot be made functional
You won’t be able to relax in it if it’s a living room, it’s not very convenient to cook in it, if you come up with the idea of using this room as a kitchen, or as a dining room, it’s also not the best option. Projects that use this space in this way are presented above. It looks great in the picture, but in real life you can’t count on an intimate atmosphere here. So the walk-through rooms are not the most habitable.
You can put a ladder in the center
Not the worst way to use this passage area is to install a staircase. After all, most domed houses have two floors, and a spiral staircase just begs to be reached here. You just need to take into account that if you simply twist it around a pole, it will be inconvenient to use - the turns will be too sharp. If you design a staircase like a “well,” it will be difficult to build it yourself. So this part will have to be entrusted to someone.
Otherwise, domed houses are planned in the same way as ordinary ones. The basic rule to remember is: to ensure that engineering systems are not very expensive, all “wet” rooms are located close to each other. The location of bedrooms, offices and other “dry” rooms is up to your taste.
On what houses and foundations is it possible to build domed roofs?
The main condition for a domed roof is the correct geometry of the building. That is, a country house either initially has a round shape along its perimeter, or its perimeter has a regular square shape.
Foundation for the construction of a domed roof.
If the perimeter of a country house has the shape of a parallelepiped, then it is difficult to build a domed roof, but for example, a semicircular roof that is not much inferior is quite possible.
A semicircular roof can be used where a dome roof is not suitable.
In cases where the perimeter of the load-bearing walls of the house has an irregular shape or changes were made to the project during construction, for example, additional rooms were added, then the only solution is a combined roof, which may include both elements of a pitched roof and elements of a domed roof.
Combination of different types of roofs.
As for the base, a domed roof can be made on almost any wall. The fact is that it is necessary to take into account the load produced by the roof on the load-bearing walls. For example, if a house is built using frame technology, then it will not be possible to make a domed roof that uses metal rafters or reinforced concrete beams. The walls will not withstand such a load. On frame walls, it is optimal to make a roof based on wooden rafters. If the walls of a country house are made of brick, shell rock or monolithic concrete, then no special restrictions are imposed.
What is a round roof?
Calling the roof round is incorrect. It's not completely round. This group includes any roofs whose shape is a figure of rotation or one of its segments:
- Dome (half or upper third of the ball);
- Cone-shaped roofs;
- Onion roofs;
- Curved roofs with complex geometry that do not have their own name.
The rafter system for all these types of roofs is manufactured differently.
Features of attic roofs
For several centuries now, since its invention in France, mansard roofs have enjoyed constant popularity. An attic is usually called an attic space adapted (or planned) for living.
The types of roofs of private houses with an attic are pleasingly diverse. All kinds of attics are suitable for arranging attics - gable, hip, hipped, domed. There is enough space in the attic to create a living room, training room, library or winter garden. Since the attic room is located in the upper part of the building, it requires a special approach:
- Heat loss from lower living spaces causes condensation to form on the inside of the roof. The design must provide for thorough vapor and waterproofing, as well as ventilation.
- The attic space has no internal walls; it is completely in contact with the outside environment. Thermal insulation with mineral wool or polystyrene foam is relevant for the room. Natural wood is best suited for interior decoration.
Mansard roofSource julifacer.com
Roof repair at the dacha
The country roof is subject to wind and snow loads and requires periodic inspection and maintenance. In the event of natural wear and tear or extreme weather conditions, complete or partial destruction of the roofing pie may occur, requiring major repairs. In such a situation, it is necessary to conduct a thorough examination of the rafter group and the condition of insulation and roofing materials.
To determine the damage caused by the elements, a thorough examination of the roof is necessary to determine the sequence and scope of work
Roof repairs in emergency situations must be carried out as quickly as possible, but without loss of quality.
Why is this design better than others?
The spherical shape of the geodome helps to harmonize the space, which is saturated with positive energy. Being in a spacious and incredibly cozy round room is good for your health. It’s not for nothing that domed buildings are classified as environmental structures. The advantages of lightweight geodetic structures include:
- no need for a solid foundation, which greatly simplifies and speeds up the installation of the facility;
- no need to use construction equipment, which significantly reduces noise during work.
The construction of geodomes is based on frame-panel technology, which makes it possible to quickly erect a number of structures for various purposes on a dacha or suburban area, for example:
- bath or sauna;
- home or summer kitchen;
- garage or shed;
- gazebo or children's playhouse;
- year-round swimming pool;
- greenhouse or greenhouse, etc.
What foundation is suitable for a domed house?
You have decided on a site for the construction of a construction project, have decided that it will be a dome house, have drawn up a layout plan with established dimensions, which means it’s time to move on to building the foundation.
Its construction requires preliminary preparation - it is necessary to mark the site, determine the zero mark and other parameters (for these purposes we recommend using a level - a geodetic device for determining the difference in heights). You should not neglect the help of professionals in the field of geodetic work.
After all the preparatory work has been completed, you should proceed to digging a trench for a strip foundation (this is the best option for creating a domed house).
Strip foundation for the construction of a domed house
Also, a pile type of foundation is often used for a domed house.
Pile foundation for the construction of a domed house
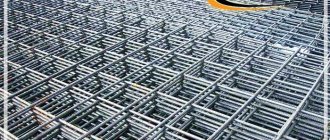
A strip foundation is a reinforced concrete structure installed around the perimeter of the entire construction site. As a rule, such an installation consists of sheathing (reinforcing mesh) and hardened concrete mixture. To create the sheathing, reinforcement with a diameter of 12 mm with wire binding is suitable. Next, the cement-sand mortar is poured.
When constructing a pile foundation for the construction of a domed house, as a rule, screw, driven or concrete piles are used, depending on the quality of the soil.
Construction of a domed house on a pile foundation
Design Features
The conical roof is even visually very different from the traditional gable roof, which is most common in Russia. Despite the fact that its use is often purely decorative, it can be very functional due to the fact that water slides off well from its steep slopes.
The design features of cone-shaped roofs are:
- Round base. The support for the rafter legs, fanning out, is always a round base. This requirement also applies to dome and bell structures, which are used only if the base shape is circular or semicircular, if they are articulated with the main roof or wall.
- Flexible roofing materials. Due to the shape, for the construction of a conical roof it is necessary to use only flexible, elastic roofing materials, for example, bitumen shingles, roofing steel. Otherwise, water will flow into numerous joints. Only flexible coatings can ensure the tightness of a cone-shaped roof. Only they are usually more expensive than usual and require special installation conditions.
- Difficulty in installing the ridge assembly. All the numerous rafter legs of the frame converge at one point, which is the most vulnerable and difficult to assemble structural unit. Therefore, the structure must be designed for the load concentrated on it.
Cone-shaped roof device
Roofs for houses with a round base
Advantages and disadvantages
From the point of view of operational characteristics, a domed roof is good because water and snow masses drain from the surface easily and in a timely manner. Due to this, the load on the structure is reduced, the material is not damaged by moisture. The ceiling in the under-roof room is usually high, which will allow for more efficient use of space.
The downside is that it is impossible to install windows (they would create additional load and reduce the airtightness), so it is impossible to build an attic under the dome. It is more difficult to install such a roof than a gable roof.
A domed roof can be installed on a base shaped like a circle or a square. This cannot be done on a rectangular building. If the house has a complex configuration, you can create an ensemble combining round and pitched elements. A roof structure made of heavy materials cannot be installed on a light frame building.
Briefly about the main thing
Installation of the rafter system is the main stage of roof construction. This is a supporting structure that receives and distributes snow and wind loads, holds the roofing in a given position, and protects the walls and foundation of the house from moisture.
The rafters include many elements, each of which performs its own task. Some serve as a frame for the perimeter of the walls, others support the rafter legs, and others connect them and keep them motionless. The result is a strong, balanced structure that is light in weight. And the load-bearing capacity is very significant.
The elements of the system can be connected in several ways, which allows you to obtain different roof designs. The choice of one form or another is made at the design stage, but, if necessary, you can change the shape and configuration of individual sections or the entire roof.
It is recommended to entrust installation to experienced specialists who can perform the assembly correctly and avoid mistakes.
Domed roof installation
The house, equipped with a semicircular roof, has a hanging truss system. This is an ordinary arch with 3 hinges. One end of it rests on a ring mounted in a pillar installed in the very center of the building, and the other on a mauerlat located on the wall. Mauerlat is a log, a beam located along the perimeter of the wall and serving as a support for the rafters. The arrangement of such a system requires good knowledge of the classical “Sopromat”, the foundations of “Theoretical Mechanics”. Therefore, it is not recommended for an untrained person to independently design a domed roof for a residential building.
Covering the frame of a semicircular roof with chipboard slabs allows you to prepare the basis for laying the roofing material.
The roof becomes semicircular thanks to the ring sheathing, which is installed on special racks, resting at one end on the rafter arches. But there is another option for a domed roof, which any house or building can have. Architect from the USA Fuller R.B. proposed a variant of a semicircular roof in the form of many cumulative triangles. This design is sometimes called a "geodesic dome". It was first officially introduced in 1951, but was not particularly widespread. The main reason is the unusual design and complexity of engineering calculations.
The “geodesic dome” has obvious advantages: its surface can be completely glazed (with the same double-glazed windows). This means that there will be no problems with clearing snow. The design has very good resistance to wind loads. Often country homeowners decorate, for example, greenhouses with a similar design. A "geodesic dome" can be:
- Connector: the frame consists of pieces of wooden beams and connector locks. The entire system is mounted directly above the walls of the building.
- Connectorless: triangular-shaped panels are pre-assembled by the manufacturer and then installed on site.
Geodesic dome roof
The geodesic dome roof project was first developed by the American architect R.B. Fuller in 1951. Manufacturing the roof according to his design allows us to obtain a dome with the most correct spherical shape.
House with geodesic dome roof.
Technology for constructing a geodesic dome roof
The roof structure absolutely lacks rafters and vertical supports for them, which are usual for pitched roofs. A typical roof frame consists of interconnected triangular elements assembled from timber with a cross-section of 100x50 mm and a length of 100-120 cm.
As a rule, after making the floor of the first floor, a mauerlat is mounted along the entire perimeter of the walls of a round house - a beam with a section of 100x100 or 50x100 mm, fixed horizontally using anchors or studs previously released from a monolithic slab with a 12 mm thread.
In the design of a conventional gable roof, the mauerlat is a single solid beam on which the lower sections of the rafters rest. In the design of a geodesic dome roof, the mauerlat is made from small pieces of timber equal to the side of the future triangles in the structure.
To connect the bars, five and six-bladed metal plates are used, which are called connectors or connectors. They represent a star, that is, a workpiece 6-8 cm long is cut from a metal pipe with a diameter of 100 mm. Next, metal plates with dimensions of 60x150 mm are welded to the resulting ring by electric arc welding at the required angle.
Connector (aka connector).
There are other types of connectors, and there is also the possibility of a connectorless connection. More information about the methods of connecting the ribs of dome structures can be found in the article: nodal elements of dome structures, types of connectors, connector production technologies.
After installing the Mauerlat along its entire circumferential length in increments of 100-120 cm, L-shaped metal plates are secured with self-tapping screws, in which holes are pre-made for attaching the edges of a conventional triangle. Having secured the edges of the triangle to the plates, at the vertex of the conditional triangle, its edges are connected using connectors.
Construction of a dome roof.
Thus, having secured the first row of triangles along the entire length of the Mauerlat, a beam is tied between their upper bases, thus forming inverted triangles. At the next stage, the ribs of the second row of triangles are mounted to the remaining two empty blades of the connectors.
In the technical design of the roof there is no ridge or any specific top. The joining of the last upper triangles is carried out similarly to the previous connection method, that is, connectors.
When the dome frame is fully assembled, to strengthen the spans of the triangles, additional sheathing is mounted on their plane, on top of which triangular-shaped sheets of plinth are mounted, followed by installation of bitumen shingles.
Dome roof with tiles.
Construction using the technology described above is used not only in the construction of roofs. In some European countries, entirely geodesic domed houses are built in this way. A distinctive feature of these buildings is that they have no facade walls. That is, after making the foundation, they immediately begin installing the domed roof.
Frame of a geodesic dome.Geodesic Dome Roof Design
Unlike a pitched roof, a domed roof requires significantly less consumables. On average, the consumption of materials is lower by a third in comparison with a gable roof. When designing, it is necessary to calculate the exact number of timber blanks for the ribs and bases of the triangles, the number of mounting connectors and the total footage of the sheathing material.
Advantages of a geodesic dome project
Although the author's architectural design of a geodesic dome has not become widespread, it still has a number of significant advantages given to it by its spherical shape:
- Although rectangular and round structures are equal in area, the internal volume of the latter is much larger. Thanks to this, significantly more air and light enter the room. In addition, the round design saves up to 30% of material.
- The rounded shape of the roof reduces heat loss in winter, as well as minimizes heat absorption in summer. Consequently, the cost of heating or cooling the space is reduced by approximately 30%.
- The small mass of the geodesic dome frame allows you to do without a reinforced foundation under the house.
- In a building with a round dome-shaped roof, you can arrange any number of windows, up to full glazing of the dome structure. At the same time, there is no need to worry about the strength of the roof - it will retain all its characteristics.
- The ball-shaped roof allows you to distribute the load as evenly as possible, so it is not afraid of even very heavy winter snowfalls.
- Thanks to its aerodynamic properties, the dome will not be damaged by a strong gust of wind.
- A rounded roof transmits significantly less external noise inside the building, that is, it provides sound insulation.
- A symmetrical spherical roof is best suited for housing solar panels and modules.
- This roof design is simply very beautiful in appearance and looks very original.
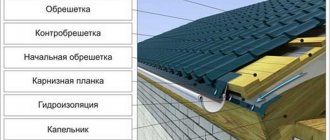
Laying roof covering
Metal tiles are very popular among private developers, so it’s worth considering this option in more detail.
The starting point for laying metal tiles is the installation of the eaves strip; its fastening is carried out using self-tapping screws. The material should be laid in the direction from bottom to top, extending the edge of the roofing material 0.4 meters beyond the edge of the eaves. The first sheet is attached to the cornice strip using self-tapping screws, and in this place the fasteners are located in each recess. Further fixation is performed in every second notch. If the sheet length is insufficient, extensions can be made using free pieces. In this case, the installation is done with an overlap and fixation with self-tapping screws.
Nuances of the drawing
Do-it-yourself roof drawing is done on a scale of 1:100. For the most important elements, the nodes are made in section. The development of drawings is carried out according to the construction procedure. The drawing includes a diagram of the elements of the rafter system, sheathing and beams. The joints of the main and additional elements, joints, and the design of the drainage system are drawn in detail.
The next step will be a scheme for laying hydro- and heat-insulating layers. The roof is complex to construct, so detailed drawings help to correctly determine the amount of building materials and save on their purchase.
What determines the choice of roof type?
First of all, the roof is selected according to its protection efficiency, taking into account the meteorological features of the area and the design features of the structure
At the same time, it is equally important that the roof corresponds to the overall architectural composition. Because a complex and elegant structure with a roof that is poorly chosen in terms of geometric shape looks much worse than one made according to a template, but as functional as possible.
Because a complex and elegant structure with a poorly chosen geometric roof looks much worse than one made according to a template, but as functional as possible.
This is important! When choosing a roof, it is necessary that it be as functional and efficient as possible, but at the same time harmoniously combine not only with the structure itself, but also with the landscape. And also did not conflict with the general appearance of all architectural structures nearby.
Particular attention should be paid to meteorological conditions. The type of roof must be appropriate to the climatic conditions in order to minimize stress on both the roof structure and the entire structure. For example, the construction of flat roofs is quite appropriate in very dry and hot areas
There they can be used as additional living space in the fresh air, and there are no difficulties with drainage.
For example, the construction of flat roofs is quite appropriate in very dry and hot areas. There they can be used as additional living space in the fresh air, and there are no difficulties with drainage.
Installing a roof made of large sheets of roofing material, for example, a roof made of corrugated sheets with a high windage capacity, is undesirable in areas where strong winds occur.
In areas with heavy rainfall, it is better to use pitched roofs with a large angle of inclination, on which snow does not linger.
In particularly humid places, close attention should be paid not only to moisture protection and drainage systems from the roof itself, but also to the treatment of the supporting roof frame with antifungal and moisture-repellent agents. This will keep the roof in good condition for many years. Another significant aspect of choosing a roof is its cost.
The more complex the structure, the more expensive its construction will be. Therefore, you should be guided by the principle of reasonable sufficiency and not choose overly complex designs where you can do without it.
Another significant aspect of choosing a roof is its cost. The more complex the structure, the more expensive its construction will be. Therefore, you should be guided by the principle of reasonable sufficiency and not choose overly complex designs where you can do without it.
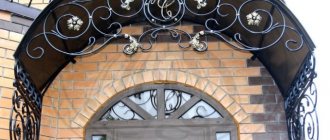
Advantages of arched roofs
Such roofs, in addition to external differences from pitched roofs, also have a number of advantages over them:
- the shape of the arch is beneficial from an aerodynamic point of view, because air flows are not inhibited by the roof and do not create significant pressure or wind load on its structure;
- the streamlined shape allows snow to slide off the roof without hindrance;
- the transparent roof provides good natural lighting to the entire interior space underneath;
- a building with such a roof looks like an ancient one from the outside and inside;
- more air is placed inside the structure than with a pitched roof, which has a beneficial effect on the well-being of its inhabitants.
Basic technologies for constructing domed houses
Today, there are several construction technologies by which domed houses are built; designs and prices, accordingly, also “play” in one direction or another, depending on the construction method. They can be made of materials such as brick, monolith, foam concrete, polystyrene foam and even clay. Moreover, buildings made of brick, monolith and foam concrete are not much different from standard structures of residential buildings. Technologies for the construction of domed houses are classified into construction:
- based on geodetic sphere;
- based on a pneumatic frame;
- based on permanent formwork.
One of the most common technologies for constructing a spherical house is the combined use of polystyrene foam and expanded polystyrene - while the construction of the building is carried out using the Japanese method. However, such houses require additional manipulations to ensure year-round living.
Domed house with a large open terrace
The most budget-friendly and closest to standard conditions is the technology for constructing domed houses, based on the frame method of construction. As experts note, for this kind of buildings you can use a frame made of almost any material (with sufficient strength and service life). To connect parts, connectors of various modifications and sizes are used.
Dome house frame
Advantages of a geodesic dome
Plan of a domed house.
The obvious advantages of buildings based on a geodesic dome determine the properties of the sphere:
- Maximum internal volume with the same usable area as a “rectangular” structure. Much more light and air. Approximately 30% less costs for construction materials.
- In the winter season, less heat is dissipated, and in the summer less heat is absorbed. Accordingly, costs for air conditioning and heating are reduced (up to 30%).
- Based on the fact that a geodesic dome is quite lightweight, there is no need to build an expensive and powerful foundation for its construction.
- A domed house can have as many windows as you like, and the entire dome can be glazed. Moreover, this will not affect its strength characteristics at all.
- Strength unattainable for other buildings makes it possible for the dome structure to withstand enormous snow loads;
- The unsurpassed aerodynamics of the canopy provide it with excellent wind deflection.
- Based on the fact that the sphere has a smaller surface area, accordingly, less extraneous sounds will penetrate into the house, which will ensure a more comfortable life;
- The symmetry of the sphere creates the conditions for the most effective orientation of solar panels and solar collector modules on it.
- The dome structure has an original and aesthetic appearance.
How to build a dome house with your own hands: assembly instructions
In order to build a strong and reliable domed house, you must strictly adhere to the proposed algorithm, performing each operation step by step. Consider each stage from laying the foundation to the final finishing of the house.
As with the construction of any traditional house, it is necessary to begin with measurements and installation of an appropriate foundation, which will become a reliable basis for the structure. After this, the main frame elements are laid out, which will perform a load-bearing function and form the basis of the entire house.
You can create a spherical house with your own hands, or you can turn to specialists or buy a ready-made package
Using a wooden hammer, dowels must be driven into the supporting vertical beams. The strength of such a connection is ensured by the own weight of the elements. For this reason, construction is moving extremely quickly, especially considering the fact that special grooves are provided in the lower parts of the boards.
After this, you can proceed to installing the transverse struts and fixing the OSB board. Standard self-tapping screws are perfect for this purpose, as they will ensure quick and reliable fastening.
At the top point where all the beams meet, a special disk is used for reliable fastening. At the same time, the lower segments are sheathed, which gives the structure additional stability and strength. After this, all that remains is to install the upper struts and cover the frame with wood boards.
Acting according to this scheme, it is quite possible to carry out the assembly yourself, instead of purchasing a ready-made domed house. Reviews from the owners claim that if you strictly follow all the recommendations, then in the end you will get an equally durable structure that will serve you for many years.
Fastening the frame of a domed house at the top point
Photo examples of spherical houses
Two-level house based on a stratodesic dome with shingle claddingSource proteh.org
Domed house with wood elements in exterior decorationSource pinterest.com
Wooden shingles look natural on a spherical buildingSource lenta.ru
House-sphere covered with bitumen shinglesSource kapus.ru
Original solution: a domed house in the shape of a flying saucerSource stroygram.ru
House-sphere made of concreteSource stroygram.ru
Roofing covering of a domed house made of tilesSource stroygram.ru
Covering a domed house with copper tilesSource svoya-izba.ru
Complex, but beautiful and original design of a dome structureSource pinterest.com
Rafter structures of layered type
Such systems are installed on the roofs of houses that have a load-bearing middle partition or intermediate column-type supports. In this case, the rafters are inclined beams that rest against the load-bearing external walls at the bottom, and against the ridge girder at the top. The ridge girder itself is supported by vertical posts that rest against the internal load-bearing wall.
This design of the rafter system means that it functions exclusively through bending. If necessary, the structure is additionally strengthened with struts, tie rods and auxiliary wind elements.
The main advantage of the layered rafter system is the lightness of its structure for any building width, which allows you to get by with a minimum amount of materials. In addition, thanks to constant cross-ventilation, putrefactive processes are prevented in structures of this type, which ensures a long service life.
In a significant number of cases, layered rafter systems are made of wood, which is due to several reasons:
- The construction of a roof truss system made of wooden elements is much cheaper compared to other materials.
- The design of a pitched roof with wooden rafters is lighter in weight, which means it puts less weight on the foundation and walls.
- The wooden roof truss system is easier to install.
- Often other internal roof structures are also made of wood. As a result, assembling a wooden roof truss system from the same material facilitates connections between elements, being the most acceptable option.
Our works
Reconstruction of the roof in the village of Selyatino
Roofing from scratch in Khimki
Installation of flexible tiles in Vidnoye
Installation of soft roofing in the village of Myshetskoye
How to calculate elements
This design solution is widely used in practice. Most buildings with a gable roof are made in the form of extensions to the stone box of the main building. This method allows you to successfully combine the roof and brick frame of a garage made in the form of an extension, an additional wing of the building, a three-pitched terrace roof and even a canopy over the porch.
Important! Calculation of the strength and rigidity of gable roof elements must be carried out only using specialized programs; in extreme cases, use the old and proven Archikad. It is quite easy to calculate the dimensions and geometry using the formulas shown in the diagram from the school mathematics course
It is quite easy to calculate the dimensions and geometry using the formulas shown in the diagram from the school mathematics course.