Without exaggeration, we can say that this flooring option has been tested for centuries. The technology of laying wooden floors on logs has been used for several centuries with minor changes. This is the most environmentally friendly solution for flooring, but at the same time, this coating has a number of disadvantages and important nuances that you need to know before starting work.
Laying a wooden floor on joists
Application area
Currently, the main area of application for wooden floors is the construction of small private houses. Especially often, floors on logs are installed in wooden houses and log houses, in which the floors between floors are made of beams.
Especially often, floors on logs are installed in wooden houses and log buildings, in which the floors between floors are made of beams
Much less often, wooden floors are laid in city apartments with reinforced concrete floors. However, the technology is still used, especially in cases where pouring a full leveling screed is impossible for some reason.
Wooden floor in the apartment
Sometimes plank flooring is a finishing coating and part of the designer’s idea when creating a renovation concept. In this case, beautiful wood species such as oak, larch or pine are chosen for the flooring. The boards are thoroughly polished, impregnated with an antiseptic and covered with varnish or wax. The result is a very beautiful and durable coating that pleases the eye with the natural texture of wood.
Natural wood floor
Wooden floors can be used even when arranging wet rooms, such as baths and bathrooms. However, this is done infrequently, as it requires careful selection of wood, reliable waterproofing and impregnation of the boards with very expensive solutions that prevent moisture absorption.
Wooden floor in the bathroom
Surface finishing
Floor thermal insulation diagram.
In order for wood to last as long as possible, it needs to be properly cared for. If you do not plan to use any additional covering such as laminate or parquet, the flooring needs to be finished off. It can be sanded, treated with soda, primer, paint or varnish. When applying paint, varnish or impregnation, you need to move in a direction parallel to the grain of the wood.
As a rule, when choosing a material for flooring, people are guided by personal concepts of comfort and beauty, as well as the quality and cost of the material. There are currently many different solutions available on the market, so you are sure to find the option that best suits your needs.
Thus, wooden floors can be laid without special skills, special knowledge, time and money. You just need to do everything according to the instructions and follow the rules. Good luck!
Features of laying wooden floors on joists
The main feature of this type of floor, which must be taken into account, is that wood can absorb moisture from the environment, deform due to temperature changes, and is also susceptible to rotting. Therefore, when laying a wooden floor, it is extremely important to take care of reliable vapor barrier and impregnate the joists and boards with an antiseptic.
Universal wood antiseptic
The joists must be attached to the base and the floor boards to the joists as securely as possible; it is necessary to prevent the formation of cracks, voids and “sagging” of the boards and joists. When laying the finishing boards, be sure to use expansion wedges that will press the boards together as tightly as possible.
The joists must be attached to the base and the floor boards to the joists as securely as possible.
Wood screws provide maximum security of fastening. The length of the screw must exceed the thickness of the board being fixed by at least 2.5 times. To prevent the board from splitting when you screw in the screw, you must first drill a hole in it with a diameter 2-3 mm smaller than the diameter of the screw.
Universal wood screws
If the boards are planned as a finishing coating, then care should be taken to hide the heads of the screws or nails. To do this, use either a special putty or small plugs made of the same type of wood as the entire floor. But the best option is to screw the screw into the chamfer of the board at an angle to the joist. The disadvantage of this option is that it is more labor intensive.
Attaching boards to joists
You should also make sure that all the finishing boards are from the same batch, because the color of the wood depends on the growing conditions, and the shade of different batches may differ.
Stage 1 – select the material
A durable, reliable floor covering, which during operation will not require significant funds for repairs and will last for many years, depends on the initially correctly selected material.
Grooved board (DP)
Parameters of tongue and groove boards
Tongue-and-groove floor beam (BP)
How to choose quality lumber
When producing tongue and groove from high-quality edged boards, the requirements of GOST standards are taken into account, which state that:
- When the board width is from 6 to 14 cm, it has a holistic structure; products with a larger width are produced glued.
- The board to be varnished must have a roughness of 120 microns, the products to be painted have a roughness of 200 microns. For the back side of the lumber, the roughness is 500 microns.
- If lumber is to be packaged in film, its moisture content should be 8%, in other cases – 12%.
DP made of pine
Profile of tongue and groove board
The advantage of wide boards made by gluing is their high strength and resistance to warping. In addition, it is more convenient to use.
As for the type of wood, budget varieties include lumber from pine and spruce, while larch and cedar are valuable species with a higher cost. Their advantage is that the structure of the wood contains a natural antiseptic and is therefore more resistant to negative influences.
Larch board
Note! Wood species that are not acceptable for making flooring material are linden and poplar. Materials made from alder and aspen (BP-27 and DP-27) have limitations - they can only be used for residential premises. It is also worth considering that aspen and alder are not used for the manufacture of DP-35.
Solid oak board
The tongue-and-groove board is equipped on the back side with one wide or several narrow cuts, which provide air circulation and compensate for the internal tension of the tree.
Several undercuts on the back provide natural ventilation
What to consider when choosing
Recommendations for choosing floor boards are as follows:
- A visual inspection is aimed at identifying defects (cracks, splits, stains). If at least one such drawback is detected, you should refuse to purchase these boards.
- Wood moisture content should not exceed 10%.
- It is necessary to pay attention to the geometric parameters of the board, check the tightness of the lock joint - there should be no cracks or gaps.
- A clean floor is usually installed from a board whose thickness does not exceed 2.2 cm, but in some cases, when there is a significant load on the floor, the material can be thicker.
- The optimal board length is two meters or more. Taking less is not recommended.
- The wood must be well-dried - when laying wet material on the floor, the boards will deform.
- Experts recommend purchasing material 15% more than the calculated quantity.
- The boards purchased must belong to the same batch so that they have the same pattern and color.
- It is also important that the shade of wood for the floor matches the color scheme of the interior.
- An important nuance is to unpack the products before storing them. If this is done in advance, the boards may become deformed.
Board grade AB
Video - Which type of wood to choose
What are the consequences of mistakes when laying a wooden floor on joists?
The biggest mistake you can make when laying a wooden floor is insufficient vapor barrier. It is usually made of dense polyethylene or foam foam, which will also provide additional sound insulation. If this step is neglected or the insulating coating is damaged, the floor will very soon begin to rot and mold will appear on it. This will not only significantly shorten the life of the floor, but can also negatively affect people’s health.
Vapor barrier Izospan
The second most common mistake is using wood that is not dry enough. The humidity of boards and joists should be no more than 15%. It is important to remember that in wet weather, even initially dry boards very quickly absorb moisture from the air. If there are prolonged rains outside the window, then it is better to refuse to lay the floor on these days. If you lay a floor with wet planks, they will begin to warp as they dry. This will lead to creaking, the appearance of cracks and differences in height between adjacent boards, which, in turn, will affect the finishing coating.
Vapor barrier (penofol)
An insufficiently accurate level when laying joists will lead to creaking of the floor and gradual loosening of the boards. This will greatly reduce the service life of the coating and will require periodic repairs.
Another common mistake is insufficient distance from the end board to the wall; it should be at least 10 mm. This distance is necessary to compensate for the thermal expansion of wood. If it is neglected, then with seasonal temperature changes the floor will experience very serious internal loads, which will lead to cracking of some boards and the appearance of creaks.
Gap between floor boards and wall
Advantages and disadvantages of wooden floors on joists
The advantages of this coating
- Environmental friendliness of the materials used.
- Good thermal insulation properties due to the large gap between the boards and the base.
- Light weight structure. This is especially important in old houses, where the floors may not support the weight of a full concrete screed.
- The beauty of the finish. The natural texture of wood, emphasized by applied varnish or wax, invariably pleases the eye and creates a feeling of good quality and solidity of the interior.
- Communications can be laid under the floor.
Communications under logs
Disadvantages of wooden floors on joists
- Flammability of the materials used. Despite the fact that there are special impregnations that reduce the fire hazard of wooden structures, such a floor is still the most dangerous coating in the event of a fire.
- Wooden floors are sensitive to strong changes in temperature and humidity. This is especially important for a country house or cottage where people do not live all year round.
- The relative difficulty of laying a wooden floor. It is important to carefully monitor the tightness and reliability of the fastening of the joists and boards; the slightest mistake will lead to creaking.
- Relatively high cost of flooring. Using high-quality solid wood boards as a finishing coating is not the most economical of the possible flooring options.
Wooden floors are not the cheapest flooring
Parquet for renovation
Parquet as a floor covering has been known since the 17th century, when it was first used in the palaces of the kings of France. The main advantage of parquet flooring is its environmental friendliness. Modern manufacturers offer a wide selection of colors, sizes and methods of laying parquet and parquet boards, which allows you to renovate the floors in a room in a style unique to each room.
Before laying such a covering, the floors are leveled with a special screed so that the differences in the heights of uneven surfaces do not exceed half a centimeter. Next, the humidity of the room is determined, for which a small piece of plastic film is laid on the floor for a day, the edges of which are secured with tape. If there is high humidity in the room, the film will become covered with perspiration from the inside. In this case, it is not recommended to lay parquet.
The disadvantages of this coating are the high price and instability to moisture. Also, this material cannot be used when installing “warm floors”.
Step-by-step instructions for laying a wooden floor on joists
Schemes for laying wooden floors
Below are step-by-step instructions for installing wood flooring. The installation of such a floor in a private house with a soil foundation is somewhat more complicated than in a house with a reinforced concrete foundation, but in general the stages of work are the same in both cases.
Laying logs on the ground base
If you are laying a wooden floor directly above the soil, then it must be cleared of turf and plant roots and a layer at least 20 cm thick must be removed. After which the soil is covered with fine crushed stone and thoroughly compacted.
Soil foundation
On this basis, brick columns with a cross-section of 250 x 250 mm and a height of at least two layers of brick are built. The tops of all columns should be at the same level, this will prevent sagging of the joists and floor boards.
Bases for laying logs on the ground
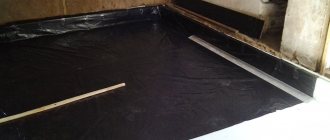
Bases for laying logs on the ground. Performing coating waterproofing
If beams 100 x 50 mm and up to 3 meters long are used as logs, then two columns at the edges of the logs are sufficient. The distance between the logs, and therefore between adjacent columns, should be 600 mm. If the length of the log is more than 3 meters, then one is strengthened with an additional column in the middle.
The top of the column is lined with a rigid waterproofing material, for example, dense polyethylene film. Wooden spacers or wedges are installed on top of it, which are necessary for the final horizontal adjustment of the joists.
Installation of support posts and joists
After this, you can begin laying the joists. Initially, the two outermost logs are laid level. A fishing line is stretched between them, along which all other logs are set. Adjustment is carried out using spacers or wedges. The lags are fastened to the posts using anchor bolts.
Laying logs on a reinforced concrete base
Laying logs on a reinforced concrete base
In this case, the procedure is much simpler; it is enough to cover the floor with waterproofing, for example, made of polyethylene, and logs are laid on top of it at a distance of 400-600 mm on wooden control spacers. First, the two outer logs are laid level, after which a fishing line is stretched between them, along which the height of all other logs is adjusted.
Method of laying joists on concrete floors
Laying joists on waterproofing film
Adjustment is carried out by adding or, conversely, removing adjusting shims.
Currently, the use of adjustable logs is sometimes practiced. These logs have drilled and threaded holes into which a special pin is screwed and secured to the concrete base using dowels. Rotating the pin adjusts the height of the log.
Adjustable joists
After all the logs are aligned to the same level, the protruding parts of the studs are cut off using a grinder. This method greatly simplifies the horizontal alignment of the logs, but is not used very widely due to the noticeable increase in the cost of the structure.
Adjustable lags with clamps
It is important to remember that there must be a distance of at least 10 mm between the edges of the joist and the wall. It is necessary to compensate for the thermal expansion of wood.
Preparing for flooring
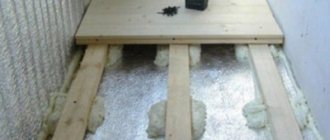
Laying thermal insulation between joists
Before you begin laying the boards, you need to lay a layer of thermal insulation between the joists. This can be mineral wool or polystyrene. At the same stage, wires in plastic corrugation can be laid between the joists, if necessary. The standard width of insulation sheets is most often 600 mm, which makes it easy to lay it between the joists.
Insulation by joists. Expanded clay between lags
After all the necessary communications and insulation have been laid, you can begin laying the rough or finished floor.
Laying rough wood flooring
If laminate, carpet or linoleum is intended to be used as a finishing coating, then, as a rule, a rough covering of uncut boards, plywood or fiberboard is laid on the logs.
Photo of plywood floor on joists
Sheets of plywood or fiberboard are laid on the joists and secured with nails or screws. You should not skimp on fastening points; screws should be screwed into each joist at intervals of no more than 30 cm. The head of the screw or nail should be recessed into the slab by 1-2 mm. It is important to leave a distance of at least 10 mm between the wall and the coating. This gap will also provide ventilation of the space under the floor. 2-3 weeks after completion of work, it can be covered with a plinth.
Plywood on joists. There is a gap of 10 mm between the wall and the sheets
When laying a subfloor made of boards, you need to start work from the far corner of the room and move towards the entrance. The length of the boards is selected so that their joint is in the middle of the log. The boards are laid as closely as possible to each other and fixed with screws. To prevent the board from splitting when screwing in a screw, you must first drill a hole for it with a drill bit with a diameter slightly smaller than the diameter of the screw. Using a drill of a slightly larger diameter, you need to make a small recess into which the screw head will hide.
Subfloor made from second grade boards
After all the floor boards have been laid, you can begin scraping the floors; this procedure can be either manual or mechanized. The cycles cut off all the unevenness of the floor and small protruding parts at the joints of the boards.
Carrying out floor scraping
After this procedure, the subfloor is ready for laying a finishing coating, such as laminate or carpet.
Laying laminate flooring on a wooden floor
Laying finished wood flooring
A folded board or a board made of laminated veneer lumber is usually used as a final finishing coating. These boards must be soaked in a protective antiseptic solution. There are some nuances in laying such boards. Since this floor will no longer be covered with anything, it is extremely important to avoid the slightest gaps between the boards, and it is also important to hide the screw heads so that they do not spoil the appearance of the floor.
Batten
Laying folded boards is carried out according to the same principle as laying boards for a subfloor, with the only difference being that two adjacent boards are pressed against each other as tightly as possible. To do this, a bracket is driven into the joist at a distance of 4-6 cm from the board, between which and the edge of the board a wedge is installed, pressing the board. When the pressure on the board is maximum, it is fixed with screws, after which the wedge and bracket are removed. The operation must be repeated for each row of boards, this will prevent the formation of cracks. The board is attached to the joist using a screw, which is screwed into the chamfer at an angle, this allows you to hide its head and improve the appearance of the floor. You can also use special decorative nails for the floor, driving them in strictly at equal distances, but this is a compromise option; the absence of visible fastening looks much better.
Flooring
Laying floorboards
Laying floorboards on joists
After all the boards have been laid, it is necessary to scrape the floor. After this, the floor is sanded and polished using sandpaper. After the floor has been polished, it should be covered with a protective material such as varnish or wax.
Varnishing
If everything was done correctly, then a wooden floor on joists can last for several decades without problems, creating an atmosphere of comfort in the house and delighting the eyes of your children and even grandchildren.
Comparative characteristics of floorboards
Batten. Prices
| Floor board. Name, material, size | Price, rub./m2 |
| Floorboard Pine K1-2 (25×90) 1.8m | 250 |
| Floorboard Pine K1-2 (25×90) 1.0m | 250 |
| Floorboard Pine K1-2 (28×130) 1.8m | 290 |
| Floorboard Pine K1-2 (28×130) 2.0m | 480 |
| Floorboard Pine K1-2 (28×130) 6.0m | 480 |
| Floorboard Pine K1-2 (32×100) 5.4m | 570 |
| Floorboard Pine K1-2 (32×130) 5.85m | 570 |
| Floorboard Larch K2-3 (27×90) 5.4m | 460 |
| Floorboard Larch K2-3 (27×90) 5.1m | 460 |
| Floorboard Larch K2-3 (27×90) 4.8m | 460 |
| Floorboard Larch K1-2 (27×130) 3.0m | 560 |
| Floorboard Larch K1-2 (27×110) 3.0m | 560 |
| Heat-treated pine LUNAWOOD (Finland). Floor board (tongue and groove) 26x92 | 195 rub. /linear m |
| Europol (pine, 32 mm) | grade 0 (Extra) 970.56 rub/m2; grade 1 (Prima) 676.80 rub/m2; grade 2 (B) 460.00 rub/m2; grade 3 (C) 384.00 rub/m2; grade N/K (D) 301.76 rub/m2. |
Without a hitch, without a hitch: expert advice
Look for floorboards marked “extra” at the building materials warehouse. Choose one that does not have knots, traces of resin, dark spots, signs of rotting, traces of wood-boring beetles, cracks, or scratches. Take the time to go and personally look at the warehouse to ensure proper storage conditions.
Before laying the finished floor, the screed must be completely dry so that the logs do not subsequently “walk” and the wooden floor does not “sing.”
Purchase the material in advance, let it sit at the place of future service for at least a week for acclimatization. This will minimize the risk of the floorboards becoming warped once they are nailed down.
Sort the material, discard without regret those whose evenness raises even the slightest doubt. Boards with a slight curvature and a small flaw can be used in utility rooms, on the terrace, in the pantry, attic, attic and so on.
Beauty from nature: how to play it correctly
There is such a trick: the narrower the floorboard, the less it is subject to bending, which means the floor will not warp or creak. Wide floorboards are in trend, but this is an amateur question. It is original and bold to use the interplay of floorboards of different widths, thus creating a textured pattern.
According to the standard, it is customary to lay along the line of sunlight. This will make the room look more spacious. You can turn an ordinary plank floor in an apartment into an interior accent, as if straight from the pages of glamor and gloss. To do this, you just need to move away from the stereotype and paint not with oil-based floor paint, but with white - shiny or matte.
A special grout will help you make an expensive, elite material from a cheap but high-quality material. With its help, you can turn pine into black wenge or red sandalwood, and after tinting it can be varnished for durability and ease of maintenance. Floors waxed to a mirror shine or a specially aged texture are in fashion.
Wood is a living material that seeks and finds itself, is reborn in your home, where it takes on shape and size, adapting to the microclimate in your home, and itself influences the favorable atmosphere of comfort.