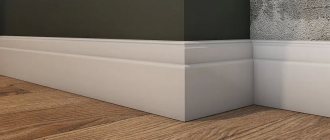
What is a plinth needed for?
The functions of floor plinths include not only decorative issues. It is important - the finishing element gives the new flooring a finished look, and the owners strive to select the planks according to the color and texture of the interior.
Besides:
- The floor plinth closes the gap between the wall and the floor, from where dust, dirt and moisture can appear as a result of loads on the area.
- One should not lose sight of the linear expansion of the covering, especially wooden ones - the floorboards are laid at a short distance from the wall. The plinth will hide the gap and subsequently the wooden floor will not deform.
- Some versions of skirting boards are of practical importance, since they contain voids in the body - cable channels.
Thanks to them, safe communication along the floor becomes a simple matter. The wires will remain invisible, children or elderly relatives will be safe.
It is no longer possible to imagine a single finished room without a plinth. In order to choose the right element for your own interior, it is important to find out what types of skirting boards exist.
Wall curvature and humidity
Before choosing a plinth, you need to check how smooth the walls in the house or apartment are. Why? It's simple. Some slats are made of rigid materials. For example, a wooden “baguette” can crack if it is fixed at the edges and there is a protrusion in the center.
It’s good if the owner of the premises did the repairs or carried out construction work himself. He can be confident in the accuracy of the geometric parameters. But contractors may lie when handing over a project, and the curvature will go unnoticed.
Therefore, you need to take a tool called a rule. It is better not to take a rod shorter than 2 meters. The sequence of actions is as follows:
- Place the tool against the wall at baseboard level.
- Press one edge to the corner, connect the second to the surface.
- Walk the entire perimeter of the room or space as a whole.
The metal strip will immediately show the “oblique” areas. If there are a lot of them, you need to think about choosing a flexible baseboard. Another important factor is the level of humidity in the room. We demonstrate this clearly in the table:
| Type of plinth | Smooth walls | Crooked walls | Humidity |
| Plastic | + | + | + |
| Wood | + | — | — |
| From MDF | + | — | + |
| Duropolymer | + | — | + |
| Metal | + | — | + |
| Suberic | + | + | + |
For curved walls, only plastic and cork strips are suitable. Wooden slats are afraid of moisture.
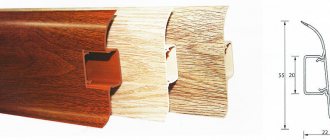
Kinds
Skirting boards are made from various building materials. Each of them deserves both positive and negative reviews. So, what are the types of floor skirting boards:
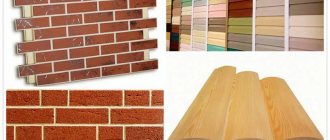
Wood
A classic plank made from a single piece of wood.
It is distinguished by its environmental cleanliness, and, nevertheless, has a number of disadvantages. He's expensive. Such a plinth is caused by temperature changes - too humid or dry climate. In private homes, such a plinth is a delicacy for rodents and parasites. Natural wood rots and becomes a breeding ground for mold. The advantages of natural skirting boards are their natural beauty. By correctly selecting it for a similar floor covering, the apartment owner will receive a decent interior.
Plastic
Budget-friendly and therefore the most popular option for floor plinths.
Available in several types - solid, hollow and flexible. Supplied with cable channels. The color range allows you to choose the baseboard according to your interior. Fastening methods are accessible even to non-professionals. Disadvantages: short service life and fading when exposed to sunlight. In addition, if you use a plastic baseboard in unheated rooms, it can crack from the cold.
Veneered
The plinth is made from thin coniferous wood.
The layers are glued together and are stronger and more stable than natural wood, which can be damaged. But the product cannot be considered environmentally friendly due to the large amount of glue between the layers - if the product is not certified, then the purchase should be abandoned due to the increasing frequency of counterfeits in the field of binders - formaldehyde, which is harmful to health, can easily be found.
MDF plinth
The plank is made of wood fiber board and covered with natural veneer or decorative paper.
This plinth is comfortable, durable, and easy to match to the interior. But! It is environmentally unclean and unstable to moisture - the MDF board swells under its influence. The plinth is quite heavy, which makes installation difficult and requires the use of self-tapping screws. Advantages: wide size range and low price. Subsequently, it is important to change the slats in a timely manner.
Metal
The high price of metal skirting boards is due to its reliability and wear resistance in comparison with other models. The plank is made of aluminum alloy and is good for installation in aggressive rooms - baths, kitchens, bathrooms.
The baseboard is not afraid of corrosion, rotting, or breaking due to cold. As a rule, a polymer film with the desired pattern is glued to the front side, so choosing an option for the required interior will not be difficult. The modules are hollow inside, suitable for laying cables and other communications.
The question of how to choose a floor plinth is multifaceted. To do this, take into account the finishing coating, the dimensions of the floorboards, the gap between them and the wall and the required functions - cable routing, durability, ease of maintenance. We should not forget about the surrounding interior - everything should be in harmony. And the colors of the floor skirting boards too.
Material selection
Choosing the right skirting board is of great importance, and many nuances need to be taken into account. Particular attention should be paid to the following criteria:
- The surface of the products must be free of knots. If they are present, then this indicates low quality. The fact is that over time, parts gradually dry out, which leads to knots falling out.
The presence of knots is a serious defect, which sooner or later will lead to the destruction of the product - The wooden floor plinth must have a smooth face. The presence of roughness indicates that the drying and finishing procedure was carried out poorly.
- Storage of products must meet a number of conditions. So, they should be located on a flat surface, and the humidity of the material itself should not be higher than 20%.
- Much attention is paid to fragments longer than 1.5 m; they are the ones most often subject to deformation, which cannot be corrected. If you attach a behavior element, it will definitely change its shape.
Reputable manufacturers use vacuum packaging to maintain optimal product moisture content.
Indeed, the choice can be quite difficult, but without this it is impossible to achieve the desired result.
Dimensions
There are assorted sizes of floor plinths on sale.
The choice depends on the structure of the floor covering - boards and others like them require wide planks, since it is necessary to hide a fairly wide gap between the floor and the wall. Narrow options are suitable for linoleum and carpet. Average values: the width of the floor plinth is from 4 to 14 cm, the length is up to 2.5 m. If you need to deviate from the standards to create your own interior, then the floor plinths are made to order. For each plinth, components are supplied - corners. Internal and external, they will carefully disguise the transitions from one wall to another.
Quantity calculation
Before choosing decorative slats, it would be a good idea to find out how many of them you will need. A preliminary calculation will help you decide on your budget. It will become clear what length of strips is best to take in order to reduce the number of trims to a minimum.
Let us have a room with the following parameters: 2 walls of 3 meters each and 2 walls of 4 meters . Let's find the general perimeter:
3+3+4+4=14 m.
Don't forget that there is a door in the room. The width of the opening together with the platbands is 0.8 m. Let’s find the final length:
14-0.8=13.2 m.
Trouble may arise during installation. You will need spare material. What if the trading center or store is already closed? This often happens during the holidays. Especially New Year's. What to do? Add 10 % to the footage:
13.2+10%=14.52 m.
Here it is, the final number. Let's take a standard plinth 2500 × 47 × 23 mm. We only need the first number since this is the length of the batten. Let's get the quantity:
14.52/2.5=5.8 pieces.
Round up. The final indicator is 6 units.
Fastening methods
Installing skirting boards is easy. There are several methods of fastening:
It is important to immediately outline the contours of the plank so as not to move it during setting.
The last option is used less frequently. It is important to remember that the plinth strip will be pressed when screwed, therefore, the width is selected in advance so that it is sufficient for the gap.
Sometimes it is necessary to install a plinth on the wall so as not to damage the front side of an expensive coating - laminate, for example. Then the plank is glued to the wall with a minimum gap from the floor - this way the lack of connection will become invisible.
Any method is available to amateurs.
Baguette consumption
Before installing floor or ceiling edging, the question arises: how to calculate the amount of plinth? So it’s easy to calculate different floor skirting boards, the sizes of which can vary. You should sum up the length of all the walls along which this element will be laid (for the floor, we do not take into account the width of the doorways).
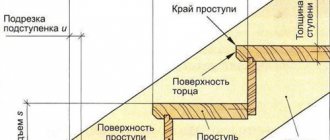
Frame calculation scheme
The total amount should be divided by the length of the individual strip, and rounded to the nearest whole number. When cutting skirting boards, waste is generated, so you should take one spare strip, or when measuring the walls, add 5 cm to the length of each strip.
There is an online calculator for calculating fillets, which, based on your data, will determine the consumption rate.
Installation methods
There are two ways to install plastic skirting boards:
- Screws or dowel-nails through the surface of the baseboard.
- Using special clips.
There is also a way to attach it
The second option is only suitable if the walls are perfectly smooth. On walls with curvature, it is better to use the usual fastening method - using self-tapping screws or dowels, the plastic floor plinth can be pulled close to the wall so that it does not lag behind the wall. In this case, it is better to use models with a rubberized edge.
Fastening with clips
This method of fastening is implemented using two types of fasteners - clips in the form of separate plates and a long plate of the same length as the plastic baseboard. The difference is that the long clamp is used as a cable channel, that is, in this case, cables/wires can be hidden in the plastic plinth.
The principle of fastening clamps of any type is the same:
- Clips are attached to the wall.
- The plastic part simply snaps onto them.
Fastening plastic skirting boards using clips
It’s worth saying again: this method is only for perfectly smooth walls, otherwise the result will be unsatisfactory. The procedure is simple:
- A mark is made on the wall at the height where the clip will be located.
- A horizontal line is drawn along the mark (it is convenient to use a laser level).
- Focusing on the line, attach clips or a bar with a cable channel.
- Laying cables. They can be additionally secured with plastic ties or double-sided tape.
- The front panel of the plinth is installed.
PVC plinth with a separate cable channel is installed in almost the same way
When installing, it is important to place the clips at the same level. Only then will it be possible to secure the decorative strip without problems. The permissible run-up is less than a millimeter, so before fastening we try to carefully check the position of the fastening bar or clip. One option is to make a template. To do this, cut a piece about 15 cm long, make a hole in it and use it as a measurement, applying it in the right places.
Installation through the baseboard using dowels/screws
This method is also suitable for not very smooth walls. A hole is made in the plinth, through it, using a self-tapping screw or dowel, it is attached to the wall.
Everything seems simple, but only until you start doing it yourself. And here problems arise: in what order is it better to drill, at what distance from each other to install the fasteners, how to do it so as not to spoil the appearance too much.
There are several ways, but the most correct algorithm for installing a plastic floor plinth is as follows:
- We place the plank against the wall, press it, and level it. If there is an assistant, he keeps it in a fixed position. If you are working alone, secure it with masking tape. You can also drill and install one extreme fastener, which will firmly fix the bar and prevent it from moving.
Installation through the baseboard - Take a drill with a thin metal drill bit 3-4 mm. Take a longer drill so as not to damage the plastic with the chuck. We make marks on the profile and on the wall. First of all, we drill along the edges and in those places where the baseboard “lags behind” the wall.
- We apply intermediate marks in such a way that there is a distance of 35-40 cm between the fastening elements (in extreme cases, more is possible, but not more than 50 cm).
- Remove or move the baseboard.
- Drill holes of the required diameter according to the marks. If dowels are used (with screws or nails), then take a drill 1 mm larger than the diameter of the nail/screw. When using self-tapping screws, the diameter of the drill is 1-2 mm smaller than the diameter of the screw.
- We return the strip to its place, put the required additional elements on the edges, and install the fasteners.
- We attach the next fragment.
Drilling without damaging the baseboard or flooring - that’s the challenge
The last stage is masking the installation location of the fasteners. This step is eliminated if the plastic floor plinth had a formed cable channel and the fasteners were installed in this recess. If you had to drill through the front surface, we mask the remaining holes with stickers in the form of small circles, which are matched to the color of the baseboard.
Selection of screws/screws/dowel-nails
First, about the sizes - the load on plastic skirting boards is usually not very large, so they take small fasteners. Optimally - diameter 4-5 mm (6 mm is possible), length - 25-40 mm.
The color of the fasteners - white, yellow, black - is chosen depending on the color of the plastic plinth. The choice is simple - to make it least noticeable.
Fasteners are chosen with flat, wide heads
When choosing, look at the shape of the cap. It should be large and as flat as possible. In this case, it will be easy to disguise everything.
A few practical points
When installing a plastic floor plinth with a cable duct, it is more convenient to lay the cables already tied here and there into a bundle. If the cables are very hard, they tend to jump out. In this case, it is more convenient to use double-sided tape for the screed. This will hold the conductors in place.
You can cut some types of plastic floor plinths with a regular stationery/wallpaper knife, but it is better to use a saw with a metal blade
Even with the correct calculation of the length of the plinth pieces (they should extend 2-3 mm into the additional element), the outer corners tend to pop out. To get rid of this problem, the connection is coated with sealant. It is better to use silicone. After drying, it remains elastic and can be dismantled if necessary.