Building materials are constantly evolving, and this trend leads to the emergence of new types with different quality characteristics. One of these new products is OSB (OSB) board or oriented strand board. It is used for the construction of load-bearing structures of a building, laying floors, cladding facades or even ceilings. Since the material is new, the question arises: is laying tiles on an OSB board feasible?
Won't such a fantasy lead to a loss of quality characteristics and aesthetic design?
Features of the work
Laying tiles on an OSB base has its own peculiarities. Chip boards are ordinary wood, and it has high flexibility and water absorption, without which it is impossible to obtain the required gluing quality.
Tile has very low flexibility compared to other materials. Before laying tiles on the OSB board, it is necessary to ensure the rigidity of the base. To do this, when laying tiles on the floor, it is necessary to use OSB boards with a thickness of at least 15 mm and lay them on logs with a minimum pitch.
The surface of the wood chips that make up the board is smooth and does not adhere well to the adhesive composition. To ensure the necessary adhesion of the adhesive and the board, there are several options:
- The best thing is to additionally cover the surface with sheets of moisture-resistant plasterboard or cement-bonded particleboard. This will slightly increase material costs and the thickness of the coating, but the result of such work will be that the tile will last the entire guaranteed period without peeling off.
- You can cover the surface of the OSB board with a metal reinforcing mesh. Then the tiles are laid on the OSB board in the usual way with standard adhesive mixtures.
- The third option is to use special adhesive mixtures designed for attaching tiles to wooden bases.
In addition to increasing adhesion, the primer layer reduces water absorption of the slab and reduces the risk of the ceramic tiles peeling off when the adhesive layer dries.
Finishing
The final stage of work is applying grout. It is required to fill voids in the seams so that the surface is uniform. Using a colored composition will make the drawing more original.
To apply grout, you must use a silicone spatula or a regular foam sponge. It would be correct to remove the remaining grout immediately, since when drying the process will require some effort.
After applying the grout, it is recommended to treat the surface of the laid tile with a moisture-resistant impregnation, which will not only prevent the penetration of moisture, but also protect the tile from the effects of fungus and mold.
Corner joints must additionally be treated with a special moisture-repellent putty.
Only after completing all the described steps is it necessary to install the plinth.
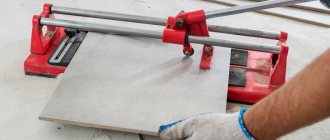
If you need to drill holes in floor or wall tiles, you should use a drill without perforation mode, otherwise chips or cracks may form on the surface of the tile. If it is necessary to obtain large holes for pipes, it is recommended to make them in advance, before laying the ceramics on the surface of the base.
After completing all the work, you need to wash the tiles and enjoy the resulting beauty. Proper preliminary preparation of the surface, compliance with all installation rules, and the use of high-quality glue are the key to obtaining a durable and reliable coating. But the main thing, of course, is patience, then everything will definitely work out.
Laying the base
According to the standard, the floor version of laying OSB slabs involves fastening them to intermediate joists laid on the floor at a distance of 40 to 60 cm from one another, depending on the thickness of the slab (the higher it is, the greater the distance).
When laying tiles on the floor, the distance between the joists must be halved. It is necessary to leave a gap of 2–5 mm between the OSB board and the shades to compensate for thermal expansion.
Wall coverings do not have such high requirements for rigidity. However, it is better to accept a slight increase in costs during preliminary work in advance than to engage in endless repairs later. In all other respects, the installation of the base does not differ from the generally accepted one, including heat and moisture insulation.
Grouting joints
The tiles are left for 2-3 days, depending on the chosen composition. Further actions:
- The quality of fixation of the cladding is checked: all parts must be held securely.
- The suture crosses are removed.
- The joints are being sealed. It is better to use specialized compounds. The solution is applied to the desired area and spread with a rubber spatula. For a better appearance, decorative devices are used.
It is convenient to apply the grout using a rubber spatula - Excess mixture is immediately removed.
Although the work of laying slab material is quite labor-intensive, it ensures that there are no problems in the future.
Surface preparation
To increase the adhesion force between the slab and the adhesive, the base must be prepared. Although the chips in the slab are not laid perfectly evenly, they themselves form an almost glossy surface. To remove the gloss, the slab must be treated with coarse sandpaper. After treatment, all dust must be carefully removed with a vacuum cleaner.
A primer is applied to the treated surface in two layers with intermediate drying for at least 1 hour. After applying the second layer, drying must be allowed for at least 12 hours. For priming, you can use almost any polymer primer.
Note! On some sites you can find a recommendation for the use of “concrete contact” primer, which supposedly has the best properties. Such advice does not take into account the fact that this primer is designed for use on a concrete floor or other surface with a certain structure of pores and capillaries. This primer is not absorbed into wooden surfaces and remains on the surface in the form of a film.
It is quite possible to apply PVA glue for construction work on the slab in two layers.
The primer is applied to the surface of OSB boards with a roller, which minimizes material consumption and ensures high quality coating.
Selection of adhesive composition
The correct choice of tile adhesive eliminates the possibility of peeling of the facing material, provided that other preparatory processes are carried out accurately. Different types of products can be used for the job, but the following are recommended:
• Elastic polymer. Excellent for work, especially on unstable surfaces. Due to its plasticity, such glue is able to reduce stress.
• Silicone. These compounds are classified as sealants, but are often used to lay tiles on walls. Although good results are observed with these products, great difficulties may arise. The fact is that there are many varieties of the mixture and not all of them have the declared qualities, so you have to choose the appropriate option by trial and error.
• "Liquid Nails". A universal solution that allows you to reliably glue various parts and elements. Its acquisition should also be approached responsibly.
Such compositions are not used as the only binding component and are applied only after preliminary surface finishing.
Laying on the mesh
A good result will be if you glue the tiles to OSB along the reinforcing mesh. To do this, you need to lay a metal mesh on the prepared and primed base, which is attached in any of the available ways - from using self-tapping screws to ordinary staples driven in with a stapler.
The mesh for reinforcement should have perforated cells ranging in size from 5 to 10 mm. The mesh should cover the slabs evenly without swelling or tearing. When joining, the mesh sheets should overlap each other by several centimeters.
Is it possible to glue tiles with regular mixtures? Yes, but it is still better to use mixtures with increased elasticity and high adhesion to wooden surfaces.
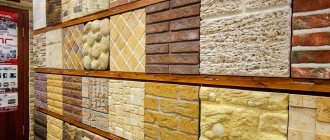
About the material
Most often, the need to cover particle walls with tiles arises when finishing frame houses. This technology has been actively used in country and cottage construction in recent years. It is oriented strand board that is the main building material in the construction of frame houses. OSB consists of several layers of compressed shavings glued together with a mixture of resins, synthetic wax and boric acid. The raw material is coniferous wood particles. The final product has a number of advantages:
- high strength;
- flexibility;
- ease of processing and installation;
- multifunctionality;
- moisture resistance;
- relatively light weight;
- price compared to plywood (main competitor);
- aesthetic properties.
Tile adhesive
In order to glue the tiles to the OSB board, regardless of how the base was prepared, it is necessary to use special adhesive mixtures. They are characterized by high elasticity and adhesion to wooden surfaces. The most widely used adhesive mixture is Ceresit CM17, which is precisely intended for laying ceramic tiles on deformable wooden surfaces, including plywood, chipboard, OSB boards.
It is somewhat more expensive, but also more reliable, to use epoxy two-component grout mixtures based on epoxy resins, for example, from Litokol, instead of glue. Epoxy adhesive has a huge advantage over all other mixtures due to its high load characteristics. This is especially important if the question is about laying tiles on the floor where there will be maximum load. The only disadvantage that should be noted is the high cost of the glue.
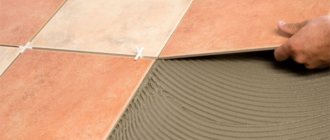
The tiles are glued in the traditional way using a notched trowel. A shaped spatula allows you to form continuous grooves on the adhesive layer, thanks to which there will be no air bubbles left under the tile. In addition, the intermittent layer of glue allows you to level the surface with minimal effort.
To form equal joint thicknesses between adjacent tiles, you need to lay special plastic crosses, which will need to be removed after the tiles have set.
Grouting of joints is carried out after the glue has dried in accordance with the requirements of the manufacturer of the material used.
How to prepare OSB for cladding
To understand why preparatory work is needed, which will be discussed later, you need to know what an oriented strand board is and how it behaves during operation.
This sheet material is made from wood chips glued together with synthetic resins.
- Despite the waterproof binder, the natural base of the boards swells from moisture, which leads to the same consequences as wood - deformation, change in size, and destruction.
- The second problem is related to poor adhesion of tile adhesives, especially cement ones, to the surface.
- Insufficient rigidity, flexibility of the material and changes in its parameters under load can cause cracking of the seams between hard tiles and their separation from the “walking” base.
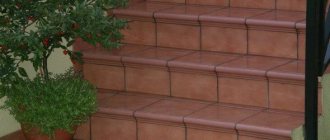
Rigidity depends on the thickness of the slab Source pamirkm.rf
These features make one doubt whether it is possible to lay tiles on an OSB board, especially on a floor that suffers more from moisture and loads. The answer is simple: it is possible if you increase the rigidity, moisture resistance and adhesive properties of such a base, and use special adhesives.
Rules for installing OSB under tiling
Possible deflections of the slab can be avoided if it is of good thickness and there is a solid and durable base underneath it. Solid is best. This is especially important when installing the floor. Loads in the form of furniture, plumbing equipment, and people moving on the floor lead to surface deformation. It is invisible to the eye, but can become critical for the integrity of a rigid, completely devoid of plasticity ceramic cladding.
OSB can be laid either on a concrete base or on a wooden flooring, having first leveled their surface, eliminating all depressions and protrusions and ensuring its tight fit.
The method of leveling a concrete base depends on its original condition.
- If there are large defects and deviations from the level, a concrete floor screed or plastering of the walls along the beacons is performed.
Beacons for screed Source buildup.ru
It is important! OSB can only be laid on a completely dry screed, otherwise residual moisture will be absorbed into the material, and the concrete will crumble during installation.
- Small cracks and potholes are sealed with putty, and the sagging is pulled off.
Before laying the tiles on the OSB, it is firmly attached to the base with dowels to prevent movement.
It is worth noting that this scheme is rarely used - it is easier to lay the tiles directly on a concrete base, without using a spacer made of wood boards. More often, OSB is sheathed on floors, walls and partitions of frame houses.
In this case, a strong wooden frame is arranged for vertical cladding, placing all its elements in one plane. And plank flooring is laid under the floor. It is not necessary to make it continuous; to save materials, you can leave small gaps between the boards. But the joints of the slabs should not “hang”, but should rest on a solid foundation. The boards themselves must be smooth, thick enough and strong, laid strictly horizontally on logs, the distance between which will allow them not to sag under load.
When installing on an old floor, it is leveled by cutting off the protruding floorboards Source polusuhaya-styazhka-pola.ru
Before laying the tiles on the OSB board on the floor, the rough covering is screwed to the wooden flooring with self-tapping screws. Their caps should be recessed and not protrude above the surface.
The pitch between the screws along the edge of the slabs is no more than 15-20 cm Source chudopol.ru
For reference! If OSB is mounted on a thin frame, you can make it more rigid by laying DSP or moisture-resistant plasterboard on top of the slab. These materials have good adhesion to ceramic tile adhesives and are less susceptible to moisture, but increase the cost of finishing.
An important point: when laying the slabs, you need to leave a gap of 5 mm between them so that when thermal expansion occurs, the joints do not bulge upward, breaking the coating.
Waterproofing and increasing adhesion of OSB surfaces
A layer of resin on the surface of particle boards makes them smooth, and glue does not stick to them well. Since laying tiles on an OSB board with such a surface is fraught with rapid peeling, it is necessary to increase its adhesive properties. What are surface treatments with abrasives and priming used for?
To remove the gloss and give the sheets roughness, they are treated with coarse sandpaper. At the end of this work, the resulting dust must be removed with a vacuum cleaner and a damp cloth.
Priming has two goals at once - increasing adhesion and hydrophobizing the surface. Therefore, you should use special compounds designed for -sheets, which create a water-impermeable layer on the surface and adhere well to both wood and glue.
Acrylic primer for OSB Source ozone.ru
The composition is applied in a continuous layer without gaps. After the first layer has dried, it is recommended to repeat the treatment and allow the primer to dry completely before laying the tiles on OSB.
Advice! When finishing wet rooms, it is advisable to prime the ends of OSB boards before installing them.
Glue selection
Since ordinary cement-based tile adhesive is not suitable for laying coverings on wooden bases, other compositions are used.
To glue tiles to small areas of walls, you can use construction polyvinyl acetate adhesive (PVA), silicone sealant or “liquid nails”.
If the cladding area is large, to reduce costs it is better to use elastic adhesive compositions with polymer additives and reinforcing fibers. Such compositions are produced by many manufacturers, the most famous of which are Knauf, Ceresit, Soudal.
Waterproof elastic tile adhesive Soudal 24A Source soudal.ru
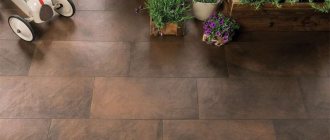
Advice! The size of the tiles laid on wooden bases also matters - the smaller they are, the lower the risk of cracks appearing on them. Therefore, it is better to choose products no larger than 30x30 cm.
Laying tiles on plasterboard sheets
The best effect can be obtained if ceramic tiles are laid on plasterboard sheets. The surface structure of the plasterboard sheet is designed for the application of any adhesive compositions based on gypsum or cement. The only disadvantage that should be noted is the increase in the thickness of the preliminary base by 9 mm and above (9 mm is the minimum thickness of plasterboard sheets).
Sheets of moisture-resistant plasterboard (with a green coating) are attached to the base using self-tapping screws with a length of 10 mm in increments of 25–30 cm along the contour and 40–50 cm over the entire area. The surface of the gypsum board is made of cardboard impregnated with a moisture-resistant composition. Before installing the tiles, the drywall must be primed with any deep penetration primer and wait until it dries completely (at least 12 hours).