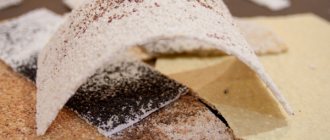
Gypsum tiles, as a finishing material, are applicable not only for interior work, but also for facade decoration on the street. This tile is widely used not only because of its quality and ease of installation, but also because of the option for self-production. This makes the interior of the room sophisticated, fashionable and original. Laying gypsum tiles is carried out without complex technologies and without the use of special equipment.
Gypsum brick-like tiles in the interior
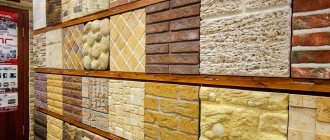
Positive and negative features of tiles
Each building material has its pros and cons. Gypsum tiles have many positive aspects:
- Light weight, which allows it to be mounted on almost any surface that does not deform.
- Fire safety. The tiles do not burn, which is an important factor.
- Wear. The tile warranty is generally 10 years. After this period has passed, you should examine the appearance of the tiles and new fashion trends.
- Gypsum tiles, installed as a finishing material, make the room individual, creative and even a little brutal. But, if this finishing material is used in the apartment, it will attract attention and delight the visiting guests.
Gypsum brick in loft style - Thermal insulation and sound insulation of partitions. With such tiles the house becomes warmer. Plaster does not allow extraneous sounds from the street to pass through.
- Gypsum tiles do not contain synthetic substances that are harmful to human and animal health.
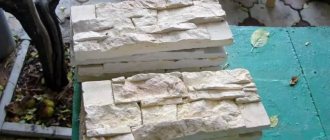
- Since gypsum tiles are an exact copy of brick and natural stone, there is no need to adjust the parameters during installation, since all slabs of decorative stone have the same dimensions.
- Laying gypsum tiles under brick requires only a level and plumb line. This does not mean that the work will be long and difficult. This tile is lightweight and installation is very simple.
- Gypsum is a good air conductor. Therefore, the rough surface will have access to air.
Gypsum brick tiles in Provence style - The price for gypsum tiles is from 350 rubles per package, which generally goes up to 800 rubles per 1 m2.
With a large list of positive aspects of tiles, it also has negative qualities:
- Moisture. Gypsum loves moisture, so if the humidity in the room is high, the gypsum will absorb it and can then become deformed.
- If the temperature is too high, gypsum tiles may also lose their appearance and the structure of the gypsum will be destroyed. For street work, special gypsum tiles are used, which contain products that create protection for the gypsum to avoid destruction.
- Fragility of the material. Gypsum is a soft component. When gypsum tiles are exposed to sharp objects, dents remain and the tile may collapse.
Gypsum tiles are not intended for the bathroom Despite the short list of shortcomings, gypsum tiles are installed by hand and serve for a long time. When installing, you should be careful, choose one of the installation methods, and follow a simple algorithm of actions.
Glue selection
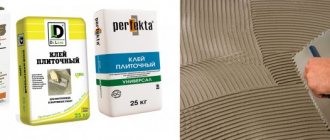
There are different types of glue for decorative gypsum stone. This can be a special gypsum-based glue or glue for clinker tiles, which is also well suited for decorative stone. You can purchase glue in the form of a dry mixture or a ready-made solution.
The dry mixture is diluted with water in the proportion indicated in the instructions. The dry mixture contains alabaster and plasticizing additives. And although the composition of the mixtures is approximately the same, they have different properties. Initially, you should pay attention to the speed of its hardening.
When choosing an adhesive for working with gypsum finishing material, you should choose one that has a minimum content of quartz sand - it significantly impairs adhesion. Remember, the right adhesive ensures a long service life of the stone. We recommend giving preference to brands such as “Ferozit”, “Elite Construction”, “Knauf Perflix”, “Lacrisil”.
The advantage of the material is also that you can choose almost any glue to work with it: PVA, acrylic, bustylate, polymer sealant. All of them will fulfill the task, but it is still better to give preference to gypsum-based glue.
Indications for use
With all the positive factors, when preparing for the installation of tiles, it is worth considering the nuances:
- The tile is placed only on a surface that is not modified. A material such as plywood is impractical, so you should avoid working with the surface;
- Gypsum tiles are moisture-absorbing. In case of high humidity, it is better not to glue the tiles;
Example of a bathroom finished with gypsum tiles - If glue or other building mixtures get on the front side of the gypsum tiles, stains will remain. This is best avoided;
- When installing gypsum tiles, there must be an appropriate temperature: 10-40 degrees;
- Joints cannot be unraveled immediately after installation. Time needs to pass.
The following can be used as adhesive for gypsum tiles:
- silicone;
Adhesive options for laying gypsum tiles - cement-based adhesive;
- plaster with gypsum.
Briefly about the main thing
Gypsum for decorative stone is used in almost every modern design. This material is a budget and modernized version of conventional brick. It is lighter, easier to install and suitable for all types of surfaces
That is why when choosing an artificial surface, attention is paid to gypsum stone
A large assortment allows you to choose the material for each room. But the types are very different from each other, so it is worth studying in detail the properties of each and comparing them with the technical characteristics of the room
You can do the installation yourself, but it is important to follow all the rules and strictly follow the instructions. Only then will gypsum tiles become an excellent addition to the interior of the house
Preparatory work
Before you begin installing the tiles on the surface, you should carry out the following preparatory work:
- The rough surface must be level. If there are large irregularities, difficulties will arise during the installation process.
- The surface must be free of dust and debris and covered with a deep penetration drywall primer.
Preparing a wall for laying gypsum tiles - The adhesive mixture is prepared in advance.
- You should not dilute too much glue, because it hardens. The glue package contains instructions for use. It should be followed.
- To ensure even laying of tiles on the wall, markings are carried out. In this procedure, be sure to take into account the gaps. They can be up to 10 mm. It all depends on the location of the tile.
- Before installation, tiles are brought into this room 1 day before installation and laid out on a horizontal surface. Be sure to check for defects.
- Tiles from different boxes are mixed to avoid a different textured pattern and color tone.
Gluing methods
Decorative gypsum stone can be glued in several different ways. The choice of method for laying the stone depends on which surface you plan to glue the gypsum product to.
Be that as it may, the walls will need preliminary preparation. You will need to level the walls, filling holes and cracks, removing too much surface relief. If the gypsum stone and its texture are similar to natural stone, you don’t have to deal with the elimination of small and minor defects. If the wall decoration is very old, it is worth removing the plaster and removing the old wallpaper. After completing the preparatory work, the wall is coated with a liquid primer, which will ensure good adhesion. Decorative stone can be laid immediately after the surface is completely dry.
Using gypsum-based adhesive
If you decide to glue gypsum stone, it is recommended to use a special gypsum-based adhesive. This is quite simple to do: you should choose a good glue, for example, Volma or Knauf. Next you will need to do the following:
Using ceramic glue
This gluing method is also considered acceptable. It can only be used in rooms where there are no difficult operating conditions. This is done simply:
It is worth remembering that this type of gluing is possible, but it is difficult to call it expedient, because glue for ceramics is more expensive and takes longer to dry. Its advantage is durability, but gypsum stones are rarely intended to be used for long periods of time.
Using liquid nails
This method is appropriate to use only if you plan to finish a small section of the wall, or to spot repair an already finished surface. The operating instructions are as follows:
“Liquid nails” are a high-quality material that is completely ready for use, but it is not practical to use it for covering large areas due to its high cost.
We recommend watching a video about using sealant for installation:
Required materials and tools
Materials:
- Deep penetration primer.
- Gypsum tiles.
- Adhesive for tiles, ceramic tiles.
- Grout for seams.
- Acrylic paint for seams.
- Varnish for surface coating.
Materials and tools for laying gypsum tiles In addition to the material, you will need the following tools:
- Notched trowel.
- Building level.
- Plumb lines for surface evenness.
- For marking you will need a ruler, pencil, meter.
- To create a seam, you may need a cut plastic tube with a diameter of 10 mm.
- For priming - roller and brush.
- To apply varnish, use a natural bristle brush.
- To paint the seams, use an art brush No. 4.
- To cut tiles, use a hacksaw.
After preparing the surface and material, you must definitely learn the features of laying tiles on various surfaces.
Installation features
To lay tiles on the surface, you should familiarize yourself with the following nuances:
- The surface must be strong and rigid, not susceptible to deformation.
- There should be no difference on the surface. To do this, it is best to use a plumb line.
The surface for laying tiles can be either concrete or brick. This also has its own aspects:
- Concrete surface. Concrete has high porosity. To achieve a better result, concrete should be treated with a deep penetration primer mixture (can be treated with a primer 2 times);
- If the wall is covered with plaster, then you need to check the strength of this coating. If the old plaster “breathes”, it should be removed and a new one applied. Then coat the surface with a primer;
Removing paint from a painted wall before laying gypsum tiles - Laying tiles on gypsum plaster involves preliminary work on cleaning the surface and covering it with a soil mixture 2 times;
- If the wall is painted, the paint should be removed. If this cannot be done, then frequent notches must be made on the surface - small stripes that damage the paint. Everything needs to be covered with a primer mixture;
- Brick wall. In the case of installing gypsum tiles on this surface, you need to carefully inspect the wall for the evenness of the masonry, as well as the filling of the joints between the bricks with mortar. If the brickwork is old, then it is worth plastering the wall and covering it with a primer;
Plastering a brick wall for laying gypsum tiles - Wooden wall. First you need to fix the fiberglass on the tree. Then cover it with plaster. Then primer. Only then proceed with the installation of gypsum tiles;
- If the wall was leveled with plasterboard, as well as plasterboard partitions, only a primer will be required.
Gypsum tiles can be mounted on almost any surface. The main condition is preliminary preparation and taking into account some surface features.
Interior ideas
The finishing material gypsum brick is an excellent option for the interior design of any room. Today there are many options for using it in design, the most common of which are:
- In the living room.
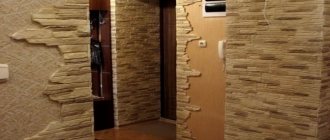
A great option is to decorate wall surfaces with decorative bricks in warm colors, such as sand shades. The atmosphere will become cozy when you place a corner, large-sized sofa and a small coffee table against the backdrop of a brick wall. A wall decorated with bricks, complemented by elements of the same material in the corners in the shape of a column, will look more organic; A great option is to decorate wall surfaces with decorative bricks in warm colors, such as sand shades. - In the corridor.
Partial decoration in the form of wall edgings and light-colored baseboards will make the corridor more spacious; Partial decoration in the form of wall edgings and light-colored baseboards will make the corridor more spacious. - In the bedroom.
A brick wall free of furniture with a restrained color scheme or in 2 colors of white and sand looks ideal. To add originality, you can use products with an aging effect against the background of furniture made of natural wood and glass decor. A brick wall free of furniture with a restrained color scheme looks ideal.
Installation of gypsum tiles
By following the rules of gypsum tile laying technology, the work will be easy, practical and of high quality.
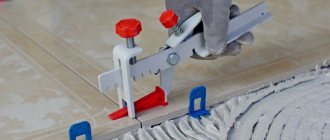
Installation of brick tiles After the preparatory work and the primer has dried, markings are made.
To do this you will need a ruler, level and pencil. Horizontal lines made without taking into account the seam will serve as a guide for even laying of the tiles. After marking, you should choose one of the methods of laying gypsum tiles on the surface.
Dry method
In the dry method, the tiles are laid vertically, starting from the top (if it is a wall, then from the ceiling to the floor) down. IMPORTANT! This method is chosen for tiles that have grooves (protrusions) on the sides.
- The upper corner of the surface is selected.
- The rail is fixed vertically in this corner.
Dry method of laying gypsum tiles under brick - After that, the width of the tile is measured on the wall and the lath is fixed horizontally according to this indicator.
- The tiles are attached to the resulting window with screws or self-tapping screws for drywall.
Thus, a vertical row is laid out.
Wet method
In this method, the tiles are laid according to the tile principle - horizontally, from bottom to top.
- If cement adhesive is chosen, then the surface should be wetted.
- The underside of the tile should be treated with a primer and left to dry.
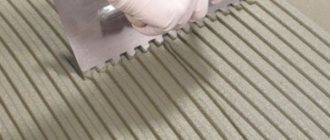
- Using a notched trowel, apply a thin layer of adhesive to the surface and back of the tile.
Wet method of laying gypsum tiles under brick - The tile is applied to the base and pressed down a little, thereby settling on the surface.
- To ensure evenness of the masonry, a level and plumb line should be used.
The glue sets in one day. It is worth starting further finishing of the tiles after this time. Watch the video: how to lay gypsum tiles under a brick.
How I chose glue
I had this situation once. My friend and I went for the first time to install our brick and needed to buy white glue along the way, because... the tiles were white. We stopped at several stores, but all the glues were of any other color, but not white. And in the last store we were in, I saw a pavilion where they were selling decorative stone and decided to ask the seller if maybe they had glue for sale. The seller says, of course there is, here’s a 25 kg bag, it costs 950 rubles. Balls almost came out of my forehead! What 950 rubles? The seller said that the glue was made on a gypsum basis, etc. I called the customer and said what the situation was and he agreed to use this glue. Here it is, litokol lithoplus 55.
We arrive at the site, prepare for work, I open the bag and see a light green powder. How so? “WHITE” is written on the bag in large letters. Or is it their white color? In short, I didn’t understand anything. The customer also said that he doesn’t see white here. But we didn’t waste time and started installation. After installation, the customer himself painted the seams with white paint, because... they wanted to seal them with the same solution.
The same story happened with Bergauf glue - exactly the same color. Why write white if it's not white? Always look at what kind of glue you buy, do not believe the inscriptions on the label.
Source
Grouting joints
A day later, when the adhesive has set and hardened, you can begin grouting the joints. Grouting process:
- The seams can be filled with adhesive.
- The top of the seam is filled with paste using a construction syringe or a bag with a cut corner.
- The formation of the seam is done using a wooden stick or a cut plastic tube. Then it will have a convex shape.
Grouting joints of gypsum brickwork - The seams should only be painted after the grout has dried.
- The seams are painted using a brush and acrylic paint.
To take into account all the intricacies of the work and avoid mistakes, it is worth watching the video.
Further finishing - how to cover gypsum tiles
After the paint has dried, the tiles are coated with acrylic varnish to avoid the influence of external factors.
Coating gypsum tiles with acrylic varnish If the tiles are placed in the interior of an apartment, bathroom, balcony or kitchen, then sealing should be done. The corners should be sealed with silicone. The connection to the floor is also sealed.
The tile is varnished in two layers. Moreover, this is not done immediately, but after the first layer has dried.
If you follow the rules for installing tiles, the period of work completed will be commensurate with the shelf life of the tiles.