Why do you need a comb?
The reason for using a toothed comb is very simple. When the material is pressed to the surface, the glue will be distributed evenly, filling the voids. If you apply the bonding mixture smoothly, when you press, the excess glue will either come out or accumulate in one place. Thus, the grooves provide better grip on the surface.
The use of a comb helps:
• uniform distribution of glue over the surface; • saving glue consumption; • saving time; • connection reliability.
Considering these features, the choice of a notched trowel for laying tiles is quite logical and justified. If the master needs to perform a large amount of decorative work, then squeezing out and removing excess glue will lead to a decrease in the pace of installation. In addition, overuse of glue leads to overspending on purchases.
Advice. The most convenient to use is a comb with two serrated sides and two smooth sides: you do not have to change tools during the process.
When is a straight edge tool used? This cladding procedure is justified in the case of leveling the wall with glue. However, only experienced tilers can handle this.
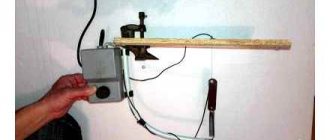
Sliding comb for tiles
The desire to do work faster and get less tired forced us to come up with a device that could reduce the time of applying glue by 70% .
Comb - transformer when folded does not take up much space. When unfolded, that is, in working condition, it is capable of applying glue to a horizontal surface very quickly and efficiently. In this case, the master finisher is standing on his feet, not on his knees. This is very important, because for each tiler, knees are a completely separate matter.
The width of the adhesive layer can be adjusted from 5 to 60 cm or from 6 to 90 cm , depending on the model. The height of the layer and the shape of the teeth can be selected depending on the configuration of the nozzles.
Advantages of a sliding comb for applying tiles:
- don't have to kneel while applying the mixture.
- You can strictly set the width of the adhesive layer depending on the width of the tile.
- The speed of applying glue to the surface increases significantly , which is especially noticeable when working with a whole team.
- Particularly effective on large areas
disadvantages :
- If you come across a poorly mixed lump of glue, you will have to remove it manually .
- Washing and dismantling the device will take much more time .
- It is not very effective when working in the sun and when working with 1 - 2 tilers , since the applied adhesive may weather due to prolonged inactivity.
Despite the apparent simplicity of a tile comb, choosing it is a responsible matter. After all, a properly selected notched trowel is the key to a quality job.
Teeth size
How to choose a trowel for laying tiles, and what tooth size is best? The choice of tooth size depends on the size of the facing material.
Let's look at examples:
- 4x4 mm - used for facing products measuring 1x10 cm;
- 6x6 mm - used for finishing with standard dimensions of a facing product 15x15 cm or 20x20cm;
- 8x8 mm - for products 30x30 cm.
For large-format tiling structures, combs with teeth from 10 to 20 mm are used, for example, a trowel for floor tiles.
The shape of the comb teeth comes in three types:
- square;
- semicircular;
- triangular.
Teeth shape
How to choose a notched trowel for tiles of the correct shape? If the size of the tooth depends on the size of the decorative product, then the shape must be selected taking into account the thickness of the adhesive composition.
An example of using the clove shape:
- comb up to 12 mm thick - square shape;
- the ridge from 12 millimeters and above is semicircular;
- ridges up to 4 mm are applied with a tool with triangular teeth.
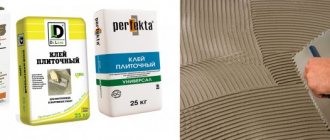
A selection of tile comb manufacturers
Below are the most popular manufacturers of notched spatulas.
Russia
- Polytech. Russian company - manufacturer. Among other things, also hand tools.
- Sibrtech . Siberian Technologies presents more than 5,000 types of hand-finishing tools.
- Bison Probably one of the most popular manufacturers on the Russian market.
Europe
- Forbo. Association of companies from Germany, Sweden and Switzerland. They work on flooring, as well as hand tools.
- COLOR EXPERT. The homeland of the brand is Germany. They produce professional hand tools. The company is confident that there is a professional in everyone, the main thing is to work with a quality tool!
- Hardy. The country of origin is Poland. They produce professional hand and painting tools at affordable prices.
- STANLEY. Not exactly a European manufacturer, but it was impossible not to mention! American company producing professional hand tools.
Which spatula is better
How to choose a trowel for laying tiles, taking into account the length of the teeth and the thickness of the adhesive? Practice shows that a craftsman should have combs of different shapes and tooth lengths in his arsenal. This is due to the uneven surface of walls and floors. Other cladding must be laid on a thicker layer of adhesive in order to level out the recess in the wall or the slope of the floor.
Advice. In order not to buy several combs, it is better to purchase one with teeth of different lengths on the edges.
There are plastic combs on sale, but you should not buy them. Firstly, they have difficulty contacting the glue. Secondly, they quickly wear down and become unusable.
Grouting tool
Jointing, or grouting, can be done without using any tools. However, this type of finishing requires a lot of time, patience and dirty hands. Therefore, purchase a special spatula for grouting tile joints.
Types of jointing devices:
- rubber products of various sizes;
- professional graters;
- distribution spatulas;
- jointing gun.
Rubber products are very convenient to use. When choosing, you need to pay attention to the elasticity of the material: it should be elastic, but not soft. Hold it in your hands: the handle should be comfortable. It is not recommended to purchase a tool with a wooden or plastic handle: it is inconvenient.
A spatula for tile joints in the form of a grater is used by professional tilers who perform complex finishing. It has a rubber or rubber surface. Distributing spatulas are somewhat similar to a mop and are used for finishing tiles with an uneven surface. The jointing gun is also used when finishing decorative stone products, terracotta and other uneven surfaces. You can make your own syringe from a durable plastic bag by cutting a hole in the corner. However, a limitation in the use of the gun is the density of the grout: it is used with mixtures of liquid consistency.
Selection by material of manufacture
It is very important what the spatula is made of:
● Stainless steel. Durable tool, easy to buy, just clean the comb. Durable, suitable for any tile.
● Painted metal. With active use, the paint wears off and the metal of the spatula rusts. Suitable if stainless steel is unavailable for some reason, but requires careful care.
● Plastic. A cheaper option, but too light, so the comb may break if you force it. And you definitely need force if you are laying large tiles that require a large amount of glue. The most undesirable type of spatula.
Preparation for finishing
Inexperienced craftsmen often ask the question: is it possible to lay tiles on putty? Of course, you can veneer any working surface. However, the question is: will the structure hold up?
- To do everything correctly, follow the rules:
- Determine the type of working surface: most require plastering and priming.
- Clean the walls as much as possible from old coverings: paint, wallpaper.
- Level the surface by plastering or installing drywall.
Only after this proceed to finishing. Experienced craftsmen can also install it on putty, having previously made notches and primed the base. In this case, the putty must be checked: knock on the wall. If the response sound is “empty”, installation cannot be done: it will still fall off along with the putty.
How to apply glue correctly
The main thing in this work is not to leave a void between the cladding and the base. The grooves that the comb forms help squeeze air out of the adhesive composition. However, novice tilers may make mistakes when finishing, which can lead to the material peeling off from the base.
So, the sequence of work:
- We take a spatula for laying tiles with smooth edges and apply a lump of glue to the product.
- Using a toothed comb, level the mixture over the entire width and 2/3 of the length.
- We tilt the tile towards the container with glue and distribute the mixture along the entire length, discarding the excess.
- If the working solution is not enough, add another lump of glue.
- Next, apply the working solution to the wall/floor and press the cladding.
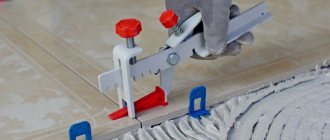
Comb for laying tiles
Operating principle of a notched trowel.
After a layer of glue is applied to the surface with a flat spatula (the layer should correspond to the height of the tooth on the comb with a small margin), excess glue is removed at an angle of 45 - 75° with a notched spatula . This allows you to maintain the same layer over the entire area. After going through the comb, apply and press the tile, with good force, but without excessive pressure, lightly tap with a rubber mallet. After pressing the tile, the glue between the tile and the surface spreads, and a suction cup effect due to the air displaced by the glue. This is another advantage of the tile comb.
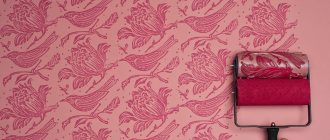
Grouting joints
Before starting, you should thoroughly clean the work surface. Remember the rule: grouting should not be done over the entire surface at once, but in parts. The facing material and tools should be periodically moistened, and the mixture should be pressed into the openings between the tiles. After jointing is completed, the surface must be cleaned of traces of the mixture.
Which putty is better to joint the seams of paving slabs? Outdoor pavement is susceptible to moisture and temperature fluctuations, so the choice of composition should be approached taking these features into account. Stores sell a special fugue for exterior work, however, you can make it yourself from cement putty and primer. The mixture for laying paving slabs must be diluted to the state of liquid sour cream. Then a durable plastic bag (you can take it from a milk bag) is filled with a fugue and grouted.
Features of adhesive compositions
The thickness of the layer of adhesive mixture under tiles or porcelain stoneware can vary dramatically. Of course, the key factor here will be the facing material used and its individual characteristics, but much also depends on the adhesive composition itself.
There are three main types of tile adhesive:
- Cement. Standard dry mixture of Portland cement, sand and modifying additives with plasticizers. An alternative is a homemade mortar made from cement, sand and slaked lime. At the same time, working with such glue is quite simple and convenient.
- Two-component. These are predominantly epoxy compounds, which include an epoxy resin and a catalyst. The result is a viscous adhesive that provides effective adhesion of surfaces with minimal mixture consumption.
- Dispersive one-component. These are ready-to-use mixtures, which mainly consist of resin components of one type or another. They can also be based on polymer components, for example, latex.