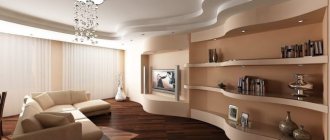
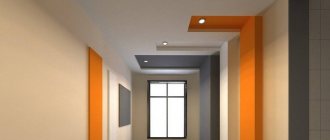
The suspended ceiling with LED lighting personally reminds me incredibly strongly of St. Elmo’s Fire, which has been filling sailors with mystical delight for hundreds of years. And I’m especially pleased with the opportunity to realize such beauty right at home. And I’ll tell you how to do this later.
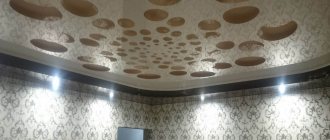
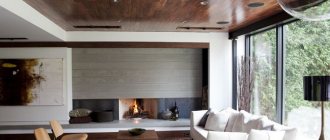
Photo of a stretch ceiling with original lighting
Types of lamps for suspended ceilings
Convenient LED strips, as a rule, help to create a stretch ceiling with lighting. These products are printed circuit boards in the form of cords of different lengths, equipped with LEDs. Most often, special niches in a plasterboard surface or in another system of several levels are used for their installation.
Classification of lighting according to installation location:
- LED strip lighting around the perimeter.
- Curly. May have different shapes and colors. It is placed on the base in the form of various figured compositions.
- Uniform. A classic option used on ordinary flat ceilings.
Floating curtains - an innovation in the world of design
Another innovation in the world of design is the floating tent, which provides integrity and a single horizontal plane to any structure “suspended in the air.” To get an idea of it, we offer you another selection of photos.
A hidden bracket is very practical for rooms with low ceilings, as floating curtains will make your room appear taller and more spacious. Also, the price of a regular cornice will be much more expensive.
If you don’t need window lighting yet, you can limit yourself to a hidden curtain that is attached directly to the stretch ceiling profile and does not “take away” excess height from the cornice.
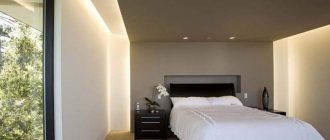
If you have a large enough studio, attic or bedroom, you can build a hidden translucent curtain above the bed, repeating its perimeter. This will create a cozy, romantic sleeping area and protect you from annoying insects.
Fluorescent lamps
These light sources are considered classic solutions that have been in use for a long time. In the old days, they were used exclusively on single-level ceilings, decorated with whitewash or paint. Currently, individual areas are illuminated with fluorescent lamps. They are also an indispensable attribute when creating hidden or open lighting.
Although devices of this type are very common, they have a number of weaknesses:
- Can be used exclusively along the main contour as additional lighting elements.
- Needs frequent replacement due to short service life. And this despite the fact that the lamps themselves do not get very hot. To make a replacement, you have to dismantle the entire ceiling structure. Next, the canvas needs to be re-stretched, which entails a significant loss of time and finances.
- Inability to adjust brightness level.
- Dependence of lamp operation on ambient temperature. At low temperatures their functioning deteriorates noticeably.
- Health hazard. One of the components of fluorescent lamps is mercury: as is known, the vapors of this substance pose a serious threat to people and the environment.
Neon lamps
Due to the low brightness level, they are practically not used as the main light source. The undoubted advantage of neon devices is a large palette of bright colors, which is widely used by designers to realize their ideas.
Using light sources of this type, you can successfully highlight individual ceiling elements, enhance or shade the main lighting fixtures. The main stopping factor on the way to the mass use of neon lamps is their high energy consumption, with a short service life. This will explain the fact why neon is practically not used in combination with stretch ceilings illuminated from the inside.
LED strips
Products of this type are by far the most popular options for creating suspended ceilings with internal lighting.
This is facilitated by the presence of a number of advantages in LED strips:
- Durability
. Replacing devices of this type is required very rarely, which is a fundamental factor for tension systems. The fact is that dismantling these structures is quite complicated and requires a certain level of skill - Flexibility
. This quality opens up great opportunities for creating smooth light compositions and lines on the ceiling surface. - Versatility
. The tape can be used in the design of a wide variety of ceiling structures - straight, curved and multi-level. - The presence of a uniform glow
, which can be adjusted.
- Hue variety
. LED devices can have not only the classic white color: products are available in various colors. This makes it possible to select the most successful combinations from the point of view of the overall design of the room. - Low heat
. In fact, the operation of diodes is not accompanied by heating of the surrounding space. This feature is invaluable for elastic PVC films, which can become deformed when the temperature rises. - Economical
. LEDs require very little electricity to operate. - Possibility of adjusting the brightness of lighting
. The device includes a remote control, power supply and control unit.
The Duralight cord is very reminiscent of LED strips: its flexible design makes it possible to perform approximately the same functional tasks. However, Duralight is inferior to LEDs in several respects: its light is not uniform and requires quite significant energy costs. In addition, products of this type quickly fail.
Fourth - final stage
At this stage, it is necessary to carry out final work on the drywall, as well as install a switch. Before performing this work, do not forget to disconnect your junction box and check the entire electrical circuit for functionality. We do the final steps in the following order:
- We cover the entire metal structure with ceiling plasterboard.
- Using putty, glue the perforated corner onto the corners.
- Apply primary putty to the drywall and wait for it to dry.
- We apply the secondary.
- Sand with a grater or sandpaper with a grain size of 200–250.
- We prime and paint.
Next we move on to connecting the switch and spotlights.
That's all my friends, our work is finished. If you do everything correctly, then even without rushing, everything will take you no more than 4 days. And remember: if you have never done such work or dealt with such equipment, and especially with electricity, entrust this work to professionals, do not risk your life. This article should not be taken as a direct instruction to action, since it is only advisory in nature, since it is intended for people who have previously dealt with similar work and tools. Good luck!
Lighting in combination with plasterboard structures
Plasterboard elements are often used in combination with tension fabric or film sheets. This is especially true when it comes to a suspended ceiling with LED lighting around the perimeter. Most often, such structures consist of two, three or more levels.
The role of the base here is played by the upper part on which the light falls. To make the lower tier, use a gypsum plaster board with a backlight hidden underneath it. The plasterboard element can have different configurations. The simplest solution is a regular slope around the perimeter of the room. More complex options are multi-level structures with steps or various shapes inside the main profile.
There are three options for illuminating suspended ceilings around the perimeter of the box:
- Ceiling perimeter.
- Separate points around the perimeter.
- Using tapes covered with tension fabric.
When decorating perimeter lighting using LED strips, a variant with niches in the sides of the contour is often used. This is where the light sources will be placed.
A plasterboard niche with illuminated stretch ceiling has the following advantages:
- Obtaining an unusual visual effect. It seems that the luminous flux is pouring onto the ceiling surface from nowhere.
- Simplicity of the device and universality of the system. This type of lighting can be used to decorate any type of plasterboard box.
The main disadvantage of this modification is the accumulation of a large amount of dust inside the plasterboard box, which is where the lamps are installed. Cleaning the surface will require significant effort due to the inconvenient location. Spot lighting involves installation around the perimeter instead of LED built-in lamps. As a result, the lighting is not so uniform, but the likelihood of large volumes of dust accumulating inside the box is completely eliminated. This is achieved due to the presence of closed sides in this design.
In cases where the LED strip is mounted under a tension surface, there is no need to use a plasterboard circuit. This method of illumination around the perimeter requires the least financial expenditure, however, it also has many disadvantages. If you place LEDs in the ceiling space, they, along with the canvas, will illuminate all the other elements located there.
We are talking about various communications - wiring, ventilation lines, cables, etc. In addition, all the debris and weld seams that have accumulated on the back of the film will become clearly visible. To avoid this effect, special false ceilings and high-quality PVC sheets without seams are used. All this significantly increases financial costs.
Installation work
During the construction of the plasterboard box, you must adhere to the following recommendations:
- When arranging the frame, the guides should be placed at a distance of 60-70 cm from each other. Its outer part should be decorated with plasterboard sheets.
- The area of contact between the tension fabric and the body is reinforced with additional fixing devices - mortgages. If this is not done, there is a real danger of the structure breaking due to the high tension force.
- To cover the joints of the frame, a narrow serpyanka mesh is used, followed by putty and sanding.
The technology for making illuminated suspended ceilings using a plasterboard box is as follows:
- Install the structure using the fixation method on the walls and ceiling around the perimeter of the room.
- A small vertical protrusion (up to 10 cm) is made on the lower cut of the body. Another one should extend upward from it to a height of 5-7 cm. This will make it possible to build a niche for lighting fixtures. The distance from the base surface to the edge of the protrusion should be at least 10 cm: this will allow you to stretch the decorative fabric without interference.
- The vertical area of the profile is equipped with a mounting baguette. This will make it possible to fix the film in accordance with all the rules.
- The finished niche is decorated with an LED strip or other lighting device. Switching to the electrical network is carried out in accordance with safe connection standards.
Plasterboard housings for LED lighting of hidden structures are used in combination with glossy stretch ceilings. This type of surface has a mirror effect, perfectly reflecting various objects. If you use an open niche, the lamps will be visible from below. Inside the hidden niche, there are completely no visibility zones for lighting fixtures. At the same time, the uniformity and beauty of the emitted light does not suffer. However, you need to remember that installing a suspended ceiling with a closed niche for lighting will require a lot of effort and time.
Installation procedure:
- Arrangement of a plasterboard box. This procedure is carried out exactly the same as in the previous case.
- Installation of PVC film on the sides of the gypsum plasterboard profile.
- The resulting recesses are decorated with LED strips. Switching with the electrical network is carried out in accordance with all safety standards.
- To ensure complete coverage of the upper side of the niche, pre-cut plasterboard strips of small width are used. Special holes are made in them for light.
The result should be a closed gypsum board box with holes along the top surface: this will ensure uniform illumination of the tension fabric. These holes will be completely hidden and therefore will not be reflected on the glossy film.
Thanks to the hidden niche, you can beautifully highlight the strengths of the glossy canvas. At the same time, external dust does not lose the ability to penetrate inside the plasterboard casing. Most often, this arrangement technique is used in children's rooms and kitchens.
How to choose for different rooms?
The choice of the number of tiers of a multi-level ceiling depends on the area and height of the room. Each level has 10–15 cm, so you should not make complex structures in low rooms or small apartments such as Khrushchev-era buildings. The fact is that multi-tiered ceilings take away useful space and visually reduce already small volumes.
The situation is different in large rooms, the area of which is more than 20 square meters. m. Many people want to create a unique design in them using multi-tiered ceilings with lighting. For spacious rooms, you can mount a plasterboard frame in 2-3 tiers, equip it with hidden side lighting or built-in halogen, LED, and fluorescent lamps.
It is also worth paying attention to the choice of the lamps themselves for multi-level plasterboard ceilings. According to their design and methods of fastening, they come in three types: point, suspended and LED strips
Spotlights have gained the greatest popularity due to their compactness, versatility and ease of installation. They are convenient to insert into plasterboard ceilings with a niche; the body and the entire wiring system remain inside. You can divide all the lamps in the room into groups, each of which will illuminate a separate area and be turned on by a separate switch.
The front part of the spotlight has a round shape, the body is made of silver metal or plastic. The advantages of such LED lamps are their long service life and low power - they practically do not emit heat. And their energy consumption is 8 times less than that of incandescent lamps and 3 times less than that of energy-saving lamps with the same level of illumination. For example, a 75 W incandescent lamp can be replaced with a 12 W LED, and the room will not become darker.
Another advantage of LED lamps is the choice of light temperature and shade of white suitable for a specific environment. There is natural white, ideal for working in the office and household chores, warm - for a relaxed atmosphere in the bedroom, heavy yellow, which is suitable for the kitchen, and other types.
Pendant lamps have a body located on the inside; their light weight allows them to be used on plasterboard ceilings. They are attached to the embedded profiles using the supplied device. The fastenings are located inside the frame. Pendant lamps are very similar to traditional chandeliers, and you can install them in the living room, bedroom or children's room, but you should not hang them in the kitchen or hallway.
LED strips are most successfully placed in a two-level plasterboard flow with a frame in the bedroom. These devices are similar to a regular cable of different thicknesses, which are evenly illuminated along the entire length. The tape bends easily and takes the desired shape.
Halogen lamps are close to LED lamps in color rendering and brightness, although they are not as economical. But such lighting options are also well suited as built-in lighting for multi-tiered ceilings.
Finally, as a budget option for illuminating complex ceilings, you can use fluorescent lamps, which are cheaper than halogen and LED lamps, but their service life and savings are shorter. A cool white glow can work well in a hallway.
Backlight without gypsum board profile
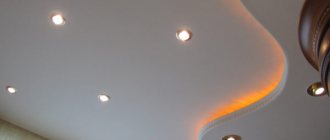
To implement this option, use the space above the decorative canvas or the internal cavities of the plinth. Using this backlight, it is necessary to ensure that the light from the LEDs reaches the base base: the glow reflected from it will be softly reflected on the film surface. The effect is very beautiful and uniform. This type of lighting has proven itself to be excellent when decorating lounges, bars and bedrooms, where there is no need for bright lighting. The light is diffused and soft. As for large premises, this option is not suitable due to the appearance of an unlit area in the center.
The procedure for arranging lighting without a gypsum board profile:
- Equipping the perimeter of the room with LED strips.
- Installation of baguettes. The indentation is made downwards by 5-6 cm, baguettes are attached. This will create a safe buffer between the light sources and the stretch fabric, protecting it from excessive heat.
- Installation of stretch vinyl film on a baguette. To cover the edges, a ceiling plinth installed around the perimeter is used.
If the ceiling height in the room is small, then the possibility of using lighting in combination with several ceiling levels disappears. In this case, the first step is to install the tension film. After this, making a downward indentation of 50 mm, the LED strip is attached to the walls.
To additionally decorate the lighting elements from below, one of the many decorative options is used. For example, wide-width ceiling plinths are often used. In this case, two methods are combined at once - installing a plasterboard box and arranging niches for LED lamps. In this case, plasterboard sheets are not used.
Adviсe
The choice of LED strip for the interior is determined by what functions you want to assign to it. Photos of various LED strips in the interior, many of which are available on the Internet, will help you understand what exactly you want from additional lighting.
White light with bluish tones will highlight the appliances in the kitchen and complement the lighting, while red ribbons will help create an intimate atmosphere.
LED lighting looks impressive on the ceiling ledges, and liquid wallpaper will help to disguise the stripes.
Choose your LED strip wisely and pay careful attention to its installation, and your lighting will bring you aesthetic pleasure, as well as last a long time and reliably.
How to install LED strips around the perimeter of the ceiling
Products of this type go on sale wound in convenient spools. The total length of the glowing cord there is up to 5 m. The ribbons can be cut into several separate parts in the places indicated for this. Professionals do not recommend laying strips that are too long on the ceiling. As a rule, one power source can serve up to 15 m. If the total length of the strips used exceeds the specified limit, then a separate cable is supplied for the remaining part. Powering long-length LEDs takes too much energy, which affects their service life.
Recommendations for installing LED strips:
- Most often, the tapes are attached in the grooves between the ceiling plinth and the tension film. This makes the backlight completely hidden from visual view.
- Lighting effects can be controlled by changing the distance between the tape and the ceiling surface. In this way, they achieve accentuation of individual contours of the perimeter (or plasterboard box) or illumination of the entire area of the upper tier with soft light.
- When using translucent tension material that transmits light well, due to the correct positioning of the backlight, you can achieve the effect of an original glass roof.
- To equip curved sections of the structure with lighting, it is not recommended to bend the tape too much. If the bend radius is less than 2 cm, there is a real risk of damage or breakage of the strip.
- During the installation of the LED strip, you must be extremely careful to avoid any mechanical damage: this may damage the conductive elements.
- When making connections with a source of electrical energy, it is important not to confuse the polarity. Direct connection of the tape to the electrical network is prohibited: an additional controller must be present in the circuit.
- Before gluing the LED strip, the base must be leveled and degreased. When using non-self-adhesive tape, high-quality double-sided tape comes to the rescue.
- Fastening with dowels or self-tapping screws is also allowed. This method makes it possible to remove the strip if necessary, without the risk of damaging the finish.
- During installation, you must follow electrical safety rules: there must always be a power supply reserve of at least 25%.
- When installing an LED strip on a metal base, a special insulating lining made of dielectric material is used.
Along with LED strips, LED tubes have gained widespread popularity. They make it possible to create unusual island lighting. Combined lighting is also very common: in this case, the central zone of the base is equipped with a chandelier, and its edges are equipped with LED devices. Most often, multi-tiered structures are designed in this way, which makes it possible to obtain fancy light combinations.
Tips and tricks
To make the backlight as correct as possible, the cut locations must be fixed using a connector or soldering iron. In this case, you cannot act on the material for more than 10 seconds. In single-color varieties, it is necessary to connect the “+” and “–” contacts.
In RGB type boards, the contacts are combined based on color and markings, where:
- R stands for red;
- G – green;
- B – blue;
- 4 contact = 12 or 24 V.
The transformer cord is connected to contacts N and L. If an RGB tape is connected, a controller is added to the system
It is important not to confuse the values of “+” and “–”, as this can lead to breakage of the tape. When making a connection, take into account the fact that the transformer is designed for a maximum total backlight length of up to 15 m
If the perimeter of the LED backlight is larger, an additional power supply must be added to the system.
In order not to suffer from negative color perception in the future, the tape must be chosen correctly. Do not buy a single-color backlight model. Consider the influence of the shade: red provokes anxiety and aggression, blue initially calms, but with a constant glow day after day it provokes despondency, then depression.
Yellow light in the daily lighting of a space creates a depressing atmosphere. Purple is good for temporary lighting in the room of young household members, but it is contraindicated for older family members. Therefore, when purchasing, based on practical considerations, you should choose between white backlighting for daylight and varieties with color changes. This will allow you to vary the shades of light flux according to your mood without getting used to them.
Options for creating lighting for suspended ceiling structures
Illumination of suspended ceilings is currently carried out using the following modifications of lighting devices:
- Fiber optic cable
. The element contains a large number of glass or plastic cores that conduct light. Design features protect it from light scattering beyond the fibers. Most often, fiber optic products are used for arranging spot lighting. First of all, a projector and diodes are placed on the base base: a canvas with star compositions is stretched under them. Next, the tension material is equipped with a series of holes of small diameter (2 mm). Subsequently, light fibers are threaded through them. - Diode mini-luminaires
. These elements are also included in the “starry sky” ceilings. Their design has good light-diffusing parts. Installation of mini-luminaires is carried out together with a fiber optic cable. Place of installation – seats in the canvas. The light initially passes inside the cable, after which it is diffused into the mini-luminaire. In the overall decorative perception, fibers play the role of small stars, and mini-diode lamps play the role of large stars. - Neon cord
. Equipment of this type operates at high voltage, which leads to the appearance of an electric field. As a result, a uniform glow that is comfortable for the eyes begins to emanate from the phosphor between the copper terminals. The neon cord can be powered not only from the mains, but also from batteries. To obtain the required voltage, a special current inverter is used. Using a cord, it is convenient to decorate the perimeter of a ceiling or plasterboard structure. It is also used as internal illumination of PVC film. - LED strips
. We are talking about printed circuit boards up to 5 m long, which are sold in convenient reels. The diodes are placed on the strip at different intervals. The color of the emitted light can be monochrome or multi-colored, which opens up a lot of scope for various combinations. Individual LEDs provide the ability to change the intensity of the glow in different sections of the strip. When choosing an option for illuminating the stretch fabric, the choice most often falls on the LED strip. For ease of installation, one of its sides is covered with an adhesive strip with a protective film.
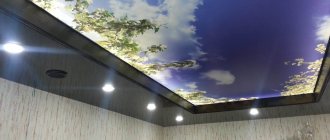
You can make the illumination of the entire area of the tension fabric as interesting as possible by using the “starry sky” effect. To achieve this effect, a fiber optic cable and mini-diodes are laid under the tension film.
Necessary materials
In order to create a luminous stretch ceiling in your apartment, you may need a wide variety of materials. However, there are not as many of them as it seems at first glance.
Table. What is needed to create a luminous stretch ceiling.
| Material or element | Tips for use |
| PVC fabric | Be sure to purchase a material with 50% transparency, otherwise you will not achieve the desired effect. |
| Harpoon profile | It is thanks to him that the stretch ceiling will hold up. |
| Masking tape | Necessary to hide the gaps between the ceiling and the wall. |
| LED Strip Light | Selected depending on the design of your ceiling. Its characteristics and types can be found above. Most importantly, don't buy cheap tape. |
| Ceiling aluminum profiles | Necessary for attaching LED strip to the ceiling. |
| Dowels | Allows you to attach ceiling profiles and a harpoon profile for the ceiling to concrete. |
| Double-sided tape | It will be needed to attach the tape itself to the profiles, but can be immediately attached to it by the manufacturer. |
| Wires and step-down transformer | Necessary for connecting the lighting system to the electrical network. |