Many people are familiar with the expression: “The renovation never ends!” This expression is especially relevant for those who live in their own home all their lives. But even apartment residents have to deal with this thankless task at least once in their lives. There is no escape from this - no one wants to “live in a hut” or be branded a retrograde. And in construction and finishing, new materials, designs and solutions appear every day. It makes sense to consider in detail how to make a two-level plasterboard ceiling with lighting yourself and bring an original design to your apartment.
Advantages and disadvantages of two-level plasterboard ceilings with lighting
A two-level ceiling is made of plasterboard and stretch fabric. Designs of this type are extremely popular among consumers, as they allow you to create extraordinary compositions that not only highlight the interior of the room, but also become its main detail.
Among the advantages of a multi-tiered ceiling are:
- Curly structures are lightweight, which prevents excessive load on wall and ceiling floors.
- It is characterized by simple installation; drywall is easy to cut and give it the required shape.
- Sheets of plasterboard reliably mask all flaws in the ceiling. When deciding to install a two-level structure, the consumer may not care about carefully leveling the surface.
- Thanks to the free space between the base of the ceiling and the levels of the plasterboard structure, the user has the opportunity to install volumetric structures (ventilation cabinet) and lay utility lines.
- The two-level design has many configurations, which allows you to visually divide the room into separate zones. In combination with properly selected lighting, this will be especially impressive.
- In its finished form, a two-level ceiling has a magnificent appearance, certainly attracts attention and can become a central element in the interior of the room.
- The presence of several levels allows you to play with lighting options. Many designers use this design feature of a plasterboard ceiling to create beautiful and harmonious lighting in a room.
- Thanks to the special technological properties of plasterboard, its use as a ceiling covering helps improve the heat and sound insulation properties of a room.
Along with the advantages, experts highlight a number of negative points that need to be taken into account when deciding to install a 2-level plasterboard ceiling with lighting:
- This design is quite large and significantly reduces the height of the ceilings in the room. Due to the profile on which the base rests, the room loses about 5 cm of space. Installing a second tier will also remove about 10 cm.
- Over time, cracks and other deformations may form in the area of the joints of drywall sheets. This can be avoided by installing special protective tapes or decorative framing at the points of contact.
- It is almost impossible to cope with the installation alone. If the user plans to do everything with his own hands, he needs to enlist the support of friends and acquaintances who will help him.
- Installation of a two-level ceiling structure is considered a rather labor-intensive process. The consumer must not only have certain construction skills, but also have a fairly large assortment of construction equipment at hand, be able to draw up drawings and design.
What to pay attention to
Even at the stage of design design, it is necessary to pay special attention to strength calculations. To create several tiers, you need to attach those that will be located below to those located above. This will require strengthening the frame at the fastening points of the lower parts.
In addition, you need to provide a place to place all the lighting elements. The list of such parts will include not only the LED strips or lamps themselves, but also the transformer, which is responsible for supplying the required voltage. It must be easily accessible for replacement or repair.
When developing a drawing, you need to take into account all the lamps that will be installed. Their number should be sufficient to illuminate the entire room. It is also better to plan the wiring in advance, since after assembling the frame and filing the first level, there will no longer be free access to the wires.
Construction of a two-level plasterboard ceiling with lighting
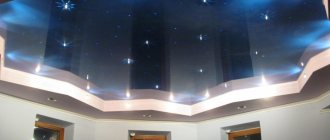
One of the key reasons for the popularity of two-level plasterboard structures is the wide range of design possibilities. The design features allow you to create real masterpieces that will become the central element of any design plan. The two-level plasterboard ceiling with lighting in the photo looks especially impressive.
The first level has a fairly large mass; it must be firmly fixed to the base of the ceiling. The second level is lighter; it is the one that forms the geometric shapes in which the structure is made.
Important! If the plasterboard is installed in a room with high humidity, it is necessary to initially select drywall with protection from water. This will prevent deformation of the structure.
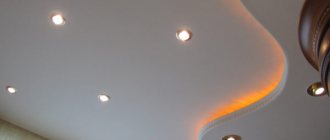
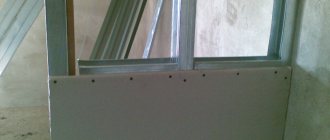
Making a cornice for hidden lighting
A light cornice can be made frameless
If the cornice is not very wide, you can simply release the edges of the gypsum board of the horizontal plane of the lower level beyond the contours of the “step” and cut it according to the markings. Two layers of gypsum board glued together with PVA are quite rigid.
But when making a second-level frame, it is better to extend the horizontal CD elements beyond the “step” to the required length and close them with a homemade flexible UD element according to the markings. In this case, the structure will be really strong, and a strip of drywall can be attached to the end, creating a side. Lighting fixtures will not be visible from below.
Types of two-level plasterboard ceilings with lighting
Experts distinguish between two main types of ceilings - single-level and multi-tiered. The first option is suitable for almost all rooms, regardless of their size and functional purpose. As for two-tier structures, everything is much more complicated here.
When deciding on arranging a two-level ceiling, you need to remember that such a design can significantly reduce the height of the room by at least 10-15 cm. The loss of free space will be catastrophic for rooms with low ceilings. That is why structures of this type are not installed in them.
Two-level ceilings can be classified in several ways:
- Depending on the type of backlight. There are ceilings with spot or contour light, with external and internal lighting, etc.
- Tier material. The two-level design allows you to combine different types of flooring. Both tiers can be made of plasterboard sheets. The most popular option is a combination of gypsum board and tension fabric. This option will significantly improve the decorative functions of the installation and give the structure a more aesthetic appearance.
There are also several types of design depending on the installation:
- Frame. It goes around the perimeter of the room, leaving an uncovered ceiling base in the middle. This option is equipped with spotlights, and a pendant chandelier is often placed in the center, with a style that is as close as possible to the interior.
- Diagonal. Crosses the space of the room diagonally, can be straight or curved. The first level is as even as possible, the second protrudes above the base a short distance. The most successful option for zoning a room.
- Zonal. Used for furnishing studios and large rooms. Allows you to visually divide the space into several autonomous zones.
Depending on the shape of the structure, there are three variations:
- figured. The second level has an unusual shape in the form of a geometric figure, a plant element or an animalistic motif;
- abstract. Here there is a combination of different forms, which can be arranged either in a strictly defined sequence or chaotically. To make the overall composition stand out, the forms are given different colors;
- soaring. This option is suitable for rooms with high ceilings. Thanks to the fastening of fitting sleeves and metal pins, the composition takes on a slightly fairy-tale appearance. Visually, it seems that the ceiling is floating in the air. This effect can be especially emphasized by properly selected lighting.
Calculating the amount of consumables needed
- plasterboard sheets
-
divide the width of the room by the length of the sheet, add 5% to the resulting number - the required reserve - and round to a whole number, add the amount that is necessary to use the second level; - guide profiles - again we take into account the width of the room, as well as the length of the profile, after dividing the first number by the second and subsequent rounding we get the whole number of elements we need.
In order to accurately determine the number of certain consumables for installing a two-level ceiling, in particular, self-tapping screws, remember that at least 8 screws
, and each ceiling suspension assembly needs
6 self-tapping screws
.
Also remember about the step that is followed when installing the sheathing for a two-level ceiling. It is at least 50 centimeters
.
Dimensions of a two-level plasterboard ceiling with lighting
The dimensions of a two-level ceiling structure can be very diverse. One of the advantages of this option is a large selection of architectural forms and design solutions.
When deciding to install a two-level plasterboard ceiling with lighting, the user needs to think about the concept of the project in advance. The specific size of the structure will directly depend on the features of the interior, the chosen style and the area of the room. If the room is spacious enough, you can install a volumetric overall composition.
Types of lighting in the bathroom
Mirror and sink lighting
When arranging lighting for a bathroom mirror, remember that the light should fall on a person’s face, but should not dazzle. To do this, lamps should be placed on the side, on top or along the perimeter of the mirror. It is better to use neutral shades of lamps to make the appearance seem natural.
The mirror is well illuminated by sconces installed on the side. You can choose a lamp of almost any style. Sconces are easy to install and are not difficult to care for. It is better to choose lamps with soft, diffused light.
Mirror illuminated sconce
In addition to sconces, you can use spotlights. For a mirror, two spots with a diameter above 5 cm or 3-4 smaller lamps are enough.
Mirror illumination with spotlights
Another option is mirrors with built-in lighting. This way saves space, which is important for small rooms. But the built-in lamp cannot be removed or moved. In addition, you need to ensure that the lamp has sufficient brightness.
Built-in mirror lighting
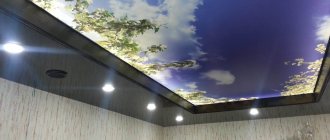
An original solution would be an LED strip. You can choose a tape that has the ability to change the operating mode: change color, light intensity.
Original purple backlight
Bathroom and shower lighting
Remember the high degree of protection of luminaires for this area! (IP no less than 67).
One of the safest options is using LED lamps. Some models of plumbing fixtures already have built-in lighting protected by glass.
The bath/shower itself can be equipped with multi-colored LED lamps and strips that match the color of the tiles.
Thanks to its flexibility, the LED strip allows you to design recesses and niches for the bathroom. Or you can directly illuminate the bath/shower area.
A popular lighting method is ceiling spots. But for those who like to take a bath, this option can be blinding when looking at the ceiling, because the spotlights above the bathtub are quite bright and shine with a directed flow. And for shower spots they are good. As an alternative, you can install spots in the “head” of the bath on the ceiling or wall. This way the light won't interfere.
- Ceiling spots
- Ceiling spots for shower
Floor lighting
For floor lighting, it is especially important to comply with safety standards. Lamps must have a degree of protection of at least. The floor can be decorated with spotlights or LED strip
They are often mounted around the perimeter of the room or along a wall.
The floor can be decorated with spotlights or LED strip. Often they are mounted around the perimeter of the room or along some wall.
Floor lighting with LED strip
The original floor lighting will be multi-colored neon lamps, well insulated from water. It is better to place neon in areas far from taps and pipes.
Multi-colored floor lighting
Lighting for cabinets and shelves
Additional light will not only decorate cabinets, shelves, and other furniture, but improve functionality. After all, it is much easier to find the item you need in an illuminated cabinet.
Bathroom lighting from warm to cool colors
LED strip is also useful for lighting shelves: just attach it along the edge of the shelf. And the tape installed under the furniture will visually expand the room.
Illumination of shelves and cabinets from below
Bathroom spotlights are suitable for shelves and niches, the number of which depends on the size of the shelf. Lockers can be equipped with built-in spots.
Decorative ideas
Designers recommend several rules:
- uniform lighting;
- the smaller the area, the smaller the size of the lamps should be;
- It is better to place the light perpendicular to reflective surfaces to avoid glare;
- Colored lamps or lamps of original shapes are suitable as accent light;
- the smaller the room, the fewer accents there should be;
- Do not neglect electrical safety rules.
Types of lighting for a two-level plasterboard ceiling
For two-level ceilings, there are two lighting options:
- Open lighting. All lamps are mounted directly into the finished product and placed in plain sight.
- Closed lighting. Between the ceiling levels in the free space, a special niche is created in which lighting fixtures are hidden in such a way that only the emitted light remains visible.
You can use any lighting options, from spotlights and contour lamps to large hanging chandeliers and LED strips.
The only thing you need to pay attention to when creating lighting is the dimensions of the suspended structure. If the ceiling is small, a massive chandelier on it will look ridiculous, and it will also visually reduce the free space, which will negatively affect the overall exterior of the room.
Important! When installing the backlight, you need to ensure that the electrical wiring does not come into contact with the metal elements of the frame.
Creation of sketches, diagrams and drawings of the future ceiling
First of all, draw the room to scale. After this, draw a line for the edge of the lower tier. It can be straight or curved. On the floor plan, be sure to mark the installation locations of lighting fixtures. We apply all the necessary dimensions.
Be sure to make a longitudinal and cross section of the ceiling. This way you can determine the distance from the base surface to the first tier and the height of the second tier. Place the required height marks or dimensions.
Important! When choosing the distance at which the levels will recede from the base surface, take into account the height of the built-in lamps.
Schemes of a two-level plasterboard ceiling with lighting
Design
Two-level ceilings allow you to bring to life the most daring and unusual ideas of apartment owners and designers. In general, the form is divided into two types:
- Direct.
- Twisted.
The first type is used in strict and minimalist interiors. This method of fixing the ceiling will help hide beams and irregularities.
The second type helps to visually change the shape of the room and is especially popular.
There are many variations of the types of ceilings described above.
Stepped
This design helps hide communications. The second level of the ceiling can be located in the form of an island in the center, or closer to the corners of the room.
carved
The canvas of such a ceiling consists of several parts. Various patterns are cut out in the central part, most often these are combinations of geometric shapes.
Unusual circles on a stretch ceiling Source potolki-nikomaks.ru
Wavy
The wave can be located only on one side, or symmetrically on opposite walls.
Waves on the kitchen ceiling Source design-homes.ru
Rounded
A semicircular or round ceiling level is usually placed above the central area of the interior to further emphasize it.
Spiral
A stylish funnel on the ceiling will fit well into a modern interior; the only requirement is a large area of the room.
Plasterboard ceiling with a spiral Source nevapotolok.ru
Striped
To create an interesting effect, LED light paths are used. Interiors in which some of the stripes extend onto the wall look especially unusual.
Podium
A small ceiling area recessed into the main ceiling. This technique is used to highlight the original chandelier.
Podium on the ceiling in the living room-bedroom Source format-potolok.ru/
How to make a two-level ceiling frame from plasterboard with lighting
Since the two-level illuminated ceiling has quite large dimensions, for this structure it is necessary to install two frame bases. To install the first level frame, you must perform the following steps:
- Install guide UD profiles along the surface of the concrete (brick) ceiling base. They must be firmly fixed with an optimal fastening step of 60-70 cm.
- Ceiling hangers are attached to predetermined points and secured to the guide elements using “fleas.”
Important! Ceiling suspensions must be fixed with an optimal fastening step, which corresponds to the installation of guide profiles. According to experts, the distance between them should be within 60-70 cm. - Insert the ceiling profile CD, after which it must be firmly fixed with a suspension.
- If the structure is large enough, it is necessary to prevent possible deformation of the base. For this purpose, special “crab” type connectors are used. They will give the structure stability and prevent subsidence.
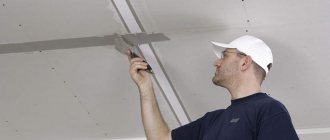
After installing the frame, it is sheathed with plasterboard. This will be the first tier of the ceiling. To form the next level, it is necessary to install a second frame:
- Special lines and marks are applied to the drywall sheet, which will allow you to place guide profiles according to a pre-planned pattern.
- UD profiles are pre-rounded and then fixed to the wall and ceiling. To form the desired shape, small notches are made on the profile.
- The CD profile is cut into fragments of the required size, and then installed with the flat side into the UD profile. Next, they should be fastened together in increments of 20-30 cm - for rounded elements, 50-60 cm - for linear ones.
- If, after fixing the profiles, some parts protrude, you need to get rid of them. To do this, small fragments are cut out of the UD profile to cover the unevenness.
Ceiling markings
It is worth paying special attention to this important stage and doing everything carefully. It is necessary to set aside the distance from the lowest corner, moving down, the distance should correspond to the distance to the lowest level of the ceiling.
Using a water level, transfer the mark to all existing internal and external corners of the room and use an upholstery line to draw lines between them.
Rub the cord with dark powder and beat it diagonally. Mark the center of the room, compensating for any unevenness in the ceiling and walls. Draw lines longitudinal to the hidden edges of the second tier. Draw a grid for suspensions of the 1st tier in the inner perimeter of the boxes, that is, place marks - each 50 cm from each other along the longitudinal boundaries of the return two lines. On the remaining lines, place points 60 cm apart. There should be a right angle at the intersection of all lines.
An ideal solution for marking would be a laser projector; it is easy to use - placing it in the middle of the room, a 600 mm grid structure is installed, and the resulting grid can be immediately drawn on the surface. Next, you need to drive self-tapping screws into the base ceiling in the center of the circles; they are outlined using a pencil along the slats with the required length. A cardboard template is also prepared in advance to draw out the curved elements.
DIY installation of a two-level plasterboard ceiling with lighting
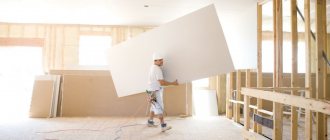
The process of installing a two-level ceiling structure with lighting begins with preparation. First you need to collect all the materials and tools:
- plasterboard sheets. In order not to buy extra material, you must first calculate the ceiling model and find out how much drywall will be required for installation;
- UD and CD profiles;
- ceiling suspensions. If the design provides for fairly large dimensions, it is better to use a spring rod; if the dimensions are small, use direct hangers;
- soundproofing materials;
- extension cord (if the width of the room exceeds the length of the profile);
- fastening elements (dowels, fleas, etc.);
- self-tapping screws;
- finishing material.
After preparing the necessary equipment, you can begin installing the structure. The first stage includes preparing the frame parts of the future ceiling. How to mount the frame is described above.
As practice shows, it is not difficult to make a two-level plasterboard ceiling with lighting. Problems often arise during the process of covering the frame with plasterboard sheets. Therefore, you need to consider the following points:
- if a sheet of drywall is cut, a chamfer is made on the edge using a knife or plane;
- to ensure the most reliable fastening, gypsum boards need to be joined in the middle of the profile;
- in order not to complicate subsequent finishing, the heads of the screws are slightly recessed in the plaster;
- when fastening, the distance between the screws should be 30-35 cm, while there should be at least 2 cm to the edge of the sheet;
- You need to leave a small gap (no more than 2 mm) between the gypsum board sheets. This is necessary to prevent deformation due to sudden temperature changes and high humidity in the room.
Fastening plasterboard sheets
Drywall is secured with metal screws
The frame must be covered with sheets of plasterboard. There are several ways:
- Use ceiling gypsum plasterboard with a thickness of 9 mm. It is thin and not tough enough. You can avoid cracks on the finished surface if, after sealing the joints, you putty the entire surface with a reinforcing mesh.
- Wall (usually moisture-resistant) gypsum plasterboard with a thickness of 12.5 mm is used. It's quite durable. With proper installation and puttying of joints with mesh (serpyanka), the appearance of cracks is unlikely.
- A more labor-intensive and costly, but reliable method is to install ceiling gypsum plasterboards in two layers.
Installing the first layer
Carry out installation work in the following order:
- If the plasterboard covering begins from the middle of the room, the first sheet is laid intact. The end edge is chamfered at an angle of 45 degrees by a third of the thickness using a special rasp or plane.
- Screw the gypsum boards with TN self-tapping screws 25 mm long in increments of no more than 250 mm.
- They are placed no closer than 10 mm from the longitudinal (covered with cardboard), and no closer than 15 mm from the transverse (cut) edge (to avoid chipping).
Advice. The screws are screwed vertically. The head of the screw is pressed in when screwed into the gypsum board by 1 mm (if deeper, the cardboard will break through and the screw will not hold). There are special limiter attachments that facilitate the installation process.
- The sheet is secured around the perimeter and along the axes of the two internal profiles.
Advice. For convenience, you can draw two thin lines on the front side of the sheet at a distance of 40 cm from the longitudinal edges. The screws are tightened along these lines.
- The next sheet is joined to the end of the first and screwed in the same way. The chamfer is removed on two end edges. And so on. The last sheet in the row is shortened to the required length and secured.
- The adjacent row begins with half a sheet. Thus, cross-shaped joints are avoided, which increases the rigidity of the structure.
Cutting drywall with a utility knife
Note. It is best to cut drywall with a sharp knife with a replaceable trapezoid blade. According to the guide rail (rule), the cardboard is cut on one side of the sheet. Place it vertically on the longitudinal edge or turn it over, break it at the cut site and cut through the second layer of cardboard. If necessary, uneven edges can be cleaned with a special rasp.
- The second and subsequent rows are mounted as described above.
- There is no need to sew up the frame above the second level, but the sheets should extend under the second level by approximately 150 mm (see the drawing on paper and the markings on the ceiling).
- After attaching the first layer, all joints are sealed with a special putty (for example, Fugenfüller from Knauf).
Knauf "Fugen"
Note. If they are not puttied, when attaching the second layer at the joints, the gypsum board may break when tightening the screw.
Installation of sheets of the second layer
The difference between fastening the gypsum boards of the second layer is that they are laid with the seams offset in relation to the first layer. Before installation, apply a layer of PVA glue to the surface of the sheet facing upward using a roller or wide brush.
Screw the sheets with self-tapping screws 35 mm long through the first layer to the base profiles. The installation procedure is similar to the installation of the first layer.
PVA glue
The seams of the second layer are puttied using self-adhesive tape - serpyanka. It reinforces the putty and prevents cracks.
After the PVA and putty have dried, an almost monolithic, very hard and durable ceiling covering 19 mm thick is obtained.
Options for finishing a suspended two-level plasterboard ceiling with lighting
In order for the two-level ceiling structure to be as smooth and beautiful as possible, after completing the installation work, the joints and seams of the drywall need to be primed. It is recommended to use a special putty composition for seams.
After the primer has dried, the application areas are covered with a thin layer of plaster. A special tape is applied to the wet layer, which needs to be slightly embedded in the primer. Particular attention should be paid to the screw heads; they are also puttied. After this, holes for lamps are cut out in places specially marked on the plasterboard.
The finishing depends on the chosen material. Often, GKD is covered with several layers of putty, after which it is cleaned with special tools to obtain a perfectly flat surface. You can proceed to painting the ceiling with water-based compositions with the addition of colored pigments.
You can also use fabrics, wallpaper, 3D paintings and other materials as finishing materials.
Preparatory stage
First of all, you must imagine the end result. It is necessary to understand what the appearance of the ceiling will be, the shape and size of its individual parts, the location and type of lighting devices, and color schemes.
Everything is limited only by your imagination
- There are quite a lot of photographs on the Internet that will help you make your choice. Then you should draw a sketch on a convenient scale, taking into account the size of the room.
Figured ceiling drawing
- In this drawing you need to depict all the elements: the location of the lamps, ventilation pipes and electrical wiring. This will greatly facilitate further work.
- If your project includes curved surfaces (circles, arcs, etc.), you should indicate in the drawing their radii and centers, the location of points and mates with reference to the corners of the walls.
3D sketch created in a computer program
Note. It is convenient to use simple computer programs to complete this drawing. They are not difficult to find on the Internet, along with instructions and video lessons.
- The location of the elements must be transferred from the paper to the ceiling. To draw straight lines, use a straight line or a construction “rule” as a ruler.
- In order to draw a circle (or part of it), a hole is drilled at the location of the center and a screw is screwed into the dowel. A thin wire is attached to it at one end.
- Its length is equal to the radius of the circle. Make a loop at the other end and insert a pencil into it. It turns out to be an improvised compass.
Note. It is worse to use thread for these purposes, as it can stretch. You can drill two holes in a piece of profile at a distance equal to the radius. A pencil lead is inserted into one of the holes, and a screw is screwed through the second at a more rigid and precise point.
If there is a need to draw an arc or other smooth curve, proceed as follows:
- Several control points are transferred from the drawing to the surface (the beginning and end of the curve, intermediate points).
- A thin flexible strip (long ruler) is set according to the marks, bending in the required direction.
- Outline the resulting curve.
Advice. If you have several identical elements of a complex shape (not just a circle, or part of it), you can make a simple template from scrap materials (cardboard). In this case, all curves will be the same.
After installing ventilation and electrical wiring (it is better to do it in a corrugated PVC pipe), you can begin constructing the ceiling.
Tips for caring for a two-level plasterboard ceiling with lighting
Plasterboard multi-tiered structures have a long service life. In order for them to continue to delight the eye with their ideal appearance, they need to be carefully looked after.
Caring for KHF is quite simple. They should be wiped regularly with a dry cloth to remove possible accumulations of dust and dirt. You can also use a vacuum cleaner. If the consumer plans wet cleaning, non-aggressive detergents should be used. Before you start cleaning, the rag should be thoroughly wrung out, it should be barely damp.
Particular attention is paid to the location of lamps. Often, under the influence of lamps, GKO changes its color. This negatively affects the overall appearance. You can get rid of plaque and faded parts using special felt-tip pens, which can be easily found in any hardware store.
Preparing wiring and installing lighting
All wiring must be in insulating sleeves. Then there will be no opportunity to change or correct anything. Using your sketch, marks are made on the ceiling where the lighting will be. Therefore, it is clear in advance where to connect the wires. If you plan to install a massive chandelier, then in this place you need to prepare mortgages for it. It will be attached to the mortgages in the future for greater reliability.
Main stages of installation of recessed luminaires
LED recessed lights for plasterboard ceilings are the most popular option. You just need to drill a hole for them in the drywall after finishing. Then they are connected to the wires and fixed to the ceiling using a special fastening system. Everything happens quickly and simply, which is why this lighting option for multi-level ceilings is in demand.
Before installing the LED strip in a plasterboard ceiling, you need to wipe the mounting location with a damp cloth. This removes all dust to improve light reflection. After this, reflective tape is installed to improve light dispersion. Then the LED strip itself is connected and installed. More details about the whole process can be seen in the video.
Photos of two-tier ceilings with backlit plasterboard
Lighting options
Thanks to the ability to create the most unusual ceiling shapes, you can create multi-level lighting that will highlight all the advantages of the room.
Most often you can find the following lighting sources:
- Chandelier. It acts as the main source of lighting and is located in the center of the ceiling. The glossy surface of the stretch ceiling will reflect the chandelier, causing it to visually double in size. This should be taken into account when purchasing massive lamps. Often the central source of lighting is additionally highlighted by the refined shape of the ceiling.
Stretch ceiling with an elegant chandelier Source blog.brigada174.ru
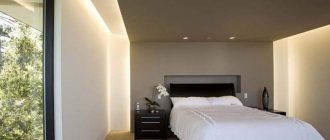
- LED Strip Light. Flexible material serves to illuminate the ceiling of an unusual shape. Geometric and wavy plasterboard figures glow mysteriously around the perimeter. Controllers are connected to the strip to help regulate the lighting intensity.
Ceiling in the bedroom, illuminated with LEDs Source topdom.ru/
- Spotlight. As a rule, such lighting sources are located around the perimeter of the room at an equal distance from each other. They are designed to create directional light in certain areas that lack light from a central chandelier.
Various lighting sources in the kitchen Source design-homes.ru
Step-by-step installation technique
The installation of a suspended ceiling begins with preparatory work on the base surface, then the installation of the first tier is carried out, utility networks are laid out, the formation of the second frame, cladding and finishing are carried out.
Preparatory work
No difficulties are foreseen; just clean the base of the old decor. If there are areas with peeling putty, seal them, foam the seams and joints. If mold is detected, clean the area down to the floor slabs, treat with an antiseptic or copper sulfate solution, and dry.
Ceiling markings
Work algorithm:
- Find the lowest corner in the room. Measure a distance from the ceiling along the wall equal to the height of the lowering of the entire structure. Move the mark to all other corners, connect the dots - you will get a horizontal line, which will become the boundary for installing the profile.
- Draw lines of level differences on the ceiling and mark the areas where the ceiling parts are attached. Installation step 0.4-0.6 m.
- Mark the mounting points of the lamps and the areas where the suspensions are fixed.
- If you plan to form a circle, calculate the diameter and draw a shape on the ceiling. To do this, find the center, attach one end of the wire to a point, screw a pencil on the other end - this is a “compass” that will accurately and quickly draw a circle. To make a curved line, several circles are joined.
Installation of the first tier of ceiling
Execution steps:
- Fix the guide metal profile according to the markings on the wall;
- fixation with self-tapping screws and dowels, if necessary, drill holes with a hammer drill, fastening spacing 0.5 m;
- Fix the hangers along the lines on the ceiling, step 0.5 m;
- Cut the ceiling profile into pieces of the required size, insert the ends into the grooves of the guides on the wall, and attach the profile to hangers in the central part.
Now you need to pull the cord between the guide profiles and align the ends of the hangers horizontally so that they are all in the same plane.
Installation of lamps and wiring
When installing LED backlighting, you should first assemble the tape on the floor, test it, and only then connect the power supply, install the tape in place, to do this, remove the protective paper from the back side and glue the light source
To install a fiber optic wire, fix the cord to the ceiling with clamps, make perforations in the gypsum board sheets, disassemble the fiber into threads and lead the end of each thread into a hole. To install neon lighting, a specific transformer is selected, into which a tube with neon is connected, the element itself is placed on a shelf and also fixed. The transformer must be connected to the power supply.
Second level fastening
The frame is screwed to the supporting base of the first tier, the assembly sequence is similar to the installation of the base level. To bend the profile, the shelves of the ceiling elements are cut, the cutting step is equal, the larger the bending radius, the thicker the cuts are made
In the space between the upper and lower level guides, racks from the ceiling strip are installed, fastened with self-tapping screws to the UD elements. Calculate the fixation step according to the degree of curvature of the plane, but not less than 0.6 m.
Secrets of cutting drywall
Cutting off part of the drywall sheet
To ensure that working with plasterboard does not take much time, use the following recommendations:
- cut the material with a sharp construction knife;
- It is convenient to cut large sheets if they are leaning against a wall with a slight slope. It is more convenient to cut small canvases (up to 60 cm wide) on a flat horizontal surface;
- Make cuts only on the front side of the material;
- if the area of the room being finished is large, purchase sheets measuring 3.6 m; in compact rooms, use plasterboard 2.5 m;
- Before cutting a piece, carefully measure the dimensions of the element so as not to “grab off” too much.
Minor but important details
Illumination is of great importance for emphasizing the ceiling levels, which, in addition to highlighting the boundaries of each hanging element, visually brings it closer to the ceiling, creates a floating effect, which significantly increases the space in the room.
A wealth of backlight variations
For these purposes, multi-level ceilings are decorated with spotlights, LED strips, and pendant lamps. By designing the lighting connection with your own hands, you achieve an effect in which the light flux is scattered throughout the room, directed to a specific area, or illuminates a separate object.
Multi-level stretch ceilings give the room an unusual look, and the built-in lighting makes the light play with the shadows. A large room can only benefit from their installation.
Features of color selection
There are several general recommendations that should be followed when choosing a ceiling color:
- For low rooms, you should opt for a dark floor covering and a light ceiling. This will help visually expand the space. If you swap the shades of the floor and ceiling, you can slightly reduce an excessively high room.
- Bright colors will add light to a dimly lit room.
- In a room flooded with sunlight, cool shades of different colors will help mute the brightness.
- In a monochrome interior, it is better to use a glossy ceiling to create a play of light.
The classic option is a simple white two-level stretch ceiling, but other colors can be added to create an interesting effect and stylish interior.
What color combinations are most common in modern interiors:
- White with black. The stylish combination adds volume to the room. Black is considered a rather dark color, but when combined correctly it will not create a feeling of pressure.
Classic color combination Source potolky.ru
- White with blue or turquoise. The ceiling looks fresh and light, adding coziness and tranquility to the room. This combination is suitable for rest rooms.
Combination of white and blue Source zabor.bz
- White with brown. Warm brown color helps you concentrate, improves your mood and well-being. Such a ceiling can be safely created in an office.
Unusual white and brown waves Source opora-stroy.ru/
- White with beige. This combination will visually enlarge the space and make it lighter. The design of the room becomes noble and emphasizes the status of the owners.
Combination of white and beige in the kitchen Source design-homes.ru
- White with green. A bright and bold combination adds an atmosphere of lightness and freshness to the room. The right shade of green helps improve mood and calm.
Bright kitchen with green elements Source stroyfora.ru
- White with red. A small amount of red will make the room stylish, it will be a bright accent that attracts attention.
Bright ceiling in the kitchen Source chudopotolok.ru
- White with yellow. Yellow color gives cheerfulness and makes the room bright and sunny. This combination should not be used in relaxation rooms, since the sunny color interferes with relaxation.
Bright living room Source dekormyhome.ru
- White with purple. The combination looks fresh and unusual. The color violet calms and induces relaxation.
Living room in an unusual color scheme Source potolki-nikomaks.ru/
How to design a ceiling structure yourself
You can design the entire ceiling scheme, which includes both a plasterboard sheet and a tension fabric, with your own hands if you have special experience. The appropriate use of all necessary materials will help preserve the ceiling for a long time, so as not to repair this structure too often.
It is only possible to make a multi-level ceiling from plasterboard, polycarbonate or plastic, but for the sake of an interesting play of light, colors and shadows, which open up limitless design possibilities, it is becoming more and more acceptable to use stretched fabrics when decorating a room.
As a result, taking into account the positive selection of finishing materials, the entire ceiling structure is effective and comfortable. It is better to compare a varnish or glossy stretch ceiling with plasterboard elements. Decorated with lighting that softly reflects the entire room, which is provided for by the interior design, the ceiling will visually enlarge it.
Materials and tools
It is advisable to calculate the amount of building materials during the development of the project (sketch). It is easy to determine the amount of drywall, since the sheets have standard sizes. Calculations are carried out taking into account the area of the room, 10% is added to eliminate shortages.
Tensile sheathing can be:
- Glossy - chosen for rooms in which you need to change the volume. Most often these are living rooms of residential buildings, administrative and public buildings. The light reflected from the glossy surface makes the space light and transparent.
- Matte – made from heat-shrinkable fabric and PVC. The market offers a large selection of shades. These canvases can be quickly changed if you are tired of the color or the surface is cracked.
- Fabric is the most expensive option, made from polyester threads impregnated with polyurethane. A professional designer can create a unique interior. The coating is strong and durable. The disadvantage is that there are fewer colors than matte canvases.
To calculate how much UD load-bearing profile is required, you need to determine the perimeter of the room and multiply by two (at two levels). The CD profile is attached in width approximately 60 cm. You should measure the width of the room and multiply by the length multiplied by 0.6.
When installing the frame, hangers and crab connectors are used. Their number is calculated based on the dimensions of the drywall. These elements are also installed every 60 cm. The sheets are fastened with self-tapping screws.
Required tools:
- knife with replaceable blade;
- screwdriver;
- level;
- tape measure and pencil.
If you are installing a two-tier ceiling yourself, you will need a stepladder, glasses and gloves.