The quality of ceilings in many apartments, even new buildings, often leaves much to be desired. Leveling them with sheets of drywall is one of the most common finishing options. But the services of professionals will not be cheap, and in order to save on them, you need to figure out how to make a plasterboard ceiling with your own hands. Otherwise, such savings can lead to very disastrous consequences.
Prepare materials
- Drywall 12.5 mm;
- PP profiles 60×27;
- profiles PN 28×27;
- profile extensions;
- single-level connectors;
- straight hangers;
- screws 3.5×9 mm;
- screws 3.5×25 mm;
- dowel-nails 6×40 mm;
- wedge anchor 6×40 mm;
- reinforcing tape;
- primer;
- putty;
- hydraulic level or laser level;
- bubble level;
- chop cord;
- metal scissors;
- screwdriver;
- perforator;
- drywall knife;
- plane;
- brush;
- putty knife.
Calculate the position of the suspended ceiling
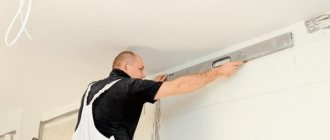
YouTube channel “Guys from Stone” The first step is to determine at what level the ceiling will be located.
To do this, you need to find the lowest point of overlap and add the thickness of the frame to it. Using a hydraulic level, make a mark in one of the corners at an arbitrary height, and then transfer it to the others one by one. If you have a laser level, simply turn it on and mark the position of the horizon in each of the corners.
Connect all the marks in one line around the perimeter of the room using a chop cord. Measure the distance from the reference line to the ceiling in the corners and several places along each wall. The smallest distance will show the lowest point.
If there is no need to specifically lower the ceiling, then mark 40 mm down from the found point: 30 for the thickness of the frame and another 10 for the gap for installation. When installing large recessed lights, add the height that they will extend beyond the frame.
In our example, the lowest point is 1,640 mm. We go down 40 mm from it and get the ceiling level at a distance of 1,600 mm from the reference line.
Marking the ceiling and fastening the guides
- First you need to find the lowest corner in the room. To do this, use a tape measure to measure each corner, and preferably the center of the room. In the lowest corner you need to make a mark at a distance of 5 cm from the ceiling if you do not plan to build in lamps, or 8 cm if there will be lamps.
- Now, using a hydraulic level, make marks at the same level as the first point on each corner.
Cord breaker for wall marking (painting cord)
- Now you need to make a break to evenly connect all the points with a horizontal line. Stretch the paint cord between the marks and release it quickly so that it hits the wall - the paint on the cord will leave an even impression. Make lines around the entire perimeter of the room.
Tape with masking tape
Before covering the ceiling with plasterboard, we recommend making notes on the position of the profiles on the walls. This will make it easier to look for them when attaching sheets to the frame.
- Now attach the guide profiles to the walls. To do this, attach one guide to the line (the bottom edge of the profile is along the line) and make marks on the wall through the finished holes on the profile. There should also be holes along the edges of the profile, so if there are none, step back 10 cm and make them yourself. Drill holes according to the marks.
- Then you need to glue the sealing tape to the profile and secure it to the wall with dowels. We fix it with at least 3 dowels.
- Next, make markings for the main ceiling profiles. Since the width of the plasterboard sheet is 120 cm, the profiles are usually placed at a distance of 40 cm from each other to secure the sheet along the edges and in the middle. So, make lines on the ceiling in 40 cm increments.
- With such a small pitch of the ceiling profiles, jumpers between them are needed only at the transverse joints of the sheets, that is, every 2.5 m (standard length of plasterboard sheets). This means that the pitch of the suspensions for ceiling profiles should be smaller by an integer number of times, for us the optimal would be 50 cm. It should be noted that the first row of suspensions will be twice as close to the wall, so 50:2 = 25 cm. The second row will be 25 +50 = 75 cm and so on in 50 cm increments.
- To mark, place the suspension at the desired points on the ceiling and make 2 marks for each anchor. There will be a lot of dust while drilling holes, so be sure to wear goggles and a dust mask.
Mark the frame
YouTube channel “Guys from Stone”
For proper installation, you need to accurately mark the position of all frame elements. It consists of guides mounted on the walls, where the main profiles are installed, and they, in turn, are attached to the ceiling with hangers. Supporting profiles are mounted across the main ones, onto which drywall is directly screwed.
- Guide profiles. We have already noted their position in the previous step.
- The main profiles are installed at intervals of 1200 mm along the axes. In this case, the outermost beams from the walls are located at a distance of ≤ 1170 mm.
- Suspensions are mounted in increments of 650–1000 mm.
- Supporting profiles are installed every 500 mm.
The main profiles are marked with a red line, the load-bearing ones with a blue line, the mounting points for suspensions with gray circles.
For example, let's mark a room 3.5 by 3.6 m. Three whole sheets clearly cover the entire width of the room. The length is 1 m short, so we will add pieces of 1 × 1.2 m to each row. According to the installation technology, the joints of adjacent sheets should be staggered, in the manner of brickwork. This means that we start the first row from a whole sheet, the second from a piece, and the third from a whole sheet again.
Use a tape measure to measure all the necessary gaps. Place marks in the right places, and then connect them in lines using a tapping cord. Distribute the hanger fastenings so that there is no more than 1 m between them, or preferably less.
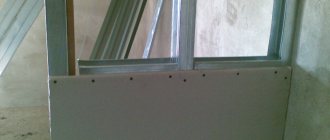
The second stage is the installation of a metal frame for the ceiling
The materials have been purchased and now the most boring, but important part of the work lies ahead - attaching metal profiles and creating a durable frame for the ceiling. In principle, this is not much more difficult than making a regular interior partition , only in this case the work is carried out with raised hands. Remember that the accuracy of the work depends on whether your plasterboard ceiling will sag in 2-3 years or not.
STEP 1: attach the profile hangers to the ceiling. This must be done with anchors, since a dowel for a vertical surface is much worse.
STEP 2: increasing profiles. Since 1 profile is not enough for the entire room, they need to be fastened together. To do this, you need to purchase special connecting fasteners and fasten the profiles with it. The joints should be close to the profile suspension.
STEP 3 : attaching profiles to hangers. You need to evenly lift the profile by 2 edges (a helper would be helpful here), screw one, rearrange the stepladder and attach the other edge. Next, following the mark on the wall (where the profile is located), “grab” the profile over the entire area. We start fastening from the corners.
Important: never leave the profile unsupported by 1 or two screws, as it weighs a lot and can break the attachment point with its weight or simply bend. At least 2 points in different corners of the profile, and preferably 3-4 points.
STEP 4 : after screwing the corners, you need to check the profile with a level. A tool 250 centimeters long will do. If you somehow managed to screw it crookedly, unscrew it and adjust it with hangers in the required place.
STEP 5 : in exactly the same way we attach all the profiles in the middle of the room, moving from the corners to the center, we attach the jumpers (joining points of 2 sheets of drywall every 250 centimeters). This can be done with a special metal crab. We cut the jumpers from the profile and screw them together.
STEP 6 : sound insulation and insulation. If the installation of a metal frame involves the installation of insulation and insulation, then it’s time to take care of it at this stage. We cut the mineral wool into large pieces and attach it over the lintels.
Important: use goggles, a respirator and gloves when laying mineral wool, it can get into your eyes and cause severe skin irritation.
Installing a frame under drywall is the most complex and time-consuming process; all subsequent work is done several times faster and will seem much easier (however, they are easier).
Mount the guide profiles
YouTube channel “KNAUF Russia”
Attach PN 28×27 profiles around the perimeter of the room so that their lower part coincides with the previously marked line. If the wall is concrete or brick, attach the profile and mark the fastening points with a pencil. Then drill a hole with a hammer drill, insert a dowel through the profile and hammer the nail inside. You can attach guides to wooden walls with self-tapping screws using a screwdriver without pre-drilling.
If necessary, connect the profiles end-to-end, without overlapping each other. The fastening spacing is 250–500 mm, but at least three pieces per piece of profile.
For sound insulation, before installation, you can stick a special sealing tape or apply silicone sealant to the profiles.
Sealing seams, leveling and counting materials
After the sheets are attached, it is necessary to prepare the putty and apply it using a large spatula, making sure that the corners are even, so that there is no excess of finishing material at the junction of the walls and drywall. If you apply more, it will take a long time to straighten the corners.
After the putty has dried (6-8 hours), you can take trowel tape or paper and remove all the “smudges,” level the surface and prepare it for finishing. The ceiling can be painted in the desired color, a suspended ceiling can be made, decorative plaster can be installed and everything else is needed.
For a room of 20 square meters you will need approximately the following amount of materials:
- 19 standard size ceiling profiles;
- 110 hangers (attaching the profile to the ceiling);
- 8-9 sheets of GC 10 mm;
- 10 guide profiles (they stick to the wall);
- 24 crabs;
- 0.5 kg self-tapping screws for attaching drywall.
- 30 dowels.
Having made simple calculations of the cost of hiring a work team, we can state that we saved 11,500 rubles by making a plasterboard ceiling with our own hands. Whether it makes sense to spend a couple of days and save this amount is up to you to decide.
Secure the hangers
YouTube channel “KNAUF Russia”
Next, at the previously marked points, install hangers for the main frame profiles. In reinforced concrete floors - using metal wedge anchors and a hammer drill, in wooden floors - with self-tapping screws and a screwdriver. After installation, bend the hangers down.
For sound insulation, you can also stick sealing tape on them or coat them with silicone. An even greater effect is achieved when using special anti-vibration suspensions with elastic inserts.
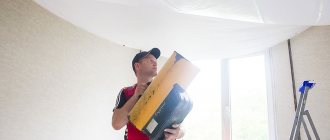
Preparing the premises
- remove all large objects and furniture that could potentially interfere with work and movement during the installation process;
- if it is impossible to carry out the first step, cover the furniture with film to protect it from construction debris, adhesive and dust;
- clean the ceiling of everything unnecessary: dust, small knots and everything that you are unlikely to get to in the foreseeable future after installation.
Install the main frame profiles
YouTube channel “KNAUF Russia”
Cut out the necessary pieces from the PP 60×27 profile and insert into the guides. Position them so that the centers of the beams coincide with the previously marked marks.
YouTube channel “KNAUF Russia”
If the length of one profile is not enough, add an additional section and join them together using a special connector.
Pros and cons when choosing a fastening method
Installation on a wooden floor involves fixing the gypsum board to the ceiling.
Advantages of the method:
- A compelling argument for choosing such an installation is cost-effectiveness, because you do not purchase additional material from which to form the supporting structure, such as a galvanized metal profile;
- The absence of a skeleton reduces the time spent on finishing surfaces in the house;
- Height loss is minimal, this is especially important for a house with a low ceiling;
- To install gypsum board on a wooden ceiling in the house, you will need a knife for cutting plasterboard and a screwdriver.
Installation of gypsum boards directly on the base itself
Disadvantages of the method:
- The processed surface is without the slightest defects;
- The quality of the wood used in the construction of the ceiling in the house. Finishing requires reliable fixation, and hardwood provides this. They are classified as hard, but more often soft wood is used in the construction of beam floors;
- The environment affects the tree. These are changes in humidity and temperature fluctuations. Under such influences, the boards swell or shrink, which affects the displacement of gypsum boards, leading to the formation of cracks;
- It is not possible to lay a layer of thermal insulation materials.
Helpful information! To ensure reliable fixation and avoid difficulties, craftsmen advise using gypsum boards cut into several pieces.
As a result, we note that the disadvantages of the method outweighed its advantages.
Reliable fastening of gypsum boards, as practice has shown, during installation is ensured by the use of a skeleton - a supporting structure, especially if it is planned to erect a two-level ceiling. It is equipped immediately before installing the sheets.
Fix the main profiles in one plane
YouTube channel “Stone Guys”
To obtain a perfectly flat surface for plasterboard cladding, you need to align all the beams in one line. The easiest way to do this is with regular thread.
Lift all profiles 10–15 mm up and secure by inserting screws into the holes of the hangers. Stretch a thread across the profiles between the walls and secure them with self-tapping screws on the guides flush with the latter.
Also, the correct installation of profiles can be controlled using a bubble level / YouTube channel “KNAUF Russia”
Starting from the outermost one from the wall, release the profiles one by one and, aligning them so that they barely touch the thread, secure them with four 3.5 × 9 mm screws - two on each side.
First, fix the hangers in the middle of the beams to remove any slack. After this, the main profiles will almost clearly fall into place. All that remains is to check the thread and tighten the screws into the hangers.
Attaching drywall to profiles
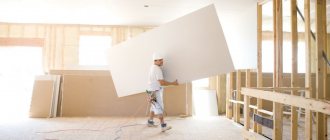
When the steel is already hanging on your ceiling, another field for creativity opens up... After installing the frame from the metal profile, you can move on to the drywall itself. After purchasing the material, it must be placed at room temperature with a relative humidity of no more than 85%, and allowed to rest for several days. Remember that you cannot place the sheets vertically and store them this way - they can become deformed under their own weight, especially if they were a little damp. Let's move on to the fastening process.
STEP 1 : Use a utility knife to cut the edges of each drywall at an angle of 30-40% to make it easier to seal them with putty later. This only applies to cut sheets, since pasted sheets already have such a chamfer from the start.
STEP 2: lift the sheet (an auxiliary worker will not hurt) and attach it in the corners, then look for a profile along the line marked on the wall and screw the drywall there. If you ignored such tags in the first section, you will have to search for the profile at random. You must retreat at least 15 centimeters from the edges so that the sheet does not crack, remember this!
STEP 3: we check all the screws so that the heads are flush with the surface of the material, otherwise it won’t be possible to putty normally, and “obliquely and crookedly, as long as it’s quick” will not suit us.
Fastening the HA sheets takes no more than an hour in a small room, since the frame is already level and all that remains is to cut the sheets correctly and attach them to the profile using a screwdriver. The frequency of tightening the screws is 20 centimeters.
Install support profiles
YouTube channel “KNAUF Russia”
Now, across the main ones, it is necessary to mount load-bearing profiles that will hold the drywall. Cut the beams to size from the same PP 60 × 27 profile and fasten them using single-level connectors (“crabs”).
If you don’t have special fittings at hand, you can use trimmed PN profiles about 100 mm long as improvised guides. They need to be attached to the main profiles with screws, and the load-bearing ones must be inserted into them and also secured with self-tapping screws.
Installation nuances
Installation of a wooden frame can be carried out directly to the surface or on suspensions. fasten
You can apply bars to the ceiling only if you are sure that its surface is perfectly flat. Otherwise, you will have to place planks under some of the bars, which will slow down the work. If the surface of the ceiling is really uneven, then it is better to immediately install the timber on hangers.
At the stage of purchasing materials, pay attention to the type of plasterboard. If you plan to do renovations in rooms with high humidity (bathroom or kitchen), then it is better to immediately choose moisture-resistant drywall. The system for fastening such plasterboard to the ceiling is no different from the standard one, but the product does not deform over time under the influence of moisture.
Marking the base for attaching drywall to the ceiling
For a wooden frame, there is no need to install a guide profile, but it is still necessary to make markings on the wall that will indicate the level of the future ceiling. This will avoid installation errors. First, the required height is determined, a mark is made on the wall, then a second point is placed using a water level. The entire perimeter of the room is marked in this way. Then a rope is stretched between the opposite walls, which will indicate the level we need. Now let’s figure out what other marks are needed to correctly attach drywall to the ceiling.
If the frame will be installed on hangers, then it will be necessary to mark the places where they are attached to the main surface. To do this, a mesh with 70x70 cm cells is applied to the ceiling. At the intersections of the lines, the hangers will be attached. This cell size allows you to securely attach drywall to the ceiling and withstand maximum load.
Install wiring and sound insulation
Electroas.ru
Before covering the frame with plasterboard, you need to lay electrical cables. As a rule, they are attached to the ceiling or suspensions. Under no circumstances should wires be laid inside the frame, as there is a risk of damaging them with screws when installing the sheets.
YouTube channel “KNAUF Russia”
To increase the sound insulation of the ceiling, mineral wool slabs are laid between the frame profiles or on top of it. If the free ends of the suspensions are sufficiently long, they are bent, thereby holding the sound insulation layer.
How to attach with glue
If you decide to use the glue method, arm yourself with useful tips.
The glue method involves:
- Cleaning the ceiling from dust and dirt;
- glue to the surface with a special spatula with teeth;
- fix the sheet on the wall using a holder, then check its horizontalness with a level;
- bumps and irregularities through the block with a hammer.
There is also an important point about adhesive fastening of plasterboard to the ceiling: the seams between the slabs should not be cross-shaped. Therefore, lay the slabs in a checkerboard pattern.
Cut out the sheets
YouTube channel “KNAUF Russia”
To cut the panels, mark the desired size with a tape measure and, applying the profile or rule, cut the cardboard with a knife. Hang and break the cut part, and then score the paper from the bottom side. Then use a plane to trim the edge along the cutting line.
Also, before installation, do not forget to use a plane or knife to chamfer at an angle of 22.5° on the edges that will be adjacent to other sheets. This is necessary in order to properly seal the joints with putty in the future.
Be sure to measure and mark on the sheets the places where the lighting wires are located. After finishing the work, the drywall can be easily cut through and the cables can be removed.
Features of ceiling plasterboard
The most reliable method of fastening is on an aluminum profile frame.
In general, plasterboard is gypsum pressed and lined with cardboard on both sides. It is environmentally friendly and does not emit toxic substances. Enterprises producing gypsum plasterboard offer consumers several types of this material, differing from each other in their scope of application and technical parameters.
For installation of ceilings, it is recommended to use ceiling plasterboard, the thickness of which is 3 mm less than the thickness of a standard sheet. Thanks to this, the sheets can be bent, which makes it possible to easily arrange arches and other curved structures.
Among the advantages of ceiling plasterboard are:
- light weight;
- ease of installation;
- availability of any type of decorative finishing (painting, wallpapering, ceramic tiles, etc.);
- flexibility - when wetted with water, the material can be given any shape;
- the possibility of trouble-free production of structures to hide utility lines (cables, pipes, air ducts, etc.).
The disadvantage of ceiling plasterboard is the need for special storage conditions and additional finishing: sealing tile seams and mechanical fastening points.
It is not recommended to use ceiling plasterboard in rooms where there is a risk of flooding from above. Water causes the material to swell and its weight to increase, which can lead to the collapse of the entire structure.
Cover the frame with plasterboard
YouTube channel “KNAUF Russia”
Together with an assistant, lift the sheet and place it in its place. Attach along the contour to all frame profiles. Join sheets in one row only on supporting profiles, avoiding allowing the edges of the drywall to hang in the air. Install slabs in adjacent rows with an offset of no less than a frame pitch.
knauf.ru
Wrap the screws evenly, avoiding distortions. Do not leave their caps protruding above the surface of the sheet, but do not recess them too much: they should be flush with the plane of the drywall or 1 mm lower.
Fasten the screws in increments of 150 mm, retreating from the edges covered with paper by 10 mm, and from the open edges by 15 mm. Shift the screws on adjacent sheets relative to each other by 10 mm.
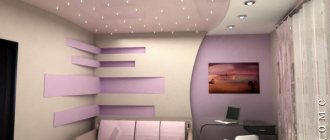
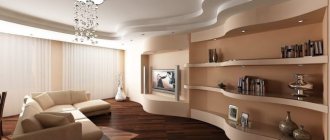
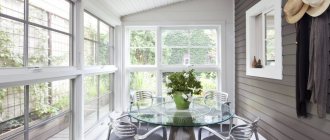
Why do you need a plasterboard ceiling?
Many people believe that this design is only for beauty. In fact, everything is completely different and the appearance of the room is the last reason to install a suspended ceiling. Let's take a closer look at why you need to make a plasterboard ceiling.
- Savings on heating: you will pay 10-25% less money for heating , especially for tall buildings. From a ceiling of 320 centimeters (private house, Stalin) you can make 240-250 cm, therefore, you won’t have to heat too much and the warm air will be closer.
- Ceiling leveling. Some emergency rooms require significant repairs. With the help of drywall, the problem with the ceiling is solved - you will smooth out any unevenness.
- The problem of laying communications and engineering networks. Sometimes it’s easier to hide them under drywall than to saw through the entire ceiling and walls with a wall chaser.
- Sound isolation. The best way to “get rid” of neighbors and retire in your own house or apartment. With high-quality insulation, you can even live on an airfield.
There are other minor advantages: plasterboard ceilings allow you to make multi-level structures and dry quickly, which significantly speeds up construction and you can move into a new house much faster.
Seal the joints
YouTube channel “KNAUF Russia”
Upon completion of installation, all sheet joints are covered with putty using reinforcing tape. To do this, first make sure that the screws are securely fastened and, if necessary, tighten the protruding heads with a screwdriver.
Then use a brush to brush off any dust at the joints of the sheets and prime all cut edges. Fill the seams with putty using a putty knife. Glue reinforcing tape in the center of the joint and press it in with a spatula. Next, apply a second layer of putty. Use the same compound to seal the fastening points of all self-tapping screws.
Rough finishing of plasterboard ceiling
Upon completion of the installation of gypsum board on the ceiling, there are usually small gaps and cracks between the individual slabs. In addition, many heads from self-tapping screws are visible on the surface. Before finishing the plasterboard structure, it is rough finished.
It is most convenient to use ready-made putty based on acrylic for these purposes:
- Bare plasterboard on the ceiling must be thoroughly impregnated with an acrylic primer. Particular attention is paid to the places of cuts where the gypsum layer is visible: it is in these areas that cracks most often appear on the finished surface. The primer fixes the plaster, providing high-quality adhesion to the putty mixture.
- The putty is usually applied in two passes. The first step is to seal all visible fasteners, screw heads, longitudinal and transverse seams, etc.
- As a rule, along the long side of plasterboard boards, a chamfer is removed or a small groove is made in advance. To avoid cracking of the seams during operation, a reinforcing glass mesh (serpyanka) must be glued to the joint areas during the sealing process.
- After the first layer has dried, it is sanded with painting sandpaper No. 80-100.
- If in the future it is planned to glue thick vinyl or glass wallpaper, further preparation may not be necessary.
- A better quality base is required for interior acrylic paint. To do this, another puttying is carried out, this time completely, achieving uniform coverage of the entire ceiling area. The dried finish is sanded with finer sandpaper No. 120-150.
- To remove dust from the surface, wipe it with a damp cloth or soft wide brush. The final stage of rough preparation is priming the base with deep penetration impregnation. It is also advisable to carry out this procedure in two passes.
When sanding, instead of the usual manual grater, if possible, you can use an electric vibratory sander with a set of spare gritty Velcro attachments. As a rule, it makes sense to buy such a tool only for professional activities.