For many years, a vegetable pit has been considered one of the most practical ways to store crops. Such a cellar can be built on a summer cottage, in a garage or even in the basement of a residential building!
The fact is that its operation does not require additional resources (no electricity or, for example, fuel is required). The freshness of grown vegetables is achieved naturally due to the appropriate conditions. Let's look at the main types of vegetable pits, the construction process and alternative options.
Vegetable pit, construction of which is completed
What are the consequences of excess moisture in the soil?
You can see the results of this phenomenon yourself - trees and shrubs die. Why is this happening?
- the oxygen content in the soil decreases and the carbon dioxide content increases, which leads to disruption of air exchange processes, water regime and nutritional regime in the soil;
- oxygen starvation of the root-forming layer occurs, which leads to the death of plant roots;
- the supply of macro and microelements by plants (nitrogen, phosphorus, potassium, etc.) is disrupted, because excess water washes out mobile forms of elements from the soil, and they become unavailable for absorption;
- intensive breakdown of proteins occurs and, accordingly, the processes of decay are activated.
Plants can tell you at what level groundwater lies
Take a close look at the flora of your area. The species inhabiting it will tell you at what depth the groundwater layers are located:
- perched water - it is best to dig a reservoir in this place;
- at a depth of up to 0.5 m - marigold, horsetails, varieties of sedges grow - bladderwrack, holly, foxtail, Langsdorff's reed;
- at a depth of 0.5 m to 1 m - meadowsweet, canary grass, ;
- from 1 m to 1.5 m – favorable conditions for meadow fescue, bluegrass, mouse peas, rank;
- from 1.5 m - wheatgrass, clover, wormwood, plantain.
What is important to know when planning site drainage
Each group of plants has its own moisture needs:
- with a groundwater depth of 0.5 to 1 m, vegetables and annual flowers can grow in high beds;
- depth of water layer up to 1.5 m is well tolerated by vegetables, grains, annuals and perennials (flowers), ornamental and fruit shrubs, trees on a dwarf rootstock;
- if the groundwater is more than 2 m deep, fruit trees can be grown;
- The optimal depth of groundwater for agriculture is from 3.5 m.
Is site drainage necessary?
Record your observations for at least some time. You yourself can understand how much drainage is needed.
Maybe it makes sense to simply redirect melt and sediment water along the bypass channel, rather than allowing it to flow through your site?
Perhaps it is necessary to design and equip a storm drain and improve the composition of the soil and this will be enough?
Or is it worth making a drainage system only for fruit and ornamental trees?
A specialist will give you the exact answer, and we strongly recommend calling him. But after reading this article, you will gain some awareness on this issue.
Upon completion of the technological and production tasks associated with the arrangement of a sewer system in an apartment building, industrial building, as well as in a private household, it is necessary to test the involved system using the forced flow method. This task is used to identify possible defects or improper installation of the entire involved sewerage part, and the test report for internal sewerage and drainage systems will be material evidence of the work on acceptance of the facility.
A visual inspection should be accompanied by inclusion in the test report of internal sewerage and drainage systems according to SNIP, which is currently represented by the current regulations of the “D” series appendix, which corresponds to SP 73.13330.2012 “Internal sanitary systems of a building”, recently a new one has been applied updated working edition according to SNiP 3.05.01-85.
The vegetable pit is designed for storing vegetables and fruits. It is not difficult to build it with your own hands. Important criteria for saving the harvest are dryness and good air exchange. When creating conditions for a good microclimate, you must be wary of sudden temperature changes. Ventilation in the vegetable pit will help avoid unpleasant odors and stale air, as well as mold fungi.
What is it intended for and what characteristics should it have?
Fruit and vegetable products purchased or grown by yourself must be stored somewhere in the winter. Refrigerators are used to store winter preparations and fresh vegetables in small quantities. However, the refrigerator will not fit a bag of potatoes and several boxes of garlic and onions. Therefore, you have to independently build a special room where you can place the twists with vegetables. The microclimate in such cellars allows you to keep the crop fresh for 4-5 months.
The constructed storage facility must have the following features and characteristics:
- temperature readings should not exceed four degrees Celsius;
- the humidity level inside the cellar should be in the range of 90-95%;
- it should always be dark inside the vegetable pit, and therefore the lighting is turned on only in cases where there is a person inside;
- The cellar is equipped with a high-quality ventilation system that will ensure normal air circulation.
Preparing potatoes and storage for winter storage
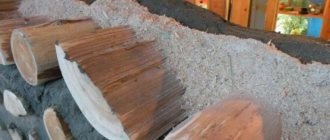
Dug up potatoes should not be dumped into a hole immediately after harvesting. Even in dry weather, the tubers are laid out in a thin layer, ventilated, and then sorted. In this case, you need to discard all potatoes that were damaged during digging, diseased or too uneven, cracked. When harvesting seeds yourself, potatoes are calibrated by setting aside small tubers without signs of disease for planting. You can leave partially greened potatoes for seeds.
They store seeds and food supplies in different pits. If the quantity is small, you need to fence off the general storage with boards.
If the pit has just been dug, it is prepared for laying the crop in the above manner, lining all surfaces with straw. If reused, special treatment of the pit will be required.
Sizing
Before equipping your garage space with a vegetable pit, you need to decide on its size.
When determining the area of the cellar, the thickness of the base and walls is taken into account. Also, when calculating the optimal area, it is taken into account that the size of the room for storing vegetables should be comfortable for the person inside. Therefore, experts advise digging a pit, the width of which will be 70-80 centimeters.
Since the pit should be located under the garage, its length directly depends on the length of the garage space, as well as on the number of products that will be stored in it. For example, if a cellar is built for a small amount of pickling, then its length can be 2-3 meters.
The minimum depth of the cellar for storing pickles is one and a half meters. However, if the owner of the premises is too tall, they dig a pit 160-170 centimeters deep.
Caisson for cellar
If you need a vegetable pit, you can install a caisson with your own hands. On sale today you can find similar designs made of different materials. This can be a prefabricated reinforced concrete structure, a metal caisson or a product made of plastic. In the latter case, no additional treatment of the cellar is required. The structure is lightweight, and its installation can be done independently, without the need to involve construction equipment. For several decades, the plastic caisson will endure negative impacts.
Selecting a location
A structure for storing supplies of vegetables and fruits should last for more than one year. For quality construction, you need to choose a suitable location. When carrying out such work, it is necessary to take into account some features. For example, the site must be on a hill so that groundwater does not fall into the hole, so the level of its occurrence is determined in advance.
You can check it yourself by drilling a well approximately 2.5 meters deep. They leave it in this form for several days and then check whether water appears there. If the place is dry, then you can safely begin arranging the storage. Another test option is to measure the depth of the adjacent wells.
Experienced craftsmen advise making a plan for yourself before starting construction. It will allow you to better navigate when performing work.
Installation Features
Before installing a plastic caisson, it is necessary to carry out external thermal insulation, since the temperature difference between the outside and inside can be significant, which will certainly cause condensation to form on the walls. Installation of such a product is carried out on a clay pillow, the thickness of which should be approximately 20 centimeters. It is important to prevent water from getting into the hole before installing the caisson, otherwise the product will begin to float. If such a problem does arise, you will need to additionally install a hydraulic lock; for this, the gaps between the walls and edges of the pit are filled with clay, as in the case described above. Waterproofing is performed below the soil freezing depth.
Site selection and subsequent planning
First, you will need to decide on the location where you plan to build a vegetable pit. Traditionally, it is installed under a storage room in a private house or under a garden house. Residents of apartment buildings have the opportunity to organize a convenient storage space by installing a vegetable pit in the garage.
It is important to note that despite the apparent simplicity of the design, simply digging a pit is not enough to arrange this type of cellar
If you are interested in information on how to make a vegetable pit, you need to take into account the following information
When planning construction, it is necessary to take into account a number of points:
In order not to damage an electrical cable or pipe accidentally lying in the ground, you will need to make sure that there are no utility lines laid in this location
From this point of view, it is more convenient to equip a hole in the basement or garage; it is necessary to determine the characteristics of the soil - it is important to collect information about the level of groundwater at the planned construction site (for this you may need to seek help from a specialist). In order for the structure to be sufficiently durable, it is necessary to select a place with a groundwater level below the bottom of the planned storage facility - at least half a meter
If they are located close enough, this problem should not be ignored - in this case, you will need to equip a reliable waterproofing system (otherwise you may end up with a vegetable pit that is regularly flooded with water). Such an arrangement will entail significant financial and labor costs, and water may still find a loophole and eventually seep inside; in the vegetable storehouse you will need to ensure suitable temperature and humidity conditions. To ensure that the fruits do not wrinkle or dry out, a humidity of 85-95% is optimal, as well as a temperature slightly above zero (from 2 to 5°C). Storage under these conditions will protect products from spoilage and allow them to retain maximum nutrients. A thermometer placed there will help you monitor the temperature in the vegetable pit; to ensure the flow of fresh air into the storage facility, it is necessary to equip it with ventilation - bring the supply and exhaust pipes outside; In addition, to prevent vegetables from sprouting during storage, the room must be kept dark.
An alternative option is a plastic cellar
As you can understand, building a vegetable pit is a problematic process; you need to calculate a lot and carry out complex work. Fortunately, technology does not stand still; you can purchase a special plastic cellar that does not require additional work, it only needs to be placed in the ground. Here are the main advantages of a plastic cellar:
- Lower requirements. Yes, before installing a plastic cellar, you also need to check the soil for the presence of any communications. No other preparatory work is required. Of course, there are soils that are definitely not suitable for storing vegetables, but the land requirements are significantly reduced!
- Turnkey vegetable storage facility. When buying a plastic cellar for storing vegetables, you can be sure that it is ready for use. It just needs to be placed underground! All racks and manholes are included in the set!
- Price. Yes, a plastic cellar, of course, cannot be called cheap, but the total amount needed to create a vegetable pit (building materials, payment for workers’ services and other expenses) is still greater!
High-tech plastic cellar.
In the age of modern technology, you can forget about vegetable pits, since they have been replaced by the latest equipment. You can purchase a high-quality plastic cellar that will meet all your requirements here.
Arranging a vegetable pit make the cellar ideal
A pit for storing crops in a garage, as we said, must be waterproofed. You may even have to make a circular drainage system in the cellar. Such measures are carried out in cases where groundwater is close to the bottom of the vegetable storage facility.
Waterproofing pits for harvest storage
The easiest way to protect the floor surface of a vegetable pit from moisture is as follows:
- treat the floor with bitumen solution (twice to be safe);
- lay sheets of roofing felt on the bitumen;
- reapply the solution;
- make a filling on the roofing material using coarse sand.
The walls of the storage facility can also be coated with bitumen or more expensive penetrating waterproofing can be used.
The final touch is installing ventilation in the basement. The easiest way is to make a natural supply and exhaust system. To do this, you will need to place two pipes (for exhaust and fresh air) at a certain height from the floor. Installation of forced ventilation will require more costs. You will need to buy a special electric fan and place it in a pipe with two doors. Your cellar for storing vegetables is ready!
This is interesting: How many bricks are needed for a garage - we will write it down in detail
Recommendations and common mistakes
Dampness in the cellar indicates poor quality waterproofing or its absence. To solve the problem, the room is emptied of its contents and the surfaces of the walls, floor and ceiling are thoroughly cleaned. Dry it. Apply bitumen mastic or roll waterproofing material, carefully sealing the seams.
To prevent mold from appearing, the surface of the walls and ceiling is treated with a solution of lime and water in a 1:1 ratio.
To arrange external drainage, dig a trench 40 cm wide and 50 cm deeper than the level of the vegetable pit. Perforated pipes are laid out in 2 m increments. They are laid on geotextile material. Then add gravel, crushed stone and sand. The top is filled with soil.
Attention! Internal drainage is arranged using perforated pipes. They are laid on geotextiles around the perimeter of the room.
Forced ventilation of vegetable pit
If the vegetable pit is located in the garage, you should give preference to forced air exchange. The arrangement of such ventilation involves the installation of not only air ducts, but also fans.
Device algorithm
- An air duct is installed near the ceiling of the pit to remove air. The end of this pipe should be 0.5 m above the roof level of the garage.
- At the very bottom of the vegetable pit, at a distance of 10 cm from the floor, a supply branch channel is installed. It extends outward 0.25 cm, connects to a 90° elbow, and is led out through the wall at the bottom of the building to the street.
- With forced ventilation, this circuit is enhanced by fans. The performance of mechanical devices must correspond to the volume of the ventilated room.
- A good option may be a combination of natural and forced air exchange systems. To do this, an exhaust fan is installed in the ventilation duct intended for air removal. It creates an air vortex, forcing air currents out of the vegetable pit. Consequently, while ensuring an influx of fresh air from the supply ventilation duct.
Optimal storage conditions for potatoes
Potatoes stay well all winter at a small temperature range in storage. Tubers begin to germinate already at +4... +5°C, and cold temperatures below -1... -2°C trigger starch saccharification processes. At lower values the potatoes freeze.
In structures that are designed for long-term preservation of products in marketable condition, it is advisable to maintain a temperature of +2 ... 0 ° C. To ensure that potato tubers and root crops do not lose their own moisture and do not wither, high air humidity is also required: it should be approximately 80-85%. The best conditions for storing vegetables are maintained in pit structures naturally when the top layer of soil freezes.
When building a pit in regions with low snow cover and possible severe frosts, it is advisable to provide additional insulation of the pit from above. This will help prevent a strong decrease in temperature in the internal space of the storage and protect the crop from spoilage. If the forecast is unfavorable, you can add additional snow to the area where the hole is located.
In addition to protection from frost, good thermal insulation of the storage facility will prevent sharp fluctuations in temperature inside during thaws and frosts. Often, due to slight warming outside, the underground space becomes 0.5-1°C warmer. Such a minor change can trigger the germination of tubers or root crops. When frozen and then thawed, vegetables simply begin to rot. To ensure good and long-term storage of potatoes in a pit, you need to build and prepare it correctly.
Natural ventilation in a vegetable pit
A vegetable pit can be built in a garage or outdoors. If it is located in a garage, it will most likely be divided by a partition with an inspection hole. However, wherever it is built, it is necessary to consider the ventilation system. An important point is the material from which it was constructed. It could be:
- wood;
- concrete plates;
- brick.
High-quality natural ventilation of vegetable pits largely depends on the insulation of the room.
The simplest option, if the pit is located on the street, may be to install two air ducts of the same cross-sectional diameter. They should be installed in opposite corners. The ventilation duct for air supply is mounted at a distance of 0.2 m from the floor. This duct will pass through the ceiling. From the outside, the pipe must rise above the ground surface by at least 0.2 m. The exhaust pipe is mounted under the ceiling in the ceiling. It is brought out as high as possible from the ceiling surface.
Thanks to the inflow and outflow of air through the ventilation ducts, natural air circulation will occur. It is based on the difference in pressure inside and outside the room. If there is severe frost outside in winter, the ventilation is blocked using dampers.
The only disadvantage of natural air exchange is its dependence on weather conditions. In the warm season, the air can stagnate due to the lack of normal draft. Another important point is to protect ventilation pipes from pests and precipitation. In the first option, you can use a mesh, in the second, a special umbrella made of metal or plastic.
Equipment
For ventilation ducts in garage pits, it is recommended to use asbestos-cement or plastic water pipes. Channels made of galvanized steel will be more expensive and will still become covered with rust over time.
Plastic air ducts are practical, resistant to large amounts of moisture, easy to install and, if necessary, replaced. In addition, they are equipped with various adapters, tees, elbows and other necessary elements, always available for sale.
The ventilation outlets are closed with grilles and small blinds so that birds (for heating in winter) and small rodents cannot get inside the ducts.
Mechanical ventilation is carried out using fans. For garages and cellars, inexpensive axial mechanisms are purchased and installed inside the exhaust and supply openings. At the same time, they provide the necessary air exchange for the garage building.
Duct fans that are mounted inside exhaust pipes can be used. It is advisable to use for large garage buildings with two floors, since they have greater productive capacity than axial mechanisms.
Umbrellas are mounted on the heads of exhaust and supply pipes to prevent precipitation from entering. To enhance draft, diffusers can be installed on the inflows. Turbo deflectors are mounted on exhaust pipes, just like diffusers, they increase draft due to the force of the wind, which creates rarefied pressure inside. A small incandescent light bulb placed in the exhaust vent will also increase the exhaust force by warming the air inside.
Pit construction
After careful planning, you can begin building your own vegetable pit.
The first step is to dig a pit for the future cellar. Then you need to dig a trench in it in which the foundation will be installed. Crushed stone is poured onto the bottom (the thickness of its layer should be at least ten centimeters), and on top of it - construction sand in a layer of fifteen centimeters. Both levels need to be properly compacted and leveled. Then you can fill the base with heated bitumen or another similar composition. If you want to make the storage very reliable, you can put a waterproofing material - for example, roofing felt - directly on the sand and cover it with reinforced concrete on top. However, such work will be more labor-intensive and cost much more. Not all cases require such powerful waterproofing. Sometimes wooden planks are placed on the floor on top of the concrete.
After the floor in the vegetable pit of a garage or private house is filled, you can move on to the walls. They are most often built from concrete or brick. The following requirements are established for them:
- for strength, concrete must be tied with steel reinforcement rods;
- the brickwork should be at least half a brick thick, but better - a whole brick or even one and a half.
The strength of the ceiling is especially important if there is any building above the cellar. Having made a vegetable pit in the garage, it is worth remembering that a car will be standing above it. In the case of a private house, everything is even more serious. If the area at the top is empty, then the requirements for the structure are somewhat reduced - the main thing is that it is reliable and does not collapse down.
The ceiling can be laid out either from bricks laid on boards, or from concrete - in this case you will need a frame made of reinforcement. At this stage, it is necessary to provide all the required openings: the entrance where the ladder and hatch will be installed, and the ventilation passage points. The most convenient place for a crawl space is the center of the underground. In this case, all the walls will remain free, along which it will be possible to install many shelving units. The final stage is insulating the ceiling. To do this, it is coated with bitumen and thermally insulated with foam plastic or expanded clay.
Do-it-yourself water heating in a private house and its installation
Materials and tools
To build a vegetable pit, you need a set of certain materials and tools.
To complete the work, you will need the following tools and materials:
- shovels;
- buckets for lifting the earth up;
- container for mixing the solution;
- fasteners (nails or screws);
- hammer or screwdriver;
- floor boards and covers;
- crushed stone;
- sand;
- cement;
- metal corner;
- insulating material.
How to design a vegetable pit in the garage with your own hands
To build a vegetable pit correctly, you will have to understand the main stages of construction.
We build a hole
The cellar begins to be created by digging a pit in which a basement will be built for storing vegetables and preserves. After this, the floor is arranged. To make the floor covering reliable, it is made of several layers. First, the bottom is covered with a small layer of crushed stone, which is compacted with a vibrating plate. Then the compacted crushed stone is covered with construction sand and filled with concrete.
When the flooring has hardened, the walls are finished. A solid brick that is resistant to high humidity is suitable for this. The walls are laid out in such a way that the seams of each subsequent row of bricks do not coincide with the previous one.
After creating the walls, a reliable ceiling is created that can withstand any load. When making a ceiling, boards are laid at the top of the pit, on which reinforcement is laid and concrete is poured. Having finished with the ceiling, you can make a staircase, which is installed near the entrance inside.
Drainage
Before using the vegetable pit, dry the room so that the walls, ceiling and floor are completely dry. There are several methods that help dry out the cellar:
- Place a metal bucket in the center of the basement, fill it with firewood and build a fire. When using this method, you will have to maintain the fire for an hour and a half.
- Place a metal pipe outside and place a burning candle underneath it, which will provide natural draft.
Waterproofing
Sometimes vegetable pits are made in areas with high groundwater levels, which increase humidity. In this case, you need to install waterproofing inside the basement, which will help keep the humidity level within normal limits.
Choice of insulation
To maintain the optimal temperature inside the cellar, additional thermal insulation will be needed. The selected thermal insulation material must have the following properties:
- environmental friendliness;
- chemical safety;
- reliability;
- protection from moisture.
To insulate storage for vegetables, use polystyrene foam or polystyrene foam.
Ventilation opening design
Any cellar must have ventilation, since it is responsible for the circulation of oxygen inside. When organizing a ventilation system, they install supply and exhaust pipes. The supply air is located near the floor, and the exhaust is led out through the roof.
For reference
A place for entry should be provided on the ceiling surface. The most suitable option is to locate the hole in the central part. In this case, shelves and racks for cans can easily fit into the storage area. In the place where the hole is supposed to be located, it is necessary to install a stop for the lid. The ceiling is thermally insulated using foam plastic or expanded clay. The ceiling surface is coated with hot bitumen, and then the selected material is installed.
Supply pipe arrangement
The correct location of the pipe is close, but not close to the cellar wall. The end of the channel will be approximately 20 - 50 centimeters from the floor. The end of the pipe must be led out through the foundation block of the garage. To protect the room from the penetration of rodents and other pests, a fine mesh mesh must be installed at the ventilation outlet. The exit should be located just above the foundation blocks, a little further than the main walls of the building. In this way, you can obtain an optimal flow of fresh air into the cellar. This scheme is used when organizing forced and natural ventilation.
Important tips when installing supply ventilation:
- The air intake should take place outside the walls of the garage or other room, preferably away from the gate, so that when entering the pipe, exhaust gases do not enter. You can consider an option so that the supply pipe is located further from the walls of the garage, but you need to think about placement without bends or right angles.
- You can make such a ventilation duct even at the stage of building the cellar. To do this, the space in the wall is limited in the brickwork, with dimensions of approximately half a brick. The masonry must be done according to all the rules, using the same mortar, but have a fairly large hole at the bottom, the end of which will be led out into the street through the garage block.
- The hole in the masonry wall or pipe must be at least 25 centimeters from the walls of the garage. This ensures normal air exchange.
- The diameter of the pipe also matters. Too small will not provide normal air flow, and a large diameter will make operation ineffective due to heat loss. The calculation can be taken as follows: for every cubic meter of room there should be at least 15 mm of pipe. Simple calculations will allow you to obtain a more or less correct section size. The same rules apply to the calculation of the exhaust pipe, so it is better that they are the same. This will additionally help to properly organize air exchange without unnecessary problems.
- For winter, it is necessary to provide insulation of the outer part of the pipe. For these purposes, you can use any insulating material, even rags. If it freezes regularly, you can think of a quick defrosting system, for example, insulating the end with non-flammable materials and building a fire under it.
- A damper must be provided from the inside of the supply ventilation to prevent food from freezing at negative outside temperatures. It is advisable not to completely close the hole; even in severe frost, fresh air should get inside the cellar.
- To prevent the hole from being covered by snow in winter, you need to periodically clear the area or use a large plywood box. It will provide the necessary protection, and the air will not be as cold compared to the other option.
A plastic version can be used as a suitable material for installing the supply pipe. The cross-section of the pipe should be from 8 centimeters; depending on the size of the cellar, you can take more. Plastic pipes have proven themselves to be excellent for such work. They do not corrode, do not accumulate mold and do not rot. Even if fungus or mold appears on the surface, they can be easily treated during the annual disinfection of the basement.
The design of the exhaust pipe is as simple as possible: in the foundation block of the garage you need to make a hole with a diameter of at least 8 - 10 cm. Then remove the pipe of a suitable cross-section, and also install a pest control net. Such a scheme will not help ensure good air flow, but in the absence of another, ventilation of the basement will be ensured.
Arrangement of the floor in the shower
Waterproofing and installing a shower in a wooden house begins with installing the floor. The first layer of waterproofing is placed under the subfloor. This can be a special roll and coating waterproofing material or ordinary roofing felt.
By the way, coating materials have recently gained popularity due to the fact that they can be laid on an uneven surface without pre-treatment with bitumen or primer, which simplifies and speeds up the work. In addition, coating agents do not have such a strong unpleasant odor as roll-based ones.
The materials are laid overlapping on the walls, and it is advisable to additionally reinforce the joints of the walls and the floor with a fiberglass mesh with small cells. This will increase the strength and increase the service life of the materials.
The floor in the shower and bathroom is installed so that it is two centimeters below the floor level of the other rooms and is separated from them by a threshold. This is necessary to prevent water from leaking into other rooms. If a lower floor level in the bathroom compared to other rooms is not planned, a threshold must be installed!
When installing a shower cabin for a wooden house, it is preferable to make a natural tray, which is formed using the walls and floor. A drain ladder is made for the shower, which will subsequently drain water that falls on the floor. The easiest to install is a plastic drain with a dry seal. To install the drain, the floor is made at a slope so that the water itself goes into the drain.
Condensation cause and effect
Condensation in a vegetable pit is a danger to humans
How to make ventilation in a vegetable pit so that condensation does not form in the room during the demi-season periods. After all, due to its formation, not only air ducts can be destroyed, but also the wet walls of a vegetable pit can collapse. To protect yourself, you need to insulate the ventilation pipe. Ideally along the entire length. If this is not possible, thermal insulation is performed only in the area from the ceiling to the umbrella equipped at the end of the duct. With proper insulation, the service life of the ventilation duct will increase, plus condensate will be removed.
Don’t forget about insulating the walls of the vegetable pit, because this factor also prevents the formation of condensation. This can be done using polyurethane foam. It helps to achieve complete sealing of the pit. It has a foamy consistency. It hardens when it hits the surface. It does not form seams or joints and retains its properties for up to 50 years.
Proper ventilation contributes to the preservation of vegetables in the autumn-spring period. In order for air exchange to take place as expected, you need to know that its multiplicity in the garage and other outbuildings must comply with SNiP standards and be equal to 180 m3/per 1 hour.
n – air exchange rate of a given room
V is the volume of the vegetable pit, expressed in m3.
L – air flow.
After all the work has been completed, it is worth testing the ventilation system - check the draft using a piece of paper.
At the end of the gardening period, the task of long-term storage of vitamin preparations arises. It’s easy to get a suitable place to place your harvest by equipping a vegetable pit - it can be placed under the house, in the basement, garage, and even under the loggia. Your supplies will remain fresh for a long time, without the need for any energy consumption. It is quite possible to set up such a storage for vegetables yourself; you can use the simplest tools and materials.
Fruit and vegetable products grown by yourself or purchased for the winter will need to be stored somewhere. No refrigerator can accommodate several boxes of onions and carrots or bags of potatoes. It is possible to make your life easier by arranging a convenient cellar for storing vegetables - in a similar way, you can organize a storage space in natural conditions, with a certain microclimate. In such storage, the crop will remain fresh for a long time.
The most convenient to use is the so-called underground - a vegetable pit in the house or in the garage, because it will not take up additional space on the site, and besides, using such a storage for vitamin preparations, including in cold weather, will be much more convenient than a cellar on the street .
Arrangement of shower walls and ceilings
The requirements for waterproofing walls and ceilings are more relaxed. Rolled materials are attached with an overlap using a construction stapler in two layers. For this, moisture-resistant plasterboard and PVC panels are used, and a PVC tension structure would be a suitable solution for the ceiling. In addition, aqua panels or extruded polystyrene panels are used to waterproof bathroom walls. The joints between the panels are sealed with sealing film.
Finishing materials are attached to a wooden frame so that there is a gap between the wall and the base to create proper ventilation and avoid condensation accumulation
During the process, it is important to treat each element of the wooden sheathing with protective agents.
Many people believe that bathroom walls can only be laid with ceramic tiles, otherwise the wood will rot and collapse. However, this is not true, because modern antiseptics can effectively protect natural materials. Therefore, you can choose any finish.
If you want to preserve the naturalness of a log or timber house, choose lining. Finishing with wooden lining will not disturb the environmental cleanliness of the structure and at the same time will protect the log house from various troubles. Thin slats are suitable for both walls and ceilings. They will harmoniously fit into the interior and emphasize the aesthetics of the room, and if necessary, level the surface.
Basic requirements for construction technology
There are several key requirements for a vegetable pit
When completing a project, it is necessary to indicate in it the dimensions of the future pit. Its depth should ideally be approximately 2-2.2 meters, width - 1.5. It will be quite comfortable to be in, and the temperature can be easily maintained at +5 degrees.
This is optimal for storing vegetables - they will not spoil and retain maximum nutrients. Humidity must be maintained at 90% so that the vegetables do not wrinkle and dry out.
If the groundwater level fluctuates at 1-1.5 meters from the surface, and it is difficult to choose another place for the hole, you can try to install a drainage system. In some cases, it may also be necessary to provide good waterproofing.
Of course, this will result in some costs, both in terms of finances and labor. But if you neglect this stage, you should prepare for the fact that sooner or later the water will find a loophole and penetrate inside.
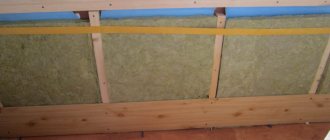
It is recommended to insulate the walls - any heat-insulating material in the form of plates that is well resistant to moisture, for example, polystyrene foam, is suitable for this.
Sand and crushed stone are laid at the bottom, then bitumen or other similar material is poured onto this cushion. It is best to install the flooring in the form of a reinforced concrete slab. If it is impossible to provide this option, strong boards are laid on the base.
The simplest option is to build natural ventilation, for which two pipes are used, placing them at different heights from the floor surface in the garage. One pipe is a supply pipe, the other is an exhaust pipe, and their outer ends should be brought out as high as possible.
This ensures a constant flow of fresh air. This helps keep vegetables in edible condition longer.
Stages of work
Stages of building a vegetable pit with your own hands
To build a good vegetable pit, it is recommended to carry out the work in the following sequence:
- To begin, check the project prepared in advance and dig a pit in accordance with the dimensions indicated in it. The simplest option is to make a hole in the ground with sides 1.2x1.4 m, depth 2 m. The work should not be done alone, but with an assistant.
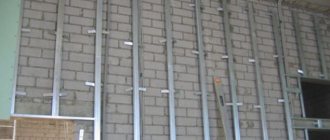
- When the pit is ready, it is necessary to strengthen the walls as best as possible. No matter how convenient the composition of the soil is for work, over time the earth may crumble and your cellar will be filled up. Therefore, you should make the bottom of concrete as carefully as possible, and place a metal frame in the corners of the future cellar. The best material is a metal corner - it is used to make a frame around the entire perimeter of the structure.
- A barrier is installed between the frame and the wall of the future cellar, which protects against crumbling earth. It is a fine-mesh mesh. A frame is placed on top of the frame, the task of which is to hold the lid. It can be made from boards on which thermal insulation material is strengthened. The lid should fit as tightly as possible to the frame - this way the cold will not get inside the pit.
You might be interested in learning how to build a greenhouse using window frames. Also, you can find out about the technical characteristics of the Volnusha composter here.
Characteristics and types
The flexible hose for connecting plumbing is a hose of different lengths made of non-toxic synthetic rubber. Thanks to the elasticity and softness of the material, it easily takes the desired position and allows installation in hard-to-reach places. To protect the flexible hose, there is an upper reinforcing layer in the form of a braid, which is made from the following materials:
- Aluminum. Such models can withstand no more than +80 °C and retain functionality for 3 years. At high humidity, aluminum braiding is prone to rust.
- Of stainless steel. Thanks to this reinforcing layer, the service life of the flexible water line is at least 10 years, and the maximum temperature of the transported medium is +95 °C.
- Nylon. This braid is used for the manufacture of reinforced models that can withstand temperatures up to +110 °C and are designed for intensive use for 15 years.
The fasteners used are nut-nut and nut-fitting pairs, which are made of brass or stainless steel. Devices with different permissible temperatures differ in the color of the braid. Blue ones are used to connect to a pipeline with cold water, and red ones for hot water.
When choosing a water line, you need to pay attention to its elasticity, reliability of fasteners and purpose. It is also mandatory to have a certificate that prevents the rubber from releasing toxic components during operation.
We fall asleep, tamp and level the floor
If several types of backfill are used, each backfilled layer must be compacted using a hand tamper. Let's consider the situation when crushed stone and sand are used. First, crushed stone is poured onto the bottom of the pit and compaction is carried out. The thickness of the compacted layer must be at least one hundred millimeters.
Next, sand is poured and compacted (layer thickness - fifty millimeters). After this, crushed stone is poured (layer thickness - five centimeters). You can only make 2 layers of one hundred millimeters each. It all depends on how wet the soil is. After filling and compacting, the floor is leveled, for which you can use the same manual tamper.
Share link:
Technical features of ventilation ducts
When designing ventilation, it is necessary to decide what material to install the ventilation pipe from. It can be:
- metal pipes;
- PVC pipes;
- asbestos pipes.
The options for metal ventilation ducts are varied. It can be stainless steel, galvanized steel, aluminum.
Stainless steel channels
Stainless steel pipes withstand temperature changes well, do not corrode, are durable, and fire resistant. Therefore, by installing such an air duct, you can protect the ventilation system from the growth of fungi and mold in it.
Galvanized pipes
Air ducts made of galvanized steel can withstand temperatures up to +85 C° and are resistant to moderate air humidity - up to 60%. Relatively light in weight, so no additional effort is required when installing the ventilation duct. They are often installed in dry rooms with ventilation equipment.
Aluminum pipes
They are semi-rigid and flexible. They are made of aluminum foil, the thickness of which is 0.08-012 mm. They can be easily bent. They are heat-resistant, can withstand + 135 C°, flexible, and rigid air ducts can withstand temperatures up to + 300 C°. Semi-rigid air ducts can be installed outdoors according to all their characteristics.
Asbestos air ducts
An asbestos-cement pipe can reach 5 m in length. Section diameter ranges from 100 to 500 mm. They are classified into pressure and non-pressure. Pipes can withstand temperatures of + 300 C°. They absorb condensation. Such air ducts are not subject to corrosion, but they are very fragile. There is a version that asbestos is harmful to health (Directive 1999/77/EC banning the use of asbestos).
PVC pipes
PVC ventilation ducts are often used to provide ventilation in residential and commercial premises. Pipes can withstand temperatures from – 30 C° to +70 C°. The smooth inner surface of the inner part creates low dynamic resistance when passing air currents. The pipes are resistant to moisture. The range of cross-section diameters and lengths of air ducts is very wide.
Ventilation to combat humidity
So, you have done high-quality combined insulation and insulation, but condensation still accumulates on the walls of the structure, and there is high humidity inside the room? This means that your ventilation system is missing or ineffective. No matter how good the waterproofing is, a vegetable pit cannot be operated without ventilation, even though it is small in size.
Ideally, you need to install two pipes, one of which will be an exhaust pipe (responsible for removing stagnant and humid air from the pit), and the second – a supply pipe (responsible for the flow of fresh air into the room). The exhaust pipe must be installed under the ceiling of the vegetable pit, because moist and warm air will accumulate there. On the other hand, at the opposite end of the pit, a supply pipe must be mounted near the floor so that fresh air enters the lower part of the room, thereby displacing warm and humid air.
If the size of your vegetable pit is large enough, then it is recommended to think about installing a forced ventilation system that would ensure a constant flow of fresh air into the room. In addition, it will be possible to independently regulate the temperature inside the storage facility, which will allow you to preserve food in its original form for a long time, as well as store more provisions without worrying about condensation and mold.