Drywall is one of mankind's greatest achievements. This material can be used not only to replace traditional plaster or to construct a variety of installations from it, but also to give free rein to your imagination and create interesting decor on the wall or ceiling. The most popular among people is the imitation of brick made from plasterboard, which allows you to get a fashionable design in country, loft or even classic style practically for nothing.
Brickwork is the highlight of the interior
Finishing procedures
This stage begins with rubbing the seam areas. The prepared mixture fills the gaps, while to create additional decor it is recommended to create various recesses.
Read also: Hellboy Hero from Hell (2004) HD
All that remains is to paint, highlighting the seams with a darker shade.
The finishing can be done using a different technology, for which the required color is initially laid, and the joints are filled with a mastic composition that has been pre-tinted.
It is best to paint in several stages. For the first layer, prepare a mixture of paint, primer and water at a ratio of 2 to 1 to 3. After applying it, you should wait a day so that the surface dries well.
During the second painting, the amount of water should be reduced so that the mixture of paint and primer with water is 1 to 2.
When you move on to the third layer, mix the components in equal parts.
Apply paint with brushes, rollers or a spray gun. The third method works faster, but there is a risk of staining the ceiling surface, floors and nearby areas of other walls. It takes a long time to use brushes, but in this case you carefully highlight each brick and the seams between them. It is best to work with a roller when you want to create a feeling of antiquity - seams, cracks and chipped areas will not be painted over and will look realistic.
Production technology
First, let's figure out how to make decorative bricks from plasterboard. For this:
- We place the slab on a flat surface so that there is room for its displacement;
- We make deep cuts with a knife (2/3 of the thickness of the plasterboard sheet);
- break off the element in one movement, cut through the wrong side;
- If you plan to make bricks for “old” masonry, it is recommended not to process uneven edges. If you need to get straight sides, you will have to work with a plane;
- parts are cut from long strips of plasterboard to look like bricks.
When working with a knife, it is necessary to use a ruler for convenience, but this condition is not considered mandatory if unevenness is planned as an additional effect.
Preparatory work
The wall on which you want to imitate decorative bricks using plasterboard with your own hands may not be completely flat. Its surface is cleaned of dirt and dust, and crumbling areas are removed.
First, the wall is primed to bind small crumbling particles and form an adhesive base for laying various compositions.
If you intend to decorate a plywood or plasterboard surface, the primer can be replaced with PVA glue diluted with water.
Decorating rooms with your own hands: decorative stone from plasterboard
The rooms are decorated with various materials. You can buy them ready-made or make them yourself from the many scraps of drywall that remain after repairs. One of the finishing materials is gypsum stone or decorative plasterboard. It is easy to obtain, easy to install, and there are finishing options for every taste (brick, stone, patterned tiles). This article describes in detail how to properly use decorative stone from plasterboard to decorate a room.
Necessary materials
To prepare plasterboard bricks for interior decoration, you will need:
- gypsum board sheets or pieces of it remaining after repairs. In rooms with high levels of humidity, water-resistant material is used; in other rooms, ordinary drywall is suitable;
- putty. It is best to purchase textured and textured options, but there are ways to obtain an imitation of masonry using a conventional composition intended for interior decoration;
- water-based acrylic paint. The shade is chosen at your discretion, but if you want to enhance the effect, use two or more colors to apply in layers with shading;
- deep penetration primer composition. It is best to take an acrylic mixture;
- sand. The material should be taken from different fractions, cleaned of foreign impurities;
- PVA glue or its equivalent. With its help, decor is applied to drywall;
- mixture for fixing plasterboard bricks. Use tile adhesive or other special composition;
- clear or matte varnishes.
Tools you should prepare:
- knife with a sharp blade;
- ruler, wooden slats, profile;
- spatulas with small blades;
- brushes and rollers;
- electric drill with mixer attachment;
- container for stirring the adhesive composition;
- roughing plane.
Surface preparation
To ensure that the cladding does not move away from the drywall during operation and that the surface is smooth, the surface should be prepared before gluing the material. To do this, dust is removed, and if there are finishing materials, they should also be gotten rid of. During all work, the room temperature must be maintained between + 5 and + 25 ˚С.
The sheets are treated with a deep penetration primer; it is better to use an acrylic composition. A thin layer of plaster no more than 2 mm is applied to the walls, and the joints are sealed with sickle tape. There should be recesses from self-tapping screws on the surface of the drywall; they must be filled with putty.
What do you need
The algorithm for making tiles in the form of bricks will require the following materials and tools for working with plasterboard:
- cutting equipment. GKL panels can be cut manually, with a stationery or construction knife;
- finishing material. Plasterboard bricks need to be given texture, as well as prepare the surface itself for further painting. Putties (start, finish, universal) are suitable; you can use the remains of textured plaster on gypsum material and even façade bark beetle;
Option for finishing brick panels from gypsum plasterboard - assembly adhesive. The best option for fixing artificial plasterboard bricks is the Perlfix mounting mixture, which is designed specifically for this work. Worse, the Fugenfüller composition may be suitable;
- tools for marking sheets and plaster spatulas;
- dye. Acrylic water-based is best for interior work.
Making decorative bricks from plasterboard
Imitation of brick from plasterboard allows you to finish both the surfaces of walls sheathed with gypsum boards and conventional block or panel walls in an apartment. But, at the same time, you need to comply with some requirements for the planes that will be used in the decor: Option for finishing the walls with decorative bricks The process of finishing the wall in the corridor
It is common to find one or more sheets of material left behind after a renovation is completed, as well as numerous pieces of drywall of varying sizes. Option for finishing decorative bricks from gypsum plasterboard. All this material will be used for brick production. In this case, the main property of drywall will help perfectly; it is very easy to process!
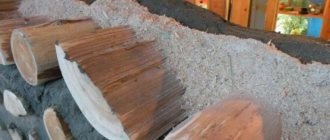
Option for decorating and finishing the kitchen with decorative bricks from gypsum board Decoration and design of walls in the hall The technology for producing tiles for a wall made of plasterboard bricks is quite simple, everything is done in several stages: Another original way to give the texture of gypsum tiles under a brick is the use of sand and glue. To do this, the front side of the blanks is generously lubricated with wallpaper adhesive and sprinkled with sand through a sieve. An example of the texture of a tile made from glue and sand. Afterwards, remove excess powder and dry the material thoroughly. Sand can be painted in one or more shades. The next step after manufacturing is the decorative finishing of the partition or wall with artificial brick.
- First, the walls must be carefully examined and all defects identified: unevenness, dilapidated areas, distortions. They should be eliminated and weak areas restored;
- a prerequisite is to prime the surfaces well before attaching decorative elements to them; The process of priming a wall for laying decorative bricks
- if there is old finishing, it needs to be dismantled;
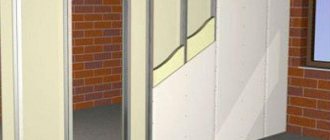
- in case of significant distortions and differences in the walls, they will have to be leveled. This can be done with plaster or plasterboard on the frame.
Scope of application
Imitating brickwork, you can decorate walls from any building materials. True, you will have to take into account certain requirements for the planes involved in the decor.
The walls of the premises are preliminarily inspected for defective areas that will have to be eliminated.
One of the prerequisites is the application of a primer. Please remember that old decorative coatings should be removed. After this, the surface is leveled using plaster or drywall attached to a frame base.
Preparing the wall
As usual, one of the most important roles in the installation of finishing materials is played by wall preparation. It happens in several stages.
- We carefully remove all old covering: wallpaper or other finishing. The surface should become absolutely clean.
- Sand the wall so that it becomes smooth.
- We make markings to place the “bricks”. This is necessary to ensure that the masonry turns out really beautiful, smooth and natural-looking. In this case, two nuances need to be taken into account. Firstly, brick blocks in real masonry are not located one above the other, but with a shift. That is, each brick must lie on two blocks of the previous row. This is called ligation. This, of course, does not apply to the first row, but it certainly does to the rest. Secondly, do not forget that in real masonry there is also cement mortar. Therefore, when marking, we take into account the seams, both side and inter-row. Usually their thickness is about 10 millimeters, but you can make it 15. When applying markings, do not forget to use a building level, this is the only way you can get perfectly even rows.
- The last stage of preparation is priming the wall. This will allow the drywall to stick to it well and for a long time. The primer must be applied using a roller in an even, thin layer. Make sure that there are no smudges or drops. After application, you need to wait until the composition is completely dry. The time required for this is usually indicated on the packaging of the product.
Video master classes
Below are video lessons from different masters. The first one shows how to make beautiful gypsum tiles from leftover plasterboard.
In the following tutorials you will see how to create a faux brick wall step by step.
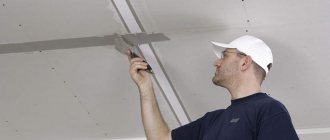
Drywall cutting and installation
Grout
Painting
We hope that the article was useful to you. Leave your questions and feedback in the comments below.
Preparation and marking of workpieces
When all the tools and materials have been collected, you can begin to work directly. First you need to take sheets of drywall and apply markings. The cells must correspond to the actual size of the decorative brick that is needed in the end, but on average it is:
Marking plasterboard for making decorative bricks
Next, you need to coat the plasterboard sheets with a primer on both sides. After complete drying, the final marking is applied (you can use a simple pencil).
Laying the drywall on a flat surface and pressing it with your hand, cut the sheet strictly according to the markings. The knife must be held firmly and at an angle of 45 degrees. Having made 2-3 deep cuts, you can break off the desired fragment and proceed to the next one. The result will be rectangular blanks for future decorative bricks.
Marking
This part of the work needs to be given enough attention. The appearance of the finished composition depends on how well it is carried out. A grid of cells is drawn on the wall, the dimensions corresponding to the parts to be glued. Between the cells it is necessary to leave free gaps of a centimeter - one and a half. They will imitate the seams between the rows of masonry. It is also worth considering that brickwork is done with each subsequent row offset from the previous one.
If you plan to make a joint between the glued parts using a special grout mixture, then all marking work will be completed at this stage. However, sometimes an imitation brick from cardboard is created with your own hands using a different technology and the jointing mixture is not used. In this case, it is necessary to paint over all the spaces between the bricks with paint similar in tone to standard cement mortar. After this, the paint must be allowed to dry.
Pasting
Then everything will be quite simple. The parts prepared in advance are simply coated with glue and glued in accordance with the applied markings. This process is not difficult. Although it takes a long time. It is necessary to glue each element very evenly and carefully, since even small unevenness and carelessness can greatly affect the realism of the created composition. Having sealed all the necessary space, the composition is allowed to dry and after that the seams are unstitched, painted and other finishing work is carried out.
Sources:
https://elite-k.ru/vidy-kirpicha/imitatsiya-kirpicha-iz-gipsokartona.html https://wikipotolok.com/kak-svoimi-rukami-iz-gipsokartona-sdelat-imitatsiyu-kirpicha/
How to paint tiles
Painting the finished imitation brickwork will take several days, since it is recommended to paint in three stages to obtain the desired color and strengthen the plasterboard bricks.
The most common paint suitable for plasterboard surfaces is water-based . As a rule, it is sold in white, which is very convenient if you have a white wall in mind. But if you want a different brick shade, then you should add special colors of the desired shade to the water emulsion.
- For the first stage of painting, a solution is diluted: paint, primer, water, in a ratio of 2:1:3. Allow to dry overnight before the second step.
- For the second layer of paint, reduce the amount of water. Now the ratio of concentrate (paint and primer) and water should be 1:2.
- For the third layer the ratio is: paint, primer, water (1:1:1).
You can paint with a spray gun, a paint brush or a roller . In the first case, it will of course be much faster, but you risk accidentally staining the ceiling, floor and nearby walls. Painting with a brush will take a little longer, but you will be able to thoroughly paint the seams and bricks.
If you decide to paint a faux brick wall with a roller, be prepared that the painting will create an antique effect. The roller does not paint over cracks, chips and seams, so the brickwork will look very realistic.
Grouting masonry
Ready-made mortar for grouting joints can be purchased at any hardware store, but specifically for decorative stone, it will be much more expedient and cheaper to make the mortar yourself, and in addition, the quality will be in no way inferior to the purchased one.
To make it you will need sand and cement in a ratio of 1:4 , but to prevent the solution from “sagging”, it is recommended to add any plasticizer to it; it can also be tile adhesive in a ratio of 2:1:4 to sand and cement. A plasticizer is needed so that the solution does not settle and becomes more plastic.
Do not try to push the mortar into the joints with a spatula - this will only stain the bricks and will not really achieve the desired effect. The most convenient solution can be a syringe gun or any plastic bag, preferably a thick one . Make something like a pastry bag out of the bag, pour the solution into it and squeeze it along the seams. Use rubber gloves - the alkali can make your hands very dry.
How to make grout is shown in the video below.
How to avoid mistakes
Eclectic combinations only seem chaotic - in fact, they are always well thought out. The interior may contain quite bright colors, but they must be precisely dosed, focusing on one surface or object. Fans of catchy colors should remember that multicolor will not allow you to concentrate or relax, and most often suppresses psychologically.
The second condition of eclectic design is the creation of combinations of opposites. Bare masonry looks great next to floral textiles; chrome-plated modern lamps may well be adjacent to the wrought-iron bed; and a complex design should always be balanced with simple finishing.
If you mix styles, try to have no more than two. Next to brickwork or concrete texture, symbolizing a loft, classically designed furniture with a multi-candle crystal chandelier looks great. If a third style is mixed in here, then only as a single accent - better than wall decor. By the way, there should be little of it, and it is better if it corresponds to some general idea.
Pop art decor on masonry background
Note: If, for example, loft and classicism were taken as the basis for the interior, doors and windows should be made in one of these styles.
Case manufacturing
The work is simple, but painstaking. First of all, you need to draw up an accurate drawing of a plasterboard fireplace. In accordance with the schematic image, it is necessary to mark the frame on those parts of the structure to which it will be attached.
Next, we connect the guides according to the markings on the floor. If the coating is concrete, you first need to attach the profile to the marking lines, then drill holes for the dowel-nails. Now it is necessary to secure the guides and then install the racks in them. The body parts are attached to each other using self-tapping screws.
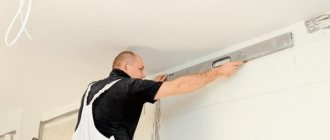
When fixing the profile to the wall, you need to pay attention to its verticality. The check is carried out using a plumb line. If irregularities are detected, then the correct installation of the guides should be inspected using the hangers. The profile must be installed strictly vertically.
Thus, first the outer frame of the decorative fireplace made of plasterboard is mounted, then the recess elements are installed. To make the structure more rigid, be sure to fasten long profiles with additional jumpers. Make the inner part of any shape, for which you need to trim one of the elements and bend it at the desired angle.
How to make decorative stone from plasterboard with plastering
An improved version of the previous method. The basis of the tiles is the same gypsum board, but the texture is created by applying a layer of plaster. This method allows you to make thicker stones with a pronounced relief and eliminates the need to remove a layer of paper from drywall, which saves a lot of time when doing large volumes of work.
What you will need
- Drywall of any thickness;
- gypsum plaster;
- primer;
- putty knife;
- plastic trowel (trowel);
- sharp knife;
- roller;
- level.
How to do
- Using a roller, thoroughly prime the drywall on both sides and allow to dry.
- Take gypsum plaster and mix a small amount according to the package instructions.
- Using a plastic trowel, apply a 3–4 mm layer of plaster to the surface of the plasterboard. Don't try to smooth it perfectly evenly, there's no point.
- Then, applying the trowel to the sheet, work along the long side of the sheet to create the texture of the stone.
- Apply a thin strip of plaster to the edge of the tool and, holding the trowel at an angle, touch the surface of the drywall to create stripes of tops. This will give the imitation stone additional volume.
- As soon as the mixture dries a little and no longer sticks to your hands, use a pencil and a level to mark the future tiles according to the selected dimensions.
- Applying a level to the drawn lines, draw a spatula blade along them. There is no need to cut the drywall - just draw a layer of plaster.
- After the mixture has completely dried, cut the plasterboard with a knife along the marked lines, and then break the sheet and cut the paper on the back side. Level the ends of the tiles with a knife or by rubbing them against each other.
- Next, the surface of the tiles is primed again, painted in the desired color and attached to the walls using tile adhesive.
Imitation of tile covering
After leveling the walls with gypsum putty, within 2 hours, on the existing non-smooth base, you can imitate any type of masonry or stone finishing.
To do this, you will need any chalk other than white - it will be used to mark the base, along which the seams are cut with a chisel or a shoe knife. So, to give the impression that the wall is brick, the lines should be straight.
To create an imitation of finishing with wild stone, lines are drawn randomly or according to a pre-thought-out plan. Here everything depends on the overall interior of the room and the imagination of the person who brings the idea to life.
When the putty has dried, the seams should be treated with coarse sandpaper, dusted off and primed. You can paint such a surface only after it has dried from the primer.
Gluing and finishing
Work technology:
- The walls are cleaned of all excess and covered with a primer.
- Markings are applied. This will allow you to quickly distribute the bricks over the surface. It is taken into account that a gap is formed between the parts, and the rows are laid offset.
- The adhesive mixture is mixed. The solution is applied to the back of the tiles, which must be glued in strict order.
- An alternative option is to cover the walls with the composition. In such a situation, spacers are placed to form joints between the fragments.
- Upon completion of the main work, the surface is left to dry.
- Next you need to grout the joints. To do this, fill all the gaps with the mixture. It is taken into account that the joints can also be decorated by creating recesses of different shapes.
- Final painting is carried out. A lighter shade is applied and the seams are highlighted.
Decoration of seams is carried out according to the same principle as in real brickwork: the seams are filled with mortar, after which, using jointing, the texture of the seam is formed.
Finishing procedures can be carried out using a different technology: initially the desired color is laid, after which the joints are filled with mastic, which has been tinted .
Installation work
Technologically, this process looks like this:
- Markings are applied to the cleaned and primed surface, allowing you to quickly place the bricks. It is necessary to take into account that there are gaps between the elements for seams, and the next row is glued offset;
- The adhesive composition is being prepared. Using a spatula, the solution is applied to the back side of the plasterboard blank;
- you can cover the surface of the wall with an adhesive solution, but when forming a row you will have to use spacers;
- Once the installation is completed, the surface is left to dry completely.