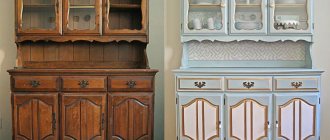
Paint for pine furniture
Pine furniture is very popular due to its pleasant texture, noble color and affordable price, but this species is quite soft. Such wood practically does not dry out, for example, compared to aspen. It is a universal material for the production of chairs, chests of drawers, tables, decoration and construction of houses, unlike cherry, spruce and other species. Let's take a closer look at how to paint pine furniture. After all, many people buy items made from such material unpainted in order to apply the coating themselves (in order to save money or to create a unified interior).
Kitchen 2022: 5 key trends
We tell you what kitchen design to choose today so that it is relevant tomorrow
Sand the surface
Your product should be completely covered with small scratches. To do this, use fine sandpaper, but if one of your friends has a sanding machine, it’s time to remind these friends about yourself.
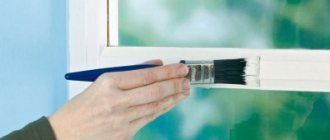
Prepare for painting
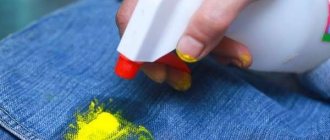
To do this, you need to remove dust and degrease the surface: wipe it with a damp cloth, and then with a cloth with degreaser or alcohol. The remaining glue from the film will also have to be sanded off and degreased. After this, you need to putty the products: remove all holes from old handles, shelves and fasteners, cracks and irregularities. After this, sand and degrease the surface again.
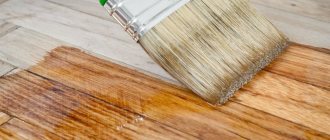
Apply primer
To ensure that the paint adheres to the surface, cover the surface with primer. Choose an unscented primer, such as Otex Akva from Tikkurila, it doesn't smell! Liquid, water-based, dries quickly. Prime in two layers, allowing each layer to dry.
Types of paint for pine furniture
To give the desired color and performance properties to pine furniture, several compositions are used. This is due to the fact that wood requires certain processing due to its characteristics. However, the compositions listed below are used not only for this type of wood, but also for others. Remember that it is always worth checking whether the previous coating will be compatible with the new one. So, let’s look in order at what and why should be used when painting pine furniture.
Tinting. It is used for:
- to hide surface defects or heterogeneity by painting in a darker shade;
- highlight the wood structure and improve its natural color;
- give pine furniture the appearance of a valuable type of wood;
- get a color unusual for wood (red, blue, etc.).
Varnish or paint. Their purpose is:
- to hide surface defects;
- give the wood the desired color;
- hide the structure and texture of wood (paint) or, conversely, emphasize (varnish).
Let's consider what types of compositions are divided into.
Water-soluble paints and varnishes . Their main advantages include:
- dry quickly;
- as a rule, they do not emit harmful fumes (therefore they can be used for painting furniture for children);
- resistant to moisture;
- easy to tinting;
- After drying, the paint layer becomes frost-resistant.
It is important to know that varnishes and paints themselves should be stored in a warm room, since at low temperatures the compositions can deteriorate. As a result of painting furniture made of pine or other wood, you will get a covering coating (paint) or a transparent coating (varnish).
On organic solvents (varnishes and enamels) . They have a number of features:
- resistant to moisture;
- takes a long time to dry;
- sold at affordable prices;
- during operation they may emit a strong, unpleasant odor.
If furniture made of pine or other wood is painted with enamel, the surface will be opaque, if varnished, then transparent.
All varnishes have fairly high vapor permeability, and also leave wood (not just pine) the ability to “breathe”, namely to give and receive moisture from the environment. Such compositions are excellent for new or well-preserved furniture. Varnishes contain substances that protect wooden furniture from destruction and fading. Please note: when you need to repeat the treatment, the previously applied coating does not need to be removed (unlike paint). A fresh layer can be applied to the old one.
How to choose the right paint
The appearance and durability of the paintwork directly depends on the quality of the material. But it’s not enough to buy good paint. It is also necessary that it is intended for painting wooden surfaces, is resistant to moisture, does not absorb dirt and dust, and does not crack at cold temperatures. And this is not a complete list of the advantages of high-quality paint.
This process does not require special skills or expensive equipment; the main thing is to choose the right paint composition and follow the technology.
Conventionally, paint and varnish products are divided into several types:
- Acrylic paint is the most common. It is made on a water basis, which gives it fluidity and good coverage. Coloring occurs evenly, the product easily penetrates into all cracks and cracks. The paint is suitable for transforming surfaces made of natural wood and plywood. You can also paint laminate and veneer with acrylic.
- Enamel with a metallic sheen is an excellent solution for decorating furniture parts, painting handles and frames. A large selection of shades allows you to create unusual combinations and transform old furniture beyond recognition.
- The varnish is intended to renew the top layers of the coating. You can varnish freshly painted furniture or give old interiors a new and attractive look.
- Paint with fire-resistant characteristics is used in cases where the furniture will be located in high-risk areas. This paint improves the fire resistance and heat resistance of the surface.
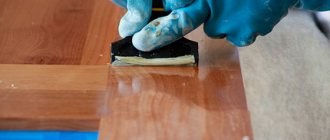
How is detarring carried out?
A special feature of pine is the presence of a large amount of resinous substances, which does not always allow paint or varnish to lie flat, so the wood must be deresined before applying the coating. Also, when a large amount of resin accumulates in a certain area, it darkens and spoils the appearance of the furniture. In addition, a sticky film appears that will prevent the primer from absorbing. This procedure involves the complete or partial removal of resinous substances. To do this, use a special solvent-based composition. It is applied with a brush, then the surface is washed and dried. If the tarred areas have a large area, then they are cut out with a knife and sealed with putty. The solvent may contain components such as:
- technical solution of acetone;
- baking soda;
- technical alcohol;
- potash;
- hot water;
- soap flakes.
Surface preparation
For the production of furniture, they used and still use different coatings on chipboard, which have to be removed at home using largely different methods.
In any case, it is better to disassemble cabinets, tables, bedside tables and take them outside or other open, well-ventilated space. If necessary, you can work without disassembling, then you should free up space around it, lay newspaper or thick oilcloth underneath so as not to stain the floors in the room.
Painted furniture
If varnish or paint has been applied to the slabs, they can be treated with a hairdryer. After heating and softening, the top layer can be easily cleaned off with a spatula. Thick coatings of old paint can form swollen bubbles when exposed to hot air, which are much easier to clean off than thin layers.
If you need to clean an ancient countertop, a regular heated iron will do. By ironing the surface through the foil, the coating can quickly be removed with a spatula or knife. For vertical or shaped surfaces, for example on a rustic chest of drawers, in the absence of a hairdryer, a torch or blowtorch with any heating source will help remove the old paint
Work must be carried out very carefully, keeping in mind safety precautions
There is an alternative method for removing varnishes and paints, the essence of which is to treat the layer with solvents. The organic liquid is generously distributed over the surface with a brush, wait a while, then the softened layer is removed with a spatula
The solvent method is convenient, but requires caution due to the high volatility and flammability of the liquid
Furniture coated with polymers, veneer or laminated paper
If there is a laminated, veneered or laminated layer on the surface, you will have to work hard. It is very difficult to remove them just like paint, because there is a high probability of damage to the particle base of the chipboard material. Therefore, the furniture is treated with sanding cloths until the roughness of the coating is formed, which allows the new layer of paint to be securely fixed.
Nowadays, chipboard home furniture very often has a laminated outer layer. It should be prepared with great care, especially if you plan to subsequently paint the chipboard in an elegant white color.
Sanding is first carried out using sanding plates with large grains, then the dust is carefully swept away with a brush.
Please note that you should not wipe dusty areas with a cloth, because dirt particles will penetrate into the pores and interfere with the subsequent fixation of the color pigment
At the next stage, sanding is carried out with fine-grained sanding sheets, especially focusing on edges, corners, and other areas where pre-treatment was previously difficult to do. After this, sweep out all the dust particles again.
Otherwise, instead of the long-awaited glossy cabinet or table, you may end up with a non-uniform matte finish.
After sanding, you need to slowly run your hand over the surface of the furniture, feeling each area for any unevenness or damage. If there are any, the furniture must be puttied with special compounds or a mixture of fine wood shavings and PVA.
After waiting several hours, up to a day, you can begin priming, which is absolutely necessary to improve the fixation of coloring pigments in the future. The primer mixture will also need a day to dry completely, provided that the work is carried out in a warm room.
If the temperature is close to the minimum allowed 5℃, drying may take longer.
How to tint pine products
After high-quality tinting, furniture made of any wood usually acquires a smooth surface with a low gloss. Upon completion of the procedure, the products should dry well. Then the surface is usually coated with varnish or transparent paint. Before tinting, make sure that the following recommendations are followed.
- The surface to be treated must be well sanded.
- Before tinting, the pine is treated with a primer.
- The surface of the products should not contain dark spots or streaks of dye.
For processing, compositions are used that have light-resistant properties, are also well absorbed and easily soluble in water. The tint itself must be applied with a brush. Pay attention to what recommendations (number of layers, drying time, etc.) the manufacturer gives.
Choosing paint
- Before you choose which paint is best to paint wooden furniture, you need to clearly understand for yourself what you want to see at the finish. The surface can be made glossy or matte. If you want to harmoniously fit a thing into the existing interior, then it is better to use covering paints and paint it, say, white.
- If you like the look of natural wood and want to highlight and emphasize the texture, then you should pay attention to transparent or translucent varnishes, enamels, stains and, of course, impregnations.
Painting white.
Tip: It often makes sense to first thoroughly clean and prepare the item so that the condition and texture of the wood can be seen. After this, it will be much easier for you to decide what type of composition to use.
- It is better to use the compositions specifically for furniture; if you take yacht or parquet varnish, this does not mean at all that the surface will be stronger and more beautiful, but it will be problematic to wash them off if the result is unsatisfactory.
- When choosing what paint to paint wooden furniture, we advise you to pay attention to acrylic compounds. They have a water-dispersed base and, when wet, are easily washed off with water. But, after complete drying, these surfaces can be washed up to 500 times without damaging their appearance.
- An important factor is the vapor permeability of acrylic; air exchange for natural wood is very important. Your furniture will be reliably protected from pests and mold. Plus, acrylic compounds have virtually no odor. To work, you don’t need to take your children out of the house or carry things into the garage - the paint is harmless to health.
How to paint or varnish pine furniture
You have already chosen how to paint your pine wood furniture. Now it’s worth finding out how to do it correctly. It is better to apply the paint in several layers as it dries. Before applying the next layer, the previous one can be sanded with fine-grained sandpaper. The general procedure for painting or varnishing is as follows:
- removal of old coating, knots and other defects . A mechanical cleaning method is suitable for this. You can use brushes or sanders, as well as sand, shot, etc. If the furniture already has a varnish coating, then evaluate how durable it is. The flimsy coating must be completely removed, and the strong coating must be rinsed with warm water and dried;
- detarring . Details of the procedure can be read in the block above;
- tinting . Information on this issue is also indicated in a separate block;
- sealing cracks and chips with putty . It must be applied in a thin layer. First local, then continuous. There should be no more than three layers. And each of them should be well dried;
- applying primer . It is applied with a brush, spray gun or other tool. If you are planning a glossy surface, then the already dried primer must be treated with emery cloth. On furniture that will be used in high humidity conditions, the primer is applied with a brush. The layer should be thin in any case (compared to the outer layers of paint);
- painting with a brush, roller or airbrush . A roller can cover a large area, but it does not allow you to work with quick-drying varnishes. For these compositions it is recommended to use a brush. It is convenient to paint furniture with an airbrush, but in this case the consumption of materials may be slightly greater than when using other tools.
Which shade is better to choose?
- If the bedroom is small, it is advisable to choose light and cool shades.
- If there is insufficient lighting in the room, it is better to avoid painting in too dark colors.
- You need to choose a color to match the interior design of the bedroom.
- It is better to choose shades that will help you relax and get ready for sleep.
How to repaint it white?
The procedure for repainting furniture white is simple. Painting is carried out in several stages:
- Remove dust and dirty stains from the surface with water and any detergent.
- Dry and disassemble the furniture into its component parts.
- Remove the old coating with sandpaper, treat uneven areas and small cracks.
- Apply two coats of primer, allowing each coat to dry completely.
- Apply a thin layer of the white compound with a brush or roller, leave until completely dry, then repeat the procedure two more times.
- When the coating has dried, the surface can be coated with matte or glossy varnish. This will provide the product with a more attractive appearance and additional protection against wear.
How to repaint a baby crib a different color?
Special safety requirements apply to compositions used for painting cribs. They should be:
- Quick-drying, fireproof, elastic, resistant to moisture, aggressive environments, and mechanical stress.
- Does not contain various volatile compounds, toxins, heavy metals, or other hazardous substances.
Most suitable and harmless for children:
- Acrylic: have antibacterial additives in their composition, are quick-drying, provide a smooth finish, and are resistant to mechanical stress, humidity, temperature changes, and exposure to direct sunlight.
- Silicone: form a film on the surface that is prone to self-cleaning. Elastic, vapor-permeable, resistant to temperature changes, and not afraid of moisture.
- Latex: based on synthetic latex. Creates a moderately durable coating. They do not deform upon contact with water, but are destroyed under the influence of sudden temperature changes and direct sunlight.
- Based on milk casein: no volatile components, composed of milk casein (binder) and porcelain (strengthening agent). They have good adhesion to wood and can be applied over old wood.
To paint a crib, it is not necessary to remove old layers. High adhesion of modern materials allows the new coating to firmly adhere to the previously applied coating.
- They take the crib apart.
- Treat the surface of all parts with sandpaper. If the old coating peels off, it is completely removed with a spatula.
- They wipe furniture from dust, dirt, and eliminate defects.
- Putty, prime the product, and leave to dry.
- After the bed has completely dried, painting begins. Using a brush or roller, paint evenly in two or three layers, allowing each to dry thoroughly.
- When the coating on all parts is completely dry, the furniture is assembled.
If you plan to repaint a crib for a very young child, you must take into account that babies often chew the sides
Therefore, when choosing paint materials, it is important to study certificates of compliance with the conclusions of state supervisory authorities
Video instructions for painting a crib:
The procedure for painting a bed with your own hands at home is simple and does not take too much time. You need to choose a suitable safe material and follow all the points in the instructions. Proper painting will provide high-quality and long-lasting coverage.
Source
TEX products
TEX materials are suitable for all types of wood. We suggest purchasing the following formulations.
Enamel for wood and metal “Profi” . Great for interior and exterior painting, painting furniture, houses and so on. Dust drying time is approximately 6–8 hours. The coating will be durable (up to 8 years). The composition itself has virtually no odor during operation.
Heavy-duty parquet ECO-VARNISH BIOTEKS. The material is water-borne and wear-resistant. It has an acrylic base. The furniture product can be fully used 12 hours after painting. If you follow the manufacturer's recommendations, consumption will be economical.
The choice of coating for pine and its application should be treated very carefully, since this furniture is sensitive to mechanical stress and other environmental factors. However, with high-quality processing, furniture made from this wood can last for many years. If you have questions on this topic, you can contact our specialist. He will help you choose the best option and also explain the nuances of the work.
Important nuances
Before you start painting any furniture at home, you need to carefully study the entire process of applying paint and varnish. We also recommend watching several videos that describe painting polished furniture, since this operation requires special skills and taking into account some of the nuances of the material.
The question of whether it is possible to paint polished furniture cannot be answered unequivocally. Painting this type of interior items requires careful preparation and experience in the restoration field. If you need to paint a large area of a polished surface, we recommend that you contact a professional, otherwise you may get a poor-quality result and spend a lot of time and effort.
We paint old furniture white or give life to unnecessary things
Often an old chest of drawers, chair, table or cabinet made of solid wood is very dear to us, like a memory. It’s a shame to throw them away, and they no longer fit into the new interior. Therefore, the task is to update it. How to paint furniture at home?
I suggest the most elegant, fresh color is white. Painting furniture is a great way to extend the life of old furnishings and equipment and give them new life.
For example, white distressed furniture can be finished in such a way that it looks very stylish. You will need to process the furniture in two stages:
- whitening;
- light sanding with sandpaper.
Wooden products made from solid wood are best suited for this purpose: oak, pine, birch, beech.
To work you should prepare:
- dark dye and white acrylic paint or two colors of acrylic paints;
- white wax candles;
- brushes;
- coarse and fine-grained sandpaper;
- textile;
- knife.
- Clean the surface of the chest of drawers or chair from dust, wipe it several times with a damp cloth and leave until completely dry.
- If the surface is painted, you need to remove the varnish layer with sandpaper (first coarse and then fine-grained).
- Places that you want to highlight: carved decorations, slats, edges, should be covered with darker paint (brown and blue shades are ideal here). Leave the paint to dry.
- To get an uneven and natural effect of worn corners, wax the areas previously painted with dark paint. The wax will make it so that the next coat of paint will not adhere tightly to these areas.
- Cover the entire surface with white paint, preferably several times, with breaks to dry. Avoid stains.
6. Areas covered with an additional layer of paint and wax should be rubbed with a knife. Don't press too hard - this way you will get a good effect.
7. Rub the entire surface with fine sandpaper to level the surface.
Whitening with whitening paste
Bleaching using a bleaching paste consists of rubbing the wood with a special paste containing wax and pigment. The wood surface will develop distinctive white lines, making it look older. Porous wood is suitable for such bleaching - trees such as oak and ash.
You need to buy in the store:
- special paste,
- prepare paint in the chosen color,
- metal brush,
- hard brush,
- textile,
- a piece of coarse and fine-grained sandpaper.
- Wipe the clean surface of a chair or chest of drawers from dust several times with a damp cloth and leave until dry.
- If the surface is painted, you need to remove the varnish layer with sandpaper.
- Paint the surface with paint and let it dry.
- Using a wire brush on the wood, make tiny grooves according to the grain orientation.
- Apply the whitening paste, fill the grooves well and wait for the paste to dry.
- Wipe the surface with a dry cloth.
- Cover the surface with varnish.
Express whitening
If you want to give a simple wooden stool new life, you can do it with a washed-off white paint effect. Nothing could be simpler.
- Rub the wooden surface with sandpaper.
- Using a brush, apply a coat of paint.
- When the paint dries, remove excess paint with a napkin.
- Coat the wood with varnish.
How to repaint lacquered furniture? Yes, just like repainting polished furniture and any other furniture. The only problem is old, cracked varnish or polish. It can be removed in several ways:
- The mechanical method is the cheapest and most accessible , but also the longest and most labor-intensive. Old polishing or varnishing is removed using sandpaper or a sandpaper. Once you select it, don’t forget to wear safety glasses to prevent dust and small pieces from getting into your eyes.
- The chemical method is quite expensive ; it involves special chemicals applied to the old surface and then washed off with water. They come in the form of powder, gel, foam, etc. When removing old varnish using this method, you need to protect the skin and mucous membranes.
- The thermal method removes the old coating using a hair dryer . Heating the surface with one hand, scrape off the polish or varnish with the other. With this method, you need to be careful with temperatures to avoid ignition.
How to Paint an Old Metal Bed
The procedure will be similar. First, disassemble the bed. Each part must be washed in warm soapy water, thoroughly removing all dirt. Wipe down the components. Next steps:
1. Sand the parts with sandpaper. Wipe off the dust with a damp cloth.
2. Apply primer. It is needed for stronger adhesion of paint to metal.
3. Apply the first coat of paint to the parts. This should be done after the primer has dried. Repeat the procedure 2-3 more times.
4. Wait for the paint to dry completely. Assemble the bed.
What is the best paint to use for children's furniture?
Author: Anastasia Isakova · Published 05/07/2017 · Updated 05/07/2017
Paint for children's furniture is currently available in a huge range. Bright colors, which will undoubtedly please both the child and the parents, can harm the baby’s health. Even the use of white dye does not guarantee safety. Especially if such a finishing material is used to paint pieces of furniture that are often in contact with the child for a long time, for example, a bed, a high chair, a desk.
To avoid adverse effects, you need to choose your paint carefully. To do this, you need to know what criteria it must meet; it is especially important what paint to paint the crib with.
Painting a baby crib at home
To paint a baby crib with your own hands you will need:
Important! During the painting process, you should make sure that the paint is applied in a thick layer and does not run into one place. To do this, you should not put a large amount of paint on the working tool.
Instructions for painting a bed with your own hands:
- We remove the mattress from the crib and all other things that were on it.
- We take the children's furniture item into a well-ventilated area.
- If there is an old layer of paint, it must be removed. To perform this action you will need a spatula, an angle grinder with a metal brush attachment and a hair dryer.
- Using fine-grained sandpaper, you need to sand the entire surface that you plan to paint. For large areas, you should use a drill with a special attachment for polishing surfaces.
- Remove dust from the cleaned crib.
- Wash small parts that do not require painting in soapy water and soap. Let's dry it.
- We treat all surfaces with stain.
- We are waiting for the crib to dry completely.
- Let's put it together into a single whole.
- Apply paint to all surfaces. This action must be carried out in two stages.
- In the place where drops of paint have accumulated, carefully clean it with sandpaper or a cloth.
- We take the bed outside or onto the balcony and leave it to dry completely.
Important! When deciding how to paint a wooden bed, after removing the old coating layer, you can apply a special primer. This product will get rid of cracks, chips, scratches and other irregularities.
Criterias of choice
Before covering the surface, preliminary finishing work must be carried out correctly. Violation of one of the technologies of this kind can cause problems with further processing. In addition, low-quality finishing materials can cause negative effects on the baby’s health.
Initially, the characteristics of dyes are studied. In turn, they must meet the following criteria. In particular, this applies to paint, so that everything is safe:
- The composition of finishing materials should not contain substances that cause allergic reactions. It is better to avoid those products that contain unknown compounds and contents. They have special coding.
- The paint must not contain heavy metals or pesticides. It often happens that children put everything that surrounds them into their mouths, so paint particles enter the body. When interacting with organic substances in the body, they oxidize and release harmful particles, destroying furniture fibers.
- The basic components of children's paint do not contain chemical compounds. The most suitable solvent for the substance is water. During the drying process, water does not release volatile harmful substances into the air throughout the entire time. Some impurities have an adverse effect on the body.
- The harmless composition eliminates the presence of flammable substances. This will ensure safe operation in extreme conditions. As a result of combustion, no harmful components and compounds will be released into the air.
- The paint must be elastic, well pliable for periodic wet cleaning and chemical influences. Constant contamination from food, paint, feces and the need for cleanliness can significantly wear down the coating, leading to mechanical damage.
The choice should be made not only in accordance with the words of the seller or consultant, you need to check the quality certificates. If the paint and finishing materials are legal and completely safe, then the document will definitely be present in the store. The option of how to paint the furniture will immediately be determined. It is best to paint it white - it is as versatile as possible.
On video: paints for a children's room.
Reasons for painting a bed white and necessary tools
Any furniture owner can paint a bed white. Such measures are resorted to in cases where the product for some reason has lost its attractive appearance, has faded, or has scratches and abrasions. Sometimes owners want to change the appearance of a model without spending money on purchasing new products. Preparation for work is the first stage, the quality of which determines the success of the procedure.
For painting, you must choose a dry, ventilated area free of small insects. First of all, the old coating is removed, after which a new layer can be applied. To complete the work you will need the following tools:
- A product for cleaning product elements and degreasing.
- A brush made of soft material for removing dust.
- Primer and putty, with which the bed is prepared for painting.
- Screwdrivers and rubber spatula.
- Tools for applying paint and mixing it.
- Mixtures for applying a new acrylic type coating.
If you have all the tools and a sufficient supply of paint, the technological process is carried out in stages. At the end, you can get a coating that is not inferior in quality to the factory one.
Types of paints and varnishes
How to paint a baby crib? Paint and varnish materials that are suitable for use in a children's room are divided into several main types. Paint for children's furniture is as follows:
- Water-based acrylic paint. This type has many advantages. This paint is easy to apply to the surface. It has high wear resistance, resistance to moisture, and does not emit harmful substances during operation. Acrylic paint for a baby crib has a huge range of colors and all shades. The negative feature is the high cost.
- Acrylate paints are considered harmless, but less practical. The consistency is elastic and easy to apply during the painting process. But first, the surface must be carefully treated, since any puncture or unevenness can cause damage or cracking of the coating. Does not tolerate wet cleaning well.
- Water-based paint will be a wonderful analogue of acrylic and acrylate. It combines their positive characteristics, but at the same time has its drawbacks - it is quickly erased from the surface as a result of wet cleaning and mechanical stress.
- Oil-wax is an original coating for furniture, which often replaces varnish. A completely environmentally friendly substance that has high wearability and processing quality. The oil penetrates into the depths of the wood, and the wax creates a protective layer on the surface. The negative features are that the paint and varnish substance is not very widespread and is expensive.
- Nitro paints can completely replace all of the above options. Durable, bright, environmentally friendly, non-flammable and elastic. At the same time, the price of one can of paint is quite high.
What paint can be used to paint a baby crib? There are other analogues of similar dyes, which are not yet widely used in our region. These are unique developments that have many advantages.
How to paint a wooden baby crib?
Share on social media networks:
How to paint a wooden baby crib? - This question worries every parent who is faced with this problem. Parents are often puzzled by this issue when they decide to update the paintwork on children's furniture. This may simply be due to the natural wear and tear of materials over time or in the event of mechanical damage. Today we will figure out what kind of paint you need to choose, how to carry out all the necessary actions, and which products are safe for your child’s health.
Materials and preparation
Stage 1
Buy gloves and a face covering and prepare the area where the furniture will be painted. Cover the floor with old thick cloth to avoid staining it with paint, and also make sure the room is well ventilated.
Stage 2
Before you start painting, remove the furniture from handles and any unnecessary hardware. This way you will carefully treat all hard-to-reach places and possible cracks, eliminating unpleasant surprises if you want to change the lock, handles or any other accessory.
Stage 3
You can even out wood fibers and fill cracks and holes using wood filler. The consistency should be quite thick, but the coating to be treated must be properly prepared. Treat the damage with sandpaper to remove any remaining protective varnish, then remove any remaining dust. Using a putty knife, fill the cracks with wood filler, then remove the excess mixture, thoroughly smoothing the surface, and leave it to dry completely.
Stage 4
Use a soft, clean cloth to remove marks from the furniture surface. If necessary, use a special detergent and wipe the wood surface with a dry cloth.
Consumables
Without a pipe cutter, installing a metal bed will be impossible.
The do-it-yourself bed will be made from a metal profile pipe with dimensions of 20*20 mm, the frame for the bed will be made from a steel channel 65*32 mm. For thrust bearings and plugs you will need a metal corner 40*40 mm and 2 mm thick. In more detail, the specification of materials for making the bed is as follows:
- for the headboard stand: steel pipe 900*20*20 mm - 4 pcs;
- for the top crossbar of the headboard: steel pipe 2000*20*20 mm - 2 pcs;
- for the lower back cross member: steel pipe 800*20*20 mm - 2 pcs;
- for the footrest of the backrest: steel pipe 600*20*20 mm - 4 pcs;
- for the lower foot crossbar: steel pipe 1680*20*20 mm - 1 pc.;
- vertical leg parts: steel pipe 250*20*20 mm - 2 pcs;
- transverse elements for backrests: steel square pipe 800*10*10 mm - 16 pcs;
- drawers: steel channel 2000*65*32 mm - 4 pcs;
- central brackets for the bed frame: steel channel 120*65*32 mm - 2 pcs;
- side brackets for: steel channel 120*65*32 mm - 4 pcs;
- end elements for the frame: steel corner 1000*40*40 mm - 4 pcs;
- base for the mattress frame: steel strip 2000*25*2 mm - 2 pcs;
- mattress frame base: steel strip 1000*20*4 mm - 6 pcs;
- thrust bearings for racks: steel sheet with a diameter of 25 mm and a thickness of 2 mm - 10 pcs;
- plugs for the upper transverse elements: steel sheet with a thickness of 2 mm and dimensions 20 * 20 mm - 4 pcs.
Diagram of a metal bed.
The size of the future structure will be as follows: length 190-200 cm, width 80-200 cm. The height of the mattress will be 20 cm, it is better to take independent spring blocks.
If we take into account the amount of material in footage, then the general calculation is as follows:
- steel square pipe 20*20 mm - 12 m 50 cm;
- steel square pipe 10*10 mm - 14 m;
- steel strip 20*4 mm - 6 m;
- steel strip 25*2 mm - 4 m 50 cm;
- steel corner 40*40 mm - 4 m 50 cm;
- steel channel 65*32 mm - 11 m.
Primer and painting
1. To make the paint go on easily and last as long as possible, use a primer. Gently brush an even coat of primer onto the surface of the wood. Carefully paint corners and hard-to-reach places. For a smoother surface, use a roller. Allow the primer to dry before painting the furniture.
2. The original effect of a sandy surface can be achieved using fine sandpaper. After priming, this technique contributes to a more thorough painting of the wooden surface, but first it is necessary to properly clean it of dust and primer residues.
3. After finishing the furniture with a roller, touch up the edges and corners with a brush. It is worth noting here that quick-drying paints tend to be applied unevenly. The result is sloppy strokes and blotchy areas. A special conditioner will greatly facilitate the work: Floetrol - for latex paints and Penetrol - for oil paints, which will prevent them from drying out quickly.
4. Use only high quality brushes. In low-quality brushes, fallen fibers remain painted over on the surface. A good brush, although more expensive, will last for years with proper care.
Stages of painting a bed white
You can find out how to paint a bed white on numerous resources. The procedure is not complicated as long as the steps are followed sequentially. The standard process is broken down into the following steps:
- Using detergent, the surface of the bed is cleaned of dirt, stains and foreign objects. After this, the product is dried and disassembled into individual elements.
- To remove old paint, the surface is treated with sandpaper. In addition to cleaning the product, small cracks and defects are removed.
- Priming of prepared elements and subsequent filling of deep cracks. The application of primer takes place in two stages.
- Using a soft cloth, clean the product from dust and debris.
- Using masking tape, cover the elements that cannot be painted.
- A layer of paint is applied in two, or preferably three layers. After each pass the model is dried.
- At the final stage, the surface is coated with glossy or matte varnish. As a result, the design receives additional wear protection and an attractive appearance.
Final stage
1. After priming and applying the first layer of paint, specialists, as a rule, paint the surface again, but only after it has completely dried (at least after 6 hours).
2. Seal the paint using varnish or sealant. This will not only protect it from scratches, but will also give an aesthetic appearance and a slight shine to the wooden surface.
Make sure the sealant is completely dry before moving the furniture back into place.
Before applying furniture paint, prepare the surface for painting.
Before starting work, check whether the piece of furniture is really suitable for painting. And it’s not even a matter of the type of surface, because paints for each of them are already on sale. In the case of furniture with veneer, it is important that it is not damaged and that the veneer does not stick out in the corners.
Before painting, each piece of furniture must be degreased and cleaned of dust and dirt. In the case of wooden furniture, the surface can be sanded; in the case of veneered furniture, just gently wipe it with fine-grained sandpaper (so as not to greatly damage the surface). If you can't or don't want to scrub the surface too much, you can use a primer, which will increase the adhesion of the base and make furniture paint applied later stick better (we talked about this above). For furniture covered with film, solvent-based preparations cannot be used, as it will dissolve.
DIY metal bed – making and painting in photos
DIY metal bed - making and painting in photographs.
Bedroom furniture can be made with your own hands from various materials, based on the requirements of the overall interior and decor. One of these options is a metal bed, which is not so difficult to make with your own hands. You can choose a model suitable for almost any style.
A metal bedroom bed will last much longer than a regular wooden bed.
Surface types
Let's look at a few of them. This will come in handy later when examining in detail the process of painting furniture.
An inexpensive material that is made from small particles of wood, such as shavings. The elements are connected using resin. When covering a polymer film, laminated chipboard is obtained. Such furniture is not only moisture-resistant, but also able to withstand high temperatures. However, the laminated surface can significantly spoil life when applying paint.
How to tell the difference?
Such a surface does not have a three-dimensional pattern, is smooth, and when tapped is more dull.
What's important to remember?
Due to the special properties, attention must be paid to careful preparation. If necessary, apply hot air to the varnished chipboard. This will make it easier to remove the old layer. This step is necessary so that the applied layer of paint can be applied without problems.
Tip: you can use a hair dryer or iron for this.
What types of chipboards are there?
Laminated
We mentioned this variety above. Laminated chipboard has a reliable layer that makes it much more difficult to apply paint.
Varnished
Several layers of varnish are applied on top of the slab.
Laminated
Paper covering that is easy to clean.
What we have before us is a finely dispersed fraction of wood, i.e. tiny sawdust connected to each other. The adhesive material used here is paraffin and lignin. This surface can be easily milled. MFD can be classified as an environmentally friendly material, which is a big plus.
How to tell the difference?
If you have an ideal surface that resembles natural wood, then you won’t have any doubts.
What should you pay attention to?
Most often, a decorative coating is required on top.
Review of coloring compositions that will be useful to you
It is worth clarifying that one piece of furniture may require several paints and varnishes at once. But don't worry, it won't incur significant costs. It is possible to choose inexpensive but high-quality paint.
- Acrylic paints
They are used most often. And for good reason. Acrylic can be diluted with water to obtain the desired shade, in addition, the composition is resistant to damage. It dries quickly, so the application process does not take a long time.
Tip: Expensive acrylic paints have virtually no odor and are absolutely harmless. If you need to make changes to the interior of the children's room, we recommend choosing this option.
Base paints in light shades
They remain popular due to their low price. White paint is often applied over the base color. After drying, an interesting gradient is obtained.
Suitable for creating a matte effect. It is not particularly environmentally friendly, it has a pungent odor when used, so it is recommended to use one based on herbal ingredients.
Water emulsion based on latex
If you have natural wood in front of you, then you won’t find a better paint. It easily paints the surface, while forming a moisture-proof film. Such furniture can be washed without difficulty, without fear that it will swell. The emulsion is odorless. The downside is that it is not resistant to low temperatures.
Silicone water-based paint
Benefits of painting furniture yourself
People living for a long time in one unchanging environment often feel a strong desire to update their boring interior. Then the natural question arises: how to paint furniture? After all, it is she, in an updated color, that can refresh the boring interior appearance of the house. Tables, chairs, cabinets and bedside tables - this is what the arrangement of the room is formed from, but replacing them with new models every time you want to change is an extremely unprofitable idea. Thus, painting your furniture yourself becomes the best option. The following are painting tips.
Painting wooden furniture is an easy, quick way to update and refresh the look of a room.
Let's consider the attractive aspect of the question of how to refresh furniture with your own hands. First of all, this is a material benefit: you don’t have to spend a fortune on buying new fittings or the services of a professional painting craftsman. In addition, when painting yourself, you are free to show special ingenuity and creativity, giving the product the look you want.
Below are tips on how to paint furniture; We will explain in detail how to paint old furniture with your own hands, without resorting to the services of third-party specialists.
Required additional materials
Many families to this day keep cabinets with chairs passed down from the older generation, dating back to Soviet times, made so conscientiously that they are still able to perform their task normally. But they have one significant drawback - external “shabbyness”. In order to correct this annoying misunderstanding and finally update the appearance of the furniture, we suggest painting it yourself.
Tools and materials needed for painting furniture
In order for painting furniture with your own hands to be successful, you will first need:
- a product in need of updating;
- sufficient amount of paint;
- tape for painting;
- brushes;
- shallow container.
This is by no means a complete list. Before you start working directly, you need to treat the surface on which the paint layer will be applied.
Materials that will be useful in the process:
- putty;
- face protection (mask or goggles);
- a sufficient amount of sandpaper;
- wooden beam.
Paint selection
Before you paint your furniture, you need to decide what paint to paint your furniture with. Here you will see a wide range of paints in all their color diversity. Don’t rush to buy the first jar you come across: the choice should be made based on knowledge of the properties of the material from which your product is made. This way the paint will last longer, maintaining its original freshness.
Acrylic varnish has no pungent odor, suitable for exterior and interior use
Specialized types of varnish for painting surfaces are suitable. Unlike some types of paints, it will give the furniture an attractive appearance and protect it from adverse factors: humidity, parasites, etc.
Alcohol varnish is used for restoration of antique interior items
If you haven’t had to deal with choosing paint before, here is a list of common manufacturers on the market.
- Acrylic paints are a popular option often used in painting work. They have increased stability, short drying time, and are easy to use. These products do not have an “aggressive” odor; they can be diluted with a moderate amount of water, thus distributing the material more economically (enough for subsequent uses).
Acrylic paints for wood furniture
When working with a spray can, the paint flies in different directions, so first cover all surrounding objects
Alkyd paints are inexpensive, but it is better not to use them for painting furniture used in residential areas
Painting process: step-by-step instructions
Important! – The key to quality painting lies in careful surface preparation.
Where to begin?
- Inspection
Check the product for any malfunctions, breakdowns, or defects. If there are any, eliminate them, then proceed to remove the old layer of varnish or paint.