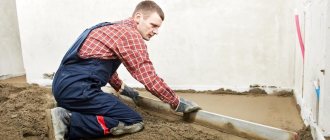
Some floor coverings, such as laminate, linoleum, tile, require a perfectly flat base. Using a regular cement screed, it is incredibly difficult to achieve such a coating, especially if you are not a professional. The best solution in this case is to pour the self-leveling floor with your own hands, creating an impeccable base for the finishing coating. Compared to installing a screed, installing a self-leveling floor can be quite a simple matter. For those who do not know how to fill a self-leveling floor with their own hands, video tutorials will allow you to understand in detail the intricacies of the process.
Construction materials and tools
Floor filling is done for two reasons:
- laminate, parquet, linoleum will be laid;
- It is planned to insulate the floor or create a heated floor structure (electric or water).
To work you will need:
- slats for beacons;
- metal brush;
- container for mixture;
- roller for priming;
- sidewalk scraper;
- a small brush for priming in hard-to-reach or small areas;
- putty knife;
- needle roller;
- drill plus mixing attachment;
- primer mixture.
Having prepared all the tools, you can begin to figure out how to fill the floor in an apartment with your own hands. It is better to prepare everything you need during the work process in advance to save your own time.
Stage 4. Approximate calculation of the amount of materials
Approximate calculation of the amount of materials
Finding the highest and lowest points will help you roughly estimate the amount of materials required for the job. It is quite difficult to accurately determine this figure, since the surface roughness cannot be described by any formulas, but an approximate calculation will not hurt.
First, the height difference is calculated, that is, the difference between the highest and lowest points. This value is divided by 2 to obtain the average height of the screed throughout the room. The minimum thickness of the fill layer is added to it (in our case, 2 cm) and the finished number is multiplied by the area of the room. This way you can find out the approximate volume of the finished potting mixture.
If the solution is mixed in a ratio of 1:3, then for one cubic meter you will need approximately 12 bags of cement, packed in 40 kg, and 35 bags of sand of the same weight. In the case when you plan to use the finished mixture, you need to clarify the information on the label.
By the way, if the height difference is too large, then the screed layer will be very thick. This is bad.
- Firstly, pouring the floor will be quite expensive.
- Secondly, the screed will take a long time to dry. In deep holes, the solution will not have time to dry as quickly as above the mounds, and this leads to the appearance of cracks.
- Thirdly, the floor will be too heavy. In such a situation, you can use, for example, an expanded clay pillow.
Stages of work execution
Filling of the floor begins after the activities related to the walls and ceiling are completed, but before wallpapering.
The arrangement of the screed occurs in several successive stages:
- Prepare the surface (remove the old coating, clean it of dust and debris).
- Before pouring the floor, the base is primed to improve adhesion to subsequent materials and strengthen the subfloor.
- They make waterproofing (several types of materials are suitable for this purpose, each of which has its own characteristics).
- Lay thermal insulation (if necessary, if you want to make the floor surface warmer).
- Check the level is horizontal.
- Concrete or cement-sand mortar is prepared; it is also possible to use a dry mixture.
- Perform a screed.
- Wait until the surface dries. Then they begin installing the finishing coating.
Materials for screeds and technologies for their use
Let's move on to the most interesting part - how and with what can you make a screed in an apartment? Let's consider all the solutions, describing along the way the properties of the materials and the technology for their installation.
Self-leveling mixtures
One of the modern solutions is the use of self-leveling mixtures. They are sold in bags of 20-30 kg. They can have a cement or gypsum base - each option has its own characteristics, advantages and disadvantages.
Self-leveling floor mixture
This type of screed is used mainly in small rooms or when you need to quickly make a small layer.
The main advantage of such a floor is the speed of its construction. Depending on the type of material and layer thickness, the floor can be walked on after 2-10 hours. The coating is very durable, does not generate dust, and has high adhesion to various adhesives. The layer thickness varies from 5 mm to 5 cm.
Self-leveling solutions create a smooth plane under the influence of gravitational forces
Such a floor spreads when poured on its own, under the influence of gravity. Ideally, he takes the horizontal level himself, and the floor turns out perfectly flat, but this does not always happen, and it depends on a number of factors:
- Firstly, the base must be well-primed so that the water from the mixture does not drain away too quickly.
- Secondly, when the layer is not thick enough to provide the desired spreadability, and gravity resists the viscosity of the mixture.
- The third reason is the most common - there is simply not enough mixture for the area to be treated. To the eye, it seems that it has already filled everything, but in fact you just poured over the old floor.
To prevent this from happening, installation must be done according to beacons.
Don't know how beacons are installed? Read about this in the article “Beacons for leveling the floor.” We tell you how to determine the floor level, prepare it for installing beacons, what types of beacon mounting exist and what is their difference, and how to install it.
It is also worth noting the high material consumption and higher material costs when compared by coating thickness. However, the advantages listed above cover this fact.
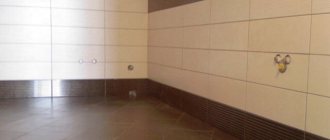
The bathroom floor is filled with self-leveling mixture
Now let's look at how such a screed is made. To work we will need the following set of tools and materials:
- The mixture itself.
- Electric kneading tool and attachment (perforator, mixer, drill).
- Several containers, the volume of each of which will be enough to dilute a whole bag.
- Tripod beacons.
- Fiberglass for reinforcement (not used by all craftsmen).
- Needle roller and spatula.
- Damper tape.
- Soil is a better concrete contact and a tool for applying it.
- Shoes with spikes for walking on already poured floors.
Table 1. Filling instructions
| Steps, photo | Description |
Step 1 – cleaning the floor | We start with cleaning the room. First of all, use a hammer and spatula to knock off pieces of frozen putty and other debris from the surface of the concrete. We clean everything with a broom. Next, we take a construction vacuum cleaner and do some general cleaning. Advice! The better you clean the base, the stronger the self-leveling floor will be. |
Step 2 – priming the floor | We need to reduce the absorbency of the base as much as possible so that the bulk mixture does not quickly lose moisture and dry out. It is better to make two layers of soil. |
Step 3 - installation of damper tape | A damper tape around the perimeter of the room is needed in order to create a technological gap for the screed to accommodate thermal expansion. If the walls and you are plastered, then the easiest way to nail this element is with a stapler. |
Step 4 – Fiberglass Flooring | If you decide to make your floor strong, spread this fiberglass over its entire surface - it will reinforce the screed. |
Step 5 – installation of beacons | Next we install beacons. Their number is not regulated, but there are recommendations. First, we place them at the lowest points of the floor, and one at the highest. To do this, you should first measure the perimeter of the room with a laser or bubble level. Secondly, we place intermediate tripods so that the desired level can be transferred from a high point to a low one. Then the beacons are adjusted - the central rod is leveled so that its lower end shows us where we will pour the floor. Advice! If you haven’t found a tripod, then use regular dowel screws instead - screw them in according to the same principle, immediately determining the height, that is, the top point of the dowel should correspond to the floor level. |
Step 6 – diluting and pouring the mixture | At the next stage, we begin to stir the mixture and pour it onto the floor. This must be done continuously so that the already poured concrete does not have time to set. |
Step 7 - Rolling | The poured floor must be stretched using a needle roller and a spatula. This also helps to get rid of air bubbles that form in the mixture during kneading. We pour the floor and roll it out in this manner until it reaches the level of each beacon. |
Expert opinion
Afanasyev E.V.
Chief editor of the pol-exp.com project Engineer.
Pouring should begin from the lowest point, gradually moving to the highest. This way the floor is guaranteed not to set until the work is completed. At the same time, do not try to fill more than 20-30 square meters at once. If the room is larger, then divide it into sections using a metal profile PN 50*40 for drywall.
Wet screed
The classic version of the screed is wet. Among other competitors, it is the most inexpensive, therefore it is widespread in mass construction. For an apartment, it is not the best option, since it requires a minimum of 2 cm of thickness, which is not feasible in some situations. “But when renovating a private house, wet screed is the optimal solution.”
Advice! When we talk about the minimum layer, we mean starting from the highest point in the room. In other places this value will be even higher.
Wet floor screed
The main advantage of this solution is the leveling of significant floor differences at minimal cost. The main disadvantages are the length of time, high labor intensity, and difficulties with mixing.
There are several types of liquid screeds:
1. Concrete - a common classic. Made from cement, water and fillers. The latter are usually sand, crushed stone, and gravel. Such a screed is best suited for creating a floor base, since, despite all the advantages that were mentioned earlier and its strength, it is unlikely to make the coating even. Plus, the surface of such a floor is usually very dusty. Due to the presence of coarse filler, an appropriate layer thickness is required.
Floor screed with concrete
2. Cement-sand mortar. It reminds many of the first option, but there is no large filler in it. It turns out that this floor is cheaper, it is less durable, but it is better leveled and can be made in a thinner layer.
Screed made of cement and sand
3. Lightweight concrete screed. The filler changes again - instead of crushed stone and gravel, it can be expanded clay, polystyrene, etc. Such a screed will also not be very strong, but it will be very warm.
Attention! Lightweight concrete is not made together with heated floors, as they will prevent heat from penetrating into the room.
Lightweight concrete
4. Polymer-cement screed - it is done on top of the subfloor in order to level it (the finishing layer is no more than 15 mm thick). It consists of Portland cement, quartz sand and polymer additives. This composition gives the screed high strength and low shrinkage.
Polymer cement screed
Table 2. Installation of wet screed
| Steps, photo | Description |
Step 1 – waterproofing layer | The first step is to prepare the floor surface - cleaning, priming, etc. We have already described these steps in detail earlier, so we will not repeat them again. If you plan to make a fairly thick layer of screed, then instead of all this, the floor can be covered with thick plastic film. You will receive excellent protection from water, plus during pouring the concrete will not lose cement laitance, which will have a positive effect on its strength. A damper tape is also attached around the perimeter of the room. Advice! You can dispense with this element for thin layers, but it’s still better not to do this - the material costs mere pennies, and it’s not difficult to attach. |
Step 2 - reinforcement | If the screed is thick, then be sure to lay a steel mesh on the floor. This stage can be swapped with the next one if you want to raise the fittings above the floor. |
Step 3 – Installation of beacons | Next we install metal or plastic beacons. You can purchase a profile like the one in the photo above, or use rectangular pipes for this - they are easier to align and do not bend when pulling the mixture. More attention needs to be devoted to this stage, since the beacons should form a single, flat plane. They are the ones who determine the evenness of the entire floor. Beacons are displayed in different ways. The most common method is to lay them on gypsum or mortar bosses and then wall them. |
Step 4 – mixing the concrete | We determine the brand of concrete (usually M200) and mix it strictly according to the recipe. If your volumes are large, then use a concrete mixer, as doing this manually is very difficult. |
Step 5 – alignment and trimming | At the next stage, the concrete mixture is dumped onto the floor and distributed evenly. For this they use a rule that moves along the beacons as if on rails. In this case, the movements are made of a vibration type, that is, from side to side, while simultaneously pulling forward. The rule does not tilt so that there is no deflection. |
After completing the work, the floor is left to dry. You can start finishing it no earlier than 20 days from now. Walking is allowed the next day.
We have described only the general procedure. In some situations, the screed can be laid on a heat insulator or combined with a finishing self-leveling coating.
We talked about all the advantages and disadvantages, types, composition and process of pouring self-leveling floors in the article “Technology for pouring self-leveling floors.” Detailed step-by-step process instructions, useful videos and expert advice are included.
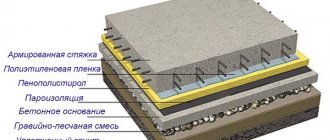
Wet screed: diagram
Semi-dry screed
Also a fairly common type of screed. The technology of its construction involves the use of the same cement with sand, but in a different ratio. The material contains a small amount of moisture, so the floor dries much faster.
The operating speed is also very high. There is only one drawback - the coating is not very durable.
The master makes a semi-dry screed
The workflow will be practically no different from what was described before, so let's note only the main points so as not to repeat ourselves.
- The beacons used are removable - they are immediately removed, and the furrows are sealed.
- The material is initially very dense, so you can move on it using special shoes with a wide support area.
- The surface of the screed can be immediately rubbed using a special machine.
Grouting the new floor
Dry screed
This technology was developed by everyone. It is called a screed conventionally, since the process of constructing such a coating is somewhat reminiscent of working with concrete.
Dry screed - a modern solution
The structure of such a floor is as follows:
- Dry backfill - with its help, leveling occurs.
- Gypsum panels are a finishing coating that provides rigidity. The panels have locks along the edges, which allows them to be connected into one.
Dry screed can be classified depending on its purpose. The following types are distinguished:
- Alpha – settles on flat surfaces.
- Beta - also done on a flat floor, but on top of a heat-insulating porous fiber material.
- Vega – floor on dry backfill.
- Gamma - installation of the floor on a combined substrate.
What is a dry floor screed?
Table 3. Installation of dry screed
| Photos, steps | Description |
Step 1 – placing beacons | Rectangular metal pipes are used as beacons here. They are placed like this: 1. A strip is made of dry backfill along the entire length of the room. 2. The ridge of the strip is trimmed with a spatula. 3. The pipe is laid. 4. A rule is placed on top of the edge, which must be aligned with the beam of the laser level. The beacon is sunk by striking the hammer according to the rule. If there is no laser level, use a bubble level. |
Step 2 - stretching the floor | Next, filler is poured into the voids between the beacons, which is usually stretched along the beacons. This is easy to do, since the backfill is mobile and has a small mass. |
Step 3 - laying sheets | Then gypsum sheets are placed on top. Their seams are coated with “liquid nails” glue. After installation, the seams are additionally reinforced with self-tapping screws. The material is cut with a jigsaw to fit walls and various obstacles. |
Step 4 – sealing the seams | The joints should be primed and then sealed with gypsum mixture so that there are no uneven spots on the floor. This step is not required for every type of slab. |
Next, another layer of material is laid. In this case, it is necessary to ensure that the seams are displaced by at least 20 cm.
Surface preparation
The preparatory stage includes:
- dismantling the old coating;
- removing skirting boards and doors;
- cleaning the floor with a brush or grinding device, removing glue, concrete crumbs, pieces of the mixture;
- removal of construction and other debris, dust and dirt;
- putty of cracks and cracks.
To enhance adhesion between the layers of the screed, the old base should be moistened. Cleaning can be done with a regular vacuum cleaner, and a regular soap solution is used to degrease the surface after dismantling.
Slots and cracks are puttied with a thin and almost invisible layer. A product containing resin or adhesive solution is suitable for this purpose.
It is not recommended to work with open windows and low air temperatures, as the result will not be what is needed.
Pouring floors in an apartment with your own hands
Pouring a self-leveling floor is a simple process. The main thing is to strictly follow the sequence of operations. Here is their list:
- preparation of the floor base;
- installation of beacons;
- pouring self-leveling mixture;
- removing air from it.
Features of the process - what is needed for this
In principle, there are no serious features of the pouring that level the solution. The main thing is to properly prepare the mixture strictly according to the manufacturer’s instructions and properly prepare the floor base. There is no need to carry out preliminary leveling or repair the floor. The self-leveling material will do everything itself: it will fill cracks, chips, and recesses.
You just need to clean the floor being repaired from debris and dust, and also remove stains of paint, grease, drying oil and other building materials that reduce the adhesive properties of the floor base.
Surface primer
Thanks to the primer, the surface becomes stronger, adhesion to subsequent materials is enhanced, and the floor is made rougher. For traditional concrete-sand mass, any of the universal primers can be used. In small rooms the composition is applied with a brush, but in larger rooms it is more convenient to use a roller. Before starting other work, the primer must dry - this will take about two hours.
Dry and porous surfaces must be primed again. Before applying the next layer, be sure to let the previous one dry. In the case when leveling occurs in several passes, a primer is applied before each.
When installing on the ground, reinforcement is used to strengthen the screed. Experts often use a special steel mesh as this. A fibrous material, fibrin, which is plastic or metal and is added to the solution intended for pouring the floor, can also provide the effect of reinforcement. At this stage, installation of various equipment is also carried out - wiring, creation of a heating system for floor surfaces.
Purpose of the screed
The fact that the screed is designed to level the surface of the floor is already clear to everyone. But it also has other purposes:
- This rough layer significantly strengthens the concrete base (slab).
- The screed is made in a continuous layer, which allows you to improve the heat and sound insulation characteristics of the room (not much, but still). There is an option to organize the screed on a layer of dense thermal insulation - such a system will be very effective.
- Hidden communication lines can be laid inside the screed - wiring, water and sewer pipes.
- Recently, heated floors (water or electric) have become extremely popular. This allows the entire surface of the concrete and the coating on it to be heated. In a room with such floors, there is often no need to even install heating radiators; heating savings become significant. Such systems are installed precisely in the screed.
- The screed helps to distribute the load evenly on the concrete base.
- With its help you can raise the floor to the desired height.
Perfectly flat floor
Requirements for the screed
Cracks in the screed
Waterproofing
Before pouring the floor in the apartment yourself, if there are large gaps on the base, especially in the place where the walls adjoin the ceiling, as well as near communications, waterproofing is carried out (for more details: “Should I waterproof before or after screeding the floor?”).
Waterproofing options differ in the main water-repellent component.
It happens:
- bitumen-polymer;
- polymer;
- bitumen;
- mineral.
The following materials are used for waterproofing:
- Film and roll . They are the most popular. These are multilayer membranes made of polymers, and are characterized not only by waterproofing, but also by thermal insulation qualities.
- Liquid . They fill the pores, creating a thin film that has a water-repellent effect. They differ in degree of viscosity.
- Mastics . These are adhesive compositions of plastic consistency. Their base is represented by polymers, resins, and liquid rubber. Mastic creates a high-quality waterproof layer.
- Powders . They are produced using plasticizers and various binders. Since these are dry mixtures, they are diluted with water according to the instructions.
Choosing a mixture for self-leveling floor
The first thing you need to do before you start arranging the finishing self-leveling floor with your own hands is to select the appropriate material. Mixtures for self-leveling floors are presented in a huge number of varieties and options, differing in characteristics, quality, and price. How do you know which composition to choose?
Criteria by which you should choose a mixture for installing a self-leveling floor:
- Compound. Self-leveling mixtures can be based on a cement or gypsum binder component, in addition to which the composition contains sand, mineral fillers, and special modifying additives. Self-leveling cement flooring is the most inexpensive and versatile option, characterized by high wear resistance, strength, and moisture resistance. Gypsum floors dry quickly and allow you to create a thicker layer, but they are susceptible to moisture, so they are only suitable for dry rooms.
- Layer thickness. Varies from 1 to 100 mm for different compositions. For cement - up to 10 mm, for gypsum and complex - more.
- Speed of setting and hardening. All poured floors dry quickly, but gypsum floors can be walked on earlier than cement ones, approximately 3-4 hours after completion of work.
- Mixture consumption. Varies between 13–18 kg per square meter. m. with a layer thickness of 10 mm. For a cement floor it will be larger than for a plaster floor.
If you are thinking about how to make a poured floor with your own hands, first of all you should be interested in the composition and approximate thickness of the pour. When choosing, you should be well aware of the unevenness, differences and slope in the room in which you will make a self-leveling floor for the finishing coating with your own hands; it is from their dimensions that you need to start.
USEFUL INFORMATION: How to lay carpet: laying on concrete, wood floors and linoleum
Many mixtures for poured floors successfully replace screed, and are also used when pouring pipes of a “warm floor” system.
Calculation of material consumption
Before making a self-leveling floor with your own hands, you should correctly calculate the consumption of the dry mixture, leaving a small reserve. The norm is from 1.3 to 1.8 kg per 1 sq. m of area per 1 mm of layer thickness. It turns out that if you need to fill a layer of 8 mm, the calculation will be as follows:
1.8 × 8 = 14.4 kg/sq. m.
Determining the surface level and placing beacons
Before moving on to how to properly fill the floor in an apartment, you need to determine the filling level and set the beacon slats. Using a level, check how level the base is. The level of the future coating is marked on the walls (read also: “How to pour a floor screed - preparation and pouring”).
Remove plaster from plastered surfaces 0.25 centimeters above this line. It is more convenient to perform this procedure when the room is in order. The level is determined to detect the highest point of the surface and correctly fill the screed (read: “How to set the floor level correctly and how to check it”).
Instructions:
- Measure along the wall 100 centimeters up from the door threshold and draw a line.
- A line is drawn along the perimeter of the room, checking its parallelism with a level.
- The second parallel is applied at a distance of 100 centimeters below the control marking.
- In the corners of the room, to make it easier to navigate, nails are driven in at the bottom line and the cord is pulled.
Marks on supporting structures will help when setting up beacons, which will be metal profiles or wood slats placed on the edge. The gaps between them should not exceed the length of the rule that will be used to level the mixture.
As for how to properly fill the floors in an apartment, you need, first of all, to set up the slats. There is no need to rush, because the result depends on this work. After completing the process, they are removed, and the remaining recesses are filled with screed mixture (about
Stage 5. Installation of beacons
Installation of beacons
Along the long wall you need to stretch parallel nylon cords, securing them to nails driven into the level line, and place beacons along these laces.
These can be special plaster markers, as well as wooden slats, corners and metal profiles.
The beacon must be stationary, so it is installed on a solution. If the profile is higher than the level of the screed and is needed only to put a mark on it, then at the end of the work it can be removed and the free space filled with a cement-sand mixture. In the case when the beacon is made level, it can be left in the filling layer.
Preparing the mixture
The composition for the floor is easy to prepare. It must be diluted in water according to the instructions and mixed until a homogeneous mixture is obtained, using a drill with a special attachment.
The sand-cement mass is prepared as follows:
- Pour 2 parts water into 4 parts perlite.
- Add one part each of water and cement to the floor screed mixture.
- After the second mixing, add 2 parts of sand and five times the amount of water into the substance.
- The solution should be kneaded until it acquires a plastic consistency.
As for the best way to fill the floor in an apartment, concrete screed is usually used in private households and on the lower floors of multi-storey buildings.
Concrete floor technology
Pouring the coating with a concrete mixture is carried out on the ground, on a floor slab, on an old screed, on a wooden floor. The concrete mixture has a simple composition, and anyone can make it with strict adherence to process technology.
It is very important to follow the method of preparing the mixture; the strength and quality of the base depends on this.
The concrete floor is poured in the following sequence: waterproofing, thermal insulation, reinforcement, installation of guides, installation of rough screed, grinding of the coating, pouring the finished floor.
The type of base may slightly modify the work steps in this process. When installing a screed on the ground, it is necessary to make a good backfill and compaction.
Next, a mandatory condition is the installation of expansion joints, which are laid to prevent splitting of the coating.
Expansion joints are of three types:
- Shrink seams. Manufactured to relieve stress on the coating screed as a result of uneven hardening and compression.
- Construction seams. They are installed in areas where the concrete screed dries unevenly. For example, when pouring a concrete coating in several stages.
- Insulation seams. They are laid in areas where the coating is in contact with other structures of the building, namely, with a wall, ledges, columns.
If one of the expansion joints is not completed, then minor vibrations on the surface may cause ruptures, even when the concrete reaches significant strength.
The depth of the seam should be one third of the total thickness of the concreting . All seams must be sealed with special sealants.
Pouring concrete on your own is a completely feasible task, although at first glance it seems like a difficult task. By doing the concreting of the coating yourself, you can save a lot of money.
Stage 7. Drying the screed
Drying the screed
Filling of each room should be done without interruption, in one day, so that the entire surface is uniform. The screed will harden in a few days, and you can step on it. At this time, it is necessary to finally level the surface by cutting off the protrusions and grinding the roughness.
To prevent the floor from cracking, it can be covered with a film that prevents the rapid evaporation of moisture. It’s even better to moisten the concrete surface from time to time - this will help avoid film.
All further activities related to laying the selected coating should begin only after the screed has completely dried, and this will last up to 4 weeks.
Elimination of differences depending on the degree of curvature
There are several ways to level floors with obvious curvature:
- Self-leveling mixtures, which themselves fill small differences of about 2-3 cm.
- A leveling screed, which is simply irreplaceable when the floor has a large curvature.
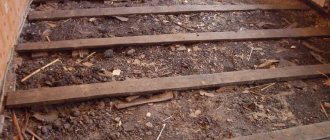
- Adjustable floors, where each joist can be raised to the desired height.
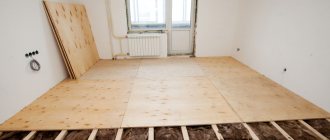
- A dry prefabricated screed that can cover everything.
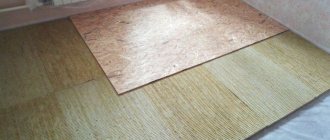
- And on a smaller scale, in the form of plywood flooring, for example.
It cannot be said that any of the listed methods is worse or better - it all depends on the condition of the base and how pronounced the curvature of the floor is.
Technology No. 1. Bringing the foundation to perfection
If the floor surface is almost flat, additional horizontality can be given to it with sheets of extruded polystyrene foam, or a full-fledged dry screed. Many people appreciate this screed because the process of such work is as clean as possible: no dust, no dirt, no dampness.
But the dry layer must be leveled relative to the horizon carefully - and this will not work just by eye. To do this, special beacons are placed in the form of U-shaped profiles and filled to the top with the mixture. They level along these profiles, as if on slippery rails - this is the only way to guarantee that the entire floor is at the same level. Quite a responsible process, we note.
Technology No. 2. Aligning minor curvature
The maximum unevenness that can be on a “wet” floor screed is 2-3 mm. If the planned finishing requires a more precise horizontal level, the floor will have to be additionally leveled with self-leveling mixtures or sheets like plywood.
Technology No. 3. Filling cracks, potholes and chips
Self-leveling mixtures are designed for thin-layer and thick-layer floors. So, sometimes it is necessary to level up to 8 cm of floor difference, and sometimes it is necessary to create something like a film on the concrete screed:
Technology No. 4. Coping with noticeable unevenness
To solve problems with fairly large potholes in the floor, it is better to use a cement-sand screed - it is quite easy to install and will not cost much.
Classification of self-leveling coatings
All floors differ in their composition and purpose:
- Methyl methacrylate is a quick-drying option; when working with it, the room should be well ventilated. Protective equipment will not be superfluous. There is no smell left after drying. It is possible to use various additives.
- Acrylic-cement is the cheapest flooring option, but has good moisture resistance. An excellent option for bathrooms, saunas, car washes. Does not require preliminary surface preparation, and the layer thickness can reach 25-30 cm.
- Polyurethane - characterized by high mechanical strength, therefore it is most often used in office, warehouse and industrial premises. The price of such a floor is high, but it pays off with its long service life. A wide selection of colors that do not fade in the sun and do not fade.
- Epoxy flooring is impervious to chemicals, aggressive liquids, acids, and oils; it is durable and does not collect dust on its surface. Can be used in medical and educational institutions, garages.
- Epoxy-urethane - the highest degree of wear resistance. It is used in crowded places, vestibules, passage areas and platforms.
In addition to differences in composition, the floor surface may differ in the following characteristics: matte, semi-matte, glossy, semi-gloss.
Attention! Separately, it is worth noting the screeds for leveling and rough finishing. They are necessary to level out significant differences in height. Cement mortar with the addition of plasticizers or a gypsum mixture can be used.