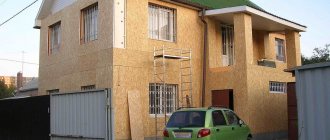
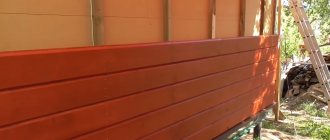
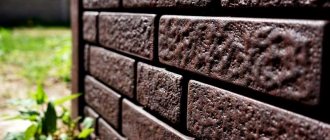
Facade thermal panels for exterior decoration of a house are a modern material that has a number of interesting properties. With its help, you can update the appearance of your home in a very short time and make it significantly warmer. The appearance of these panels is very interesting - they imitate brick or stonework, and quite reliably. Today we will learn the structure of this amazing material, analyze its pros and cons, and also see how it is installed.
Facade thermal panels for exterior decoration of the house
What are façade thermal panels?
Facade panels are the latest development in the field of exterior finishing of buildings.
The strength of such a product is comparable to granite, but unlike it, it has a lower radiation background. The panels include polyurethane foam and polystyrene foam, which are almost 90 percent air mass . The decorative component of the material is clinker, porcelain stoneware and glazed ceramics.
The range of colors in the presented panels is varied and is produced by single or multiple firing of the product.
Basic properties
Thermal panels are slabs of polyurethane foam (which is sometimes replaced with polystyrene foam or mineral wool) with a decorative coating.
Flexible stone is sold in sheet form. In terms of its characteristics, it is similar to linoleum, but unlike it, it has a rough structure and is made from natural marble chips.
Flexible stone and thermal panels have many advantages:
But the main feature is its wide scope of application. Thermal panels and flexible stone are used for finishing facades, swimming pools, fireplaces, floors, and stairs. This material is often used for landscape design and frescoing.
Types of facade thermal panels
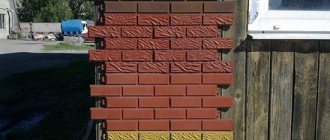
Clinker
This type of facade cladding panels is made from clinker tiles as a decorative layer. The stability of such a layer surpasses even natural stones. The appearance of such products is excellent and has natural colors.
The raw material for the production of such products is special clay from Europe, obtained from slate. Therefore, we can call clinker panels natural and one hundred percent natural products.
The properties of such panels contribute to additional sound insulation and waterproofing of the room.
The difference between these panels and natural stones is that the material does not “phonite”. The strength grade of such products is M-800, while water absorption is low - 2.3 percent.
Based on this information, it becomes clear that the material is frost-resistant in its properties and is able to withstand enormous loads from natural phenomena.
Panels of this type began to be used not only in the facade of buildings, but also for interior work, finishing fountains and swimming pools.
A special technology for creating panels gives them a pleasant appearance and unique color. An undeniable advantage of panels of this type is the possibility of installation at any time of the year.
Let's get started
After the preparatory work, you need to mark the bottom line from which installation will begin. If there is a clearly defined boundary on a building between the facade and the basement, then it can be used as a zero line. However, it is better to move 15-20 cm down from this line to avoid the formation of cold bridges. In other cases, to mark the perimeter, you need to draw a horizontal line, from which work will begin. Along the entire length of the -zero-mark, a guide is mounted along which the ebb will be mounted.
Particular attention should be paid to the horizontality of the zero line - the final result will depend on this. Use level to check
Attention! If the facades of a building have differences in height and, for example, a wall on one side is higher than on the other, then for each wall there should be a line
Installation instructions
The technology for attaching clinker panels to the wall of a building is carried out using special frame structures.
The frame can be made from various materials: metal, steel with a galvanized surface, aluminum or even wood that has undergone special treatment.
The type of frame is chosen based on the individual characteristics of the building and the financial capabilities of the owner.
If the owner opts for a metal frame, it is worth remembering that such structures require considerable financial investments, but become a reliable framework for the entire structure.
Installation of clinker-type slabs is carried out in an invisible way and is secured using clamps and clips.
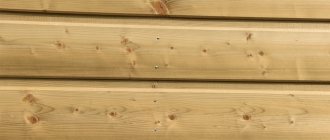
If there is a wooden sheathing, fastening should be done using screws with a simplified head, the diameter of which does not exceed one centimeter.
Without treatment, it is impossible to avoid the appearance of mold in the depths of the structure.
Frameless mount
Today, designs with frameless fastening are very popular.
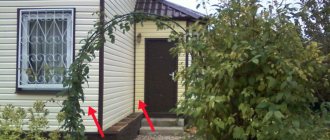
They are fixed using dowels and self-tapping screws directly to the wall surface, as shown in the photo on the left.
After installation there should be no defects or scratches.
This method is chosen by owners of houses made of silicate-mineral materials . Such walls do not require constant ventilation due to the peculiarities of their manufacture.
If after installation there is an unfilled space between the wall and the slabs, it is customary to fill it tightly with construction foam.
The entire installation process of such panels is shown in the video below:
general information
Dachny basement siding is installed on the sheathing.
It is fixed horizontally over the entire surface of the walls, individual bars are installed around the openings of windows and doors, along the upper and lower edges of the cladding, and at the corners of the building (vertically). For the sheathing, wooden blocks of 40x40 cm are used. They are pre-impregnated with an antiseptic and fire retardant. Wood moisture content is up to 20%. For the first row, the distance between the bars is 43.5 cm for facade panels of the “Wild Stone” series and 42 cm for the “Large Stone” series. Subsequent bars are fastened in increments of 44 cm. Insulation can be placed between the sheathing bars, and other insulating elements can be placed underneath them. The façade panels are high. To make the cladding more rigid, employees recommend installing additional horizontal slats between the main sheathing bars. When installing bars and slats, check the correctness of their position horizontally and vertically. They should form a flat plane.
Fasteners for facade panels are nails or self-tapping screws made of galvanized steel. The length of the leg is such that it fits into the sheathing bars at least 3 cm. The cap is wide, 9-10 mm, the leg is 3 mm.
The Dachny base siding and its components are fastened through perforation holes (made along the edges of each element). The leg of the fastener must fall strictly into the center of the hole and enter perpendicular to the plane of the cladding. It is not allowed to hammer nails or screw in screws at an angle, skew, or bend them.
Facade panels are not fixed rigidly: the fastener must fit so that a temperature gap of 1-1.5 mm remains between its head and the surface of the basement siding (see Fig. 4). Each panel is fixed at least at five points.
Country base siding is made of polypropylene and can slightly change linear dimensions when heated by sunlight or cooled in winter. To avoid deformation due to temperature changes, compensation gaps are left between the ends of the row panels and the components during installation. If work is carried out in summer, the gap is 5-6 mm. At negative temperatures it is increased to 9-10 mm. Installation is possible at temperatures down to -10° C. When carrying out work in cold weather, the basement siding is first kept warm for 10 hours (in a heated room, but away from heat sources).
Fastening vertical profiles, corners, slats starts from the top. The leg of the fastener should be located at the top edge of the hole so that the element hangs on it. The remaining fasteners are placed in the center of the holes (see Fig. 6). The fastening step is no more than 25 cm.
The order of fastening row panels on the main surface of the walls is shown in Fig. 3. They are placed horizontally, starting from the bottom row, moving from left to right.
Selection of material
Thermal panels
In order to carry out all the work without any hitches, it is necessary, before starting finishing, to stock up on all the elements that will be needed for this.
- Thermal panels. Their number is calculated by multiplying the entire length by the height. After this, the area of window and door openings is subtracted from the resulting amount.
- Corner elements. The amount of this material is calculated by measuring the length of all external and internal corners of the facade.
By the way! It will be interesting to know: Chalet-style houses - photos of facade and interior decoration
Additional elements
The slopes of door and window openings are treated with cement mortar or a special corner element with clinker tiles is installed. The junction with the roof overhang is covered with a decorative element. The drain is carefully fixed with screws through the panels.
Cladding a building with thermal panels is not difficult; you will need free time and strict adherence to the instructions.
How to make a house warmer with clinker thermal panels
This instruction was created just for you - here we have collected all the answers to all questions: from surface preparation of walls to laying insulation. So let's not waste time!
How to prepare facade walls?
Afterwards we look not at the evenness, but at the cleanliness of the façade surface (we need the heat insulator layer to lay down very well):
Important! It also happens that no matter how much you clean it, everything crumbles and crumbles. In this case, you must first prime the walls using a sprayer, and then putty them rough
Advice! The primer mixture can be applied using one of several options: spray or brush. Of course, it’s better to use a brush; in this way, the walls will be cleaned a second time. But if the facade is crumbling a lot, then it is more convenient to use a sprayer.
Installation of external window sills
Thermal insulation of walls with facade thermal panels also involves a similar moment as the installation of external window sills. The best way to do this is before insulating the wall systems.
Important! There is no need to make a protrusion less than 4 cm, since when it rains, water will begin to flow through the insulation. More than 5 cm is also not suitable, since raindrops will sound very loudly
For example: if the thickness of the thermal insulation is 6 cm, then the window sill needs to be installed in a similar way so that it extends beyond the wall (not yet insulated) by ten centimeters (6 cm + 1 cm + about 5 cm).
Attention! Both of these rules (installation of external window sills and preparation of the surface) must be done with any option for external wall insulation
Selecting forms
It is important to understand that the factory technology for manufacturing facade tiles is not suitable for home use. The only thing that can be introduced is the vibration casting method. As for the forms, the cost of a quality product is high.
The purchasing decision depends on the scope of work. One high-quality mold is designed for up to 1500 tile production cycles. If you need to produce up to 20 squares of tiles, then buying an expensive mold will not justify the investment. In this case, it is better to do it yourself. Therefore, it is important to make the correct calculations.
Therefore, if you do not have the ability and opportunity to make a high-quality mold with your own hands, it is better to purchase it.
Installation of thermal panels
Calculation of the number of thermal panels Regent
- Calculate the area of the facade of the house. Subtract openings (windows, doors).
- Add 10-15% depending on the complexity of the facade (arches, trimming at 45°).
- Calculate the required number of Regent thermal panels.
Recommendations for installation of façade thermal panels Regent
- Hammer.
- Angle grinder with diamond disc
- Hacksaw
- Screwdriver
Consumables:
- Dowel-nail for through installation (with a countersunk head without a collar) or self-tapping screw ø8 mm (Consumption: 16 pcs. per m² of surface) SNiP 2.01.07-85;
- Aluminum or galvanized corner 25-30 mm (along the length of the perimeter of the house); Grout for wide joints (consumption: 1.5-2 kg per m2 of surface);
- Euromix grout for joints between clinker tiles is an elastic cement mixture for grouting joints with a width of 4 to 16 mm, used for colored filling of joints, developed specifically for clinker thermal panels and clinker installation.
- Polyurethane foam with slight expansion.
Surveyor's visit, description of the work being carried out
- Photographing the object from four sides (with the customer’s consent)
- Carrying out measurements of all facades and openings.
- Façade geometry tracking.
- A sketch of an object is a working drawing with dimensions.
- Discussion of installation and finishing details.
- Consulting - answers to customer questions.
- Demonstration of ordered samples (if color has been selected)
The customer is provided with:
- Drawing with dimensions (in one of the formats *.jpg, *.pdf, *.tif, *.pln, *.dwg)
- Detailed estimate of materials and work, taking into account additional work and the specifics of a particular object.
Materials are sent to the customer by email. mail.
At the request of the customer, additional visualization can be made and a collection of facade decor “Regent-Decor” can be offered.
Types of facade thermal panels
Clinker
This type of facade cladding panels is made from clinker tiles as a decorative layer. The stability of such a layer surpasses even natural stones. The appearance of such products is excellent and has natural colors.
The raw material for the production of such products is special clay from Europe, obtained from slate. Therefore, we can call clinker panels natural and one hundred percent natural products.
The properties of such panels contribute to additional sound insulation and waterproofing of the room.
The difference between these panels and natural stones is that the material does not “phonite”. The strength grade of such products is M-800, while water absorption is low - 2.3 percent.
Based on this information, it becomes clear that the material is frost-resistant in its properties and is able to withstand enormous loads from natural phenomena.
Panels of this type began to be used not only in the facade of buildings, but also for interior work, finishing fountains and swimming pools.
A special technology for creating panels gives them a pleasant appearance and unique color. An undeniable advantage of panels of this type is the possibility of installation at any time of the year.
Using ceramic tiles
The production of porcelain stoneware has taken the sustainability of façade wall panels to a new level. This happened thanks to a special manufacturing technology, which consists in firing the product at high temperatures and strong pressure on it.
The result of this process is a special compressed material that is not afraid of external influences. In terms of strength, it can compete even with natural minerals.
Among the owners who prefer this type of panels, most often there are lovers of a textured surface on the facade of the house.
It is usually chosen by designers to give the home a Scandinavian or Mediterranean feel.
It is used in the decoration of restaurants and holiday homes to emphasize the special flavor of the building. Porcelain stoneware is a large material, and in appearance it resembles not brickwork, but stone.
By the way! It will be interesting to know: How to properly insulate a timber house from the outside
Despite the fact that the individual parts in the material are large, they cannot be called heavy. They are light in weight and are simply mounted to the wall surface.
With glazed tiles
Today, this type of cladding does not lose popularity and is valued due to the positive characteristics of the material and ease of installation.
Such tiles are easy to clean and allow you to maintain their original appearance for forty or even fifty years. This is convenient for those home owners whose plots are located next to dusty highways.
The advantages of such tiles are the glossy surface, which is a distinctive feature of this type of panel.
Properties, advantages and disadvantages
Facade panels become more popular every year, thanks to the properties they possess:
Another important component of a sandwich panel is polyurethane foam;
Manufacturers claim that the service life of the material exceeds one hundred years .
Panels made using
polyurethane foam poured into clinker tiles ensure the reliability and strength of the product, and have high thermal insulation.
Panels made using expanded polystyrene foam are made by heating particles of artificial material soldered onto the tile for finishing.
Thus, the connection of two substances - the cladding layer and the insulation - occurs without the use of glue, but at the same time high-quality adhesion of the materials to each other is ensured.
Possessing the above properties, the material, of course, has a huge advantage over other products for finishing facades.
The main advantages of facade thermal panels:
Such panels can be installed even on outdated houses with half a century of history. If the façade geometry is noticeably disturbed, it is recommended to lath the façade for alignment.
This is convenient when construction work lasts until cold weather, and construction needs to be completed quickly.
Like any product, facade thermal panels also have a number of disadvantages :
You can find out more details about facade thermal panels from the video below:
Facade panels
Other names: basement panels, basement siding. They are polymer sheets pressed into the shape of a given relief with perforations for fastening with self-tapping screws.
Operating procedure
1. We install and level the sheathing made of wood or galvanized profile.
2. Install corner elements and frames of openings.
3. Install the starting profile (cornice) for the first panel.
4. We mount the panels from left to right, from bottom to top, observing the overlap of the joints.
- The panels are 400–500 mm wide, so they are attached to the sheathing on four sides (additional profile consumption).
- Higher cost of the panels themselves.
Another type of facade panels is the so-called thermal siding. In fact, these are ordinary sandwich panels (expanded polystyrene inside a metal shell). Their installation is also identical to that of vinyl siding.
Facade panels from Russian manufacturers:
Attention! The tables show prices only for wall panels. For cladding, corner and other elements will be needed, the price of which is determined by the manufacturer.
Unventilated facade - the wall is thermally insulated according to the principle of a thermos.
We will consider two types of combined finishing - thermal panels and thermal siding. It is called combined because it combines thermal insulation and appearance.
Financial plan
Starting costs for organizing a mini-workshop will be:
Total – 956 thousand rubles.
| Costs for production of 1 m² of flexible stone (rubles) | Costs for production of 1 m² of thermal panel (rubles) | |
| Raw material costs | 150 | 230 |
| Labor costs | 50 | 50 |
| Electricity | 5 | 5 |
| Additional expenses | 5 | 5 |
| Total | 210 | 290 |
By producing and selling 50 m² of this product, you can earn 80 thousand rubles (690x50 +910x50). For the calculations, the minimum threshold and the most pessimistic sales forecasts were taken. Successful entrepreneurs in this field earn 500-700 thousand rubles per month.
Thermal siding
It is a polystyrene foam panel with a “thermal lock” system, textured on one side. These lightweight panels are simply glued with cement adhesive and then painted.
- Extremely simple technology.
- The cheapest of the materials presented.
- Lightest panel weight.
- Not suitable for installation on lathing.
- Does not level the wall (should be relatively flat).
- Relatively short declared service life (15 years).
Thermal siding grade 25:
Vitaly Dolbinov, rmnt.ru
Did you like the article? Subscribe to the channel to stay up to date with the most interesting materials
DIY making
Before starting work, you need to understand the structure from which the future material will be created.
Thermal panels are made of three layers: facing, metal profile and insulation:
The production of terpopanels is carried out as follows:
Necessary equipment for panel production
Equipment is the main part in making terpanels with your own hands.
This issue requires special attention.
A craftsman familiar with this type of equipment may notice that the manufacturing machines are similar to those that produce polystyrene foam.
This is not surprising, because both technologies use the technique of foaming over polystyrene granules.
Thus, in the home workshop there will be two directions at once: the first for the creation of foam plastic, and the second for the production of clinker tiles.
To make polystyrene foam you will need the following tools:
- special dispenser for raw materials;
- sediment to create foam;
- set of forms;
- Vacuum type installation;
- steam generator;
- pre-foaming device.
To carry out work on creating clinker tiles you will need:
- oven for firing products;
- Press forms.
If it is not possible to purchase a device and tools for creating polystyrene foam, then it can be purchased ready-made from other manufacturers. Such a purchase will significantly increase the financial costs of production.
You can purchase an expensive machine and produce more than three hundred parts per day. If we are talking about producing panels not for sale, but for your own site, you can buy small equipment capable of producing one hundred products per day.
Equipment can be purchased both from foreign manufacturers and from production facilities in large cities. It is possible to buy tools secondhand, but then the risk of receiving a low-quality product and incurring the costs of repairing it will increase.
Before making your own, you need to calculate how much such a solution will cost. To decorate your own home, most likely, it will be cheaper to buy ready-made, high-quality panels.
By the way! It will be interesting to know: What additional elements for metal roofing consist of and how to install them correctly
Watch the video to see how thermal panels of varying complexity are produced by professionals:
Business relevance
The time when walls were decorated with clay is long gone. The modern construction market offers many finishing options. Some of them can be called flexible stone or flexible marble. This is a thin layer of sandstone (2-5 millimeters), which is held together with a textile-based polymer. For insulation and finishing of the facade, thermal panels are used, which consist of polyurethane foam and a facing part in the form of: clinker tiles, marble chips or sheets of flexible stone.
Due to their excellent characteristics, these materials are often used for finishing work. But since the technology for producing flexible stone and thermal panels is quite new, entrepreneurs are in no hurry to launch lines and workshops for the production of this material. But in vain - this direction can bring good profits. There is little competition, and the cost of the final product is quite high. This will make it possible to quickly recoup costs.
Types of facade thermal panels
Clinker
This type of facade cladding panels is made from clinker tiles as a decorative layer. The stability of such a layer surpasses even natural stones. The appearance of such products is excellent and has natural colors.
The raw material for the production of such products is special clay from Europe, obtained from slate. Therefore, we can call clinker panels natural and one hundred percent natural products.
The properties of such panels contribute to additional sound insulation and waterproofing of the room.
The difference between these panels and natural stones is that the material does not “phonite”. The strength grade of such products is M-800, while water absorption is low - 2.3 percent.
Based on this information, it becomes clear that the material is frost-resistant in its properties and is able to withstand enormous loads from natural phenomena.
Panels of this type began to be used not only in the facade of buildings, but also for interior work, finishing fountains and swimming pools.
A special technology for creating panels gives them a pleasant appearance and unique color. An undeniable advantage of panels of this type is the possibility of installation at any time of the year.
Using ceramic tiles
The production of porcelain stoneware has taken the sustainability of façade wall panels to a new level. This happened thanks to a special manufacturing technology, which consists in firing the product at high temperatures and strong pressure on it.
The result of this process is a special compressed material that is not afraid of external influences. In terms of strength, it can compete even with natural minerals.
Among the owners who prefer this type of panels, most often there are lovers of a textured surface on the facade of the house.
It is usually chosen by designers to give the home a Scandinavian or Mediterranean feel.
It is used in the decoration of restaurants and holiday homes to emphasize the special flavor of the building. Porcelain stoneware is a large material, and in appearance it resembles not brickwork, but stone.
Despite the fact that the individual parts in the material are large, they cannot be called heavy. They are light in weight and are simply mounted to the wall surface.
With glazed tiles
Today, this type of cladding does not lose popularity and is valued due to the positive characteristics of the material and ease of installation.
Such tiles are easy to clean and allow you to maintain their original appearance for forty or even fifty years. This is convenient for those home owners whose plots are located next to dusty highways.
The advantages of such tiles are the glossy surface, which is a distinctive feature of this type of panel.
Surface preparation
Priming the walls
Before starting installation, the surface of the facade must be leveled - plaster the holes and sand the protrusions and prime the walls. If there is a significant difference in level, it is necessary to make a sheathing. This is a frame made of wooden planks with a section of 5x5 cm or a metal profile. The following requirements apply to the surface of the building:
- low percentage of humidity;
- coating strength and absence of peeling;
- cleaning from any type of pollution.
Methods for installing façade panels
Enterprises that produce façade thermal panels must include instructions for the finished cladding material. The method of finishing facades with thermal panels also depends on its choice.
There are 2 ways to lay cladding panels outside:
- Seamless, which is less labor-intensive and costly.
- With filling of seams, requiring filling of gaps between elements with mortar.
Before the installation begins, an assessment of the upcoming work related to the cladding of the façade walls is carried out.
Laying thermal panels resembles finishing the surface with ceramic tiles.
The difference between these methods is that thermal insulation panels do not allow hiding any irregularities. Thermal insulation in modern construction is carried out based on the following methods:
Regardless of what type of surface the façade thermal boards will be installed on, the base must meet the following basic requirements:
Equipment
Equipment for the production of flexible stone for beginners is inexpensive. To start production at home, all you need is:
Equipment for the production of thermal panels with your own hands:
The main buyers of these products are:
Source
The abundance of materials intended for cladding and insulation of private houses, presented on construction markets and in specialized stores, is striking in its diversity .
Typically, the cladding and insulation of an object are carried out by builders in a sequential order. The use of facade panels helps to combine these construction stages into one.
Installation of facade thermal panels can be done with your own hands on any surface: brick, wood, aerated concrete and concrete walls.