Sooner or later, humanity had to start thinking that the planet, already quite devastated and polluted, needed to be protected. And it happened. Now the main condition for many earthlings has become environmental friendliness, so for the construction of buildings they are increasingly choosing those building materials that are not capable of causing harm to the environment. Thanks to this doctrine, old, almost forgotten technologies get a chance for a second life. One of these “returnees” was the ancient, and therefore 100% natural, adobe. Eco-houses are now being built from it, and they are often built independently, without the help of specialists. Since owners planning to build their own homes need to know all the “fashionable new items” that have returned from oblivion, it is better to understand what an adobe house is, learn about its strengths and weaknesses, about the material itself, and about technology in general.
Is everything so rosy?
Saman
Before taking the first steps towards the implementation of the project, it is necessary to analyze, having learned everything about the pitfalls that you may encounter on the way to the desired goal. The following arguments can be put on the positive side of the scale:
- free components of building blocks;
- there is no need to use special equipment;
- excellent thermal insulation;
- ideal vapor permeability;
- ease of construction;
- good sound insulation;
- service life can be 100 years.
The other side of the scale:
- poor resistance to moisture;
- in some cases there is a high probability of ignition;
- high labor costs in the manufacture of blocks;
- such designs are loved by rodents;
Building such a house is more of a creative process. There are basic principles, but there are no perfectly precise guidelines to follow. You are not tied to any particular form. There is an advantage to completely designing literally everything yourself.
Mazanka
Muzanka. There is so much talk about this technology, but few people have thought about what it is. Often, when they want to make an attack on Ukrainian traditional housing, they mention the “muzanka”. A mud hut is the warmest hut of all the huts that are built from clay. It is the fastest in construction, but no less labor-intensive.
In Europe, huts have been known since before the Middle Ages. This technology is used by the British, known as English oak frame filled with clay and straw, by the Germans and French, known as half-timbering, even in Italy and Spain, outbuildings are made using this technology. But about the Middle and Far East, about buildings in Africa, India, China, the author modestly keeps silent, because mud huts are still being built there today. So, a hut is a wooden frame, usually made of white acacia (in Ukraine), filled with clay.
When a large tree was cut down, one trunk with a diameter of 300-400 mm was split into 2 or 4 parts and used as supports at angles. If younger trees were used, then trunks from 100 to 200 mm were used for supports. Then branches were woven into the crossbars to create a kind of “basket.” After all these simple operations, the frame was smeared.
A clay-straw mixture was used, the amount of straw ranged from 10 to 70% by weight. It is possible that there were cases when the frame could first be covered, and then the walls were finished, which makes the construction process more convenient, but requires more skilled work on the frame. The advantage of adobe is that it dries much faster than ordinary adobe; it uses less adobe, which makes construction easier.
What is adobe
Adobe consists of clay and straw.
Construction technology originated several thousand years ago, when there were no factories for the production of concrete floors, cement, etc. People used what was available and widespread. But it cannot be said that building with adobe is an unmodern method. On the contrary, there are names that are used in everyday life: clay concrete, raw brick, etc.
So what is it? In the classical sense, it is a mixture of water, straw and clay. Various plant stems (usually fibrous) can be used as filler. Additives from sand, animal manure, lime and ordinary soil may be present. Today, cement, plasticizers, synthetic fibers, antiseptic compounds and much more have begun to be added to the mixture. All this is in order to improve certain qualities and compensate for shortcomings.
If you liked the article, please share it
Previously on the topic:
Share
Component analysis
Checking the quality of clay
As noted above, the main component is clay. But not every one is suitable for high-quality work. To prevent cracks from forming later, the clay should not be too greasy. Also, it should not be too dry, otherwise there will be no good setting, and all efforts will go down the drain. It can be brought to order or obtained independently. In the second case, you will save significantly, but you will need to analyze its quality. To do this you will need:
- Determine at what depth the clay layer is located. This can be done experimentally by digging a hole and looking at the cut. Or you can obtain data from land managers in your area.
- For further actions you will need to take 3 or more glass bottles, liquid soap or salt and water.
- In several places of the planned fence, wells are made using a hand drill. Usually it is necessary to go deeper by 1-1.5 m.
- A sign is installed on each pit so as not to confuse the place from which the sample was taken.
- The clay is crushed and placed at the bottom of the jar. Each vessel is also marked with a mark that corresponds to the well used.
- 40 g of salt or 200 g of liquid soap are added, the jar is filled to the top with water and closed with a plastic lid.
- It is necessary to shake it with sufficient force for 10 minutes so that the clay dissolves well. If there are still pieces of soil inside, then you need to leave the suspension for a while so that it soaks well.
- Now you need to select the most flat surface possible and place the jars on it. It is better if it is some kind of elevation, for example, a table, then it will be more convenient to conduct observations.
- After waiting a minute, you can see the first sediment that has fallen - this is coarse sand or silt. Now you need to make a mark using a marker, electrical tape or other suitable material.
- After 10 minutes or a little more, the next layer begins to settle - this is fine sand, the last one to sink to the bottom is clay.
- When the water has already become as clear as possible and there are no floating particles left in it, another mark is made for the upper level of sediment.
- Measurement is taken from the bottom to the top mark. Where the value is greatest, that material is the best. By the number you can determine from which well the fence was made.
This method does not take much effort and time, but makes it possible to assess the composition of the building material as accurately as possible. The highest indicator is the composition that contains the least amount of fine sand impurities. The ideal option is an area where there are layers of red clay; it has excellent plasticity, which makes preparing the solution much easier.
Clay mining
There are some signs by which you can determine the places where clay exactly lies:
- Near rivers and lakes.
- Swampy area where there is a small layer of water. The liquid is held in place by a layer of clay, which prevents it from being completely absorbed.
- You can determine it by the water level in the well. If it is low, then most likely this area is also suitable.
- Clay soils are a favorite place for sedge and mint to grow. Therefore, if they are abundantly present, one can judge the possible presence of high-quality material.
- It would be useful to ask those who have already built a house from adobe or are engaged in laying stoves.
Characteristic
Adobe is a brick made of clay and straw with the addition of water, but there are no exact proportions, as well as a complete set of components - the composition of artificial stone can vary markedly depending on what characteristics are required from it.
The main ingredient of any adobe was and is clay; preference is given to varieties with medium fat content. The viscosity of the mass may vary, so if necessary, add a certain amount of water to make mixing the composition easier. Traditionally, a filler was also used, which increased the strength of the dried clay, holding it together, and somewhat improved thermal conductivity. Historically, fibrous plants and even manure were used as such a component, but today finely chopped straw or chaff is more often used as such.
Of course, in the old days everything was limited to the ingredients described above, but today, in the age of developed technology, the composition of adobe can contain various additives that significantly improve certain qualities of such bricks:
- crushed stone, sand or expanded clay chips in half with clay allow the drying building material to avoid severe shrinkage, maintaining the specified size and shape;
- casein and bone glue, as well as archaic slurry or modern liquid glass, can be used instead of water to shape uncured adobe blocks into any desired shape without spreading;
- lime and cement are known for their ability to quickly release moisture into the environment, so they are added to the recipe so that the bricks dry faster and are moisture resistant;
- Fibrous cellulose, crushed straw, wood shavings or the same manure allow adobe to also be relatively elastic, which increases the material’s resistance to temperature changes and compression or stretching.
The exact date of discovery of adobe is unknown, but scientists say that houses were built from it six thousand years ago. At that time, this was almost the only solution for residents of steppe and desert zones, where even more traditional wood or natural stone was practically unheard of. As happens in any era and in any state, building a house was also associated with enormous costs, so the poor population had no choice but to come up with a way to build from what was lying under their feet and no one really needed. Ancient Egypt is considered to be the birthplace of the first adobe, and from there such material spread to many regions with the described climate conditions.
Modern adobe brick can have different characteristics, highly dependent on the components included in its composition and their proportions, but on average it should look something like this:
- density comparable to ordinary brick - at the level of 1500-1900 kg per cubic meter;
- thermal conductivity depends, first of all, on the amount of straw used (the more straw, the better the walls retain heat), but in general, adobe in this indicator is twice as good as ordinary brick - 0.1-0.4 W/ (m*deg);
- In terms of resistance to compression, adobe blocks are very similar to modern foam blocks - in both cases this figure ranges from 10-50 kg per square centimeter.
Making blocks
Ready-made adobe blocks
The clay itself has a high viscosity, so it’s a little problematic to dig it out and then mix it with the necessary components. To make your task easier, you need to think about the preparation in advance. This is usually done in the fall. In winter, under the influence of frost and absorbed moisture, the material breaks down into smaller parts that are easier to work with. The preparatory stage is carried out as follows:
- A box is made from an edged board (you can also use other durable material that will be resistant to moisture). Its dimensions can be, for example, 1x1.5x2 m (height, width and length).
- Clay is placed in the middle. In order to ensure the required effect in the future, it must be placed in layers of 30 cm. After laying each, the surface is generously moistened with water.
- You need to leave a gap of 20 cm to the top. It is closed with straw. It will serve as a barrier to liquid evaporation in warm weather.
- The entire structure is covered with roofing felt or thick polyethylene film. In this state, the material is left throughout the winter so that the required natural processes can occur.
- In the spring, when the temperature begins to rise and is not below freezing during the day, it is necessary to open the pile and remove the straw. After this, you need to tighten the film again. In this case, some semblance of a greenhouse effect will occur, which will contribute to the rapid freezing of the material, and will also prevent it from drying out, maintaining elasticity and adhesiveness.
There are a large number of tables that show what ratio of components should be. But the fact is that depending on the area, the clay itself will differ significantly. What would be an ideal in one case may be a negative solution in another. This is explained by the fact that it is often difficult to predict shrinkage parameters.
Checking the quality of the solution
It is better to determine the quality of the prepared mixture experimentally. First of all, clay and sand are mixed. Water is added in portions so that the composition remains sufficiently thick. Take a small part and roll it into a ball in your palms. If during this procedure the product sticks and some remains on your hands, then you need to add more sand. If it is not possible to form a lump, then you need to add more clay. The second part of the test is carried out after the ball has frozen. It must be thrown up and allowed to fall freely to the ground. If its shape has not changed and no cracks have appeared, then you can begin making the main blocks. In the case when it crumbled into pieces, you need to add clay, changed shape, but remained intact, add more sand.
These steps helped determine the optimal proportions for a particular case. Next, you can move on to preparing the bulk for construction. Kneading can be done in a construction trough, on thick plastic film or tarpaulin. It will be most convenient to do this in a pit. It is necessary to dig a hole 50 cm deep. The length of the hole is 1.5 m, the width is 2.5 m. It should not be filled to the brim, but to a height of 30–35 cm. If you make the layer larger, then it will be difficult to mix efficiently, which will lead to to the low quality of the final product. If the specified dimensions are observed, in one output it will be possible to produce about 60 blocks with dimensions of 20 × 20 × 40 cm.
Making a batch
Before laying each component, it is necessary to prepare the hole well. To do this, its bottom and walls are compacted using available means. The entire area is covered with film so that there is an overlap on the surface, which will prevent it from slipping. First of all, clay is poured in; its layer should be 20–25 cm. The space on top is covered with water so that the clay is completely submerged. Everything is left in this state overnight. This is necessary so that the material becomes as pliable as possible and all lumps are softened. The next day, before starting preparations, you need to trample the clay well so that the water passes to the lower layers. Next, sand is added, mixed well, then straw.
In order to speed up the process, the pit can be made large, and the mixing of the components can be done not by people, but by animals, for example, horses. But we must remember that it will have to be constantly directed, because it will follow in its own footsteps, as a result of which the kneading will not take place. You can use mechanical means, for example, a walk-behind tractor, but it is worth considering that a large amount of clay will stick to the wheels, which is difficult to clean. If this is to be done in a concrete mixer, then 2 or 3 stones up to 10 kg are placed first, they will ensure good mixing of sand and clay. Straw will need to be added not in containers, but during external mixing.
As written above, the optimal size for blocks is 20x20x40 cm. But before moving on to making the final form, you need to make a trial one. Usually it is made from edged boards 3 cm thick. The internal space must correspond to the size of the future brick. The surface must be well sanded so that the solution can be easily separated. A small batch is made and several blocks are made. They are left for 7 days, after which the sides are measured to calculate how much drying has occurred. The final molds can be made to accommodate this gap.
Material advantages
The main advantage of this material is the unique combination of the following advantages:
- high vapor permeability;
- low thermal conductivity;
- good load-bearing capacity;
- low cost of raw materials;
- the ability to produce blocks without the use of expensive equipment.
We talked in detail about what adobe is made from, as well as its advantages and disadvantages here (Adobe).
There are 2 types of this material suitable for use:
- ready mix;
- dry blocks.
The finished mixture is placed in formwork installed at the site of the future wall, then compacted. Every few rows, steel or other reinforcement is laid to connect and strengthen the wall.
In addition, such walls are equipped with vertical reinforcement, so they are stronger than those laid from blocks or bricks, but their disadvantage is that they have to build up the formwork to the full height of the wall, otherwise the weight of the upper rows will crush the lower rows that have not yet hardened.
Ready-made blocks are much less demanding to work with, because you can lay 3-5 rows daily, but the block production time is 1-2 months. Therefore, first, the entire volume of building material is prepared and dried, while simultaneously building the foundation, and only after that they begin to build walls. Blocks and bricks are made from the same mixture that is used to build walls.
What's at the bottom
The foundation of an adobe house
Ultimately, blocks made of clay are lighter in weight than similar ones made of cement or silicate. Therefore, there is no need for them to build a massive foundation, but we must not forget that the condition of the soil in a particular area is also a determining factor. In order to make a base with a slight recess, you will need to carry out the following work:
- The site is marked according to the plan drawing. And it is cleared of debris.
- A fishing line is stretched and secured, which will serve as a guide when excavating soil. It is best to stretch two for each side to the width of the future foundation. In this case, it is more difficult to move and easier to maintain the required dimensions.
- The diagonals must be checked, because they allow you to maintain the correct geometry.
- A trench is dug to a depth of 70 cm. adobe is a very plastic material that can be molded as you go, that is, it is possible to make semi-arches or rounded corners.
- The bottom is well compacted, sand is poured to a height of 20–25 cm, compacted, moistened with water, the missing level is filled in and compacted again.
- The internal walls are closed using roofing felt. It is laid in such a way that it can be folded onto the surface with an overlap of at least 10 cm.
- Formwork is displayed, which can be made from edged boards or laminated plywood. It is well secured with spacers and jibs.
- Stands under the sheathing are placed on the bottom. Their height should be at least 5 cm so that the concrete covers it from below.
- The metal frame is made of reinforcement with ribs, the diameter of which is 12 mm. Its height is selected taking into account the size of the foundation, and also so that it is at least 5 cm recessed into the concrete. Transverse rods are attached every 40 cm. The fastest way would be to connect all the components using a knitting wire.
- The concrete mixture is poured and compacted well using a vibrator. It also needs to be leveled with a trowel or a rule so that you get approximately the same plane around the entire perimeter.
- It will take about a month for the structure to reach its full strength. This time can be spent on making the required number of blocks.
- Several layers of roofing material must be laid on top, which are coated with bitumen mastic. This will prevent the walls from getting wet.
How to build a clay house with your own hands
This technology can be used to build all types of buildings with your own hands on your own site, be it a chicken coop, barn, bathhouse, smokehouse, and of course, your own home. The undoubted priority of this technology for building clay houses with your own hands is its material availability and ease of execution. Any man, with periodic control of the masonry horizontally and vertically, will be able to build a house with straight and strong walls made of clay and firewood.
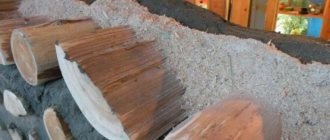
The step-by-step process of laying can be described as follows: firewood is stacked in the crossbar of the walls, just as firewood is stacked in a woodpile. They are fastened together with a clay-sand mixture with finely chopped hay or straw. Sometimes, instead of a clay mixture, the masonry is held together with cement.
In order to increase the energy saving of a building, the following technology is used: a clay mixture is placed along the edges of the firewood, and the middle is covered with a layer of porous insulating material, for example, sawdust, perlite, ecowool. The diameter of the beams can be any, and all the logs must be the same in length. The length is selected depending on the region. In southern latitudes, 0.3 m will be enough; in regions with a temperate climate, firewood is cut at least half a meter long, and in cold areas, the length is increased to 0.7 meters.
Useful article: how to make adobe brick
Before laying, it is recommended to split wooden blocks to prevent them from cracking in the future, which can result in moisture ingress. The logs are also cleared of bark. During the construction process, to add decorative value, the logs can be pushed beyond the plane of the wall. To prevent excessive accumulation of moisture in the wood, wood cuts are treated with flax oil or drying oil. Prepared building material for building a house made of clay and firewood must be dried for at least two months, since the wood will absorb moisture during the construction process.
The pattern of clay masonry depends on the diameter of the logs and the amount of clay bonding mixture. Some people like it when there is a wide layer of cement between the logs, while others prefer it when the logs are tightly fitted to each other and there is a thin layer of a binding mixture between them.
According to the step-by-step description, when laying the wall of a clay house, special attention is paid to window and door openings, as well as wooden corners. To ensure reliable bandaging in these places, the outer logs are laid so that they completely fit into the wall that adjoins
It will not be any hassle to erect a building in the shape of a circle; in this case, there will be no difficulties with installing corners and openings. The facade of such a clay pot will only benefit in terms of originality. Logged masonry can also be included as a decorative element, rather than just as a feature wall.
We build walls
Thanks to the exact dimensions, there are no problems when laying walls.
Building from such material is a pleasure. It can be easily cut to the required size using an axe. In order for the walls to be smooth, the following requirements must be met:
- Masonry, like any other block material, starts from the corners. To do this, you must first determine the highest level. This is done using a hydraulic level. One part of it is installed in one of the corners, and the second moves along the rest, where the spread is higher, and you should start from there.
- Using a bubble level, the first block is aligned in all planes. It will serve as a guide. The rest are already being exhibited based on it. This is done using the same water level.
- A mixture of clay and sand is used as a binding solution. Their ratio is 1:1.
- The thickness of the seam should not exceed 1 cm. In this case, it will be possible to ensure ideal thermal insulation properties.
- As you move forward, it is necessary to ensure that the seams are interlaced, as is done in conventional masonry. Then the wall turns out to be monolithic.
- In every fifth row you can lay a metal mesh, which will give greater strength.
- The horizontal plane is controlled with a stretched string, and the vertical plane with the help of a building level.
- At the masonry stage, it is necessary to determine the location of window and door openings and mark them. Jumpers are made from boards 10 cm thick or more. Its length should be such that it extends 15 cm into the masonry on each side. At first, it is supported by beams from below; after the mortar has dried, they can be removed.
- After the walls have been completely demolished, they need to be plastered as quickly as possible to protect them from the effects of adverse weather conditions.
- The outside walls can be covered with any facing material. It is advisable to install a vapor-permeable barrier underneath it, which will prevent moisture accumulation and provide the necessary drying.
- On the inside, the entire area is also covered with a vapor barrier; its throughput should be lower than that of what is located outside.
- It is advisable not to install windows and doors right away. It is necessary that the entire structure undergo drying and shrinkage, only after this it will be possible to select the required parameters.
It is better not to build more than two rows in one day. This is due to the fact that each new one adds weight, which can lead to the destruction of the lower blocks. The height of the walls must be made with a margin, by which shrinkage will subsequently occur. The approximate figure was obtained during the manufacture of trial blocks.
Adobe house: construction technologies
Any person who is familiar with all stages of building construction can build such a house. But in this case there are 3 options.
- Construction of a dwelling from adobe parallelepipeds - from adobe. This method differs little from building a house from ordinary bricks. The first stage of work is the production of material. All adobe blocks must be exactly the same shape. Then they are laid out in the traditional way, using clay-sand mortar. The maximum thickness of seams is 12 mm. The disadvantage of this method is that it takes too much time to make and dry adobe blocks and to lay walls.
- Construction of house walls using permanent formwork. Light adobe is used for this technology. This method involves driving adobe into formwork made of wood. The walls are plastered with clay mortar only after the adobe “filling” has dried. Due to permanent formwork, costs are more significant, but lightweight adobe allows you to save on the foundation. Two more advantages are the speed, which allows you to “grow” a house in a few months, and the ability to make the building two-story.
- Construction of monolithic walls without frame. In this case, a thick mass is first made from clay, water and straw, then it is laid in portions on the foundation. The layer (one per day) should be small - 100-150 mm. To prevent it from sliding, craftsmen already familiar with this technology recommend smoothing the wall and immediately plastering it. The main disadvantage of monolithic walls is their rather long drying time: shrinkage of the building will continue for a year.
Internal partitions are made of frames. Filling: light adobe. Walls made using blocks will not shrink significantly, but the monolith will not require so much time for construction. However, the timing is largely dependent on the weather, because when it rains, any work stops.
Separately, it should be said about the thickness of adobe structures. External walls that will be built from heavy adobe must be at least 500 mm, maximum 600. No greater value is required: such an adobe wall will correspond to a brick wall, the thickness of which is 1000 mm. The thickness of the internal partitions is 300 mm, no less.
Foundation for a lightweight structure
In this case, a columnar or pile foundation can be used as a base. For the second option, you can purchase ready-made screw elements. They dive to a depth below freezing of the soil. They should be placed at a distance of one meter from each other. A separate line should also be made for the partitions. Their upper part should be approximately 30 cm above the surface level. The ends are leveled and a square penny measuring 25x25 cm is welded on top. All elements are connected to each other using a wooden grillage. To make it you will need a beam measuring 15x15 cm or 20x20 cm.
For a columnar foundation, holes are dug at a distance of one meter to a level below freezing of the soil. Formwork is installed inside and metal lathing is laid. The solution is poured and compacted well. The size of one element can be 40×40 cm or 50×50 cm. The same wooden base is made on top as in the previous case.
Roof installation
To reduce the load from the rafter system on the adobe, the roof must be made quite steep - at least 30 degrees, and preferably 45. The recommended length of the roof overhangs is approximately 70 cm. The optimal roofing option for an adobe house is a straight gable roof. When installing an attic structure, the load on the walls increases significantly.
Roof installation
To install the rafter system you will need:
- wooden beams;
- timber with a section of 150x100;
- boards 30x250 mm;
- waterproofing film;
- insulation;
- roofing;
- primer;
- fasteners;
- level;
- roulette;
- screwdriver;
- hammer;
- hacksaw.
Step 1. Installation of ceilings
Mansard roof installation
When laying the last two rows of walls between the blocks, holes are left for the ceiling beams. In the places where the wood adheres to the adobe, the beams are wrapped with roofing material and coated with mastic. They should protrude quite a bit beyond the perimeter of the wall, about 2-4 cm. The beams are laid at a distance of 1-1.5 m. After this, another row of blocks is erected and the assembly of the rafter system proceeds.
Roof structure
Step 2. Installation of rafters
Sheathing boards are placed on the ceiling beams. The beams at the ends are cut at an angle of 45 degrees and connected to each other. Having strengthened the structure in the middle with a jumper, lift it up and install it above the side wall. The rest of the rafters are placed in the same way and connected with longitudinal beams. Between the ceiling and the rafter lintels, additional support posts are installed and pediments are nailed.
Step 3. Attaching waterproofing
The rafter system must be protected with a waterproofing layer. You can use roofing felt, plastic film or a special membrane for this. Attaching the hydraulic barrier begins from below along the eaves of the house. The material should sag slightly between the beams, so it should not be stretched too much. Adjacent pieces of film are overlapped and taped at the seams with construction tape. If roofing material is chosen as protection, the joints are coated with mastic or resin.
Step 4. Roof insulation
Roof insulation from the inside
Mineral wool, polyurethane foam or polystyrene foam boards are suitable for roof insulation. To lay the thermal insulation layer, first install a timber sheathing. Insulation boards are inserted between the cells of the frame, compacted, and the cracks are filled with foam. After this, the roofing covering is fastened, the eaves are screwed in, and the snow guards are installed.
Light walls
Constructing walls from straw
To construct walls you will need beams measuring 5x7.5 cm or 10x7.5 cm, for corner beams - 15x15 cm or 20x20 cm.
- First, the corner supports are installed. They are fixed using a tenon joint and nails or metal corners.
- Additional vertical racks are installed. Two beams of the required height are connected by a crossbar, the length of which is equal to the width of the grillage. Such crossbars are mounted every meter. The space between them will subsequently be filled with adobe.
- The top trim is being made, which will connect all the racks together.
- The roofing system and decking are being installed.
- A liquid solution is made from clay and water.
- The prepared straw is soaked in this composition and left for a while to drain a little.
- Formwork made from edged boards is installed on the walls.
- Moistened straw is placed inside this formwork and compacted well.
- As the formwork dries, it is moved higher and higher. This is how construction is carried out.
- The finishing is the same as in the previous case.
External and internal cladding
It is necessary to finish adobe walls. The material absorbs moisture and will not last long. The traditional option is plaster . Choose vapor-permeable compositions, such as silicate or lime. It’s better not to use cement; it doesn’t stick well to unfired clay.
are also allowed : lining, boards, siding, brick. The latter must be laid with a gap between the adobe and the stone.
For interior decoration, gypsum and clay plaster . Can be tiled. It is better not to use plastic panels, as they do not allow steam to pass through.
Roof
Making a roof
For such structures, the optimal solution would be a straight gable roof with an angle that exceeds 30°, it can even be 45°. Thanks to this, it will be possible to minimize the load on the walls. But it is important to remember that such a design is subject to gusts of wind, so it is necessary to analyze how things are in a particular area. The overhang of the slopes should be at least 70 cm. This will protect the walls from flying splashes during precipitation. You can use any material you like as flooring.
Additionally, it is necessary to make a blind area and install a water drainage system to prevent the walls from getting wet.
Using this guide, you can easily cope with the independent construction of your future residence.
Rules for adobe construction
To avoid mistakes that can cost owners dearly, it is better to familiarize yourself with some recommendations.
- When constructing monolithic walls, the layer laid per day should be up to 300 mm thick, this is the maximum. Otherwise, the walls may “float”.
- The rafter system of an adobe house requires a mauerlat, which relieves adobe walls from uneven loads. It is made from boards.
- Reliable protection of the structure is mandatory on rainy days, when any work completely stops.
- Plastering with lime mortar is carried out after the building has completed shrinkage, about a year later.
- Reinforcing mesh through 3-4 rows of blocks is necessary if you are building a two-story house or a building with an attic.
- To protect the walls from getting wet, the roof overhangs must be at least 700 mm.
An adobe house is an opportunity to create an unusual structure at minimal cost, which will be very different from typical buildings. If the first experience is successful, then knowledge of the process of building an environmentally friendly, breathing home with your own hands and feet will no doubt prove useful in the future.
To get acquainted with all stages of work, it is better to watch a very interesting video, consisting of several parts:
Was this article helpful? We want to improve. Thanks for your opinion!
Photo
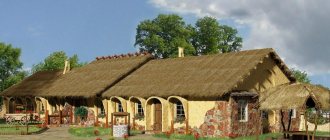
The old adobe house is still strong
Small house made of adobe
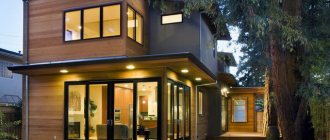
Adobe house
Adobe eco-house on stilts
Original house design
Modern adobe house
The whole family can participate in the construction of an adobe house.
Did the article help you?
Finishing
Even at the end of the last century, adobe houses in Russia, Ukraine, Kazakhstan, etc. were mainly coated with clay and whitewashed. Today, such technology is considered, of course, outdated. Of course, with a certain amount of skill, you can coat adobe with clay evenly and accurately.
However, it is still better to use this finishing method only for interior decoration of the house. Exterior walls plastered in a similar manner will have to be greased and whitened, most likely, every year.
Most often, adobe boxes these days are lined with brick. You can also coat such walls on the street side with clay and cover them with siding.
Partitions in adobe houses are most often made of panel boards filled with clay or lined with mineral wool. The floors are assembled in the usual way - along joists with boards filled.
Kinds
The ingredients traditionally included in adobe blocks can be used in different proportions and subject to different masonry technologies. For this reason, adobe is usually divided into two main varieties - the so-called light and heavy.
Although adobe in most people's minds is seen as a brick or block of any other shape, the light variety very rarely has this appearance. The fact is that a very small amount of clay is used to make lightweight adobe - usually its share is no more than 10%, while the filler plays the dominant role. The resulting mass has significant fluidity and low ductility, and therefore requires a more solid base made of another material. Typically, lightweight adobe is either a kind of covering for sheathing, which is installed next to a frame wall, or a filler between two such walls at once.
It turns out that it is impossible to build a house entirely from light adobe - it necessarily complements other building materials, but advantages can also be found in this. Thus, the building retains all the advantages of its adobe counterparts (except, probably, cheapness), but it is erected much faster and somewhat easier. The disadvantages of this solution are that the material for the frame can be significantly more expensive than adobe blocks of similar volume, and wood is often used as lathing with all its disadvantages such as price, flammability, exposure to moisture and pests.
What most people consider “ordinary” adobe blocks are so-called heavy adobe. We have already discussed the composition of such bricks above, and the advantages of its use are obvious - the building turns out to be much stronger and more reliable, and finishing can be done almost immediately after the wall is erected, because adobe literally requires that it be protected from the effects of the atmosphere as soon as possible . A huge disadvantage of this type of material is its susceptibility to the destructive effects of water - it is the main enemy of adobe buildings. Although water is used in the production of adobe, it is always necessary to protect the finished material from moisture, starting from the drying stage and ending with construction, finishing and living in the finished house.
Fastening plasterboard to a plastered, wooden, adobe wall, using a frame method and without a profile
But the desire to simplify the process and achieve savings suggests the possibility of fixing sheets directly to the surface, without a profile.
It is recommended to leave a gap between the floor and ceiling and the edges of the trim sheets. Natural ventilation will help the glue dry completely.
Among the advantages of the frame mounting option, we note the possibility of covering a wall whose height reaches 10 m; the gluing method is recommended to be limited to rooms whose height does not exceed the length of a standard gypsum board. It is possible to use plasterboard to finish adobe masonry, but strict adherence to all recommendations will be required. If the length of the wall exceeds 10 m, compensation gaps should be provided; their presence will eliminate the threat of deformation of the sheets due to fluctuations in temperature or air humidity. The house will need to organize a high-quality ventilation system.
Normal air humidity will allow drywall to maintain its qualities for a long time. It is recommended to impregnate the sheets themselves with a moisture-proof primer on both sides.
And now a little about the advantages:
1) Provided that you take care of it (heat it in winter so it doesn’t crack, make a good quality blind area so it doesn’t wash away), then it will last quite easily for the same amount of time.
2) Cool in summer, warm in winter (We do without additional devices for air ventilation (air conditioning, fan, etc.), and in winter it warms up very quickly.
4) A house for the application of hands and creativity, because it requires repairs and improvements. We think, based on the above, there is no need to decipher this point :-)
Of course, we believe that here in the South there are other options. There are also more modern options made of brick, gas blocks, and frame. But they, naturally, will cost much more than their adobe counterparts. Look at your capabilities and try not to spend all possible funds when purchasing a house. Because, no matter which one you take, it will still require both effort and money to remodel and repair it “to suit you,” and the money will come in handy for the first time, until you find a job.
So, if you are a stubborn, excuse me, stubborn lover of ecology and naturalness, then there are no questions at all. For you, an adobe house should seem like one big plus, absolutely without nuances, just a heavenly option for everyone else, but know that in this type of construction there are a lot of minuses, literally full of them.
Thank you for still staying with us. We appreciate it :-)
Main disadvantages
An adobe house, like any other building, has its drawbacks. Among others, low moisture resistance should be highlighted. To eliminate this defect, plastering and whitewashing work is carried out in the finished building. This also eliminates the impact of precipitation on the façade.
If you purchase bricks or blocks that contain a high content of organic fillers, then you need to be prepared for uninvited guests in the form of rodents and insects to settle inside. At the same time, such material becomes even less fireproof. This happens due to an increase in organic mass, which excellently supports combustion.
Another disadvantage of an adobe house is that the finished building must stand and dry for quite a long time. This is typical for areas with temperate climates. If work is carried out in hot conditions, then such a problem should not arise. If the house is not allowed to stand, the material will not gain strength, and the organic filler will begin to rot. As a result, the microclimate inside the building will not be what you expected. In this regard, you will not celebrate your housewarming soon.
When considering the pros and cons of adobe houses, you should also note that construction work has a limited time. It is better to build a building in the summer, in hot weather. The reason here is expressed in the above-mentioned disadvantage. As for frosty weather, construction in such conditions is very difficult. If it is carried out, it requires the presence of salt or alkalis in the water in the blocks. If the walls are not compacted enough, then over time they will give a large linear shrinkage. Dimensions can reach 1/20 of the height of the walls.
Additional insulation measures are required for walls built from heavy adobe. This material has a low content of organic fillers. In this case, it is better to use compressed straw, which is then plastered with clay or coated with a composition of clay and lime. In terms of labor costs when making adobe bricks, almost nothing has changed since ancient times. The blocks are made manually, and not using special units. Therefore, the speed of preparation for construction is quite low.