Decorating your own garden plot is an activity that has become a favorite hobby for many. What kind of ideas are not embodied on six hundred square meters. After all, this is a great opportunity to show your creativity, sense of humor and surround yourself with objects that can bring joy and aesthetic pleasure. Despite the abundance of crafts made from plastic and other artificial materials, wood and stones have been and remain the leaders for countryside creativity. These two materials look especially organic in any treatment. We have already talked about how stones can be used in garden design, so today we will pay special attention to painting on stones with our own hands.
- 2 What if there are no necessary stones?
- 3 Choosing suitable paints
- 4 Which brushes are best?
- 5 How to build a palette correctly
- 6 Sequence of painting
- 7 What can you draw on a stone?
- 8 Where is the best place to use painted pebbles?
Preparatory part
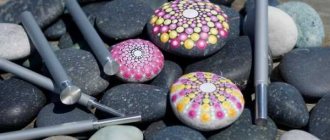
To create an exceptional, special piece that will delight the eyes of those passing by in the garden, light pebbles with a dense and smooth texture are selected. Sea pebbles are like that. It is carefully washed with water, baking soda and soap and dried (preferably in a warm place, not with a towel).
For a light and smooth paint coating, it is advisable to apply a layer of solution mixed from PVA and water in equal quantities. For painting on stones, it is preferable to use paints that are most resistant to weather changes and do not wear off.
Acrylic corresponds to these properties, but you can use gouache, watercolor, or paint specializing in painting ceramic ware. In case of an erroneous smear, a solvent will come to the rescue.
Brushes and rollers will come in handy. Protect the work area with oilcloth and paper. Wear special clothing. When finished, coat the work with acrylic or clear manicure varnish. This will add shine and provide protection from environmental conditions.
Choosing suitable paints
Brushes and paints are an important element of the work ahead. Undoubtedly, you have heard that acrylic paints are used to paint stones. Why acrylic? After all, there is also gouache, watercolor and oil paint.
Acrylic paints have many useful properties: they cover stones well, are not washed off with water, do not fade, and withstand changes in temperature very well.
We prefer acrylic for the following reasons:
- these paints dry quickly and turn into an elastic coating that will not crack;
- acrylic fits well on the surface without rolling or being absorbed;
- the colors of these paints are unusually bright, they do not fade in the sun, do not become dull over time and are not washed off with water;
- acrylic coating is non-toxic and odorless.
The elastic film that acrylic paints form on the surface of the stone after drying is quite strong, resistant to mechanical stress, does not react to high humidity and temperature changes, and does not dissolve in water.
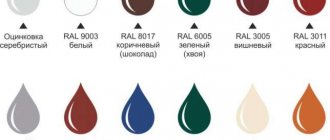
Acrylic paints are produced by both foreign and domestic manufacturers. It is necessary to choose those that would suit us not only with high quality, but also at an affordable price.
Gamma paints are very well suited for beginners’ first jobs: they are inexpensive, but quite good quality, and their ability to darken after drying just needs to be taken into account
Let's consider several options:
- Artistic acrylic brand "Gamma" (Russia). This is an inexpensive material that can be used by beginning artists. Its peculiarity is that the drawing becomes a couple of shades darker after drying.
- Glossy paints “Dekola” (Russia). Due to their saturation and brightness, they are perfect for depicting flowers and plants. The glossy surface allows the drawing to look more impressive, but creates unwanted glare that is not necessary for animal images.
- Russian products “Ladoga” and “Sonet” are an excellent example of a normal relationship between quality and price. Thanks to increased adhesion, paints from the “Ladoga” series adhere well to stone and withstand changes in temperature conditions. Acrylic of both series becomes darker after drying. To create additional effects, you can successfully combine the use of matte paints “Ladoga” and “Sonnet” and glossy “Dekola”.
- Pebeo paints, jointly produced in France and China, and Vivace creamy acrylic are higher-level materials used by real artists, which is why you should look for them in art salons. They are not only easy to work with, but also do not change their color after drying.
- Maimeri and Plaid paints are not so easy to find, and they are more expensive than the previous ones. It should be remembered that these brands also sell materials for working on glass, metal and plastic. We need those that say “for cement or stone work.” If the stone will subsequently be placed in the garden, then acrylic should be for outdoor use.
- American Plaid FolkArt products will most likely have to be ordered online. The drawings she creates will never darken. In addition to a large palette of colors, this series contains mediums - means with which you can create various special effects.
- The “Polycolor” series of paints “Maimeri” (Italy) have continuous advantages. If you find them and aren't put off by the price, you have every chance of using them to create something truly unique.
As you have already seen, there are paints, a lot of them. Every artist from beginner to professional has the opportunity to choose what he likes.
Italian Polycolor paints make up a large series, which includes many different colors of excellent quality, durability and brightness
If you can’t find it, no problem
If you couldn’t find a suitable stone for the expected design, you can make it yourself. Water and sand are mixed in a basin. Excess liquid is drained. Once all the moisture is completely absorbed, a hole is made in the sand, shaped with the necessary outlines.
A plastic film is spread over it and diluted cement mortar is poured with the addition of any coloring pigment. The top is covered with oilcloth and pressed with a sufficient layer of sand. All that remains is to wait for the cement to harden.
Pebble painting tools
To paint stones you need ordinary artist's tools:
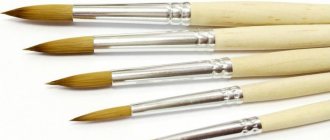
- brushes You may need flat and round brushes of different thicknesses. Flat ones are convenient for applying primer, painting the surface of the stone, and varnishing. Using round brushes, a design is applied and details are highlighted.
- Glass for water. Necessary because used brushes are immersed in water after work to prevent drying. It is advisable to have a tall and stable glass that can accommodate several brushes.
- Toothpicks. They will be needed to create particularly fine patterns, droplets and dots. They are especially needed when the ornament is made on a small stone.
- Napkins or rags. They are needed to promptly wipe away an unnecessary smear of paint on a drawing or paint that has fallen on the table.
- Oilcloth or film to protect the table from paint.
- Apron to protect clothes.
- Fabric gloves.
- Hair dryer. An optional tool, but if you need to speed up the drying process of paint or varnish, you can safely use it.
Painting stones for the yard
An easy and cheap option for decorating a dacha or garden plot for beginners step by step:
- Choice of material.
- Drawing up a sketch.
- Choice of paint and brush.
- Transferring the sketch to the cobblestone.
- Fixing the image.
Drawings on stones with acrylic paints come in a wide variety. It is better to choose such a dye for a number of significant advantages. It does not fade in the sun, does not crack over time, is not toxic, does not stink, dries in a short time (about 15 minutes), is not dissolved by water (and therefore rain) and is not afraid of various temperatures (from the heat of the sun to the frost of winter) .
If there is a ceramic figure of a gnome or other fairy-tale hero in the yard, then a magic house will be useful for it. So he will have his own home. For the tower you need a large boulder with an elongated oval, slightly pointed shape. For effect, you can form a path leading from the threshold.It’s not difficult to imagine how to draw a stone, the usual parameters for animal lovers. These are any representatives of the fauna: a cat curled up in the shape of a ball or a dog; snails with their shells on their backs; deer or foxes; any insects with or without wings.
Note!
- Wood burning for beginners: tips and secrets for burning pictures
- Plasticineography - interesting options for creating pictures from plasticine on cardboard for children
- DIY scrapbooking for beginners: what it is and how to do it. What you need to create a beautiful album or notebook (photo + video)
Sometimes, it’s enough to schematically outline the tail and muzzles, complete the eyes and ears, and it will be clear. The main thing is to choose a place on the grass so that they don’t get lost there.
Painting flowers on stone will add brightness and richness to the flowerbed. Tulips, roses, peonies will create a feeling of blooming all year round. Wildflowers: dandelions, forget-me-nots, cornflowers will add romance to any yard.
Fantasies can be anything. Drawing water waves, splashing fish, croaking frogs and water lily leaves on the stones will create a reservoir or pond.
Another useful application is to determine terrain zones. You just need to place and evenly distribute them in the form of borders and paths.
Frog
You will need: a stone of a suitable shape, acrylic paints of green, yellow, brown, white, black and gold, a brush, a simple pencil, and craft varnish.
Master Class
- Mix green and yellow paint to create a light green tint and paint the top and sides of the stone, then let dry.
- Paint the bottom of the stone white.
- Draw the paws with a simple pencil and color them light green.
- Draw the tip of the ponytail in the form of a small drop, then wait for it to dry.
- Draw the legs and face with a simple pencil, then outline with black paint.
- Draw a semicircle above each eye with a pencil and draw 2 lines along the back, then outline with white paint.
- Paint the area around the mouth and feet with white paint.
- Paint spots on the frog's body using brown paint
- Paint the eyes gold.
- Create highlights using light green paint.
- Wait for it to dry and coat the craft with varnish.
The frog on the stone is ready!
Stone crafts for indoors
Indoor works can become a harmonious part of the interior and Feng Shui. Inexperienced artists can use stencils or regular masking tape and combine any colors into geometric designs.
Note!
- How to make a craft with your own hands: what you can do with your own hands at home
- DIY foam crafts: snowman, Christmas tree, sculptures, original figures with instructions (photo + video)
- Papier mache from egg trays, boxes, cassettes: the best ideas on what can be made from egg packaging
List of necessary materials for work
Before starting work, the master must stock up on all the necessary tools and materials (this will not only save time, but also not be distracted from more important matters).
In the process of completing the assigned task, you will need to prepare:
- stones;
- set of acrylic paints;
- special solvent for acrylic paint;
- mixing palette;
- varnish (colorless);
You can put an image of an animal, plant or just an ornament on the stone
- tassels;
- container with water for washing tools;
- soft fabric;
- simple pencil.
Finding and selecting stones is a primary task for the master, since not every cobblestone is suitable for performing this type of work. The ideal base should have smooth edges and flat sides. Experts recommend using sea or road pebbles, which have already been processed by nature and, accordingly, are ready for practical use.
How to paint a pebble with a strawberry, the following instructions
We stock white, red, black and green paints, gray pencil, varnish and thin synthetic brushes of various thicknesses. The stone must first be coated with a primer and wait until it dries.
Then it is painted red, and leaves are drawn on top, and the outline is filled with green. Using a thin brush number 1, apply small black stripes over the entire surface. White ones are drawn next to them. When everything is dry, cover with a fixative.
There are many uses for this strawberry. Can be a separate item on a souvenir shelf. If you glue a magnet to the flat side with superglue, you will create a unique composition on the refrigerator door. Part of the style may be a vase or jug filled with pebbles. All kinds of drawings are possible on them: butterflies, patterns in the Gzhel style, skulls, birds, pandas, elephants, dolls, penguins, turtles, Teletubbies, landscapes, sheep, emoticons or miniature plot painting.
Cute panda
You will need: a flat stone, a simple pencil, a brush, acrylic paints in black, white and green, craft varnish.
Master Class
- Draw a white oval.
- Mark a cross with a pencil.
- Draw the panda's head and ears.
- draw the muzzle, eyes and front legs.
- Color the ears, eyes and paws black.
- Draw the lower body and legs, then color it black.
- Draw a twig in the paws and grass, then color it green.
- Emphasize the outline of the panda with a simple pencil.
- Wait for the paint to dry, then varnish.
Cute panda on the stone is ready! I recommend watching this video!
Drawing on the stones
Drawing a bird on the stones (step by step)
- First, an oval is depicted, with a slight slope - the body.
- A circle is drawn at the top - the head.
- On it is a triangle with a stripe - a beak.
- An eye is drawn randomly.
- To the bottom of the oval there are three inclined segments tending to one point - the tail.
- The legs and wing are being drawn in.
- There is a drawing, all that remains is to color the chick.
Use in landscape design
Painted stones
- is actually a universal decor.
Much depends on the type and size of the stones, the design that was depicted, and the place where decoration or decoration is planned. For example, in a serious office made in a classic style, an island on a table with stones decorated with children's drawings or gnomes will look ridiculous. At the same time, if you decorate such a room with stones
on which some symbols, ornaments or mandalas are drawn, then there is a chance that the element will fit into the overall interior.
When designing a garden, it should be taken into account that compositions of painted stones look more elegant in small grass. To avoid it getting too tacky, you can use painted and clean elements in one composition. Fairytale houses, pebbles with images of plants or animals look best on a flowerbed, terrace or in the house.
How else can you paint pebbles with acrylic? Drawing on the stones:
Cacti in a pot
Having bought small pots and poured sand into them, inserted elongated pebbles, painted completely green with white dots and suns, bright and ever-living cacti will delight you on the windowsill.
Brushes
If you have to work with pebbles, choose the smallest brush. Soft squirrel brushes are very convenient in this regard: heavy paint forces the bristles to bunch into a thin needle. This brush is convenient for drawing small details.
But for a large stone you need to prepare different brushes with natural hair. To draw the background and three-dimensional details, you need a wide brush with a “spatula”. Brushes with hard synthetics are also used if the stone is very large. In a word, everything here is at the mercy of the artist - what is convenient and familiar to draw, what brushes the hand has already fallen in love with, those are used.
little people
The composition of the Cheerful Family will look funny in any room.
To create it you need a minimum of action and talent. Glue small oval pebbles in a vertical position to the large stone. Draw eyes for them and cover them with varnish. Ready! Note!
- DIY vase: step-by-step photo instructions, master class for a beautiful and unusual craft
- Paintings from buttons, panels, appliques and compositions with your own hands: how to make flowers, a butterfly, a fish or a tree craft from buttons
Flowers made of wool (85 photos) - how to felt a flower from felt or a wool brooch. Step-by-step instructions for beginners
Everyone can choose for themselves which paintings from stones with their own hands are best to make for their bedroom or living room based on photos on the Internet or books about crafts. Their highlight is volume and texture.
Adorable hedgehog
You will need: a stone of a suitable shape, acrylic paints in white, light brown, grey, black and red, a brush, and craft varnish.
Master Class
- Paint the surface of the stone so that the center is light gray and the edges are dark gray.
- Draw a light gray muzzle.
- Draw the nose, the border of the muzzle and the needles in black.
- Mark the transition to the neck with light brown paint.
- Draw a bag with a knot with white paint and draw a muzzle with black small strokes.
- Draw the needles in a chaotic order in black.
- Apply white and light brown strokes to the needles.
- Paint the bag white and add black strokes.
- Draw the paws, eyes and mouth in black.
- Draw red dots on the bag.
- Wait for it to dry and coat the craft with varnish.
The charming hedgehog on the stone is ready!
Shall we play?
In addition to visuals, many things can be adapted in games. For example, 2 sets of two colors, 5 pieces each, plus a drawn field of four segments intersecting in pairs and “tic-tac-toe” will delight everyone - both adults and children.
Taking a checkers board and 24 granites of two colors, you can play checkers with a partner. Every chess player will quickly figure out how to draw on the chips for playing chess.
If you can find 28 small, approximately identical, flat pebbles, you can play dominoes. How to decorate them? You can make all possible combinations of numbers from one to six in pairs or double combinations of six different colors.
If you draw letters, you can study the alphabet with your children and put them into words. If you have the patience to paint a considerable number of stones like this, you will be able to play “scrabble”.
The favorite game of many children is “shop”. Products can be made in any way. A special variety for a vegetable shop: oranges, tomatoes, potatoes, cucumbers, apples, cabbage... When weighing goods on scales and paying for them with cash slips at the checkout, the children learn to count.
For role-playing games, in order to act out full-fledged scenes, you can manage to arrange the pebbles so that you get entire stone cities, parks and zoos.
Creating a Sketch
Many people underestimate the process of creating a sketch. But for high-quality drawing of stone step by step, it plays a key role. Thanks to it you can create a realistic drawing.
- The sketch is created on some basis. The best option is to go out into nature with little students.
- They will be able to draw from real life, improve their health and get a lot of positive emotions.
- To begin with, a few sketches are made. Gradually, a realistic stone is formed from them.
Tip: It is worth studying the techniques of famous artists. The child will be interested to learn how recognized artists create shadows or play with light.
Anything
Drawings on pebbles in the form of snowflakes with a mini greeting will be a mega original postcard to your loved ones for the New Year or Christmas. Tank, camouflage, Russian flag for February 23. A bouquet of flowers and a bottle of champagne for March 8th.
Hearts and dots for Valentine's Day. Chickens hatching from eggshells for Easter. Ghost, skeleton, pumpkin for Halloween. For your birthday, you can put together a whole collection with inscriptions of wishes or inspiring quotes, or just a creative and funny collection in the form of the birthday person’s favorite theme, and present it in a magic jar or box.
With children, gouache drawings on stones become light, cheerful and pretty. As a result of this art therapy, environmentally friendly toys are obtained, unlike plastic ones. Even a standard portrait of a family on paper can be transferred to several sea pebbles and it will be very extraordinary.If you get even more creative, you can glue three-dimensional parts, for example, made of cardboard, plastic and felt. For a frog - legs, for a crab - claws, and so on. Then the crafts are obtained in 3D format.
Owl
You will need: a stone of suitable size and shape, a simple pencil, gouache, varnish for crafts.
Master Class
- Cover the entire stone with white paint and wait until dry.
- Draw eyes, feathers and wings with a pencil.
- Mix black and white paint, then paint the owl's body.
- Paint the feathers black and wait until dry.
- Outline the eyes using black and white paint.
- Color the pupils red and orange.
- Draw white feathers on the face.
- Paint the feathers with white and wait until dry.
- Paint the nose with black paint.
- Use black lines to highlight the border of the owl's face and wings.
- Wait for it to dry and coat the craft with varnish.
The little owl is ready! I recommend watching this video!
Tutorial gatto su pietra | Tutorial cat on stone | Painting | Tutorial draw | Disegno su pietra |
Recommendations on how to beautifully color a drawing
When choosing acrylic paint for stone, synthetic or nylon brushes are needed. Natural wool with its assistance will be destroyed.
There are exceptions when porous minerals are better, when making something with pores or holes, for example, a piece of cheese.
To prevent acrylic from hardening, use a palette and small portions.
When working with professional paints, finally bake the product in the oven for firing. This way the drawing will last longer and without cracks.
The materials are sold in both art and construction stores.
When using metallic acrylic paint, the painting will acquire a pleasant-looking shine.
To add volume to individual details, you can use a felt-tip pen.To draw a contour, use a white or black contour pencil opposite the background.
How to build a palette correctly
One of the properties of acrylic that helps us in our work is its ability to dry quickly. But for beginning artists this circumstance causes some difficulties. They have to draw faster than they can yet. In addition, you constantly have to add new paints, and this unnecessarily increases their consumption.
Recent Entries
Lilac perennials that are beautiful, compact and do not crowd out other plants Why when buying seedlings you should not take the sellers’ word for it and how to determine the age of the plant using 3 signs Tomato seedlings have turned purple or whitish: why the color has changed and how to save the plants
You can, of course, use special means that slow down drying, but then the effect we need disappears, and creating drawings will be much more difficult.
As you can see, such a container is easy to find in any grocery store, so you shouldn’t have any problems constructing a palette
Meanwhile, if a jar of paint is opened and we dip a brush into it, acrylic will quickly become viscous, and then an elastic, dense substance. Simply put, the paint will dry out and you will have to throw out the entire jar. If you squeeze paint onto a regular palette, then its consumption will be simply enormous, and this is no good.
To work calmly, slowly and without wasting extra paint and nerves, you need to make a special palette with your own hands. To do this, let's take:
- a regular plastic container with a lid;
- toilet paper or napkin;
- baking paper.
Let's start with a container of any size. Subsequently, when you start painting regularly, you will decide for yourself what size palette you need. The wider the container, the greater the color palette you can use to color the rocks for your garden.
The small container we chose is perfect if you need to paint small sea pebbles. Place a piece of toilet paper or a paper napkin at the bottom. Lightly compact the paper and fill it with water so that it is well saturated. The napkin should be wet, but not floating in water.
This homemade palette contains several drops of paint in different colors, which indicates minimal material consumption
Now you need to take wax paper and cut a piece out of it that matches the size of the bottom of the container. We will place this paper on top of a wet napkin. The work is complete, we have made the ideal palette for acrylic paints. Baking paper retains moisture and prevents paints from drying out. When closed, this palette can even be placed in the refrigerator if the painting process has to be interrupted.
Now it's really time to start painting the stones.
Photos of drawings on stones
Please repost
0
Children's crafts
Stone painting can be used as an idea for a children's craft show or as an educational activity for children at home. Using painting, you can create models of insects, flowers, fish, frogs, or simply draw faces, abstract lines and shapes.
For stone, you can use regular gouache or acrylic paints.
In your work, you can use various auxiliary materials in the form of feathers or wigs made of woolen threads, glue small pebbles together to create animal figures, or assemble three-dimensional pictures from small painted pebbles, like a construction set.
Master class No. 2: painting mugs and cups with acrylic paint
A fairly simple drawing will be used here, which does not require special artistic skills, so you only need desire, materials and a little time.
- white cup (mug) and saucer (ceramic or porcelain),
- marker Pebeo Porcelaine 150,
- several colors of acrylic paints (blue, sapphire, white, rainbow colors),
- one or two brushes,
- palette for mixing paints (you can use a plate),
- several cotton swabs (to correct mistakes),
- alcohol or glass cleaner, a regular kitchen stove.
Painting technology:
- First, you need to clean the ceramics and dishes from fingerprints or grease with alcohol or window cleaner.
- We draw raindrops on the cup and saucer (except for the center of the saucer where the cup is placed), that is, their outlines. Draw a rainbow in the center of the saucer.
- Thus, it turns out that when the cup is on the saucer, the rainbow will not be visible, but when the cup is lifted from the saucer for tea, there will be a pleasant little surprise, rainbow in the literal and figurative sense of the word. Remember that the paint dries in 5-10 seconds.
TIP: If you have never used a marker before, you need to make the paint start to flow out of it. To do this, you need to shake it for about 30 seconds, and then press the tip onto a sheet of paper until the paint begins to flow. Once the paint has gone, you can start painting.
- Use a medium sized brush to paint the raindrops. Use blue paint. You can paint right away with the paint in the bottle, or you can add a little water so that the color is not so saturated. Do not shake the paint, this may create bubbles which will reduce the quality of the painting.
If you have gone a little beyond the contours and the paint has not yet dried, this can be corrected with a cotton swab or napkin. If the paint has already dried, first moisten a cotton swab with alcohol, and only then correct the mistake. If you made a big mistake while painting and you want to start over, then rinse the dishes under warm water or wipe with alcohol and let them dry well before starting to paint again.
These paints mix well with each other, so you can paint some of the droplets with blue, then mix with sapphire and paint the rest
You can paint some of them with just paint, or often with paint mixed with water. It is important to wash and dry your brush well when switching to each new paint color.
- After you finish drawing the raindrops, move on to the rainbow. To do this, use a very thin brush so that the design is neat and does not go beyond the contours.
- Remember that green can be obtained by mixing yellow and blue, and orange can be obtained by mixing red and yellow.
- The drawing is already finished, but this dish is not ready for use yet. Leave to dry for 24 hours.
- After this time has passed, place the dishes in a cool oven, set the temperature to 150° C. When the oven has warmed up to the set temperature, set the timer for 30 minutes and leave to bake. When the time is up, turn off the oven and let the dishes cool before removing.
- That's it now. You can enjoy your tea!
In general, with the help of these same tools you can draw any other drawing that appears in your imagination.
Figurines and garden compositions
- An excellent option is to create a collection of various “smileys”. They can be cunning, smiling, sad or crafty.
- Double-sided compositions look interesting. You can implement ideas such as a caterpillar and a butterfly, a princess and a frog, a chicken and an egg, etc.
- You can take and create a collection of fairy-tale characters , for example, the heroes of the tower - from a mouse to a bear. A bouquet of various flowers – garden and exotic – looks great.
Use Cases
Depending on how you paint the stone, it can become a bouquet of flowers, a cute animal or a gnome. If the stone has a round shape , this is an ideal option for turning into a lying animal, berry or insect. Sometimes the cobblestones already resemble something. Paints will help highlight the features inherent in a ladybug, animal or flower.
For a pond you need to use large boulders. You can paint them with Japanese carps or water lilies, frogs and other aquatic life.
Recommended paint for working with stones
The goal of painting is to create a good layer with clear lines, details and the necessary contours.
Different types of paints are suitable for the job.
| Type of paint | Peculiarities |
| Gouache | It has a liquid consistency when diluted with water. When applied in its pure form, it creates a too thick layer that can crack in the sun. |
| Acrylic | When applied to a primer layer, it creates a dense layer and gives a clear outline. The pattern does not crack or fade. |
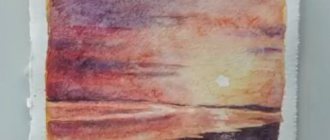
| Watercolor | It has a liquid consistency, does not give a clear pattern, and fades under sunlight. |
Auxiliary tools are felt-tip pens, liquid eyeliners, and gel pens. The last fixing layer that can preserve the design is a layer of varnish. Varnishing prevents the image from cracking or fading.
See also
How to properly paste wallpaper on water-based paint step by step and is it possible
Useful tips
If you want to try to decorate stones in a decorative way, you need to follow several recommendations. This is necessary in order to get a more beautiful result without spoiling your mood:
- It’s better to use pre-prepared clothes that you don’t mind ruining. Very often, professionals purchase an apron.
- There is no need to look for perfectly shaped stones. The more prominent the workpiece is, the more beautiful the final result will be.
- To paint small details, you need to use only a thin brush. Thick ones are suitable for creating an overall texture on the material.
- It is not necessary to use expensive paints. To begin with, you can use ordinary children's gouache or watercolor, which is quite easy to find in any baby store. But if the creator wants to achieve more brightness, it is best to use acrylic paint.
- Once a person has learned about standard painting technologies, he can conduct his own experiments with the palette. For example, it is advisable to try mixing different colors yourself to give more saturation to the picture.
- After the workpiece is completely ready, we must not forget about applying high-quality varnish. This is especially necessary to do in the case when the product will be placed in a summer cottage where the sun's rays spread. The varnish should also protect against rain.
Recently, a large number of master classes on this type of hobby have appeared. You can find a suitable option on the Internet and attend a lesson to gain more experience and communicate with like-minded people. It is precisely such acquaintances that often help artists promote their works to exhibitions.