Preparatory part
To create an exceptional, special piece that will delight the eyes of those passing by in the garden, light pebbles with a dense and smooth texture are selected. Sea pebbles are like that. It is carefully washed with water, baking soda and soap and dried (preferably in a warm place, not with a towel).
For a light and smooth paint coating, it is advisable to apply a layer of solution mixed from PVA and water in equal quantities. For painting on stones, it is preferable to use paints that are most resistant to weather changes and do not wear off.
Acrylic corresponds to these properties, but you can use gouache, watercolor, or paint specializing in painting ceramic ware. In case of an erroneous smear, a solvent will come to the rescue.
Brushes and rollers will come in handy. Protect the work area with oilcloth and paper. Wear special clothing. When finished, coat the work with acrylic or clear manicure varnish. This will add shine and provide protection from environmental conditions.
How to choose stones
The best option for decorating a garden is sea pebbles of regular shape, polished by waves. It does not have to be pre-treated with PVA glue. Usually light, smooth stones are selected to create a neat, distinct pattern so that the paint lays down in an even layer. They should be small in size with a flat base so that they can be easily and steadily installed on the site.
In some cases, a porous material that absorbs pigment well is more suitable. For volumetric compositions, you can find large stones right on the site. Depending on the design, not only ideally smooth, but also complex geometric shapes will be useful for realizing fantasies.
If you can’t find it, no problem
If you couldn’t find a suitable stone for the expected design, you can make it yourself. Water and sand are mixed in a basin. Excess liquid is drained. Once all the moisture is completely absorbed, a hole is made in the sand, shaped with the necessary outlines.
A plastic film is spread over it and diluted cement mortar is poured with the addition of any coloring pigment. The top is covered with oilcloth and pressed with a sufficient layer of sand. All that remains is to wait for the cement to harden.
Creating shapes and volume
Even new painters can do this task easily. However, stones need particular depth of design. It is important for them to ensure the realism of the rock, and the play of light and shadow is also acceptable. A suitable likeness is a cube, since this needs to be dealt with with a light shadow to show its multi-dimensional nature. The top edge is considered to be very exposed; direct sunlight falls on it.
Painting stones for the yard
An easy and cheap option for decorating a dacha or garden plot for beginners step by step:
- Choice of material.
- Drawing up a sketch.
- Choice of paint and brush.
- Transferring the sketch to the cobblestone.
- Fixing the image.
Drawings on stones with acrylic paints come in a wide variety. It is better to choose such a dye for a number of significant advantages. It does not fade in the sun, does not crack over time, is not toxic, does not stink, dries in a short time (about 15 minutes), is not dissolved by water (and therefore rain) and is not afraid of various temperatures (from the heat of the sun to the frost of winter) .
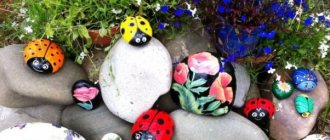
If there is a ceramic figure of a gnome or other fairy-tale hero in the yard, then a magic house will be useful for it. So he will have his own home. For the tower you need a large boulder with an elongated oval, slightly pointed shape. For effect, you can form a path leading from the threshold.It’s not difficult to imagine how to draw a stone, the usual parameters for animal lovers. These are any representatives of the fauna: a cat curled up in the shape of a ball or a dog; snails with their shells on their backs; deer or foxes; any insects with or without wings.
Note!
Wood burning for beginners: tips and secrets for burning pictures
Plasticineography - interesting options for creating pictures from plasticine on cardboard for children
DIY scrapbooking for beginners: what it is and how to do it. What you need to create a beautiful album or notebook (photo + video)
Sometimes, it’s enough to schematically outline the tail and muzzles, complete the eyes and ears, and it will be clear. The main thing is to choose a place on the grass so that they don’t get lost there.
Painting flowers on stone will add brightness and richness to the flowerbed. Tulips, roses, peonies will create a feeling of blooming all year round. Wildflowers: dandelions, forget-me-nots, cornflowers will add romance to any yard.
Fantasies can be anything. Drawing water waves, splashing fish, croaking frogs and water lily leaves on the stones will create a reservoir or pond.
Another useful application is to determine terrain zones. You just need to place and evenly distribute them in the form of borders and paths.
Sequence of painting
The order of decorating stones requires a certain sequence of actions:
- creating a sketch of a drawing on paper,
- thorough cleaning of the material for work,
- surface primer (white paint and PVA glue in a 1:1 ratio),
- complete drying,
- drawing with a pencil the elements of the future drawing,
- layer-by-layer application of appropriate colors of acrylic dyes,
- tracing the contours and details of the picture,
- coated with a transparent protective varnish.
The painting technique is simple and accessible even to children.
Stone crafts for indoors
Indoor works can become a harmonious part of the interior and Feng Shui. Inexperienced artists can use stencils or regular masking tape and combine any colors into geometric designs.
Note!
How to make a craft with your own hands: what you can do with your own hands at home
DIY foam crafts: snowman, Christmas tree, sculptures, original figures with instructions (photo + video)
Papier mache from egg trays, boxes, cassettes: the best ideas on what can be made from egg packaging
Simple children's figures and applications
The simplest crafts from sea stones or any other analogues are not difficult to make. The most important thing: come up with an idea. To implement it, you will need to take a good look at the existing material.
Surely, there will be pebbles of all kinds of formats. Select options that can serve as details.
It can be:
- Pens,
- legs,
- Ears
- And other parts of the reproduced object.
Next, the elements are secured in the chosen method. Typically, glue is used for this purpose, designed for reliable fixation of solid objects.
How to paint a pebble with a strawberry, the following instructions
We stock white, red, black and green paints, gray pencil, varnish and thin synthetic brushes of various thicknesses. The stone must first be coated with a primer and wait until it dries.
Then it is painted red, and leaves are drawn on top, and the outline is filled with green. Using a thin brush number 1, apply small black stripes over the entire surface. White ones are drawn next to them. When everything is dry, cover with a fixative.
There are many uses for this strawberry. Can be a separate item on a souvenir shelf. If you glue a magnet to the flat side with superglue, you will create a unique composition on the refrigerator door. Part of the style may be a vase or jug filled with pebbles. All kinds of drawings are possible on them: butterflies, patterns in the Gzhel style, skulls, birds, pandas, elephants, dolls, penguins, turtles, Teletubbies, landscapes, sheep, emoticons or miniature plot painting.
Creating a Large Boulder
To understand how to gradually create a pencil drawing, you should carefully read the instructions and mentally imagine the result. But it’s worth giving a clear example. For the image, you need to rely on a 2B pencil; you will need to highlight the shadow areas. The light elements of the painting were created using an F pencil.
Stages of work
The sketch is created based on small markings. Focuses on the appearance of recesses, shadows and recesses. It is these details that are drawn in dark color. After creating the supporting moments, you should rely on a collet pencil with a curved version of the cut.
Shadow strokes are applied throughout the layer, using flat and even strokes. A 4H pencil is used for light elements and 2H for dark elements. During the work, the technique of lighting planes and corners is used.
The most difficult step: creating the surface texture of the boulder. You also need to rely on small lines to highlight pits and irregularities. The diagonal mark allows you to easily display wide and flat lines. The features of the stone are emphasized, since they all have their original shape. The drawing is actually ready. Can be used as a background or as is.
Drawing a bird on the stones (step by step)
- First, an oval is depicted, with a slight slope - the body.
- A circle is drawn at the top - the head.
- On it is a triangle with a stripe - a beak.
- An eye is drawn randomly.
- To the bottom of the oval there are three inclined segments tending to one point - the tail.
- The legs and wing are being drawn in.
- There is a drawing, all that remains is to color the chick.
Cacti in a pot
Having bought small pots and poured sand into them, inserted elongated pebbles, painted completely green with white dots and suns, bright and ever-living cacti will delight you on the windowsill.
little people
The composition of the Cheerful Family will look funny in any room.
To create it you need a minimum of action and talent. Glue small oval pebbles in a vertical position to the large stone. Draw eyes for them and cover them with varnish. Ready! Note!
- DIY vase: step-by-step photo instructions, master class for a beautiful and unusual craft
- Paintings from buttons, panels, appliques and compositions with your own hands: how to make flowers, a butterfly, a fish or a tree craft from buttons
- Flowers made of wool (85 photos) - how to felt a flower from felt or a wool brooch. Step-by-step instructions for beginners
Everyone can choose for themselves which paintings from stones with their own hands are best to make for their bedroom or living room based on photos on the Internet or books about crafts. Their highlight is volume and texture.
How to build a palette correctly
Painting a small stone usually requires very little pigment. To avoid excessive consumption and drying of the dye in the container, you need a palette. It is not recommended to use special agents that stop thickening: this will lose some of the qualities of the paint. Using a palette will give you the opportunity to work slowly, without fear of the material drying out. It is permissible to squeeze out the strictly required amount of paint onto it and add as needed.
You can easily make the device yourself:
- Take a regular plastic container for food (the size depends on the number of flowers).
- Cover it with a napkin.
- Soak it with water.
- Place a little paint of the desired shades into this device.
After finishing or stopping painting, cover the top of the homemade palette with wax paper so that the moisture does not evaporate and the dye does not dry out. Some craftsmen place the container in the refrigerator. The work can be continued at any time, the paint will not be lost.
Shall we play?
In addition to visuals, many things can be adapted in games. For example, 2 sets of two colors, 5 pieces each, plus a drawn field of four segments intersecting in pairs and “tic-tac-toe” will delight everyone - both adults and children.
Taking a checkers board and 24 granites of two colors, you can play checkers with a partner. Every chess player will quickly figure out how to draw on the chips for playing chess.
If you can find 28 small, approximately identical, flat pebbles, you can play dominoes. How to decorate them? You can make all possible combinations of numbers from one to six in pairs or double combinations of six different colors.
If you draw letters, you can study the alphabet with your children and put them into words. If you have the patience to paint a considerable number of stones like this, you will be able to play “scrabble”.
The favorite game of many children is “shop”. Products can be made in any way. A special variety for a vegetable shop: oranges, tomatoes, potatoes, cucumbers, apples, cabbage... When weighing goods on scales and paying for them with cash slips at the checkout, the children learn to count.
For role-playing games, in order to act out full-fledged scenes, you can manage to arrange the pebbles so that you get entire stone cities, parks and zoos.
Anything
Drawings on pebbles in the form of snowflakes with a mini greeting will be a mega original postcard to your loved ones for the New Year or Christmas. Tank, camouflage, Russian flag for February 23. A bouquet of flowers and a bottle of champagne for March 8th.
Hearts and dots for Valentine's Day. Chickens hatching from eggshells for Easter. Ghost, skeleton, pumpkin for Halloween. For your birthday, you can put together a whole collection with inscriptions of wishes or inspiring quotes, or just a creative and funny collection in the form of the birthday person’s favorite theme, and present it in a magic jar or box.
With children, gouache drawings on stones become light, cheerful and pretty. As a result of this art therapy, environmentally friendly toys are obtained, unlike plastic ones. Even a standard portrait of a family on paper can be transferred to several sea pebbles and it will be very extraordinary.If you get even more creative, you can glue three-dimensional parts, for example, made of cardboard, plastic and felt. For a frog - legs, for a crab - claws, and so on. Then the crafts are obtained in 3D format.
Panel of birds on a tree
It is not necessary to limit yourself only to stones when making crafts. Use twigs, leaves and preserved moss to create an environment.
What you will need:
- stones;
- paints and varnish;
- glue;
- branches, leaves, cones or moss;
- large photo frame.
First of all, you should prepare the background of the panel - on a sheet of paper or the back wall of a photo frame, draw the sky, forest or city, to your taste, this will set the atmosphere of the picture. Then place the branches on the picture so that they form a tree or part of it, securing them with glue.
For foliage, you can use real leaves, cut out of paper and painted, or stabilized moss. Draw birds on the stones and place them on branches, also securing everything with glue. The panel is ready, you can take the masterpiece to school!
IMPORTANT! If you allow your child to use stabilized moss, ventilate it before use and monitor the creative process. Despite the general safety of the material, it may have an unpleasant odor and should not be eaten under any circumstances.
Ladybug
One of the simplest crafts for kids. Here you don't need a lot of materials, just pebbles, paints and varnish. You can also add wire feet, but this is not necessary.
First you need to measure the head, eyes and wings on the stone with a simple pencil to make it easier for the child to paint. Then you can start drawing; here you will need only three colors - red, black and white. Paint the head and body with the first two, and use white paint to mark the eyes and mouth of the bug.
Composition horse
Here, just like with birds, you can use a background with a background on which your horse will gallop or graze, or you can create a three-dimensional composition.
For the second option, use a sheet of thick cardboard as a stand, on which you place a thin layer of stabilized moss, it will serve as grass. In addition, you can make several trees from twigs, placing them in the background.
To make the horse itself, you will need pebbles of three sizes: very small for the hooves, large for the body, and medium for the head.
Also needed:
- thick wire;
- glue (it is advisable to use a glue gun);
- yarn for the tail and mane;
- paints.
Cut the wire into 5 pieces, four of which will serve as legs, and the remaining one as the neck. Bend each of them a few millimeters at an angle of 90 degrees and fasten the wire with the pebbles using hot glue. When it hardens and the structure becomes stable, start painting, there are no rules here - everything is limited by the imagination of the creator. Finally, glue the yarn as the mane and tail. It is also better to secure the horse on the stand with glue.
Additionally: If your little one loves fairy-tale creatures, use bright colors and multi-colored yarn, and also add a horn to the horse. Now a fabulous unicorn will graze on the field.
Fridge magnets
Any of the painted pebbles can be used as a refrigerator magnet - just glue a special magnetic strip to the back side. And if you use crafts from the first point - letters and numbers - then learning will become even more convenient and fun.
Foot mats
Many doctors claim that walking on stones is very beneficial and can replace foot massage. In this case, this rug will be a useful craft. The main thing is to choose only smooth pebbles without chips and cracks, so as not to injure your feet later.
For the base, you can use the simplest rubber bath mats; it is convenient to glue the material onto them.
It is best to use pebbles of different sizes to maximize the effect of this massage. There is no system here, just place pebbles randomly so that they cover the entire surface of the mat. It is better to avoid dyeing and leave the natural color of the material.
Cacti made from stones
What if you don’t have the time or desire to grow plants, but a little greenery in the interior wouldn’t hurt? Combine the process of creating crafts with benefits for the family. Stone cacti are a great home decoration.
You will need:
- shallow planter;
- large pebbles;
- paints;
- varnish;
- small pebbles or sand.
The creation process is very simple. Large stones must be painted green and the needles and pattern marked with white paint. After drying, coat the pieces with varnish to extend their life.
You need to fill the pots with sand or expanded clay and then stick the finished “cacti” into them.
Constructor made from pebbles
A great option for developing fine motor skills and a sense of balance would be a construction set made from natural stones. This is probably the easiest craft on the list because the only thing you need to do is paint the pebbles in different bright colors. After drying, you can begin the competition and find out who can build the tallest and most stable tower.
Mosaic of stones
Another simple craft for younger schoolchildren. On thick cardboard you need to draw an ornament or any picture that will serve as the basis for laying out the mosaic. Here you can use both painted small pebbles and semi-precious stones of different colors. The complexity of the execution depends on the detail of the design and the size of the materials used.
Houses made of stones
Humanity has long been using natural stone to build housing, why not repeat this on a smaller scale for children. With the help of stones you can build an entire play town or castle, it all depends on your child’s perseverance.
There are a lot of options, you can simply paint large pebbles in the shape of houses, or you can use glue to build walls. For the roofs of such buildings, small branches tied together are great, and doors and windows can be made using popsicle sticks or cardboard.
As you can see, there is nothing complicated in making crafts from stones; you can choose the option that suits you in terms of time and materials. Don't be afraid to create and awaken your children's imagination!
Recommendations on how to beautifully color a drawing
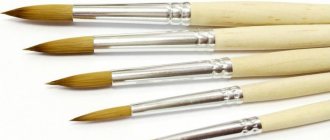
When choosing acrylic paint for stone, synthetic or nylon brushes are needed. Natural wool with its assistance will be destroyed.
There are exceptions when porous minerals are better, when making something with pores or holes, for example, a piece of cheese.
To prevent acrylic from hardening, use a palette and small portions.
When working with professional paints, finally bake the product in the oven for firing. This way the drawing will last longer and without cracks.
The materials are sold in both art and construction stores.
When using metallic acrylic paint, the painting will acquire a pleasant-looking shine.
To add volume to individual details, you can use a felt-tip pen.To draw a contour, use a white or black contour pencil opposite the background.
Where to begin
If a master class is being held for novice artists, especially in the case of a younger age group of students, it is necessary to explain how to correctly convey the shape of various stones.
Although in most cases it is not necessary to distinguish the rock, it is enough to designate the background based on inanimate elements. But, if a seashore is depicted, it is impossible to do without highlighting pebbles or rocks, it depends on the chosen landscape.
Therefore, it is worth figuring out how best to present the picture to the viewer: a boulder, a dolmen, a rock, a mound of stones covered with moss, pebbles, granite, slate, sandstone, limestone and various formations as a result of a volcanic eruption.
We will rely on creating step-by-step instructions for children. After an introductory explanation of the characteristics and types of stones, options for their use can be suggested.
Photos of drawings on stones
Please repost
0
