If your dacha has a fireplace, a potbelly stove, or at least a barbecue grill, you should always have a supply of firewood, which should be stored somewhere. Of course, you can simply stack the logs against the wall of the house, but in this case they will quickly become damp and will look sloppy.
It is better to build a beautiful and convenient shed for firewood - you can use available materials for this, so that construction will not result in large expenses. This article will help you make a woodshed at your dacha quickly and efficiently.
How to make a shed for firewood with your own hands
To protect firewood from moisture, it is necessary to build a firewood shed in a house outside the city. Nowadays, everyone has modern heating, and you can’t do without wood when lighting a barbecue, grill, or barbecue. A well-made structure will keep the wood dry and ensure its quality.
Next we will talk about how to create a woodshed with your own hands. You will find that it is quite simple and quick, not counting the time it will take for the foundation to harden.
What are there
A sheet of metal will protect the walls from woodworms (wooden ones, of course)
. If you do not pay attention to the size, there are two types of sheds for firewood - attached to the wall of a building or standing separately. It is clear that it is easier and faster to install, but this is not always possible. Or rather, not with all buildings: it is dangerous to attach to wooden walls
And not only from a fire safety point of view. With the firewood comes a whole army of wood-boring beetles, which will happily take on your home. Therefore, it is better not to attach woodsheds to wooden buildings, even with wood treated with bioprotection, but if you really want to, then nail an iron sheet to the wall. As in the photo. It should be larger than the size of the woodcutter. Then all the bugs (most of them, for sure) will remain in the firewood.
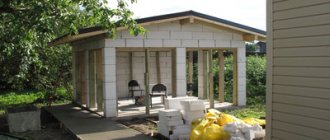
Free-standing firewood sheds can be completely open - several pillars, a couple of lintels and a roof. The main thing is that the roof is large enough: it is advisable to make larger overhangs. And the rest will be completed by air and sun. They say that they dry no worse than in more closed structures. In regions with heavy snowfall, to prevent snow from getting inside for the winter, sheets of plywood are attached (attached) below. They are removed in the spring.
How are walls made?
More often, woodsheds are built with lattice or slotted walls. It is better if the boards are stuffed at some angle - like blinds. Then, even with oblique winds, little precipitation gets inside. But even if the boards are filled at some intervals, everything dries well.
Boards/slats are placed on the frame mostly horizontally, sometimes vertically; they also make lattices from thin planks or place them diagonally. In any case, there should be a lot of cracks for ventilation.
Vertically stuffed planks are rare. This is a woodshed with a pitched roof
Does the drying speed depend on the method of installing the planks? No comparisons have been made, so it’s difficult to say for sure. But one owner claims that if you lay the boards diagonally (he has 10 cm with a 2 cm gap), with each wall in a different direction, it dries faster and faster: in a month.
About the size of the slots: they are made from 2 cm to 10 cm. But it also depends on the width of the board. If you leave the gaps very wide, snow will sweep in a lot. If there is little snow or you are not concerned about the amount of snow, you can fill the boards less often. It's also more economical.
Beautiful woodshed for the dacha
Not all woodsheds have doors (those with doors are also called “woodsheds”), as in the version in the photo. Often there is not even a front wall: this allows for more active ventilation. The front wall and doors are needed if stealing occurs in your area, but in general you can do without them.
Log location
Now a little about the structure of the woodshed. If it is small and everything fits in one row, then there are no special problems - everything is accessible. But if large volumes are loaded, it is better to divide the area into sectors into which batches of firewood will be loaded. Thus, previously imported and already dried out ones will not be covered by fresh ones.
It is better to divide the area into sections, so that you can go inside
If the woodshed is square, arrange the sections so that you can reach inside to remove the driest logs. To do this, a passage is left in the middle. In terms of depth, it should not be up to the wall, but it is advisable that only one, or maximum two, rows of logs separate you from the wall (and in general it depends on the volume) - this way they will all be accessible. It’s easier with rectangular ones: they are simply separated by non-sectors by a partition. For example, as in the photo.
This is a large shed for firewood - each section fits one car - about 4 cubic meters. The back wall is not solid; if you look closely, there are holes there.
And a little about height. You don’t need a large woodcutter for a (seasonal) dacha. All you need is one or two cubes for heating in the fall/spring, and even then only for the weekend. But if you have to heat a house, and even a bathhouse, you will have to build something solid. Then, regardless of the layout - long or square, the height is about 2 meters. With average height, you can load it almost to the ceiling. but there should be a ventilation gap at the top.
Making a shed for firewood on your estate with your own hands
The process of self-building a shed for firewood at the dacha does not require expensive materials at all. You will need:
- timber
- Rounded log
- Boards of various widths
- A mixture of cement, sand, gravel
- Roof covering
You can also build a wall shed for storing firewood.
Types of woodburners
There are not so many different schemes and designs of rooms for storing firewood, but there is nothing wrong with that. In fact, everyone who built wooden woodsheds for their dacha with their own hands chose the simplest, most convenient and reliable schemes. Beauty is not particularly required here, the main thing is reliable storage and a convenient way to store and select firewood in winter. And, of course, simplicity is important so that you can build quickly, and not sit in the evenings and plan step by step the construction of a firewood shed with your own hands, as if it were a house and not a shed.
Typically, firewood storage structures are divided according to storage method into several main types:
- A portable or small firewood rack, used for storing small logs and logs stacked in one row. There is no roof or sides. In essence, this is an improvised rack made of timber and boards, on which a small supply of firewood in the country is laid out for drying;
- Freestanding woodshed. It is built according to the same scheme as the barn. Despite its apparent complexity, this type of firewood maker can be made by yourself without any problems;
- Wall-mounted firewood burner, often used in dachas with sheds. In this case, the woodpile is laid out in one row across the entire width and height of the wall.
Important! It is believed that this installation method will serve as additional insulation and thermal insulation for the walls. Many dacha owners prefer to build a woodshed with their own hands according to this scheme, which is not always justified
The woodshed looks unusual, but such a design is noticeably more hassle than it’s worth. Firewood brings garbage and pests into the yard. In fact, with this arrangement, the firewood dries only on the sunny side of the dacha; the rest of the woodpile picks up moisture in winter and often freezes. Therefore, experienced summer residents prefer to build a firewood shed at their dacha with their own hands in a free-standing version. It’s more hassle, you have to go farther to get firewood in winter, the quality of the fuel is much better.
It is best to place the woodshed on poles at a distance of at least five meters from the cottage
For summer dachas, it would be correct to make a portable type of woodshed; the supply of firewood is usually small, and most often it is necessary to store it under the porch or next to the stove. In this case, any available material is used for construction, from old boards to metal corners, roofing scraps, barrels, slabs and timber.
Let's choose a place for the canopy
The location of the canopy is of great importance for the future safety of firewood, so when choosing a location we follow the rules:
We give preference to places on a hill so that after rain puddles and moisture do not form here. It’s good when the firewood is dry and flares up immediately. To achieve this result, you need to place the shed in a sunny, drafty place, where it is best to store firewood.
If the woodshed is still in a recess, then it is necessary to create outlets for water.
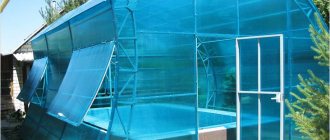
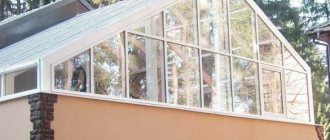
An alternative or just beautiful firewood sheds on a summer cottage
If you do not have the time to build a firewood shed yourself or you simply do not have the desire to do this work, you can use alternative options: designs of a different profile. They are excellent for storing wood supplies.
The most popular alternatives are:
Structures from warehouses used to move various goods - pallets. Usually they are folded into a cube and attached to each other. And the top is covered with roofing felt or film.
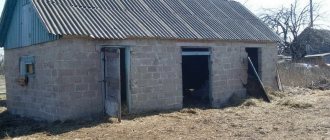
Not used rabbitry. The grids and doors that form its front side are removed from it. And after this you get a good woodshed for storing firewood.
ce3c6f6eec739b7f928a732b12ef2525.jpe
2f2b1d47a3d3bed71ecdc255e742d4e4.jpe
1f62c6c9bee56951c955375527ddbb61.jpe
1117b3a665674153b075ddc53f093daf.jpe
Firewood rack:
This option is reminiscent of the famous Kallax shelving unit from Ikea.
Firewood shed project
This construction is not at all tricky, it is easier than building a shed, so the project of creating a woodshed in the country is quite simple. But you will need a drawing.
To create a drawing, follow the plan:
- We measure the area for construction in order to understand what dimensions and geometry the future canopy will be.
- We transfer the idea to paper and arrange all the dimensions.
- In accordance with the drawing, we select the material and calculate the required quantity.
Important! You can mark the work area with pegs and a cord stretched across them. Of course, you can draw markings on the ground, but it will quickly get trampled and this will cause inconvenience.
Wood shed
The easiest woodshed to make is made from timber and boards. In terms of its design, it looks like a small shed with a pitched roof, but with “slitty” walls.
The construction algorithm is as follows:
- Site preparation. They select a place on the site, remove vegetation, carry out markings, and determine where to install the pillars for the foundation.
- Installation of a columnar foundation. Remove a layer of fertile soil at the site where the pillars are laid. The bottom of the pits is compacted, a sand and gravel cushion is filled in, pillars made of building blocks are installed and leveled. If the soils are wet, then folded pieces of roofing felt are placed under the blocks.
- Installation of the lower trim. Sheets of roofing material folded in half are laid on the blocks, on top of which a lower frame made of timber with a cross-section of 100x100 mm is laid. For proper installation of the strapping, use the simplest type of corner connection of the beams - into the wood floor. For greater reliability, each beam can be secured to the blocks using anchors.
- Installation of racks. The racks can be made from timber 100x100 mm or 100x50 mm. The front and rear pillars are made in different lengths. For an extension, the front pillars are made shorter than the rear ones; for a detached building, vice versa. The racks are aligned vertically, each is fixed with a pair of temporary jibs, then attached to the lower frame using metal corners and screws.
- Installation of the top trim. First, grooves “into the floor of the tree” are pre-selected on the ground on each beam of the top trim. As for the lower crown, a beam with a section of 100x100 mm is used here. First, the strapping elements are fixed to posts of the same height - for this, a temporary fastening in the form of a perforated metal strip is used. Then the transverse elements of the strapping are fixed. Check the angles and levels, adjust if necessary, and finally secure the top trim to the racks with corners and self-tapping screws. Remove the jibs and temporary fastenings.
- Installation of additional racks. These are stiffeners that take part of the load from the roof. They are also necessary for attaching the fence, and, if necessary, for installing the door. Typically, the spacing of elements should be at least 500-600 mm, but in each case it depends on the length of the fence board. For additional racks, use a beam with a cross section of 100x50mm. Fastening to the harness is carried out with metal corners and screws.
- Installation of a pitched roof. First, the rafters are installed - the load-bearing elements of the roof. To do this, use a beam with a cross section of 100x50 mm. The length of the rafters should provide the required roof overhang (one way for an extension, two sides for a free-standing structure). Typically, such an element is installed on an edge so that the roof does not sag under its own weight and snow. But if the woodshed is narrow, in one or two stacks with a total width of 1 meter, then the timber can be laid flat. Then the roof sheathing is installed. The type of sheathing (solid or row) depends on the type of roofing materials. For a metal roof, roll waterproofing must be laid on the sheathing. The simplest type is roofing felt, rubemast or similar materials made of fiberglass impregnated with bitumen. For slate or ondulin, there is no need to install waterproofing.
- Laying the floor. Usually this is a classic wooden floor on joists, but with gaps between the floorboards (they are necessary for ventilation and drying of firewood). If the woodshed is narrow and there is no need to walk inside it, then the boards are laid across and attached directly to the beam of the lower frame. For a “full-fledged” barn, it is necessary to lay logs, the pitch of which is chosen depending on the thickness of the board.
- Installation of fencing. For cladding, use a regular edged board 20 mm thick. As an alternative, you can use ready-made panels from used pallets (Euro pallets).
- Treatment. All wooden structures outdoors, including the woodshed, must be treated with an antiseptic. And in order for a firewood shed to last a long time, it needs to be painted.
Formation of the foundation
The foundation is suitable from six to eight columns, it all depends on the size and shape of the planned guide. We dig holes: diameter – 0.3 meters, depth – 0.5 meters. Along the edges we make formwork with a height of 0.1-0.15 meters. Next, fill everything with a mixture of cement, sand and gravel. The foundation will harden in approximately 4 days. Before drying, everything is covered with polyethylene.
When the foundation is ready, we install the piping. It is formed by a beam with a cross-section of 15x15 centimeters. They are fastened together with a notch and steel corners. We use anchors to fasten the strapping across to the concrete. Using a steel angle, stiffening ribs for the deck of the structure are attached.
Stages of woodpile construction
Before starting work, the wood must be treated with an antiseptic and well soaked in drying oil. Iron must be cleaned of rust and coated with a primer.
The construction of a country woodshed is carried out in the following sequence:
- Installation of supports. Steel or wooden supports are immersed in pre-dug holes and carefully leveled. For this purpose, supports and braces are used. Concrete mortar is poured into the hole or broken brick mixed with sand is poured. Concrete needs at least 5 days to harden. If stone backfill is used, then construction can continue immediately after compacting it.
- Making the top and bottom trim. These structures will be the base for the floor and roof of the woodpile. Steel pipes are held together by welding. The wooden beam is inserted into the grooves of the supports and fixed with nails.
- Pallet assembly. It is made from timber, which is nailed to the bottom trim at intervals of 10-15 cm. To prevent the pallet from sagging, it is advisable to place bricks under it, covered with roofing felt on top.
- Roof arrangement. It is best to make a simple lean-to structure. The roofing material is laid on a sheathing made of timber or steel pipe. To prevent water from flowing in, the roof slopes must be moved 30-40 cm beyond the edges of the woodshed.
- Sheathing the frame with slats, carrying out minor finishing work, installing windows and doors. You can store garden tools and other property in a closed woodpile.
The final stage of building a woodpile is decorating and painting it. If you have time, desire and imagination, it can be turned into a real fairy-tale tower.
Finishing and covering the firewood shed
Using corners, we install racks in the corners of the frame, which act as supports for the roof. The side and rear wall cladding is also attached to them. During the work we check the building level. The outside of the racks is covered with boards (15 centimeters) with an interval of 15-20 centimeters. We attach logs on top for covering.
Important! Only the roof of the firewood shed is solid. The walls and floor should be in the form of a lattice to provide ventilation to prevent rotting.
The slopes on the roof should be made as wide as possible so that the firewood does not get wet in bad weather.
Construction legislation standards.
Installing a shed for firewood near the property line with a neighbor raises some doubts.
As the norms of construction legislation indicate, in the case of a land plot on which a residential building is located or intended for residential construction, in accordance with Art. 29, paragraph 1, paragraph 2C, you can install a canopy with an area of 50 m2 without any formalities.
Moreover, the total number of such canopies on the site should not exceed two for every 1000 m2 of site area. However, as regards the possibility of its location, this depends primarily on local development regulations, which may determine the local improvement plan.
A shed is theoretically considered a construction project that does not perform a useful building function, meaning it does not need to be set back 3 or 4 meters from the boundary like a house. But if we want to store wood there, it is necessary to take into account the provisions of the regulation on the technical conditions that buildings must comply with and their location in the field of fire protection of buildings.
As stated in § 4, paragraph 1, paragraph 6, it is prohibited to store brushwood and other flammable materials outside the building at a distance of less than 4 meters from the border of the neighboring plot.
This means that the shed must be set back from the boundary unless it has a fire-resistant barrier on the side of the adjacent property. These requirements are not important for woodshedders, but only if they do not have walls.
Don't be greedy, share with your friends;)
What it is?
The woodshed is a simple structure, but with many nuances that must be taken into account. Woodburners have existed for thousands of years, exactly since there were houses that needed to be heated during the cold season. These objects are functional; they often also carry an aesthetic meaning. In our era of the existence of innovative materials, zealous owners manage to turn these technically simple structures into real works of decorative art. Craftsmen even manage to make a woodshed not only a fuel storage facility, but also a gazebo, greenhouse, workshop, etc.
The simplest design that can be found in any rural house is a woodshed in the form of a canopy. It is not difficult to construct such a structure. In any private household, such an object is necessary; it is difficult to live without it, because dry firewood is always needed. Woodsheds are often made in a barn, but there must be ventilation there. If the household is large and a lot of firewood is required, then a spacious building with a large area should be built to store it.
Most often, rural residents and summer residents use used wooden materials to build an object. Old beams, boards, beams, window frames - all this can be an excellent building material for creating a high-quality wood burner that will serve for decades. First of all, you should choose a suitable site for it. It is recommended to proceed from common sense.
Construction begins with site preparation, which is cleared and leveled. Then the work is done according to the following algorithm:
- the groundwater level is checked;
- the level of the gravel cushion is determined;
- pits up to 40 cm deep are dug in the corners;
- Guides are installed in these holes and filled with concrete;
- the guides are attached using diagonal bars or parallel crossbars.
The bars are laid out in the lower part, the strapping is made
It is important to consider that the perpendicular posts must be of different heights. If the roof is pitched, then the angle should be at least 20 degrees
Once the posts are in place, you can make the roof. The top trim is made using timber and boards. The rafters are laid and the sheathing is made.
Dry firewood is a rather heavy material and it is inconvenient to carry it in the cold season, so having a supply of such a valuable product close to home is the right decision
It is also important to provide good access for transport. Firewood will sometimes need to be delivered by car, so it is important that vehicles can easily enter the property’s territory
The woodshed should be located on a “cushion”, that is, on a hill of about 15-20 cm. So the firewood on the lower rows will not absorb moisture from the ground, and therefore will not rot.
Often the woodshed becomes an extension to the main structure on the site, that is, it can additionally protect the wall from the cold wind. If you apply imagination and skill, you can make a wonderful landscape object out of it, distinguished by originality and taste.
Installation of a free-standing woodshed
The design of the product is similar. The difference is in two points - the canopy can be beveled in any direction, a foundation is required.
Please note that the diagram is similar to the previous one and can be used for a firewood shed adjacent to the house. Elements of longitudinal and transverse strapping have been added here
If desired, you can make the wall cladding continuous or sparse, including the front wall, and additionally hang the door.
The foundation in this scheme is shallow blocks or a shallow strip foundation.
The scheme with a gable canopy is also close to the previous one.
In this option, there is no sheathing as such - its role is played by crosspieces made of timber on the side walls of the woodshed. Instead of individual rafters, simple triangular trusses are used, and the role of the longitudinal strapping is performed by rafter beams at the top and timber flooring at the bottom
If trusses are used for a gable roof, they are assembled separately using a template and only then attached to the frame. Another difference between a design with a gable roof is that the ridge needs to be protected from leakage. For this purpose, additional elements are used, which can be purchased complete with roofing material.
Attaching the frame to the foundation
If the firewood shed is installed separately on a foundation made of concrete, brick or blocks, it is necessary to properly attach the wooden or metal frame to the foundation.
There are several options:
- mortgage with a U-shaped holder, used for monolithic bases. The mortgage is installed at the pouring stage, the frame is fastened after the base has reached its design strength;
- anchor bolts (dowels) on top of the waterproofing. To increase the service life of the support (crown) beam or board, lumber is impregnated with an antiseptic;
- studs to the foundation over the waterproofing.
The last two methods are applicable for both monolithic and block foundations. The first method is suitable for block bases to a limited extent, only when using a fastening profile with a supporting plane.
When using a foundation, there are two options for the installation sequence:
- first secure the racks to the foundation, then assemble the frame;
- fasten on the base of the post of the already assembled frame.
The first option is convenient for small point supports with already concreted embeds, since otherwise it is difficult to guarantee the correct placement of the posts. The second method is universal.