For leveling backfill, expanded clay gravel of a specially selected fraction (to reduce shrinkage), which is laid on top of a vapor barrier film and leveled along the beacons, is best suited. Next, lay sheets on a gypsum or cement base (most often GVLV 12.5 mm thick); they are laid in two or three layers and fastened with screws, and then the joints are puttied. It is also possible to use ready-made two-layer floor elements with stepped edges. "Knauf"
When installing a dry backfill screed, first of all, a polyethylene film is laid on the floor, extending onto the walls with an overlap of strips of at least 10 cm. This layer will prevent the backfill from being moistened by vapors penetrating through the ceiling from the lower apartment
"Knauf"
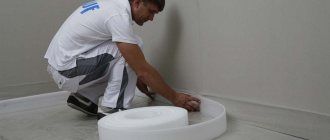
Then the screed is isolated from the walls using a strip of polyethylene foam
"Knauf"
Calibrated expanded clay gravel is poured. The use of ordinary expanded clay is undesirable, as it will cause significant shrinkage
"Knauf"
The backfill is leveled using beacons and a slatted bubble level, and then two-layer GVLV floor elements are laid on top
"Knauf"
Almost immediately after this, you can begin installing the flooring, such as laminate.
Much less common are dry screeds made from high-density mineral wool mats and plywood. This design is more expensive than backfill and cannot be used to level the floor - it only provides additional heat and sound insulation.
Any dry screed is afraid of moisture, so it is not suitable for bathrooms and kitchens, and after a leak, most likely it will have to be partially dismantled. The compressive and tear strength of the surface layer is not sufficient for the use of solid wood coatings - floorboards and block parquet. However, this is one of the optimal solutions for old houses with very uneven and also worn-out and cold floors. Dry screed is ideally combined with interlocking parquet boards and laminate, and also allows for the installation of linoleum, carpet and large-format porcelain tiles.
RockwoolDry slab screed can greatly improve thermal insulation and dampen structural noise.
Rockwool
When installing it, you need a vibration-proof border along the walls and a durable plywood flooring
How to measure the floor level?
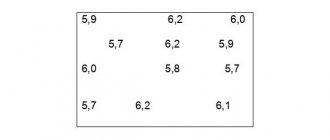
The choice of floor leveling method, first of all, depends on the degree of surface unevenness , which is difficult to determine with the naked eye - special devices will be needed. for these purposes :
. If its length is not enough, then a building rule is placed under it;
normal building level- a hydraulic level allows you to more accurately and easily take measurements in large areas, but when filling the instrument with water, it is important to avoid airing its working tube;
- Laser levels are even easier to use and allow you to take measurements with maximum accuracy, and their wide functionality makes the entire measurement process much easier. The error is no more than 1-2 mm/m, and when measuring it is better to wear safety glasses;
- The level is a professional geodetic instrument, quite complex to use, it provides ideal accuracy and allows measurements to be taken over vast areas, therefore it is used mainly in large-scale construction.
When leveling the floors in the apartment, you need to bring them to zero level . After all work is completed and finishing is completed, the floor level should be the same in all rooms, which means that when leveling, the height of the finishing material used must also be taken into account. Thus, the height of the subfloor level in rooms where different coatings will be used may differ by 1-2 cm.
Do I need to level the floors in my apartment?
It will be possible to lay parquet boards, ceramics or porcelain tiles, laminate and other coatings so that they do not creak and “go on a spree” within a month after completion of the work only on a leveled base. The selection of the leveling method is carried out taking into account the degree of unevenness and specific damage. A traditional building level and its modified analogues - laser or hydraulic levels, a professional geodetic level - will help you measure the curvature of the coating.
You will need the procedure if:
- during measurements, it turned out that the curvature of concrete or wooden floors exceeds the permissible values - deviations are determined by SNiP 3.04.01-87 and should not exceed 0.2% of the size of the room (but not more than 50 mm);
- after the work of dismantling the base foundation, numerous mastic deposits remained in the apartment;
- floorboards or slats creak;
- There is a clearly noticeable difference in height between the plates.
According to the current updated set of rules SP 29.13330.2011 (which includes the requirements of Soviet SNiP 2.03.13-88), leveling is not necessary if the height of the base for the floor in different parts of the room does not exceed 3 cm. If the difference is less than 5 mm, work is also carried out only at the request of the apartment owner.
No. 1. Cement-sand screed
Cement-sand floor screed is considered one of the most popular methods of leveling the surface. It is performed using a mortar of cement and sand in proportions of 1:3 or 1:4, depending on future loads on the floor. Cement-sand screed is used in private houses and high-rise buildings with concrete floors. It is great for use in rooms with high humidity (kitchen, bathroom) and where the floor will be subject to significant load. Often this leveling method is used for future coverings of tiles, parquet and linoleum.
Advantages of cement-sand screed:
- strength and durability;
- the ability to hide some communications in the thickness of the screed;
- the ability to level very uneven surfaces - this method is used when the height difference exceeds 5 cm;
- low cost of work.
Among the main disadvantages it is worth highlighting:
- long hardening period;
- the need to have the skills to perform such work or involve professionals.
The execution of the screed begins with determining the zero level . To do this, you can use a building level, with the help of which a single line is created at a height of about 1.5 m from the floor, from which the distance to the floor level is measured. It is worth focusing on the minimum distance, which will help determine the level of the floor height, but it should be taken into account that the minimum thickness of the screed is 2 cm. You can also draw lines along the bottom of the wall for the future floor level , which will help make the screed as even as possible.
Preparing the base involves thoroughly cleaning it from dust. It is first swept out, then the remains are vacuumed, and only after that can you start priming the surface. After applying the first layer of primer, it is recommended to cover the floor with a waterproofing solution, and then apply a second layer of primer, due to which the maximum level of adhesion with the concrete solution is achieved.
The next stage is placing beacons , which allow you to achieve the most even surface possible. They can be used as T-shaped metal guides, which are attached to the base with adjustable screws. An easier way is to install guides on slides made of thick cement-sand mortar of the required height. The evenness of the beacons is constantly checked using a building level. The first one is installed at a distance of 20 cm from the wall, the rest are mounted parallel to it in increments of 40-60 cm.
Leveling material can be prepared from ready-made dry mixtures intended for leveling the floor. They add water in the amount specified in the instructions. You can prepare the necessary mixture from sand and cement with your own hands. Mix the solution using a construction mixer or a special attachment on a drill. The consistency of the finished solution should resemble thick dough and be homogeneous. The solution should spread slightly on the surface, but not spread.
The finished solution is laid out between the beacons , starting from the far corner of the room and moving towards the door. The mixture poured between the two beacons is leveled according to their level, moving it towards you. During the installation of the screed, it is better to pierce the fresh solution in some places with a metal rod so that air voids do not form in it as the screed hardens. If you decide to carry out all the work yourself, then you still can’t do it without the help of a partner: while one is leveling the mixture into the beacons, the second must prepare a new portion of the solution, because the screed within the same room must be completed in one day.
You can walk on the finished screed after just a few days, but it will completely harden only after 2-3 weeks. During this time, it is recommended to cover its surface with plastic film to prevent the surface from becoming cracked. An alternative to film is to evenly wet the surface twice a day.
Indicators of a high-quality screed are a uniform gray color over the entire surface, the same sound when struck with a wooden block. The maximum horizontal deviation is 0.2%, which means that for a room 4 m long, the height difference should be no more than 8 mm.
Depending on what requirements are put forward for the floor, a concrete screed can be an independent leveling method or just one of the stages in creating a flat surface.
the wood-concrete screed method , which previously enjoyed great popularity, has been almost completely forgotten It differs in the composition of the solution, to which sawdust is added, which gives the concrete greater strength and allows it to breathe. The only problem is the smoothing process, because larger sawdust floats closer to the surface of the mixture and breaks it.
Preparatory work for repairs
The main preparatory work for repairing and finishing any room is leveling the surface of the walls and floor.
Unfortunately, the technology for constructing residential buildings does not involve the delivery of smooth surfaces inside the house, and the evenness of the surfaces of the walls and floors of the apartment is far from ideal. Not only new buildings, but also old residential buildings are characterized by uneven surfaces of walls and floors. Modern renovation requirements force them to plan work on leveling walls and floors.
No. 2. Semi-dry screed
Semi-dry screed is one of the varieties of the popular cement-sand screed. It is performed in virtually the same way as in the case described above, but the changes affected the process of preparing the mixture - a minimum of water is added to it , which is necessary only to hydrate the cement. Fiber fiber is added to the solution as a reinforcing agent. , many advantages were achieved
high density of the resulting screed, as well as the absence of pores and voids, because during the hardening process there will be no evaporation of moisture characteristic of a wet screed;- minimal shrinkage, because evaporation is almost completely absent. The screed can be laid without taking into account shrinkage;
- a cleaner installation process, since the solution is less wet and produces less dirt;
- it will take less time to completely harden, again due to less moisture and a faster process of evaporation;
- the level of humidity in the room after pouring such a screed does not prohibit carrying out associated finishing operations and storing building materials in adjacent rooms, which is strictly not recommended when a regular cement-sand screed hardens.
You should also not forget about the disadvantages of the method:
- Due to the higher density, the ability to spread worsens and sometimes difficulties arise in filling corners. However, experts advise combating this drawback by introducing plasticizers into the mixture;
- You can level only small surfaces with your own hands, up to 75 m2 in area; in other cases, you can’t do without a pneumatic paving machine.
The process of laying a semi-dry screed is almost identical in principle to the installation option for cement-sand screed described above, but some features require consideration. In particular, this is the process of preparing a solution . It is recommended to mix three shovels of sand and a shovel of cement in a container until the required amount of mixture is formed. It is mixed and a little water mixed with fiber is added (approximately 80 g is used per bucket of water, unless otherwise specified by the manufacturer). Water is added until the mixture has the consistency of sandy loam, sticky clay sand. If you compress the mixture, the moisture will not be released, and the lump will retain its shape. If you still go too far with water, you can add cement and sand in the same proportions, but in smaller quantities.
It is recommended to lay the mixture in two layers : the first slightly below the intended level and with maximum tamping, the second - with pulling and grinding. You need to act very quickly, because within an hour the mixture hardens. Some experts advise applying the first layer immediately around the perimeter of the room: this can only be done if the second layer is applied within one hour. A day after installing the screed, expansion joints can be cut along the walls to a depth of up to a third of the screed itself and a width of no more than 3 mm.
Method 3: leveling with expanded clay
Do-it-yourself Knauf bulk floor
Features of the method
It uses light bulk material, most often expanded clay. It allows you to smooth out even deep holes and strong slopes.
When to use
Leveling the floor with expanded clay
There are several ways to level a floor with expanded clay, but all of them are used when it is necessary to remove significant unevenness. If the height difference is more than 10 cm, the concrete screed will be very heavy, which will create a load on the floor slabs. It will dry unevenly, taking longer in holes than in shallow places, which will lead to cracks. In such cases, it seems more appropriate to use expanded clay.
Stages of work completion
- All preliminary steps: preparing the base, waterproofing, laying damper tape, searching for the zero level. In this case, it will be quite high, since the thickness of the backfill layer must be added to the height difference, and it is not less than 3–4 cm.
- Installation of beacons.
- Preparing expanded clay. You need to mix two fractions: medium and fine. The medium one is needed to reduce the weight of the finished screed, and the small one is needed to compact it.
The following are possible options:
- Expanded clay is leveled along the beacons, compacted, and sheets of various flooring materials are laid on top. This can be gypsum fiber board, chipboard, fibreboard and similar things. They are laid side by side according to the principle of brickwork, so that the transverse seams of one row do not coincide with the other. A second layer is laid on top of the first layer, which is attached to the bottom layer with self-tapping screws.
- Expanded clay is poured onto the floor, leveled along the beacons, not reaching their top 2-2.5 cm, compacted and filled with cement “milk”, that is, a mixture of water and cement. This will give strength to the expanded clay pillow. After a day, when the composition has hardened, you can lay out a solution for a regular concrete screed on top, leveling it now along the tops of the beacons. Or you can remove the beacons, wait for complete drying, cover the expanded clay with a waterproofing film and fill it with leveling agent.
- Preparation of expanded clay concrete leveling mixture. To do this, cement, sand and expanded clay are combined with water, and the finished mass is laid out on the floor along the beacons, not reaching 2–2.5 cm from their top. A layer of concrete screed will complete the structure.
expanded clay
No. 3. Self-leveling mixtures
Self-leveling mixtures are otherwise called self-leveling mixtures, floor levelers and self-leveling floors. This is a fairly simple way to level the floor and get an excellent result. Suitable if the height differences are no more than 3 cm. Such mixtures can be used to level floors for finishing with tiles, cork, linoleum, carpet, etc.
The basis of the self-leveling mixture is cement, but in addition to it, the composition also includes special modifying additives that can increase the plasticity and fluidity of the solution. Some additives allow you to reinforce the solution and inhibit the appearance of microcracks in the future. Depending on the composition, self-leveling mixtures are divided into:
- high strength;
- for heated floors;
- fast-hardening;
- thin-layer.
In addition, there are self-leveling mixtures on sale, intended not only for rough finishing, but also for finishing , as well as compositions with special properties. There are also compounds for rough leveling , they are intended for surfaces with significant unevenness.
All self-leveling mixtures boast a number of advantages :
- simplicity and high speed of working with them;
- speed of hardening;
- high strength indicators, so this leveling method is quite suitable for rooms with a high degree of traffic;
- resistance to temperature changes.
disadvantages to this method of leveling the floor - these are rather its features. Large differences in the level of the floor surface cannot be leveled with a self-leveling floor. You need to work with the mixtures very quickly - if you hesitate and allow it to dry out, then it is unlikely that you will be able to achieve a smooth surface.
Working with such mixtures is really simple. They are usually used to level concrete and sandy bases. Preparation of the mixture consists of diluting the purchased powder with the required amount of water. For mixing, it is better to use a construction mixer or a drill with an attachment. The composition is prepared in portions, since its properties are lost within 20 minutes. Naturally, before starting work, you should carefully prepare the original surface: clean it from dust, seal all cracks, and treat it with a primer.
When the mixture is ready, it is immediately poured onto the floor. The principle of its operation is based on the law of gravity, so there is no need to install beacons and level the solution according to them. It is also worth remembering that this solution is self-leveling and not self-spreading, so after pouring it onto the floor it must be leveled with a wide spatula or a needle roller. It is better to immediately fill the entire floor in the room, but if the area is large, apply the solution in strips, acting very quickly and not allowing the edge of the strip to dry out. In this case, only professionals can achieve a perfectly flat surface.
The hardening speed depends on the room temperature, humidity and layer thickness. On average, after 6-12 hours you can move on the surface, and after 3-4 days you can install the finishing coating.
Installation of screed for heated floors
Warm floors are used for heating living rooms, bathrooms, large premises, verandas, and production workshops. But when deciding how to level a concrete floor or wooden floors under a warm floor, it is important to choose the right type of screed. It all depends on the nature of the heating elements:
- Water polypropylene pipes or electrical cable.
Floor slabs are lined with a waterproofing membrane. It is also laid out on top of the mineral wool. Directly under the pipes there is heat-reflecting foil. The screed for underfloor heating can be semi-dry or wet. If its thickness exceeds 50 mm, a reinforcing mesh will be required. There are no restrictions on finishing; - Infrared heating mats.
They are laid directly on concrete slabs. The best finish is tiles. - Film heating elements.
They are laid under plywood, drywall, fiberboard. Any finishing, except tiles and mosaics.
No. 4. Leveling with gypsum fiber sheets (GVL)
Leveling with GVL is called dry screed. This process is much simpler and faster, but the quality of the finished screed is inferior to a monolithic one. A layer of expanded clay is laid under the gypsum plasterboard, which plays the role of a heat insulator. The technology allows the use of other materials that have similar thermal insulation properties.
Leveling of GVL begins by cleaning the surface from dust and dirt, after which a waterproofing material, which can be a polyethylene film, is spread over it. Its strips are laid with an overlap of about 10-15 cm and overlapping the walls by 10 cm. Along the perimeter of the room, it is better to use an edge strip, which is placed between the plastic film and the expanded clay layer.
Expanded clay must be carefully compacted and leveled to the intended level. The first plate is mounted in the corner closest to the door, secured with self-tapping screws. When the first layer of gypsum plasterboard is ready, proceed to the installation of the second, which is attached with glue. It is imperative to shift the sheets by 25-30 cm relative to the first layer. For reliability, the second layer can be attached with self-tapping screws to the first. Some experts recommend installing beacons in the form of wooden blocks or metal U-shaped profiles. To move on expanded clay, sheets of plywood or gypsum fiber board are used.
At the final stage, the joints of the plates and the fastening points with self-tapping screws are primed , then the rest of the surface is primed, and the excess plastic film and edge tape are trimmed. An important advantage of this method of leveling the floor is the ability to perform it in stages, in several approaches, and not in one day, and this greatly simplifies the process when leveling the floors is done with your own hands.
Tools and materials
The preparatory stage plays a big role, since it is the determining criterion for the correct execution of the work. To begin the recovery process, you will need quite a few tools. However, it all depends on the chosen alignment method.
Basic tools in the fight against uneven floors:
- hammer;
- chisel;
- mount;
- Bulgarian;
- Sander;
- vacuum cleaner;
- self-tapping screws
Flooring materials can also be varied. The most common are backfills and special sheet elements for covering the old floor.
No. 5. Leveling with plywood
Another dry way to level floors is to use plywood. This method is applicable only for those rooms where there will be no significant changes in humidity during further operation. Leveling with plywood is used, as a rule, for wooden and concrete floors when the topcoat is laminate, parquet or linoleum.
Depending on the level of deformation and height differences, two main methods of leveling with plywood are used:
- installation of plywood directly on the plank floor;
- installation using lag.
The first option is applicable when the height difference is minimal, and the unevenness is caused mainly by the deformation of correctly laid floorboards. In this case, logs will not be required - their role will be played by the tubercles of the curved floorboards. The thickness of the plywood sheets, in this case, will be 8-10 mm if the width of the main floor boards does not exceed 20 cm, and they are all uniformly deformed. If the floor consists of boards more than 20 cm wide, or not every floorboard will rest against the leveling layer, then it is better to use plywood 20 mm thick.
It is better to keep plywood sheets for several days in advance in the room where the work will be carried out. They should be treated with an antiseptic . Before starting work, the sheets are laid out on the floor in the way they will later be attached. If sheets measuring 125*125 cm are used, it is better to cut them into 4 parts for ease of work. They are laid out on the floor, moving each row relative to the previous one and imitating brickwork, leaving a gap between the sheets of 1-3 mm and a gap between the sheets and the wall of 1-2 cm for the expansion of the wood. Now all that remains is to attach the sheets to the “ridges” of the plank floor with self-tapping screws.
Sometimes sheets of plywood are laid on an already leveled concrete floor. This technique helps to achieve the most even surface possible.
The second method is used when the elevation differences are significant. Concrete and old wooden floors can be leveled using joists. Work begins with preparing the base , which is cleared of debris. If the base is a wooden floor, then it must be treated with an antiseptic. Then a layer of waterproofing is laid, which can be a polyethylene film or a special membrane. Joists and plywood are pre-treated with an antiseptic.
As a lag you can use timber with a side of 40*40, 50*50 or 60*60 mm, second grade board or cut plywood. If it is undesirable to raise the floor too much, then use not timber, but cut pieces of plywood. The logs are laid across the direction of incidence of the sun's rays in increments of 40-50 cm. Now you can install transverse jumpers, which are attached using self-tapping screws.
Next comes the most crucial moment - placing the finished sheathing at the level previously marked on the wall. For this purpose, metal wedges, roofing felt, roofing felt are installed under the logs, but most often wooden spacers are used, which will resemble point supports. Some people use sand for this purpose. After leveling, the entire system is attached to the floor, for which you can use dowels three times the length of the log thickness. The space inside the sheathing can be filled with a layer of insulation (mineral wool is often used) or with a screed made of wet sawdust and PVA glue. In the latter case, the mixture is applied in 2-3 layers, waiting for hardening for 2 days, but less thick plywood can be used. Pre-prepared and processed plywood sheets are fastened with self-tapping screws, leaving a gap of several millimeters between the sheets.
If the height differences are more than 5 cm, but less than 8 cm, then a more complex mini-lag system . Wooden pads are installed under the logs and lintels, and the height of each such supporting element is calculated separately and can be different, and this is the most difficult stage.
In general, the leveling method using plywood can be called quite fast, because you don’t need to wait for it to harden. Joists and sheets of plywood do not create such a load on the floors as concrete, so in the case of old housing stock this option is irreplaceable. But in some cases, this leveling method will require a professional approach, and will cost a pretty penny.
The best options for leveling different types of floors
For wooden floor
If the boards are in good condition (no rot, multiple through cracks and not susceptible to fungus), but there are deflections and differences in height, the following methods are used to level the floor:
- covering with sheet wood-based materials;
- semi-dry screed;
- grinding and scraping.
The last option is very time-consuming to implement, but in the end it provides a completely flat base without loss in the height of the room. If the board base is seriously damaged or simply rotted, then the damaged boards must be replaced before leveling.
For concrete floor
For discrepancies up to 5 mm, the following are used:
- levelers or self-leveling compounds;
- tile adhesive.
If the height difference is more than 3 cm, then the following type of screed is used:
- concrete or semi-dry;
- dry on joists or on an expanded clay “cushion”.
Advice! To correctly determine the height difference, you will need a calibrated level.
Under tiles
When laying porcelain stoneware or tiles, the permissible height variation for each square meter of surface is 2 mm. If there are irregularities up to 5 mm, they can be eliminated with tile adhesive, otherwise you will need to purchase and fill leveling compounds, wet or semi-dry cement-sand screed.
Under laminate
It can only be laid on a completely flat base. If there are even small irregularities and roughnesses, the panels will weaken over time, and then the laminate will begin to creak. If the differences do not reach 5 mm, then self-leveling mixtures are allowed for leveling. To eliminate more serious deficiencies, there is no other way out than to level the floor in the apartment under the laminate, pouring a wet or semi-dry screed.
Under linoleum
Self-leveling and sand-cement mixtures are suitable for linoleum. You can also level it with sheets of drywall. But, if you want to level the floor in an apartment under linoleum as quickly as possible, give preference to a semi-dry screed.
