02.05.2021 13:36:00
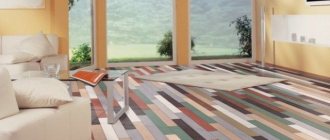
Installing laminate flooring is not a difficult process, provided you follow the rules and follow the advice of flooring manufacturers and interior designers.
The instructions included with the package usually describe one of the installation schemes (classic). By following it, you can completely cope with this task on your own.
At the same time, there are many other laminate laying schemes that will help emphasize the texture and color of the coating. It is better to entrust the implementation of non-standard types of installation to professionals. The wear resistance, service life and decorative effect of the floor covering depend on the method and quality of installation.
Preparing the base
The first important condition when installing any type of laminate is careful preparation of the base. In this regard, this material is the most demanding among all other coatings. Laminate can be laid on the following types of rough surfaces:
- concrete;
- tree;
- ceramic tile;
- linoleum.
The laminate can also be attached to the wall if that is what the designers intended. There are several ways to attach laminate flooring to a wall.
The rough base can be any of the above, the main thing is that it is perfectly level, smooth, without cracks, depressions or bumps.
Concrete base
Concrete screed is one of the best bases for laminate flooring. But by the time the laminate is laid, the concrete must dry completely. Usually it takes at least 25 days for complete drying after pouring the cement mixture. If the concrete base was made a long time ago, then before laying it should be carefully checked for cracks and chips. If minor flaws are found, it is necessary to apply a thin layer of self-leveling mixture. In case of significant damage, it is better to remove the old concrete and make a new screed.
Any type of self-leveling floor (including concrete) requires the laying of a special polyethylene film, which overlaps by 20 cm and overlaps the walls by up to 15 cm. Regular tape will help secure the edges of the film. But dry screeds include a layer of vapor barrier, so additional film is no longer needed.
Wooden base
Wooden base The old wooden base under the laminate should be carefully checked for fungal infections, cracks and sagging of the boards. Rotten elements must be replaced with new ones, securing them with self-tapping screws. If there are small unevennesses, then you can go over the wooden floor with a scraping machine: it will remove the top layer and level the surface.
Experts recommend filling the plank floor with a self-leveling mixture or laying sheets of plywood (chipboard) on it in a checkerboard pattern. In the latter case, laying a vapor barrier film is not required.
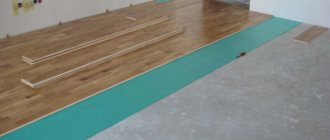
An important condition for the preparatory work is laying the substrate under the laminate. You should not ignore this stage, even if the base is perfectly flat. The underlay performs a number of important functions: absorbs the sound of steps, moisture, and insulates the floor.
Laying on tiles or linoleum
It is permissible to lay laminate flooring on linoleum or tiles if they are a durable, even coating and are installed in compliance with all the conditions necessary for proper installation of the laminate. You can even do without plastic film, but a backing is required.
Seam sealant
In general, I would recommend refraining from buying sealant, because often something that is closer in properties to glue is sold under the guise of sealant. It is not recommended to glue locks together; this can lead to unpredictable defects during operation. If the panels stick together, it will be extremely difficult to disassemble part of the covering to replace some boards without damaging the locks and edges!
Sealant is needed to protect locks from moisture. Some manufacturers impregnate locks with something like paraffin, in which case there is no need for sealant. This type of laminate is not difficult to recognize by picking the lock with your fingernail. If the locks are not impregnated, when installing even in a dry room, there is a risk that the floor will creak.
If you nevertheless purchased a laminate with non-impregnated locks, it’s okay, you just need to be more careful in choosing a sealant by contacting a competent sales consultant. Having purchased a sealant, you can test its properties by coating and testing two pieces of laminate. After a couple of days, separate them. If the lock opens freely, the sealant remains elastic and can be easily removed - everything is in order.
Alternatively, instead of sealant, you can use impregnation for locks and treat each panel with this solution before installation.
In what cases should laminate flooring not be installed?
Laminate is a rather demanding coating. When choosing this material for installation indoors, remember a few “don’ts”:
- laminated panels cannot be laid on carpets;
- it is unacceptable to glue them or somehow attach them to the base of the floor;
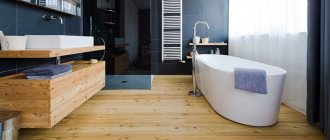
- It is not recommended to lay ordinary laminate in bathrooms, bathhouses and other rooms with an excess of moisture;
- panels cannot be laid on electric heated floors;
For kitchen rooms and corridors, you should purchase only special types of laminate intended for installation in rooms with excessive humidity.
Substrate
I think there is no point in singling out any type of substrate as being of higher quality - they are all quite good.
The cheapest foamed polyethylene fully satisfies all requirements. The only note is that you should not choose a substrate thicker than 2 mm, the floor on it will sag unnecessarily when walking. If there is a need to raise the level of the finishing coating, then it is better to use other materials, for example fiberboard sheets. The disadvantages of foamed polyethylene include slight subsidence over the years - 1-2 mm.
Cork backing does not sag, but is more expensive. By and large, it is no different from polyethylene.
A backing made of thin EPS sheets is also no worse. However, this material is very inconvenient for flooring: there are many seams and they all need to be taped.
Whatever underlay you choose, it is not necessary to spread it over the entire area - I spread it as I lay the laminate.
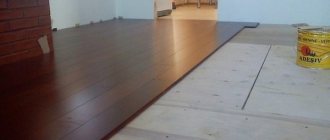
Laying methods
Laminate flooring is installed in three ways:
- adhesive;
- “Click-lock” system;
- "Lok-lock" system.
The first method is the least used and is similar to the parquet installation system. Its essence is that the edges of the panels are covered with an adhesive composition and tightly attached to each other.
Typically, the coating is installed using the adhesive method in rooms with active movement, when additional protection against moisture getting into the gaps is needed. The rarity of using this method is due to significant disadvantages:
- installation is quite labor-intensive;
- short period of operation (the glue dries quickly);
- inability to repair the coating area.
The most popular is the installation of laminate flooring with the “Click” locking system.
This is explained by the ease of installation, which is carried out using the tongue-and-groove method. One panel is inserted into the other at an angle of 30º and pressed against it. As a result, you can hear a sound resembling a click. Next, using a block and a hammer, the panel is carefully driven into the previous one.
The “Lok” locking system functions somewhat differently. The boards are laid horizontally. There should be a small gap between them. The tenon is aligned with the groove, then the block and hammer continue fastening until the lock is activated.
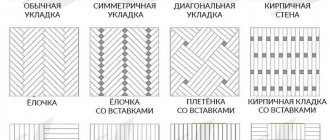
Herringbone and square
To place laminate planks in a herringbone or square pattern, you need to purchase a special type of laminate. Its panels are equipped with specially designed locks and are smaller in size, which allows installation at an angle of 90°. Parquet is most often laid out in the same way.
Before purchasing and subsequent installation, you should ask the seller whether it is possible to install such a laminate in exactly the way planned. There are about fifty different options for placing laminate boards in squares. It can be closed or open, and the herringbone can be single or double. Some of these styling methods are called English dressing.
Herringbone pattern layout
In one pattern you can combine up to 50 different board options: light, dark, with different patterns. The installation can look like a stepped ladder with alternating light and dark shades.
Laying scheme
Most often, laminate is laid in a direct way, that is, parallel to the direction of light. However, if the geometry of the room allows, two other installation options are also possible: diagonal and perpendicular.
Depending on the lighting conditions of the room or the design solution, three laminate laying schemes are used:
- classical;
- chess;
- diagonal.
A common condition for all schemes and methods of laying the coating is to lay the laminate flooring “staggered”. This means that each panel of the subsequent row is shifted forward relative to the adjacent panel by a level of 15-20 cm.
Choosing the method and layout of laminate flooring makes it possible to visually change the geometry of the room, focusing on the advantages and covering up any structural “cons”.
Classic scheme
This scheme can be called the most economical, due to which it is most often used for coatings in offices and residential premises. According to the classical scheme, the installation of panels begins from the nearest wall and is carried out parallel to the flow of lighting. In this case, the remainder of the panel of the previous row becomes the beginning of the next row. Panels will also have to be cut at doorways and in battery niches. Experts do not recommend using pieces less than 30 cm in length. In general, when using the classic laying scheme, waste is about 5%.
Chess scheme
This scheme is also called brick, since the coating pattern imitates brickwork.
The displacement of panels in each row occurs at the level of half the board of the previous row. The main disadvantage of the chess pattern lies in the large waste of material (about 15%). But the strength of the coating doubles.
Diagonal pattern
Laying panels diagonally is not much different from the classic scheme. Installation begins from the wall on which the doorway is located, at an angle of 45º. The covering, mounted in a diagonal way, looks very elegant. In addition, it visually expands the space of small rooms. The excess consumption of material depends on the geometry of the room. In square rooms it will be no more than 10%, and in long rooms - no less than 15 cm.
General information
Before describing the basic methods of laying laminate flooring, it is worth understanding what laminate flooring is.
Design
The laminate consists of the following parts:
- The top layer is a transparent coating that protects the previous decorative layer.
- Under the protective coating there is a paper layer with some kind of pattern, which, as a rule, imitates wood or some other material.
- Below is a central, reinforced layer of chipboard, which gives the laminate its shape and strength (read: “We lay chipboard under the laminate with our own hands”). In addition, this layer is equipped with locks that determine how the strips will be joined together.
- The lower part of the panel structure consists of moisture-repellent paper, which is impregnated with resin to give it these characteristics.
Installation instructions
Instructions for laying the coating are included with each product package. The general rules for laying laminate flooring are as follows:
- A gap of at least 10 mm must be left between the wall and the panel. This is one of the most important conditions for installing laminate flooring. The gap is made so that the material has free space to expand during temperature changes. If you do not leave a gap, the integrity of the coating will be compromised within a year: the panels will simply come apart at the seams. The width of the gap is reinforced with special wedges, which are removed upon completion of work.
- Panels in each row are stacked with a shift relative to the adjacent panel. This is necessary to achieve coating strength.
- Laying the laminate should begin from the corner near which the radiator and heating pipes are installed. In the panels laid around the pipes, it is necessary to cut holes equal to their diameter, and also leave an expansion gap of at least 10 mm.
- The panels of the last row are adjusted to the required size, taking into account the gap.
- The last stage of laying the laminate is attaching the panels and decorative joints of the tiles and laminate. It is better to fix the panels with special clamps, which ensure tight pressing of the entire covering.
- Interlocking laminate flooring is ready for use immediately upon completion. The adhesive coating will require some time for the glue to dry.
Furniture in Provence style.
Read this article on how to properly glue meter-long wallpaper.Living room in light colors 16 meters: https://trendsdesign.ru/home/liv/svetlaya-gostinaya-praktichnoe-dizajnerskoe-reshenie.html
How to design difficult places
How to lay laminate flooring is theoretically clear. If you already have laminate flooring, you can practice on a small area - then it will become clearer. But there are always some problem areas in the rooms that you don’t immediately understand how to fix. In any case, there are two such areas - pipes and the door frame. How to lay laminate in these places so that you can’t find fault? In principle, this is not difficult. You need a ruler, a drill with bits, a hacksaw and pads that will close the gap at the pipes.
There's no need to do that
Connection to the door frame and threshold
In order for the laminate to lie nicely and without gaps near the door frame, it is advisable to lay it with the frame already installed. If you haven't installed the doors yet, you have time to get started while the laminate is curing. When installing the box, you need to make it a little shorter - the saw blade should fit between it and the floor. If the box is already standing, you can trim it.
How to beautifully design a joint with a door frame
When laying, the laminate is slipped under the racks, so there will be no gap. But how to design the joint between a laminate and another coating is a whole separate topic. And if the doors open onto a tiled corridor, there are additional methods for joining laminate and tiles. The simplest and most obvious is the threshold. They come in different varieties, so there are already a lot of options here. If you don’t like the thresholds at all, there is a cork compensator. It's almost invisible.
How to beautifully bypass pipes
The second difficult place to decorate beautifully is the pipe exit from the floor. We cannot live without heating and there are pipes in almost every room. Let us remind you once again: there must be a gap of at least 5-7 mm around the pipe. Having placed the board against the wall, mark the middle of the pipe with a pencil at the required distance. We measure the diameter of the pipe, add 2 cm to this value (at most 1.5 cm), we get the diameter of the hole that needs to be drilled in the laminate. It is difficult to find a drill with such a diameter, but a “crown” type attachment is possible.
How to go around pipes with laminate if they are on a short part of the board
After making a hole (or two, if necessary), draw a straight line through the center of the holes and cut off part of the board along it. We install the laminate, insert the cut piece behind the pipes. If everything is done as it should be, great. We coat the joint with glue (universal, for wood) and install everything completely. And we close the gap with overlays. They are available in wood color, white, black, and shiny. There are plastic or metal-like ones. In general, options are possible.
If the pipes are on the long side of the laminate
If the pipes fall on the long part of the laminate board, the technology changes slightly, but the essence remains the same. You just need to cut out the area in the form of a trapezoid.
Gaps from walls
Laminate flooring is installed using the so-called “floating technology”. This means that during operation the canvas can change its position within small limits. Changes in temperature and humidity cause the coating to change in size and this should not be prevented. If the panels have nowhere to expand, the coating will swell, something will prevent the narrowing and the seams will come apart.
That is why laminate cannot be glued or nailed to the floor, and it is also necessary to ensure technological clearances from walls and pipes. Most manufacturers recommend gaps of 8-15 mm, and usually the size of the gaps for different areas is not indicated, only a general recommendation. However, it is quite logical to conclude that for small areas the gap can be made smaller, but for a large area a larger gap is needed.
The theory is of course good, but practice shows that in most cases laminate narrows
. Therefore, the gap must be made such that it is covered by the baseboard with a margin for narrowing. Recently, many plastic skirting boards with a closed gap of 15 mm have appeared. - this is not enough. A standard PVC skirting board with a cable channel (meaning not the cheapest) covers 20-25 mm. from the wall.
Based on the gap to be closed plus the margin for drying of the canvas, 15 millimeters is the maximum gap that should be left. However, this is usually the maximum value recommended by the manufacturer, so it is better to take something in between - 1 cm. In most cases, the gap is 10 mm. more than enough. The exception is large installation areas, for example throughout the entire apartment without thresholds - there you should be more sensitive to this issue.
When installation is carried out in one room, it may be necessary to minimize
gaps. There can be many reasons, as an example - connecting laminate to tiles with a special profile that covers less than a centimeter. Therefore, it is possible to create gaps only near two of the four walls - there is no gap on one side, but there is on the opposite side.
Formation of the first row
For an objective understanding, it should be noted that you can start laying laminate flooring from any convenient point in the room, even from the middle. However, in the vast majority of cases, this convenient place is the far wall without doorways.
It is more correct to choose a left-to-right layout for assembling panels; this will allow you to place “groove” type locks on already laid panels. Thus, assembly will be carried out by inserting the tenons of new panels into the grooves of already assembled ones - this is much more convenient.
For the first row, the required number of panels is assembled, connecting them together in transverse locks. There should be a strip from wall to wall. The last plank is sawed taking into account the gaps - the assembled row should have the necessary gaps on the left and right. Then the entire row is moved towards the starting wall, spacer wedges are inserted to form a gap.
Without a doubt, the first row will not be able to be aligned in a perfect straight line - there is minimal play in the transverse locks and therefore the panels may deviate from the straight line. To form a straight row (still not ideal), panels with overlapping seams need to be inserted into the longitudinal locks of our strip, like a second row, but without connecting the transverse locks. This temporary measure will help level the first row as much as possible and adjust the spacer wedges along the starting wall.
The rare wall from which installation begins has a perfectly flat plane, so the gap may vary, and in some places it may be unacceptable. Therefore, it is quite possible that the first row will have to be disassembled and the connection to the wall will have to be cut in some places. After sawing, the row is reassembled and leveled with additional panels, and wedges are inserted.
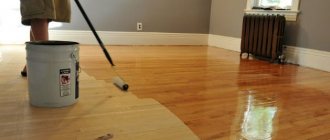
Leveling the floor
Cement-sand base. The surface is leveled with a thin-layer self-leveling floor.
The step-by-step instructions for doing the work yourself are as follows:
The base is cleaned of the old coating and swept. Damper tape is laid along the walls. It prevents cracking of concrete or cement. The mixture is mixed and poured onto the floor. Smooth out with a roller on a long handle and a spatula from the walls to the center. The floor will spread out on its own, it just needs a little help. Limits are immediately set to prevent the mixture from breaking into another room. Laying laminate flooring is possible only after the self-leveling floor has completely dried.