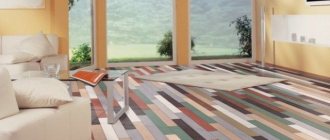
The correct technology for laying engineered boards involves two options - on a concrete base or on an additional layer of plywood. There are nuances that this article talks about
The correct technology for laying engineered boards involves two options - on a concrete base or on an additional layer of plywood.
The material has structural features - it is useful to know them before work. Detailed installation instructions are below.
What is an engineering board
When creating an engineered board, the multidirectional fibers in the layers of plywood are observed, which makes this material more stable and durable compared to other multi-layer floor coverings.
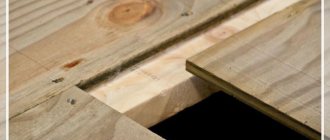
Engineered board is a two-layer material consisting of the following elements:
- Cutting natural wood with a thickness of 2.5 to 7 mm. Hard wood is used, since this layer can withstand heavy loads, it is coated with varnish or wax.
- The base is multilayer plywood, its thickness is 10-16 mm. All layers are glued together under pressure and high temperature, which eliminates the possibility of delamination.
Content
- Prices
- Work examples
- Design features
- Three-layer engineering board
- Competitive advantages of engineered boards
- Description of the installation process
- Preparing the subfloor base
- Technical requirements for installation
What materials and tools are needed to install engineered wood boards yourself?
An engineering board can have several types of connecting elements:
- tongue-and-groove is a classic connection method that is used for laying solid boards and engineered boards using glue or fastening to the base using self-tapping screws;
- The Click lock is a tight, self-clicking connection used in floating installations;
- groove-groove - there are recesses at the ends; a key is inserted into them, which prevents the boards from moving relative to each other; it is used for the adhesive installation method.
The shape of the planks is usually rectangular, but some manufacturers offer curved engineered planks; this material looks very impressive and unusual, but its installation should only be carried out by specialists, as this is a complex process.
To work you will need the following tools:
- hacksaw or electric saw;
- sandpaper;
- screwdriver with bits and drills;
- mixer;
- construction vacuum cleaner;
- mallet;
- notched spatula;
- roller;
- hardware;
- spacer wedges;
- measuring instruments;
- pencil.
Important!
It is better to use materials from the same manufacturer, otherwise chemical reactions may occur, which leads to damage to the engineered board. In addition, you will need a material for leveling the surface , this can be plywood, chipboard or OSB, cement or self-leveling mortar, engineered board adhesive, primer, underlayment and waterproofing film, their choice will depend on the installation method used.
The backing for the engineered board is:
- Multilayer backing (tuplex) - provides additional sound insulation, has high moisture resistance, and improves ventilation. Sold in rolls of 10 m2.
- Coniferous substrate - used as a sound-leveling and heat-insulating material, environmentally friendly.
- The cork backing is a damping material, has good sound insulation, is hypoallergenic, and antistatic. Allows you to smooth out uneven floors.
Flaws
Due to the special installation method and the correct selection of wood species, it is possible to eliminate a number of disadvantages inherent in solid wood as a material. First of all this:
- sensitivity to fluctuations in humidity and temperature;
- low thermal conductivity and inability to use with underfloor heating systems.
However, a number of factors remain negative:
- premium boards made from valuable and exotic wood species have a high price and are often more expensive than parquet;
- even a floor free from deformation needs careful care, regular treatment with special impregnations that prevent rotting, flammability, and eliminate vulnerability to pests;
- Due to the limited options for cutting wood and types suitable as flooring material, there is not much scope for design solutions.
Engineering board laying technology
it must lie in the room for some time before installation Depending on the time of year, the difference in temperature outside and in the building, this may take from 1 to 5 days. After bringing the material into the room, do not forget to unpack it.
Before installation begins, several boards are first laid out on the floor and a sketch is made in which further installation will be carried out. Since natural wood is located on top, it has a non-uniform structure and in order to match its pattern as beautifully as possible, you may need to change the boards in places.
What are the methods for laying engineered wood?
Installation can be done in several ways:
- Installation with glue . Special polyurethane compounds are used, which form a strong and waterproof connection between the floor covering and the base. Laying engineered boards on plywood, concrete, OSB, chipboard or wooden floors can be done using glue. When installing an engineered board on a screed, you can use universal parquet adhesive for fastening, such as Homakoll 214. Strengthening multimol is also used, which in its properties is similar to reinforcing fiberglass used to strengthen walls.
Rolls or mats glued to the base eliminate the possibility of it falling off, slightly level the surface and relieve the material of stress that arises from bending and shearing loads. You cannot lay engineered boards in this way on self-leveling and heated electric floors; floating installation is suitable for these coatings.
- Using glue and fasteners . Here, in addition to the adhesive composition, the planks are additionally attached to the base with special hardware that are screwed into their grooves. The advantages of this method are the strength, reliability and durability of the fastening, but it requires more consumables and time for installation.
- Floating installation. Provides for the use of Click locks and the floor covering is not connected to the base. To use this method, you need a perfectly flat base.
- Glue method into a “dowel” . Installation is carried out using groove-and-groove boards using a special key; this option is suitable for regions where there is high air humidity and significant temperature changes.
When performing installation, it is recommended to offset the planks by 1/3 to ensure the surface is as strong and dense as possible.
Preparatory work
Laying work begins after finishing the ceiling and walls. A plan is drawn up , a trial layout and the most suitable option is selected.
For installation, it is important that the indoor temperature is within +16. .. +25 °C , and air humidity is in the range of 45...60% . The material is placed in the room for some time ( up to 3 days ) to ensure its adaptation to the microclimate .
Floating installation
Since this installation method requires the production of engineered boards with special locks, it is used quite rarely. This technology makes it possible to install the flooring quickly, since it is not attached to the base , and installation is carried out on a special substrate.
The elements are connected to each other using a lock; in the case of an engineered board, it is usually adhesive. The use of special glue allows you to obtain a strong and high-quality connection that does not weaken over time. This type of installation makes the floor covering movable, therefore relieving the stress that occurs in the floor plane due to changes in humidity or temperature changes.
The technology of laying engineered boards using a floating method includes several stages:
1) Preparatory work
It is recommended to first draw the installation diagram on a sheet of paper, especially if you plan to install curved planks. Before installing the floor covering, the walls and ceiling must be completely finished, and all existing debris must be properly removed.
Important! Experts recommend laying a solid covering without expansion joints over an area of no more than 120 m2, and the distance from the floor covering to the wall should be about 10 mm.
You can choose the direction of installation at your discretion, but in narrow rooms it is recommended to do transverse installation, and to emphasize the texture of the coating, installation is carried out along the light (perpendicular to the window) or it can be done along the wall.
2) Preparing the subfloor
Before installing an engineered board, it is necessary to properly prepare the base, so it must meet the following requirements:
- the humidity of a coating made of wood, plywood, chipboard or OSB should not exceed 8%, and if it is a concrete screed, then 2% humidity; use a moisture meter to check;
- height differences should be no more than 2 mm per 2 m;
- the floor must be above ground level;
- indoor humidity within 40-45%;
- temperature +18…+22 °С;
- the base must be perfectly clean, without greasy stains.
If you are leveling the floor with plywood or chipboard, then they are attached to the base using dowel-nails or self-tapping screws at intervals of about 30 cm. The concrete screed should dry for 28 days, and self-leveling mixtures for at least 14 days. Concrete coatings must be primed, which improves their strength, protects them from moisture and increases adhesion; the primer is applied with a roller in 1-2 layers. Plywood and chipboard are not primed.
3) Installation of engineered boards
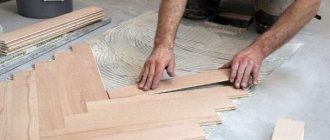
Waterproofing is laid on the subfloor to protect the floor covering from moisture, this is done with an overlap of 10-15 cm. Work begins from the long wall located on the left. On the first board, the protruding tenon is cut off on one side, a row is laid, and spacer wedges are installed between the planks and the wall. Further installation is carried out as when laying laminate: the plank is brought at an angle of 45 degrees, the lock is snapped in place (glue can be applied) and the joint is sealed using a mallet or block.
Thus, they move to the last plank, its dimensions are adjusted to the required parameters and it is fixed with the rest of the covering. All that remains is to remove the wedges and close the gaps with baseboards.
Rough floor. Requirements, features, recommendations
Laying engineered boards is carried out on concrete , wood floors or plywood . The main condition is that the base must be level . Wooden floors are leveled by adjusting the joists, and concrete floors are leveled using a screed . SNiP 3.04.01-87.
Screed
An important condition is the dryness of the screed. Humidity above 2% is unacceptable (use a moisture meter to check).
With this method , more glue will be required than in the case of installation on plywood or a substrate.
Plywood
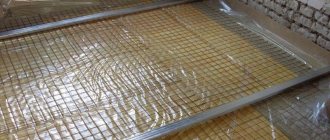
It is laid on glue applied to the base and secured with dowels . Rectangular sheets are laid according to the chessboard principle in small squares ( 30 cm each ).
If there are wires inside the tie , fixation is carried out only with glue . In this case, the size of the sheets will be smaller ( 15 cm each ). Leave 2-3 mm .
Along the perimeter of the room, the indentation can be up to 15 mm so that the plywood does not break due to expansion of the wooden material. Compliance with the difference in height of the squares is achieved by lining the sheets and scraping .
The humidity of plywood should be no higher than 12% , and its thickness should be at least 1.2 cm.
Substrate
Substrates are used only when choosing a laying method without the use of glue . They are artificial (polyethylene) and natural:
Carrying out adhesive installation
The first two stages are carried out in the same way as in the previous case. After you have cut the planks to size, apply an adhesive composition to the rough coating, straighten it well using a notched trowel and lay the boards; their adjustment should be carried out for 30-90 minutes until the glue has set.
Spacer wedges are installed between the floor covering and the wall, and if necessary, self-tapping screws are screwed into the locks, doing this at an angle of 45 degrees in increments of 30-40 cm, which allows you to securely fasten the slats. After installing the boards, it is recommended to press them down with a weight for a day until the glue completely hardens.
It happens that the top layer of the engineered board is not covered with anything, in which case, after laying it, the surface is sanded, and then, using a vacuum cleaner, the debris is removed and it is coated with varnish or wax. The gaps between the wall and the floor covering are covered with skirting boards; they can be wooden, PVC or MDF. In a week you can fully use this coating.