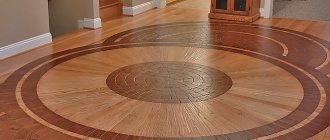
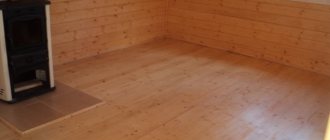
Parquet is valued for its wear resistance, durability and attractive appearance, and at the same time it is one of the most expensive and capricious floor coverings. Its professional installation will also be expensive, so many people decide to install the parquet floor themselves. Strict adherence to the instructions will allow you to avoid mistakes in work and ensure the perfect condition of this luxurious coating for many years. Let's look at the most commonly used technology and find out how parquet is laid on a concrete screed
Parquet and its budget alternative
Parquet is called planed, perfectly smooth boards made of solid wood. This material is considered to be elite, and accordingly its price is quite high. The planks have the following dimensions:
- length – from 15 to 90 cm;
- width – from 3 to 12 cm;
- thickness - from 1.5 to 2.5 cm.
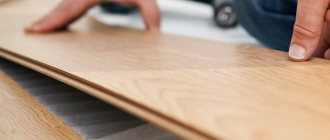
A more affordable material and less picky in relation to the subfloor is parquet board. It is a multi-layer coating, the top layer of which is made of valuable wood veneer, and the 2 lower layers are made of coniferous wood. The length of such boards is up to 220 cm, and the width is up to 25 cm.
Parquet board structure
Parquet board with ash veneer
Laying specifics
To prevent an illiterate installation process from causing damage to the building material, it is recommended to carefully understand the details of the installation technology and only then start working. Solid board is a complex coating consisting of at least 4 layers. Thanks to this, it is not afraid of dampness and tolerates wet cleaning beautifully.
Board adaptation
The front layer of such a covering is made of real veneer, and the actual value of the type of wood from which it is made affects the price of the solid board. To extend the working life and increase the working properties, this layer is covered with specialized oils or varnish. The layer below is also made from wood treated with water-repellent agents, but less valuable coniferous species are used for this.
To ensure that there are no gaps between the covering panels and for ease of installation, the boards are connected to each other using proprietary locks. These connection methods will allow, if necessary, to dismantle the coating, which would not be possible when fastening it to the floor surface with glue or screws.
Is parquet suitable for your apartment?
Laying parquet on a screed is an effective solution for flooring installations. However, before making it, the reasonableness of such a decision should be carefully assessed. After all, wood is a natural material, very susceptible to temperature fluctuations and high humidity. Therefore, it is reasonable to use it only in rooms with guaranteed suitable temperature and humidity conditions.
If it is too dry, the parquet dries out, loses its shape and appearance, cracks form, and if you lay it in a damp room, the parquet planks will rise when saturated with moisture. Optimal parameters:
- Humidity 40–60%;
- Temperature not less than +18°C, but not more than +24°C.
USEFUL INFORMATION: How to glue linoleum joints at home
How is parquet installed?
The technology of laying parquet on a concrete screed, provided all the necessary nuances are observed, is not particularly complicated. Conventionally, the process can be divided into several stages.
- Checking the quality of the screed or installing a new one.
- Waterproofing.
- Plywood flooring (chipboard, OSB).
Important! Parquet can be laid directly on the screed only if the conditions of low humidity of the base are met - up to 6%, or even better - up to 3%. It is highly recommended to use an additional layer of plywood, chipboard or OSB.
- Laying parquet planks.
It is recommended to lay parquet on a screed without plywood in two ways - using brackets or using the tension method. It is not worth gluing the planks due to the large difference in the thermal expansion of the materials. If you still decide to use an adhesive composition, it must be elastic.
- If necessary, sanding and varnishing the parquet.
Parquet boards can be safely laid on a concrete floor without using a plywood backing. To learn how to lay a parquet board, we recommend watching the instructional video:
How to lay parquet boards on a concrete floor - instructions
Why do you need to know how to lay parquet boards on a concrete floor step by step? Understanding the process will allow you to do the installation yourself without the cost of craftsmen and unnecessary materials. As for the choice in favor of natural parquet, it fully justifies itself. Wood copes well with heat conservation and sound insulation, and is available in a wide range of colors and textures. This floor will last for several decades without requiring special care.
There are several ways to lay parquet flooring on concrete.
Materials and base - what should they be?
In order for the parquet board based on a natural floor to last the period stated by the manufacturer, it is important to adhere to certain rules regarding the preparation of the base and materials. We are talking about the following indicators:
- The norm of deviations of the subfloor surface from the horizontal plane. An important parameter, it assumes deviations of no more than 2 mm for every 2 meters of length, regardless of direction.
- The maximum inclination of the concrete floor surface to the horizon. It also has implications for the future use of parquet flooring. The permissible norm is up to 0.2% of the length of the room.
- Subfloor moisture level. The concrete screed must be completely dry before installing the parquet board. The permissible humidity level is up to 5% by the time the floor is installed.
- Temperature and air humidity level in the room where installation work is carried out. The parameters of the tree will depend on this indicator. Humidity should be between 40-60%, temperature - from 18 to 23 degrees above zero.
The quality of the base directly affects how long the parquet will not require repair
And the last no less important indicator is the compressive strength of the screed. The strength of concrete depends on it. The norm is 150 kgf/cm2, typical for concrete M150 and above.
It is worth considering that a damaged concrete screed will require mandatory renewal using self-leveling mixtures.
Options for flooring on concrete screed and technology
You can install parquet boards either directly on the screed or on wood materials - racks or joists. They do this in three ways:
- adhesive;
- floating;
- using fasteners.
In the first two options, before learning how to lay a parquet board on a concrete floor, it is worth paying attention to the construction of a continuous substrate. It will become the intermediate layer. In the latter option, the boards are attached directly to plywood laid on the base or joists with a distance of 0.3-0.4 mm.
The parquet floor is assembled on a pre-arranged base
The peculiarities of installing boards on a concrete screed imply the mandatory installation of a waterproofing layer, for example, in the form of polyethylene film - the most affordable material. It is important that the film is laid with an overlap (at least 20 cm) and secured with tape, with an overlap of 10 cm from the wall.
The substrate mentioned above is laid as the next layer after the film. Polystyrene, cork or polyethylene foam are suitable. Just as in the case of the waterproofing layer, the strips of the substrate are fastened together with tape. The most convenient and safest material is considered to be cork as a substrate.
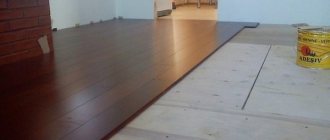
In the case when the choice falls on the adhesive method of fastening, it would be appropriate to use waterproof plywood as a backing. It is attached to the base using self-tapping screws. The device begins by moving from the walls to the center of the room.
Laying plywood backing with glue
An important step is calculating the amount of parquet boards. If it is necessary to trim the last row by more than 5 cm, then the first row must correspond to its width. The slats of the first row are fastened to the wall with a tenon. This is necessary to ensure a tight fit. In this case, the spike on the longitudinal side is cut off.
A gap of 10-15 mm must be left between the wall surface and the board, taking into account the ability of wood to change parameters under the influence of the microclimate in the room. To maintain the gap, stakes are used. The floating flooring method involves the use of a special hammer to tap the parts connected by the locking method.
Preparatory stage
Cases when the surface of the base (concrete slab) is perfectly flat (permissible difference is no more than 1 mm per m2), hard and dry, are extremely rare. Therefore, the laying of block parquet is carried out not on concrete, but on a cement-sand screed, or its equivalent - a self-leveling floor on a gypsum or cement-gypsum base.
Additionally, the subfloor is inspected for cracks and other imperfections, which are filled with putty or cement mortar.
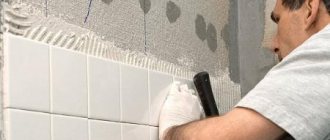
Please note that before laying parquet, it is necessary to completely clean the surface of the base from the remains of old coatings, oil stains, construction and household waste. It must be removed from dust, carefully cleaned, and treated with a primer.
Important! A freshly poured screed should be given time to dry. If its thickness is up to 5 cm, then it will take 4–6 weeks.
Step by step guide
First, let's list the materials and tools that will be required for work:
- Polyethylene waterproofing film 0.2 mm thick;
- The backing is made of polyethylene foam, cork, extruded polystyrene foam or spruce. Section – no more than 3 mm;
- Impact block required for tight fit of planks;
- Metal bracket or wringer for installing the last row;
- Mallet;
- Carpenter's glue or PVA for gluing sections of board when forming pipe contours, etc.;
- Mounting wedges;
- Hacksaw, jigsaw or miter circular saw;
- Tape measure, square ruler, pencil;
- Level and moisture meter;
- Primer composition;
- Polymer adhesive for gluing parquet boards to the base and a notched trowel.
Laying the flooring is the final, final stage of repair, so all other work must be completed by this time. Recommended air temperature is from +18 to +24 °C, relative humidity level is 40-60%. The floor heating system turns on in 14 days and turns off in 2-3 hours.
In this case, it is necessary to comply with the acclimatization conditions: the parquet in packaging should be delivered to the premises 2-3 days before the start of work, and opened immediately before installation.
Laying boards with glue is most often carried out in cases where the risk of changes in linear dimensions is very high (consistently increased humidity levels, serious changes in climatic conditions). Or if the assembly area exceeds 120-200 m². The maximum permissible width of the coating laid in a single, continuous sheet is up to 15 m.
Advice! It is strictly not recommended to lay the boards on electric “warm floors”, since the spot heating is too high, this leads to deformation of the planks.
The floating installation technology is as follows:
Preparing the base
Absolutely all manufacturers require that the concrete floor be smooth, dry, durable, free of debris, old coatings, oil and other stains. The permissible level of differences is up to 2 mm for every 2 meters of the base. A 2-meter control rod is used for checking.
If the sand “crawls out” from the screed layer, then it is necessary to prime the floor with a strengthening compound. You can also use special reinforcing canvases (Multimol from Wuqing, etc.).
The humidity of a cement-sand mixture screed or concrete floor should not exceed 2.5%, anhydrite - up to 0.5%. The percentage of moisture content must be checked with a contact moisture meter.
The next step is the waterproofing deck. The film is spread over the entire surface with an overlap of 15-20 cm, the joints are taped. Next you need to lay the backing end-to-end. If a coniferous variety is used, then, according to the recommendations of the manufacturers, it is laid diagonally with trimming of the outer plates.
Before assembly, you must carefully measure the room again and draw a layout diagram to scale on a sheet of paper. This is done in order to accurately calculate the dimensions of the extreme strips. Their width should not be less than 50 mm. Otherwise, the first row is shifted by the missing centimeters.
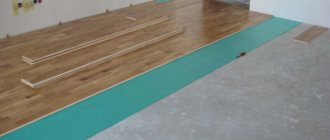
Laying flooring material
Parquet slats are removed from the packaging and laid out on the floor. Since the top layer is made of natural wood, the surface may vary in tone or pattern.
Laying of wooden coverings must be done in the longitudinal direction. This is the best option, since the percentage of longitudinal shrinkage of wood products is significantly lower than transverse shrinkage.
Floating way
Installation starts from the length of the wall from left to right. A tenon is cut off at the end plank, the board is laid in place and plastic or wooden wedges are installed to provide a gap between the wall and the covering. The first row is assembled, the second begins with the trimmed lamella. If necessary, the connection is compacted using a tamping block.
The last row is cut to the specified dimensions with a miter saw, assembled along the end, then inserted into the gap and pressed with a metal bracket.
To form a pipe outline, you need to “cut” the strip with a pencil, cut it and cut out the required hole in compliance with the rules for expansion joints. The board is installed, the section along the edge is coated with glue and put in place.
On glue
The installation method using the adhesive method repeats the first stage (preparing the base). But the installation itself proceeds as follows:
- A suitable one- or two-component polymer adhesive is applied to the screed and carefully spread using a notched trowel.
- The tenon is cut off from the first row plank and installed in place, observing the thermal expansion joints.
- Subsequent strips must be laid in a standard manner, with dense interlocking.
- The last row is also trimmed and secured with a mounting bracket.
- After assembling the coating, it is necessary to place a weight on it for better adhesion to the base for 1-3 days.
Installation of baseboards and other moldings
Remove all wedges around the perimeter and activate the “warm floors”. Screw a decorative strip that matches the tone and texture to the wall, and install transition strips in the doorways. For columns and the like, flexible PVC thresholds can be used.
Waterproofing
After the base has been prepared, a special film with waterproofing properties should be laid on it. The strips are laid with an overlap of approximately 20 cm. The edges are secured using tape, and the film supply is placed on the wall for laying under the baseboard. The underlay used during the installation of laminate or parquet boards is not suitable for parquet.
The role of restrictive wedges is performed by a special self-adhesive rubber cord, which is installed around the perimeter of the room. The same element compensates for possible thermal expansion of the slats.
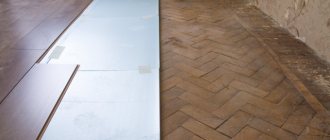
Plywood flooring
If you decide not to take risks and lay a stabilizing plywood layer on the screed, which will protect the parquet from swelling and damage, do the following:
- Thick plywood sheets (the thickness should be 2/3 of the thickness of the parquet) are sawn into squares (40 × 40 or 70 × 70).
- The screed is treated with a primer.
- Special glue is applied to the surface.
- After such processing, the plywood squares are laid, and it is done with an offset, and gaps of 3 mm are left between the sheets.
- The gap between the laid plywood and the wall should be approximately 1 cm. Upon completion of the work, it must be filled with sealant.
- Before installing the parquet, the plywood is sanded to eliminate possible differences.
USEFUL INFORMATION: How to make a floor screed on a balcony with your own hands
Why is the underlay needed?
Once the base floor has been thoroughly inspected and prepared, it is time to move on to the next preparatory stage. Laying the boards on the concrete floor is done as soon as the underlay is fixed. This point is mandatory, since the substrate protects the building material.
- It smooths out small imperfections in the base floor;
- Eliminates height deviations and floor alignment defects;
- The material serves as protection against the negative effects of moisture and protects the lower part of the board from getting wet, preventing the appearance of mold and mildew;
- Forms a layer that does not allow cold to pass through, and thanks to this makes the floor even warmer;
- It becomes an additional shock-absorbing layer that protects the board locks from breaking and failure;
- Keeps the floor covering from shifting in case of sudden changes in room temperature;
- It does not allow gypsum or cement dust, which appears over a period of time from the screed, to get into the cracks between the panels and then make its way into the room;
- in high-rise buildings, the use of a substrate increases the level of noise insulation in the room.
Cork backing for parquet boards
Installation of parquet with brackets
If we lay planks on a screed using steel brackets, then the procedure is approximately as follows:
- To the wrong side of each plank, with the exception of the last row, at a distance of 15–40 cm from each other, we stuff special staples, which can be purchased at hardware stores. This manipulation is performed in such a way that half the length of the staple remains free.
- We coat the ends of the parquet planks with adhesive (you can use PVA) and lay them in a row.
- The second row is installed in such a way that the remaining free edge of the bracket fits securely into the adjacent plank.
- We repeat this process by analogy for the required number of rows.
- The final row of planks is glued to the previous one without using staples.
Installation methods
Masonry
boards are made in two versions: floating and fixed. The names of such methods speak for themselves. With the floating method, you do not have to use glue or auxiliary fasteners. You can disassemble the covering almost at any time and replace the faulty rail. With the fixing method, fastening is done using additional materials. Once the coating has been installed, it is held firmly, but there is no way to disassemble it. In this option, the entire floor is completely replaced.
During floating installation
is carried out gradually:
- The first board is laid with a groove to the surface of the wall in the direction to the right. Wedges are installed between it and the wall at a distance of 1 cm.
- The initial row is laid with a tongue and groove towards the groove of the previous board and secured with a lock.
- Using a level, check the evenness of the coating; if there are distortions, then leveling slats are placed under the boards.
- After the first rows have been leveled, another 3-4 rows are laid down and again leveled.
- After the constructed structure is knocked down using a block and a hammer.
- In this order, lay out the entire floor covering to the end.
- It is better to place the parts like in chess.
- The last row of slats is cut to the required length and width and secured with a plinth.
Floating installation method
During installation using the fixing method, installation is carried out in the same way as with floating. The difference is that any component, not counting the locking fastening, is additionally glued or attached to specialized brackets.
The video will tell you about the intricacies of laying solid boards.
Tension parquet
If we are talking about stretched parquet laid on a screed, then the procedure is as follows:
- A hole 1 cm in diameter is drilled in each plank.
- The central row is assembled, which will later become the basis for the entire canvas.
- The tenons of the parquet planks are mounted in grooves offset by a quarter or half the length, so the holes made in the body of the parquet flooring must coincide.
- After assembling the floor, it is necessary to stretch special fastening cords made of plastic, which have the necessary elasticity to withstand possible seasonal changes in the geometry of the material.
Fastening parquet to plywood
When using plywood flooring laid on a screed, the planks are attached to it using parquet glue applied with a special spatula. Next, it is recommended to shoot the parquet flooring along the edge - several pins or nails per element. This will not only make the fastening more reliable, but will also allow you to squeeze out excess glue and ensure a more uniform fit of the planks.
USEFUL INFORMATION: Soundproofing rooms in an apartment in a new building
Final processing of parquet
After installation, the floor covering must undergo a rough sanding procedure. Before it, all minor defects, cracks and chips are covered with putty. Then the base is refined using fine-grained grinding machine attachments.
Upon completion of sanding, a primer and protective coating are applied to the parquet, and the gaps near the walls are closed with baseboards.
Having laid parquet on the floor, to extend its service life, do not forget about the need for appropriate care: treatment with special care products, annual application of wax protection, and careful handling. Then the noble floor covering will delight you with its attractiveness, reliability and convenience for a long time.
Glue selection
When preparing the adhesive mixture, you need to choose the optimal type depending on the type of surface.
Dispersive – suitable for beech and oak parquet. The advantage of this mixture is its affordable price.
The disadvantages are: the maximum drying time is 5 days.
Solvent-based - its advantage is the ability to make changes to an already glued surface within 25 minutes. Drying time is 3–5 days.
Reactive hardening mixtures. Suitable for all types of wood. Drying speed – 2 days. Expensive modern adhesive based on a polyurethane composition. The highest strength and reliability indicators are provided by two-component adhesives.
Any adhesive is applied to the board using a notched trowel.
Notched trowel
It allows you to avoid unevenness of the glue layer.
For installation you need to prepare the following tools:
- fine-toothed saw;
- hammer;
- drill;
- roulette;
- construction pencil;
- cord;
- square;
- screwdriver;
- construction knife;
- wedges, block, wedges;
- putty knife;
- parquet sanding machine;
- construction vacuum cleaner;
- corner grinder.
Corner grinder