If you are faced with the task of decorating a wooden wall with tiles, then in this article we will tell you how to do it and avoid making serious mistakes. The fact is that wood, as a material, is not the most stable finishing option, for the sole reason that wood breathes, which means the cement base of the adhesive used for laying tiles can crack. As a result, your tiled wall will soon begin to crack at the seams and ultimately either lose its appearance or simply fall apart.
Let's start installing tiles on a wooden wall
- First of all, you need to use any antiseptic in order to protect your wooden walls from rotting. Since wooden walls can absorb moisture, this is a very important point; do not neglect the use of antiseptic!
- Afterwards you need to glue the roofing felt to the wooden wall. It will protect the tree from destruction. During the drying process, the cement mortar releases moisture, therefore, if you do not protect the wall with roofing felt, it will absorb all the moisture, thereby causing the formation of fungus or mold.
- Next, at a short distance from the wall, you need to mount a metal mesh, which will serve as a reinforcing material and will prevent your wall from crumbling. To install the mesh at a distance from the wall, it is advisable to use slats. This way you will give the wood the opportunity to breathe without destroying your structure.
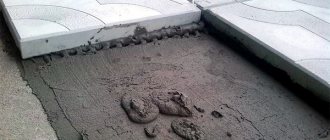
- Afterwards, you need to roll the entire wall into cement mortar. Be sure to use cement mortar and not gypsum, otherwise you may have problems with the wall in the future. After applying the solution, it must be allowed to completely harden. Moreover, it is advisable to periodically wet the wall with water for three days so that the cement becomes as strong as possible.
- Next, we move on to the work of cladding a non-wooden wall.
- Before starting work, it is advisable to soak the tiles in water for 5 hours. Tiles soaked in moisture will have better adhesion, which will significantly increase their chances of durability.
- Be careful, because sometimes due to a violation of the tile production technology, stains may appear on it when soaked. We recommend testing one or two tiles before soaking the entire material. Those tiles on which stains appear must be returned and replaced. If you don’t want to take risks, use a spray bottle with water and simply wet the inside of the tile.
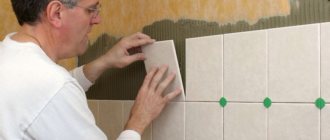
- The main thing when facing is to do everything smoothly. In simple terms, the first tiles set the vertical and horizontal of the entire future cladding. Therefore, use a bubble level or laser level to correctly lay out the first tiles.
- When laying tiles on the wall, use crosses to ensure that the width of the joints between all tiles is the same. At least two crosses are installed on each tile. It is advisable to install along the edges of the tiles to avoid accidentally bevelling.
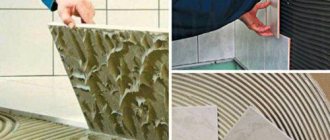
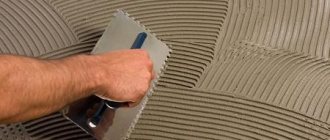
- The solution must be laid on the inside of the tile, leveling it with a comb or trowel, and then apply the tile to the wall.
- If excess mortar appears along the contour of the tile, simply remove it using a scourer.
- After the solution has completely hardened, it is necessary to remove all the crosses, clean the horizontal and vertical seams, and then fill the solution with plaster, or better yet, with a special grout for tiles.
Is it possible to glue
Is it possible to glue tiles to wood? The clear answer is yes! Strength and the result of perfect gluing are ensured by additional work that improves the adhesion of the solution and the integrity of the structure itself. And the choice of tile adhesive for wood depends on the external state of the working field and the conditions of its maintenance.
Initial additional work before laying ceramics
- strengthening the base to avoid load fluctuations;
- surface priming with a non-absorbent composition;
- leveling the wood with elastic putty;
- sanding and degreasing.
For example, before using liquid nails as facing adhesive, the fastening surface is thoroughly sanded and degreased. This procedure has the added benefit of making the material waterproof.
Methods for attaching ceramics to boards:
- Light-weight tiles can be laid by applying spot glue;
- When joining heavy ceramics, it is best to use a spiral technique for applying adhesive material;
- For the purpose of budgetary savings, to fix the tiles, preliminary installation is done with a metal grating secured with a cement screed. Regular cement is usually used for gluing to this structure.
The drying time of the masonry depends on the thickness of the applied layer, temperature conditions and humidity inside the room.
When covering plywood, it is important to properly prepare the coating for the upcoming work. To minimize micro-oscillations from physical activity, work is first carried out to strengthen the foundation. Then the plywood covering is primed several times, with the obligatory drying of each layer. When laying tiles on plywood, choose a highly elastic adhesive - this composition will not allow the ceramics to crack under physical pressure.
Typically, when gluing onto plywood, two-component adhesive mixtures are used, which are characterized by good waterproofing properties and strength. They contain polyurethane resin and hardener, which are mixed immediately before application.
It is important to know that two-component adhesive retains its adhesive properties in the first hour after production.
As can be seen from the above, gluing tiles to wood is possible subject to preliminary and high-quality preparation of the original base, as well as a responsible approach to the choice of adhesive.
Is it a good idea to tile wooden walls?
Frankly speaking, if we consider the option of finishing wooden walls with tiles, or finishing walls with another material, the following conclusions arise.
If you have never laid tiles on wooden walls, then it is better not to risk it and hire a professional who specializes in such work. In this case, you will at least be sure that your wall will not crack after a while, and most importantly, you will be sure that the process of wood rotting and the formation of mold and mildew has not begun under the tiles.
If you decide to do the work yourself, we strongly recommend that you choose another material for cladding that does not require such careful preparation of the walls. Otherwise, simply try to comply with all the necessary technical points in order to reduce possible problems to a minimum.
Summary
It is possible to lay tiles in the bathroom on the walls and floor in a wooden house, the main thing is to find the optimal approach.
Gluing ceramics directly to walls and floors is possible only with special adhesive solutions based on epoxy resins or polyurethane; the use of cement-sand glue with additives can cause damage to the base - saturating it with water and insulating it from air.
Experts still recommend using an integrated approach to cladding and installing an additional base of plywood or drywall - this is exactly what real professionals do. This method has a number of advantages:
- the main wood does not suffer in any way, therefore it retains its properties and integrity longer;
- the cladding can be dismantled at any time, again without harm to the main wall or floor;
- The wood has constant contact with air, which means it does not accumulate moisture and does not dry out, and the natural balance of moisture inside the timber is maintained.
Whatever installation method is chosen, special attention should be paid to adhesive compositions: read the instructions and description. Perhaps the mixtures have narrowly targeted properties that are suitable specifically for your room (humidity, type of materials used, etc.).
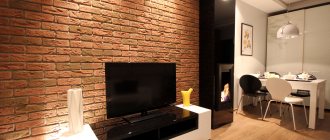
- Exterior finishing
What are the reasons
- Even if there are minimal conditions for the formation of humidity or generally changes in temperature conditions, the wood will expand and contract depending on the air.
- The tiles and the mortar itself also have the ability to change depending on air humidity and room temperature.
- The tile itself is very fragile, it is comparable only to glass, so for its installation you need the most static base.
- Wood, even covered with tiles, will still absorb moisture from the environment, so without any care it will begin to rot and form fungus and mold.
- The seams, which are made of gypsum grout, will begin to crack soon after installing the tiles on a wooden wall, and then your tiles will begin to crack.
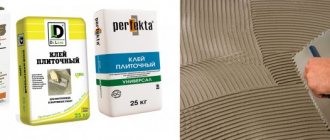
Which tile adhesive to choose
To install ceramics on a wooden or plywood base, you should choose an elastic adhesive based on:
- polyurethane;
- epoxy resins.
These materials serve as both fasteners and waterproofing. Glue with natural and artificial resins is sold in finished form, and two-component adhesives are sold in powder form, which must be diluted with water before use according to the instructions.
You can also use “liquid nails”, which are suitable for working in wet conditions. These retain their load-bearing properties even when exposed to moisture; the usual composition for bathrooms and kitchens is a short-lived option.
Tips for installing tiles
We will consider the installation method using flexible tile adhesive, since this method is the most optimal. If you understand these instructions on how to glue tiles to plywood, then in the future you will be able to install tiles using other adhesives.
Ceramics should be laid from the second row. The first one will need to be cut to size and installed at the end. It is recommended to start this process from the far wall of the room. You should regularly check the horizontal position of the material using a level. The seams should not be made more than 3 mm, but also not less than 2 mm. If there is high humidity in the room, then the seam must be made half a centimeter.
The adhesive for tiles on plywood must be prepared as specified by the manufacturer. However, do not forget that the solution dries quickly, so it would be better to prepare it in small batches.
Preparation instructions
Tip: it is preferable to lay plywood in 2 layers to reduce the risk of tile peeling. A material with a thickness of 22 to 28mm is best. These conditions increase the strength of the box.
Tile adhesive thickness
Then we prepare the surface for tiles on chipboard. The material is sanded and cleaned from dust. Plywood must have a smooth surface without flaws. We prime it 2 times. The second coat of primer is applied only after the first has completely dried. If plywood is intended for use in a room with high humidity, then it is pre-treated with waterproofing materials.
Let's disassemble the floor
Breaking up a wood floor that is in good condition instead of immediately starting to lay tiles?
This idea may seem absurd, but let's start with the fact that the floor should not be broken, but disassembled, carefully removing the boards, in order to then use them again.
There is a logical explanation for this action:
- It is necessary to check the condition of the joists and boards, and, if necessary, repair and strengthen them.
- To ensure ventilation, the boards (the same or new ones) will not be nailed close to each other.
These arguments are more than enough.
Glue selection
The adhesive for laying porcelain tiles should have a high content of plastic polymers that ensure adhesion of the material to the base. The dry method requires higher quality glue than for laying on a reinforced screed.
When choosing an adhesive, it is recommended to pay attention to the following points:
- Porcelain tiles do not have moisture-absorbing properties, so cement and tile adhesives are not suitable for them.
- External installation (veranda) requires the use of glue with plasticizers, which make it more resistant to low temperatures.
- For interior work (sauna), glue with a high content of latex or acrylic is suitable.
The following adhesive mixtures are used for the preparatory screed:
Screed on a wooden floor. Pouring technology
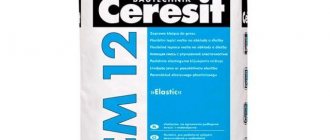
- Ceresit CM-11;
- Ceresit CT-117;
- Profit;
- Moment.
For dry preparation, specialized highly plastic mixtures are used on the heated floor system and insulating substrate:
- Knauf Flex;
- Litokol.
Laying porcelain tiles
Porcelain tiles are laid in two ways: with or without seams. Seamless technology is used when it is necessary to obtain a smoother surface. For end-to-end installation, it is recommended to use larger tiles, which reduce the number of seams on the surface.
Step-by-step tile laying:
- Determining the center of the floor from which to begin laying the tiles. A regular cord is used for this. This tactic helps keep the center intact. Small fragments that need to be cut to size are placed along the edges.
- Using a spatula, glue no more than 5 mm thick is applied to the base under each individual tile and spread with a comb spatula, the tooth height of which must match the thickness of the porcelain stoneware being laid.
- The tiles must be laid on the adhesive no later than 15 minutes after its application, during which time it sets.
- The next tile is placed on the edge close to the previous one, after which it is lowered onto the previously applied glue, moving it slightly from the starting point, while pressing it down, and then tapping it with a rubber hammer.
- The equal width of the seams is ensured by crosses, which are inserted between the plates and are not removed until the adhesive mixture has completely dried.
- The levelness of the masonry is controlled by the water level. Measurements are taken after each tile is laid.
- When taking breaks between laying, the factor of subsidence of previously laid tiles should be taken into account. It is impossible to focus on it during subsequent laying, otherwise differences will form after the surface dries and shrinks.
- For grouting, tile adhesive or a mixture is used to fill the joints. Grouting is performed 2-3 days after installation. The choice of grout depends on the desire to give the coating neutrality or emphasize the pattern. In the first case, you should choose a grout that matches the tile, in the second, a contrasting shade.
Preparing the floor for gluing tiles
There can be many options for preparation and materials used for this procedure. The condition of the wooden floor also plays an important role. Access to it will be completely closed after laying the tiles, so all unreliable elements must be replaced. In addition, wood is less durable, so it’s better to be safe.
The weight of the tiles will significantly increase the load on the load-bearing joists. If there is no firm confidence that they will cope with their task, then the distance between them should be reduced by adding the required amount of lag.
USEFUL INFORMATION: How to level walls in an apartment: building mixtures for leveling walls
Let's consider two options:
- The condition of the old wooden floors is close to perfect. They do not bend, do not creak and have no visible defects.
- Wooden floors require partial replacement of elements, including the addition of joists.
Option #1
In the case where the wooden base does not require repair or replacement, preparatory work will include the following steps:
- The floor boards are completely cleared of the paint layer. This can be done mechanically, using chemicals, or using a hair dryer. Then the surface of the wood is impregnated with an antiseptic solution.
- A layer of waterproofing is laid. This can be glassine or a vapor barrier membrane (the rough side should face the inside of the room).
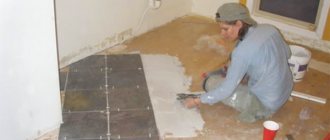
- To obtain a perfectly level base for a wooden floor, you can use thick plywood or chipboard. They are much less susceptible to deformation under the influence of the external environment than wood. The sheets are laid in a checkerboard pattern, a compensating gap is left along the perimeter along the walls, which is subsequently filled with polyurethane foam.
You can attach the tiles to wood using a special epoxy-polyurethane adhesive, which retains its elasticity after hardening. This allows you to compensate for minor vibrations of the base.
This tile adhesive is quite expensive. Is it possible to glue ceramic tiles to wood without it? There are two options:
- If the room is high enough, you can make an additional screed. Sheets of plywood or chipboard are impregnated with hot drying oil or latex. A reinforced mesh is laid over the still uncured impregnation. Its edges should extend slightly onto the walls. After the impregnation has dried, the mesh is additionally fixed with self-tapping screws. The screed is carried out with various self-leveling solutions, usually based on liquid glass.
- Another option is to level with gypsum fiber sheets. They are attached to the wooden floor in a checkerboard pattern, ensuring minimal gaps between the individual elements.
A prerequisite remains the presence of a compensating gap between the wooden floor and the wall. But if you use screed or gypsum fiber, you will need the most ordinary cement glue, since the tiles will be attached to a reliable base that is not subject to deformation, and not to wood.
Option No. 2
If there are problems with the wooden base, you will have to disassemble the structure completely. This will allow you to replace floor elements that have become unusable, add and level joists, and update waterproofing and insulation.
It is important not to forget to leave a gap between the insulation and the floor boards for natural ventilation.
The further algorithm of actions will be the same as in the case of a floor in good condition.
USEFUL INFORMATION: Main types of primer for wall treatment
Do you need a screed?
Before laying, you should check the coating and evaluate how even it is using a level. If there are significant deviations, it is necessary to make a screed before facing.
What alignment methods are there?
Wet screed. Suitable for cases where it is necessary to increase the strength characteristics of the floor. At the same time, a gap is created around the perimeter of the room, taking into account possible deformation. This condition allows the base to move without destroying the installed coating;
- Dry screed method. This method is the most popular because it allows you to create not only a flat, but also a reliable floor with high load-bearing capacity;
- Leveling with gypsum board sheets is considered the easiest option. First of all, carefully examine the condition of the wood floor. Those bars that have rotted should be replaced with new elements. Next, the drywall is installed, the sheets are fixed with polyurethane glue, and the joints are treated with sealant. You should also soak the sheets with a primer mixture.