Comfort and coziness in an apartment largely determine a person’s quality of life. In order for a home to be a favorite haven, a place of rest, you need to properly care for it: keep it clean and tidy. However, over time, the paint finishes fade, and small scratches, stains or cracks spoil the appearance of even a carefully cleaned apartment. In order to return your home to its former luster and add newness and freshness to the interior, you will have to make cosmetic repairs. To achieve the goal with minimal costs, you should first understand: what cosmetic repairs are and what investments (financial, temporary) are ahead. Without a clear action plan, it’s easy to get bogged down in large financial expenses, since cosmetic work can smoothly turn into capital work: this is facilitated by a wide selection of materials and accessories, the purchase of which can be difficult to refuse.
What are cosmetic repairs?
The name “cosmetic” speaks for itself. This type of repair is used to restore beauty without remodeling the apartment, deep replacement of heating and water supply communications, electrical wiring, and plumbing. In this part, they limit themselves to updating external accessories: sockets, switches, faucets - that is, they change what spoils the beauty due to wear and tear or unsightly appearance.
Cosmetic repairs initially involve minimal costs, but they can also be expensive, since the cost of some modern luxury finishing materials is quite high. All repair and finishing work is usually divided into types according to the degree of complexity and the materials used.
Bathroom (bathroom and toilet)
We begin in the same way as described above, cleaning the bathroom from tiles and putty and other materials. If replacement of plumbing components and pipelines is required, they must be replaced first.
A small but necessary tip for cosmetic repairs in the bathroom: tile adhesive does not stick to putty or other gypsum solutions, so it is recommended to putty exactly under the tile line with a small margin, but in any case, the ceiling is done first. It is not tiled.
Next, unlike puttying the walls of the living area, we place the tiles on the floor under the level, from which we will build when laying wall tiles. After laying the flooring and setting it, we proceed to laying it on the wall.
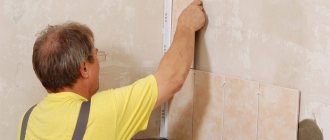
But here it is important to remember that the first row of tiles is attached to the level and left for about a day, until it completely sets, so that the wall does not “float” and remains level? and into the plane. The next day we begin laying the rest of the wall.
After the tiles have been laid and the ceiling is ready, we proceed to jointing, but it is important to remember that it is advisable to clean the tiles from the joint immediately (with a wet rag), because after drying it will be difficult to wash off and you can scratch the ceramics itself.
Floor repair: finishing work in the house and apartment. Design features, selection of materials and design optionsGood repair: how to implement a comprehensive high-quality repair
- Examples of the best design projects in an apartment
Simple cosmetic repairs
This type of repair is done periodically every 2–7 years. It includes:
- whitewashing or painting ceilings;
- replacing wallpaper;
- painting (varnishing) of wooden floors, window frames.
In this type of construction work, materials similar to those with which the room was finished are used. Thanks to a simple cosmetic renovation, the apartment regains its lost cleanliness and freshness, and the use of materials of other colors and textures allows you to change the style of the home: after the floral wallpaper, an avant-garde pattern on the wall will give the room a completely different sound. A simple repair goes into the “complex” category if, in addition to painting and wallpapering, the following is required:
- replacement of finishing of openings (windows, doors);
- change of flooring (linoleum, laminate);
- tiling kitchen, bathroom.
Doing cosmetic repairs with your own hands is, one might say, a Russian tradition. However, for tiling and sticking “heavy” wallpaper (metal, vinyl, photos) that require improved preparation of the walls (leveling, puttying), it is cheaper to hire a specialist: there is a high risk of damage to the expensive material, and the fruits of independent labor can disappoint, since even the most beautiful finishing the material can be damaged by careless/inept application.
Preparing surfaces for finishing
After completing the dismantling of the old coatings, it is necessary to eliminate defects in the walls and ceiling. To facilitate the penetration of the repair material (putty) into the cracks, they must be expanded (widened), the damaged areas must be cleaned of weakly adherent fragments, and the peeling (“bubbling”) areas of the plaster layer must be completely removed. Surfaces prepared in this way must be treated with a primer composition for hygroscopic (moisture-absorbing) substrates.
Primers are aqueous solutions of polymers containing long polymer chains that are capable of penetrating deeply into the porous structure of concrete or plaster and being fixed inside it, significantly strengthening the surface layer of the base and eliminating the formation of dust, which, in turn, ensures the maximum level of adhesion of repair compounds to the base material .
After the primer has dried, deep potholes and places where the plaster layer has fallen off are sealed with cement-lime plaster mortar. As a last resort (to speed up the process), you can use alabaster or gypsum-based plaster mortar of the “Rotband” type (TIGI Knauf). As a rule, this operation is performed using a rectangular stainless steel float - an extremely convenient and versatile tool. To seal deep cracks in concrete and brick structures, we can recommend a quick-hardening cement-based repair putty.
The repaired areas are primed, and the surfaces are finally leveled with putty, for example “Vetonit KR” or “Vetonit LR” (Optirok). During this operation, minor unevenness in the base is eliminated and small cracks are filled. It should be taken into account that the thickness of the putty layer should not exceed 2 mm; greater thickness is ensured by applying several layers, with each subsequent layer applied after the previous layer has completely dried. It is recommended to additionally glue serious cracks in the ceiling with strips of plaster fiberglass mesh with a mesh size of 2x2 mm. The use of “serpyanka” tape made of non-woven material for this purpose does not exclude the possibility that the crack will reappear on the ceiling surface. The technology for gluing the tape is as follows: a layer of putty is applied to the ceiling surface, the fiberglass mesh is pressed into the putty and rubbed in with a spatula. Excess putty squeezed out through the mesh cells is removed with a spatula and returned to the container for reuse. Do I need to putty the walls and ceiling completely, or can I limit myself to leveling individual sections? If you plan to decorate the walls with thick wallpaper in dark colors, thick embossed wallpaper or paintable wallpaper, there is no need to putty the entire surface. Through thin light wallpaper, the unputtyed areas will show through with dark spots: in this case, the walls are completely puttied. It is not necessary to completely putty a ceiling covered with water-emulsion paint (it is enough to limit yourself to puttying the damaged areas), but it should be borne in mind that the texture of the finishing layer of paint on puttyed and unputtyed areas can vary greatly, which is especially noticeable under sliding lighting. Material compatibility problems often arise when painting enamel-coated surfaces: some water-emulsion paints do not adhere well to enamel. Based on this, it can be recommended in all cases to completely cover the ceiling surface with a thin (“scrape off”) layer of putty. The dried putty is carefully processed with fine-grained sandpaper or an abrasive mesh. The use of an abrasive mesh provides the best results.
European-quality renovation
This is what they call the renovation of a room using materials and technologies that came to us from European countries. Such materials include:
- Euro-windows – frames made of aluminum-plastic profiles;
- PVC panels;
- imported laminate and linoleum;
- plastic skirting boards;
- interior doors made of cheap slabs, covered with veneer (artificial or natural);
- stretch ceiling.
USEFUL INFORMATION: How to insulate a concrete floor in an apartment on the ground floor
The production of European materials has long been mastered by domestic manufacturers (as well as Asian ones, for example Chinese), but repairs using them have retained their name. European-quality renovation is an opportunity to quickly change the appearance of a room with the help of easy-to-install elements, but it is still classified as a complex type of cosmetic renovation.
The disadvantage of European-quality renovation is the need to hire specialists. Of course, any man familiar with a screwdriver and drill can screw drywall, hang doors, or assemble a slatted ceiling with his own hands. But some nuances of execution come with experience, so the result when carrying out European-quality repairs on your own will, with rare exceptions, not be so flawless.
Where to begin?
A huge plus of such a renovation is the price. The only thing I want to note: if you are going to do cosmetic repairs yourself, you will save, and quite seriously.
The prices are such that of the total amount you spend on repairs, about half will go on employee fees. You can spend this money on materials and do almost everything yourself.
The next thing you need to determine is the amount you are going to spend on repairs. Having decided on the amount, add 10% of it, because... in any case, there will be small spills of material, accidental damage, albeit minor, be prepared for this.
An equally important stage in the renovation is drawing up a plan for the work to be performed, which professional builders draw up before submitting an estimate to the customer. You will also need it for going to the hardware store and determining the final budget.
Don't forget to buy a tool if you don't have one. When everything is ready, the materials have been purchased, the tools are available, the most difficult and most basic part begins - repairs.
Minor cosmetic repairs
It includes whitewashing/painting/wallpapering one room or part of it, for example, a ceiling damaged by flooding by neighbors. A simple cosmetic renovation of a room is considered short-term if you only need to whitewash the ceiling and wallpaper the walls, when there is no need to seal cracks, putty, or paint windows, doors, floors, and radiators with enamel.
Cosmetic repairs are done regularly for reasons of hygiene and updating the environment.
Interestingly, thanks to the development of technologies for the production of building materials, the time until the next cosmetic repair is increasing. Thus, our grandmothers had to whitewash the ceilings 1-2 times a year, and modern finishing materials, such as panels, plastic, special ceiling paints, are easy to clean, retain color for a long time, so their service life is quite long.
Methods to prevent re-cracking
The likelihood of cracks appearing depends mainly on the design of the ceiling. A ceiling formed by a solid reinforced concrete slab is, as a rule, not susceptible to cracking. If there is a joint between concrete slabs on the ceiling, a crack in this area is very likely. The most difficult situation occurs in old houses with wooden floors (often with insufficient rigidity), the ceilings of which are covered with a layer of plaster. Plasterboard ceilings are also susceptible to cracking; sooner or later they crack at the joints of the sheets, no matter how well these joints are sealed. As practice shows, the likelihood of reappearance of even carefully repaired ceiling cracks is very high. To combat this unpleasant phenomenon, we can recommend the use of fiberglass ceiling wallpaper, known as “spider web”. Gossamer is a rolled non-woven fabric made of fiberglass, having a thickness of 1.5 - 2.0 mm and having a relatively loose structure. The significant thickness and loose structure of the web prevents the cracks that form from reaching the surface of the ceiling.
Individual web panels are glued end to end with wallpaper glue. The ceiling surface, prepared as indicated above (defects sealed, cracks sealed with fiberglass mesh, puttied and treated with sandpaper), is primed with glue diluted with clean water by 20-30%. After the primer composition has dried, a layer of glue of normal concentration is applied to the ceiling with a roller, the web panels are glued end-to-end and rubbed in with a stiff brush. When working with cobwebs, as with all materials containing fiberglass, you must use rubber gloves. Note that the final coloring of the web completely eliminates the emission of glass dust and makes the use of glass wallpaper absolutely harmless to health. The correct choice of glue is of great importance. There are cases where the glue sold complete with the web did not provide sufficient water resistance to the joint, which led to the formation of bubbles, wrinkles and yellow spots during the application of the final coat of paint. Practical experience in working with cobwebs allows us to recommend QUELYD “Special Vinyl” adhesive for gluing it, which is distinguished by its high and, importantly, stable quality.
It is almost impossible to get perfect joints between the web panels, so they need to be puttied. This operation is performed after priming the entire surface of the ceiling with water-dispersion paint, diluted with clean water by 10-30%. It is impossible to indicate the exact ratio of paint and water, since paints of different brands vary greatly in thickness. After the primer has dried, joints and minor surface defects are puttied with “Vetonit KR” or “Vetonit LR”, the putty areas are sanded with fine-grained sandpaper, and the ceiling is finally painted with water-emulsion paint. In old houses with wooden floors, even the use of spider webs may not be enough. In these cases, it is recommended to completely cover the ceiling surface with plaster fiberglass mesh with a mesh size of 2x2 mm. The mesh is puttied, sanded, primed with diluted wallpaper glue and covered with cobwebs, as described above. This “layer cake” provides the maximum degree of protection against cracks emerging on the ceiling surface. More details about the use of fiberglass plaster mesh can be found in “TS” 1/2001.
Cost and terms
The price consists of two indicators: the cost of materials and crew services. The work of a craftsman is calculated per square meter, so the larger the area of the apartment, the more expensive the project. In Moscow, the price for cosmetic repairs varies between 3.6 thousand rubles - 4.5 thousand rubles.
Pay attention to the price offered by the contractor. All positions in it must be clear. Make sure that the work is not repeated. Make sure that there are no “extra” lines in the estimate and that you are not paying for work that is not carried out during cosmetic repairs.
Large repair and construction companies are engaged in the installation of suspended ceilings, plumbing and electrical work. If you hire teams of private traders, then you will have to look for other performers for this work.
How long you will have to wait for the repair to be completed depends on the professionalism of the performers: experience, use of professional tools. In addition, the type of finish matters.
On average, a one-room apartment is renovated in two weeks, a two-room apartment in three, and a three-room apartment in a month.
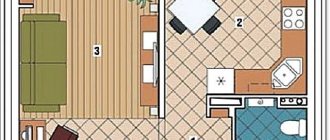
Designer with interior layout
designer renovation
This type of renovation includes not only the repair and reconstruction of the premises, but the development of the entire interior of the apartment, including the arrangement of furniture and installation of complex lighting. You won’t be able to save money on the interior design of this type of renovation. But professionals will help reduce unnecessary costs during the work itself. For example, it is quite possible, instead of expensive wall alignment, to limit yourself to interesting wall decor. Therefore, you should not turn to unknown manufacturers of repair work for this type of work - the slightest mistakes will lead to a very disastrous result.
The interior design is planned and controlled by the architect-designer. It is best to choose such a specialist based on recommendations from friends. If possible, look at his previous work in real apartments, and not just in his portfolio. Try to discuss your preferences with him in as much detail as possible - what color scheme suits you, what level of lighting and decor is best and most comfortable for you. Interior design renovation should reflect your character. By choosing a new face for your home, you will have the opportunity to express yourself as an artist, even if others will “paint” this picture. The main thing is that your idea and wishes come true as accurately as possible...
design project
Then a detailed repair plan is drawn up - sketches, plans for ceilings, electrical relocation, ventilation and heating systems are made. After this, materials are selected that will ensure the highest quality of work.
Any repair, regardless of the type, takes a lot of time and a corresponding waste of nerves for those involved in construction work. But the most important “advantage” of renovation is that any remodeling in the office brings a lot of positive emotions, especially to employees for whom a change in environment is very important.
Stages of work
Preparation
Preliminary preparation is required. Think about what the apartment should be like. All details are important: the color of wallpaper and paint, the amount of laminate, linoleum and ceramic tiles, the shade of the doors.
The modern apartment is decorated in the same style. This also applies to cosmetic updates. In addition to color, think about the texture of the finish. For example, the high-tech style uses laconic finishes and metal surfaces, while the Provencal style uses pastel shades, natural fabrics and wooden objects.
Measurements and purchase of material
Having thought over the style, measure the parameters of the walls, ceiling, floor and calculate the surface areas. Calculate how much finishing and construction materials (putty, primer) will be needed. For calculations, use the information provided by the manufacturer on the packaging.
Moisture-resistant putty Axton 1.5 kg - 106 RUR, Leroy Merlin
To save money, compare prices at several stores. If you are out of budget, replace one type of finishing materials with another, cheaper one. Buy everything you need, including decorative elements and necessary tools. If you are repairing it yourself for the first time, it is better to take a little more material.
Dismantling
After everything is prepared, the old finish is dismantled. Wallpaper, tiles, old linoleum, carpet or laminate are removed. Paint is washed off from the ceiling and walls. You need to thoroughly clean the surfaces before you start decorating the apartment in a new way.
Finishing and installation
Cosmetic repairs include different types of work. The correct sequence is: ceiling, walls, floor. However, if a suspended ceiling is installed, the sequence changes: often the walls and floor are repaired first, and the ceiling structure is installed last.
At the final stage, new sockets and switches, lamps and household equipment are installed.
Switch Hegel Master 1-key IP20, silver - 149 RUR, Castorama
Renovation from A to Z: main stages of apartment renovation
When it comes to renovating your own house or apartment, the famous aphorism comes to mind: “Repair is worse than fire.” Many people still perceive repair and construction work on their living space as a natural disaster. Even if the work is performed by invited specialists.
However, whether you are doing the renovation yourself or by professionals, it is worth finding out what stages of remodeling the apartment you will have to go through . We talk about the types and main stages of repair and construction work, why a repair plan is needed, and how to draw it up correctly.
Renovating an apartment is an expensive undertaking, but with a pleasant result. Photo: sps-sng.ru
Types of apartment renovations
Depending on the scope of work, there are two main types of repairs: cosmetic and major . In the first case, this could be, for example, finishing the walls with a new coating or updating the interior; in the second, dismantling and replacing communications or a complete redevelopment of the living space with moving walls.
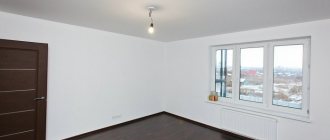
Redecorating
The main purpose of cosmetic renovation is to replace damaged or outdated finishes in the apartment. This could be stale wallpaper, yellowed whitewash or deteriorating flooring. In other words, cosmetic repairs are needed when updating the finishing of a home is required .
Compared to a major overhaul, cosmetic repairs are less expensive , both in terms of time and finances. The finishing of the premises is carried out without dismantling electrical and plumbing networks and structural elements of the apartment. Sometimes it may be necessary to replace the plumbing.
What work is included in cosmetic repairs:
- replacement of worn finishing materials;
- puttying and whitewashing the ceiling;
- puttying and wallpapering walls;
- installation of flooring;
- painting pipes and heating radiators;
- repair of plumbing equipment;
- laying tiles on the floor or walls;
- dismantling and installation of new doors;
- installation of a suspended ceiling;
- other cosmetic work.
Usually such alterations do not take much time. If you have the necessary skills and know how to do repairs correctly , you can do the necessary work yourself. Just keep in mind that communications and structures in your apartment must be in good condition.
Even non-professionals can perform minor cosmetic repairs. Photo: azurka.ru
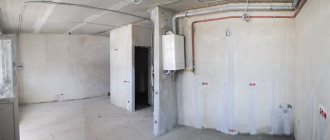
Major renovation
Major repairs involve complete reconstruction of housing . It includes such complex construction and repair work as replacing outdated utilities (water and sewer systems, electrical wiring, etc.) and redevelopment.
This is an expensive type of repair and it takes a lot of time. Typically, major repairs are required for apartments in new buildings that are rented without finishing. But owners of secondary homes, sooner or later, have to spend money on major repairs: replacing worn pipes or outdated electrical wiring.
What work does a major overhaul include:
- replacement of electrical wiring;
- dismantling and installation of pipes and heating radiators;
- production of floor screed up to 3 cm;
- dismantling old finishing materials and structures;
- hidden pipe routing device;
- installation of electrical appliances;
- dismantling and installation of plumbing;
- dismantling and installation of doors and windows;
- redevelopment (creation of new structures);
- removal of construction waste;
- other jobs.
If you are not a professional builder and do not know how to make repairs, then it is better to entrust the major remodeling of your home to specially trained people. After all, before starting construction and repair work, you still need to properly plan these works .
Communications wiring is carried out before the apartment is finished. Photo: ok8.md
Why do you need a renovation plan?
A plan for renovation and construction work or a design project for renovating an apartment is the main stage that precedes the main stages of repair, finishing work, and home decoration.
Kitchen room
Dismantling of old materials occurs in the same way as described above, but you should not dismantle gas equipment, it is dangerous and special organizations do this under a license.
Just like in the bathroom, it is worth designating the level of the tiles, the so-called “apron”. It should be laid out first, and then proceed to puttying the ceiling (if required), having previously sealed the tiles with masking tape and cellophane.
After the ceiling, we proceed to puttying the walls and painting, and then to the floor coverings. It is not recommended to lay wooden coverings in the kitchen, even if the manufacturer guarantees protection from moisture. It is recommended to use tiles or linoleum. After this, we finish finishing the walls with wallpaper (if there was no painting).
Drywall installation
Drywall covers many communications, and not only in bathrooms. A false wall in the living room will allow you to hide risers and heating radiators; it takes up a minimum of free space, but it allows you to avoid installing complex joints with laminate and stretch ceiling pipes.
After this, you can proceed to the installation of frames for the remaining plasterboard structures, in particular, to hide communications, niches for hatches are organized. Mortgages are installed for hanging furniture and built-in cabinets, if necessary. If the ceiling in the apartment is plasterboard, it will be installed during the same period.
After covering the frames with sheets, they are primed and paint corners are installed. Next, the walls are plastered. After complete drying, they are sanded, another layer of putty is applied, which, after drying, is sanded again. The result is almost smooth walls (depending on the skill of the worker).
If the ceiling is suspended, at this stage it is worth calling a measurer.
We wrote earlier about what you can hang on a plasterboard wall.