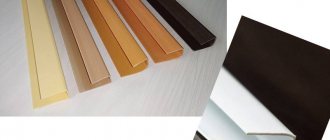
Convenient finishing of slopes with a starting profile
In most rooms, plastic windows are installed. When it comes to finishing, special nuances appear. For example, you can use P and F profiles for slopes .
Application of products
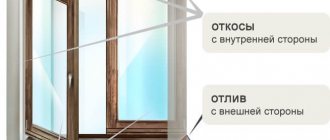
There are two types of slopes: one of them is located outside the building, the other is located on the inside. Both types require proper finishing. The slope is intended not only to give the windows an aesthetic appearance, it performs important protective functions.
Plastic windows are attached to the opening using mounting foam. It deteriorates under the influence of moisture and is gradually carried away by the wind, which is why it is important to install a slope profile that can protect the structure from adverse weather conditions. Otherwise, the foam may become deformed and damage the window frame.
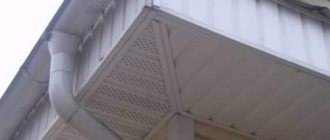
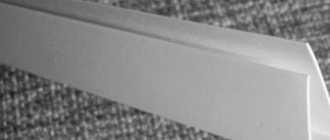
Application of F-profile for finishing the external slope
Methods for finishing slopes
PVC and F-profiles for finishing external slopes
Slopes can be internal and external, and both of these types require proper finishing. Of course, their design is aesthetic in nature, because appearance plays a big role. However, this is necessary not only for beauty. The foam that fills the space between the window and the wall of the house must be protected from adverse conditions. Everyone knows that it is afraid of moisture and tends to absorb it, after which it swells and deforms the plastic window.
There are several ways to improve the appearance of the window space:
- Plastering is an old finishing method that takes a lot of time and effort. Unfortunately, it does not have the property of heat and sound insulation and over time may move away from the surface due to shrinkage of the house. Since the finishing work takes place in several stages and requires subsequent painting, I decided that I would not bother using this option.
- Plasterboard - this option is better than the first and if you insulate such slopes, they will last longer and will retain heat in the house. But one significant drawback made me refuse to use drywall - the fear of moisture. A prerequisite for long service life is a dry room with a low level of humidity. And the installation of such slopes is not far removed from plaster, and I already said that I wouldn’t want to bother.
- From PVC panels - a simple and affordable way that I immediately liked. Long service life and quick installation prompted me to choose plastic slopes, and most importantly, they are not afraid of moisture.
Important! The use of PVC panels is very appropriate for plastic windows; this combination will look quite harmonious, and besides, there are PVC profiles that will help complete and make the finishing process convenient and quick.
When I decided which method I would use, all that remained was to get acquainted with additional components for PVC and learn the installation technology.
Features of application
Finding out the desired profile is quite simple; it looks like the Latin letter “F”. The material is fixed using special plates that are fixed in its grooves. The starting profile for slopes has two important functions:
- Decorates the ends of windows, giving them a decorative look.
- Levels the surface without the use of complex structures and plaster.
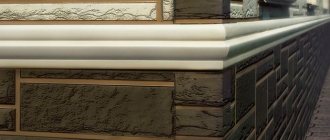
Ready solution
The F-shaped profile for slopes is a convenient solution for cladding. It creates a perfectly flat surface, free of imperfections, protects the opening from moisture and sunlight, as well as wind, dust, and other mechanical influences.
The starting profile is attached to a plastic window without the use of glue. The design not only helps to make the slopes visually attractive, but is also perfect for places where different materials meet.
The starting profile is most often mounted in this way: one side of it touches the wall, the other touches the plastic structure.
If the size of the material does not correspond to the required parameter, it can be cut using a stationery knife; for the same purpose, a grinder or a metal file is sometimes used.
Advantages
The starting profile for PVC windows has several obvious advantages:
- Ability to resist ultraviolet radiation. The profile does not fade even for ten years.
- The material is durable, looks good, and can fit into any interior without standing out.
- Suitable for use both indoors and from the facade.
- Moisture resistant.
- There is minimal chalk in the composition.
- The semicircular end of the tail allows you to lay the profile on the most uneven wall.
- Hides wall imperfections, levels slopes without the use of other materials.
- The plank can be safely cut, no chips or cracks will appear on it.
- Installation is carried out independently; this does not require special skills.
- No glue is used.
PVC windows and slopes
The starting profile for a PVC window sill is ideal, but it can be used not only with it, but also if the walls are made of sandwich panels. The material will help protect the inside of the panel, easily attach to it and last a long time.
Do not put the profile on glue. This action will cause it to crack when exposed to low temperatures and begin to leak moisture.
PVC fabric that is too cheap may also be excessively soft. This will make it fragile. The soft fabric does not last long and is not suitable for outdoor use. It easily deforms from any touch.
You should not save on materials; once you save and purchase low-quality PVC panels, you risk not only spending extra money on replacing them, but also incurring more serious costs if the window frame is deformed.
What is required for finishing
The starting profile is the main component. If the window is standard, you will need 6 meters (the fact is that the panels are sold in lengths of 3 and 6 m). In addition, you will need a drill or screwdriver, as well as metal cuts.
The F-profile is attached using liquid nails. Before its installation, a starting profile is attached. This is easy if the windows are level. Pay attention to the joints: they must be cut to fit exactly together. You need to start work from the side slopes. Insulation can be placed between the wall and the profile.
Features of installing slopes
The starting profile for PVC windows should be used according to the existing algorithm. Preparatory activities are required. During this process, you need to properly prepare the wall surface. Usually, when installing PVC windows, a gap is formed between the frame and the wall, which is sealed with polyurethane foam. Such foam is divided into two categories:
- simple;
- professional.
The first option is very easy to use and is equipped with a special nozzle tube for squeezing out the foam.
And the professional foam is equipped with a collet mount for installation on a special gun. The gap must be foamed from bottom to top very slowly. When the foam has hardened, cut off any remaining foam from the frame using a sharp knife .
The listed types of foam differ both in quality and cost. When doing repair work, it is best to use a professional option, despite the fact that it is not cheap.
Profile installation process
When you have foamed the joint between the wall and the window, and the foam has already hardened, you can begin to install the starting profile. The advantage of installing it is that you do not need to remove old finishing materials , primer, putty, etc.
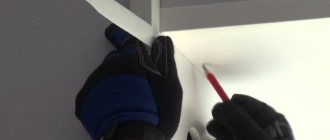
Measure the height and width of the window opening with a tape measure, then measure and cut the profile to the required length. The edges of the profile joints should be cut at an angle of 45 degrees for better joining. You need to start installing them from the top of the opening, then put plastic parts on the sides, and finally - at the bottom of the window.
carry out the installation along it . PVC profiles are attached to the very edge of the window frame using self-tapping screws with a drill or liquid nails.
Self-tapping screws are screwed in every 20 cm along the entire length of the profile, and liquid nails are applied in a thin wavy strip along the entire length, then the structure is pressed firmly against the upper edge of the frame.
If a glue solution protrudes from under the profile, it must be removed immediately with a dry cloth. Once it dries, it will be more difficult to clean the frame. Some experts do not recommend using glue at all to install such structures. The fact is that over time it can peel off from the surface due to dampness or temperature changes, and this may lead to the need to dismantle the entire window.
Each type of design has its own characteristics of installation in the opening. For example, many people attach the F-profile to the outer ends of panels or plasterboard sheets with mounting adhesive, but it is recommended not to do this.
The PVC-based profile will adhere firmly to the slope panels without glue; it can be easily removed and put back if repairs need to be made.
Installation of sheathing
Next, you will need to install a sheathing in the window opening, which will act as a frame for the plastic panel. To do this, they usually take bars with a cross-section of 2 by 4 cm, but you can also take metal profiles. The choice depends on how suitable a particular material is under certain conditions.
So, the bars for installing the frame need to be well dried, otherwise, when drying, they can twist and bend, as a result, the entire structure can be deformed.
The wood will still need to be treated with a special antiseptic composition, since the space under the slopes may be exposed to high levels of dampness. The frame bars are attached along the outer edge of the opening with dowels and nails along the joint, maintaining a pitch of about 30-40 cm.
Installation of facing panels
The last stage of work is the installation of facing panels. It starts from the top of the opening. You need to measure its depth and length, then cut out a PVC panel of the required size. Then install one edge of the panel into the groove formed by the start-profile shelves. And attach the second, outer edge to the sheathing bars with mounting glue or self-tapping screws.
If you use self-tapping screws for fastening, then screw them into the end at an angle of 45 degrees. This way you will hide their caps under the trim. After installing the top panel, install two slopes on the sides in the same way. At the end of the work you need to install decorative trims. For them, you can use an F-profile, which is put on the outer end of the slopes.
Varieties
In addition to the starting one, there are other types of moldings. F-shaped is used when it is necessary to beautifully “close” the joining of the ends. For example, these could be corners where two sheets of PVC, windows or doors, or other slopes meet, or they could be joints of two different materials, for example, plastic panels and wallpaper. In other words, it is used when moving to another plane. Judging by the name, you can guess that this connecting profile is shaped like the letter F.
The next mounting molding - connecting - is selected in situations where two panels need to be connected to each other. For example, when it turns out that the height of the panel is much smaller than the walls, and you have to “grow” it. This profile resembles the letter H and is therefore also called H-shaped.
External corner, as the name suggests, hides the places where the panels form external right angles. The outer corner is considered to be the outer corner. The internal corner, in turn, masks the joining of sheets in the internal corners, which are always straight.
A general-purpose universal corner has approximately the same characteristics as a decorative corner. It is available on the market in several sizes: its sides can be from 10 to 50 millimeters. It is used to hide those places where the panels meet at right angles. This molding can serve both external and internal corners; thanks to its design, it bends in the desired direction.
Galtel, also known as ceiling plinth, is used at the joints of the ceiling and the upper edges of PVC panels. It masks this transition and adds completeness to the overall picture. This molding can be colored and thus fits perfectly into any interior. In addition to the fillets, you can also find profiles at the top called external corners. They are used when peculiar protrusions are created at the top, for example, columns or beams. Finally, interior corners on the ceiling are mounted where the walls form the interior corner.
If necessary, the ceiling plinth is supplemented with a connecting element. This detail secures two skirting boards together when one is simply not enough. It is worth noting that the length of a standard plinth is 3 meters, but in large rooms this may not be enough. Guide rails for sheathing, according to some experts, are also considered a type of profile. The purpose of this element is to simplify the installation of PVC panels. If the sheathing, like the sheets themselves, is made of plastic, then they are connected using special clips.
Finish molding, as again you can guess from the name, is used to secure the last panel. It “completes” the entire structure.
External or external decoration of windows from the street side
Installation of external PVC panels is convenient and justified in further use, because they:
- Cleans well;
- Give the house an aesthetic appearance;
- Protect seams from moisture and external influences;
- They are inexpensive, quick and easy to install.
A special feature of the external finishing of slopes is the use of corners with a rotation of 105 degrees, with dimensions from 100*20 mm, when installing them. Such parameters make it possible to reliably protect windows and openings from wind and moisture, and the degree of rotation provides more opportunities for ease of installation. Of course, if you do not live on the ground floor, the installation of panels correctly and safely will be entrusted to specialists.
Material selection
Currently, the market offers profiles made of plastic and metal. Plastic moldings are cheap, but not of high quality. It would simply be unreasonable to use them for serious tasks, so most often they are chosen as a decorative addition.
In general, if we talk about how the PVC panel and the profile are connected, it turns out that the panel is partially “placed” in the profile itself and is fixed there. Therefore, to ensure reliable fastening, preference should be given to metal molding, which can be steel or aluminum.
As a rule, metal elements are also treated with a special compound that can prevent rust.
If we talk about sheathing slats, they can also be made of wood, however, this material is quite capricious. Despite the cost savings, this design will not please the owners for long - the wood may begin to rot, be exposed to fungus or become moldy. Therefore, the choice is still made in favor of other materials.
Dimensions
The dimensions of moldings for polyvinyl chloride panels depend primarily on the plastic sheets themselves, more precisely, their thickness. Usually there are four subtypes of profiles, the thickness of which corresponds to 3 mm, 5 mm, 8 mm and 10 mm. The usual profile length corresponds to 3 meters, and for a profile with a thickness of 3 millimeters - 2.5 meters.
Installation
Even before the installation of auxiliary components begins, it is necessary to calculate their required quantity. Both corners and other moldings are usually sold individually. They are selected in accordance with the color of the PVC, as well as taking into account their thickness. The planks must be attached to zinc-coated nails or regular self-tapping screws. When fastening is carried out, it is necessary to retreat at least 5 millimeters from the edge of the part. If the element is external, then it is glued to the slabs with a polymer-based composition. It is also worth mentioning that the profiles, if necessary, can be easily cut and brought to the required size. To ensure that they are aligned and placed parallel to each other, a regular thread is used.
Before installing the starting profile, it is important to clean the surfaces from dirt and, if necessary, level them; the quality of leveling can be assessed by using a level. In general, if a window opening is to be designed, the walls must be thoroughly cleaned of fasteners and other protruding parts.
It is also recommended to check window openings and frames for violations and deficiencies.
The starting profile must be secured to the sheathing with self-tapping screws. In general, regardless of the type of profile, they need to be installed so that a distance of 50 centimeters is maintained between them - this way it will be possible to mask all surface irregularities. Then a panel is installed in this profile, which is mounted on a rail. When the coating reaches the corner, it is time to use a corner profile, external or internal. Towards the end, the window and door slopes are covered with an F-profile, and the joints with the ceiling are covered with skirting boards. If necessary, connecting molding is also used. Installation occurs using staples, screws, nails or adhesive solutions. In the second case, however, it is worth remembering that the use of chemicals is possible only under specific temperature, humidity and other factors.
If the installation of PVC sheets takes place on the ceiling, then each sheet must be inserted into the profiles on three sides, so that its long side ends up in the initial molding. A screwdriver is used to correct errors. Again, speaking of the ceiling, the last panel is attached so that both sides are in the profiles.
In general, a certain sequence of fastening the moldings can be distinguished. First, elements are installed along the perimeter of the wall or ceiling, that is, the surface that is to be decorated. Opposite elements are mounted in such a way that they are in the same plane. Otherwise, curvature of the structure may occur, which will affect the joining of the panels themselves and, as a result, their appearance. The first profiles are attached either to brackets or to self-tapping screws.
Corners, both external and internal, are fixed according to the same principle.
Finally, the intermediate profiles are attached so as to connect the parts for which they are intended. Any process ends with the installation of skirting boards for the floor and ceiling and corners. They perfectly hide the joints and give the walls a finished look.
Advantages of a collapsible starting L-profile
The width of the upper decorative front trim has been increased.
If ordinary elements have a strip width that does not exceed 15 mm, then collapsible ones have a strip width of 22 mm. What does this give? It is much easier for builders to install panels; there is no need to accurately measure each of them, which takes a lot of time and increases the cost of work. Installation of L profile
It is no secret that not all rooms have strictly vertical corners; often such a deficiency is present in the bathrooms of Khrushchev-era apartment buildings. If you use a regular profile, then such a panel must be mounted after taking individual dimensions for each panel. A wide collapsible profile can compensate for the difference in the width of the wall in the bathroom up to 4 cm, this is quite enough to compensate for construction defects made during plastering of the walls of the room.
Now you can stack all the panels, measure the width of the wall at the narrowest point and at the same time cut to length. The process of installing panels is accelerated by 25–30%, which is quite a lot for small rooms. Another plus is that the amount of unproductive waste is minimized, the length of the segments increases by about 4 cm, which allows most of them to be used for covering bathroom walls in the future. The distance between the corners of the walls and the door or window openings is small; in these places, if desired, you can easily fix the short panels remaining after cutting the standard ones.
It is possible to adjust the gap taking into account the thickness of the panels. This property makes the collapsible L-profile universal. The maximum thickness of facing materials can be up to 15 mm, which allows it to be used not only for plastic materials of various thicknesses, but also when covering bathroom walls with moisture-resistant plasterboard or wood panels. Moreover, regardless of the thickness, the tight fit of the top strip guarantees the absence of gaps along the entire height of the wall. The upper bar fits into the lower one with latches; they firmly hold the two elements along the entire length.
PVC panel (drawing)
When performing repair work, the risks of damage to the panels are minimized. If it is almost impossible to remove a panel from an ordinary profile without cracks, then with a collapsible profile it is much easier to replace it. Use a thin object to pry up the top bar and remove it from the latch. Next, the damaged cladding element is dismantled, a new one is installed and the decorative element of the collapsible profile is fixed in its original place. The work can be repeated several times, the design does not change its original characteristics and is reused without preparatory work.
Installing slats in the starting profile
The scope of application of the collapsible profile is expanding. It can be installed both at the beginning of the cladding and at the final stage. The element is used at the junction of the cladding with platbands, window and door frames, and when finishing walls and ceilings.
The order of finishing the walls changes slightly; below we will give step-by-step instructions for installing plastic panels on the walls of the bathroom.
What it is?
F-shaped profiles are special metal trim strips equipped with a groove for the panel; they are designed for designing slopes. Some models are made from different types of plastic.
These structures have excellent resistance to ultraviolet radiation and can be installed independently without the help of specialists. Such profiles are quite elastic; the material can be easily bent if necessary, without breaking or crumbling.
F-shaped profiles are reusable. They can be quickly removed and installed in another place. In addition, such products have an aesthetic appearance. They allow you to give structures a finished look and fasten them securely and tightly.
Such decorative elements will not turn yellow and lose their original appearance for a long time. In addition, they are equipped with a special semicircular shank, which makes it possible to fix the element even on curved surfaces.
After cutting such planks, chips and cracks will not form on their surface. These parts can last as long as possible; if necessary, they can be easily replaced with new ones yourself.
Application area
F-profiles can be used in many areas of construction. But most often they are used for finishing cladding of window structures. At the same time, the products will ensure the tightest possible connection of the panels to the wall coverings.
These profiles are often used in the design of door structures. Moreover, their installation does not require the use of a special adhesive composition. With the help of such products it is easy to make even and neat joining of even different materials.
Sometimes these elements are taken as a starting profile. In this case, one of the sides will be pressed tightly against the wall, and the other - against the slope.
F-shaped models can be used when installing siding. In this case, they will cover the end if the surface on it is not finished with material. This makes for a much more beautiful and neat design.
Parts of this type may well be suitable for decking boards. This material is used in the construction of verandas and terraces in suburban areas. The profile will allow you to carefully hide all the imperfections and make the finished structure more beautiful.
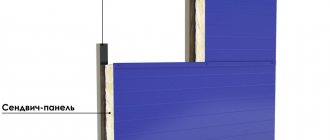
Sometimes the parts are used for sandwich panels, which are a durable three-layer building material with an insulating layer, for the construction of structures made of plasterboard or gypsum vinyl, polycarbonate.
Metal F-shaped models can be purchased when designing the most winding staircases. After all, they are easy to bend, giving the necessary smooth shape, and they will not break. To give a wavy shape, a special metal bending machine is often used; it allows you to process the structure right at the installation site.
Types and sizes
These types of building profiles can be classified into separate groups depending on the material from which they are made. Most often there are several types of models.
- Aluminum. Such metal products are particularly durable. They can last a long time without breakage or deformation. In addition, profiles made of aluminum are lightweight, making installation as easy as possible. They are resistant to fire; the aluminum structure is almost impossible to set on fire. It should be noted that the material is absolutely safe for humans. A special anodized coating is most often applied to the surface of aluminum parts, which also significantly extends their service life.
- Brass. These varieties have fairly high strength, resistance to corrosion, and flexibility. They are easy to install and are often fixed using silicone sealant. Brass products allow you to create the most accurate joining.
- Steel. As a rule, stainless steel is used in the manufacture of such parts. It boasts a high level of quality, durability and increased wear resistance. Products made from this metal are relatively lightweight; over time, a layer of corrosion will not form on their surface.
- Plastic. It is plastic profiles that are most often used in the design of window openings. They, as a rule, have a low thermal conductivity, good sound insulation, and resistance to various atmospheric influences. In addition, plastic models also boast durability and relatively low cost.
Such profiles can also be divided into separate groups depending on what design features they have.
- Finite. This type of profile is used for reliable and durable fixation of the slope to the wall, as well as simply for finishing window openings. Products can be painted in a variety of colors, but white and brown models are more common, and there are also black samples. Most often they are made from high quality plastic. These structures easily withstand exposure to ultraviolet radiation and sudden temperature changes. As a rule, they are attached using special screws.
- Laminated. This type is a standard F-shaped building profile, and its surface is covered with a special decorative coating. The outer film of such structures is highly durable and wear-resistant. It can be applied to the surface of products using powder dyes.
In construction stores, buyers can see a wide variety of such profiles. They all have different sizes. Mostly there are samples with the following values: 3000x10 mm, 2700x12 mm, 4000x30 mm.
The width of these decorative structures can vary significantly. You can often see such products with a value of 8 mm, 10 mm, 45 mm. Wider options are also available: 60 mm, 65 mm, 70 mm.
Accessories for PVC panels: guides, starting strip, corners
PVC or polyvinyl chloride is a universal polymer material, which, due to its high environmental performance, is widely used for the manufacture of various building materials for interior decoration.
PVC has the following useful properties:
- good plasticity, which allows you to create various products of any configuration;
- mechanical strength;
- resistance to alkalis and acids;
- fire resistance;
- light weight.
What are PVC panels
Due to these beneficial properties, PVC is used for the production of plastic panels. Today, PVC panels are the most used material for interior decoration, since this building material has many advantages:
- affordable price;
- wide range with a variety of colors;
- strength and lightness of construction;
- high sound insulation characteristics;
- resistance to sun and moisture;
- antistatic coating;
- quick installation and easy dismantling;
- the possibility of replacing a damaged part of the structure;
- easy care.
The strength of plastic depends on the amount of polyvinyl chloride in its composition. The more PVC in the composition, the stiffer the plastic sheets.
Types of plastic panels
The building materials market offers a huge selection of plastic panels for interior decoration, which differ in size, color, and design features.
PVC panels in a store
According to the area of application, PVC panels are divided into ceilings and walls. The material for finishing ceilings is fragile and lighter in weight than the material for finishing walls.
Therefore, ceilings made of PVC panels should be installed very carefully so as not to accidentally damage them with any sharp objects.
Wall plastic is more durable and less flexible because it contains more PVC.
Based on the type of decorative layer of PVC panels, matte and glossy surfaces are distinguished. The surface of matte panels is without any coating, so they are cheaper than glossy ones. Glossy canvases are coated with special varnishes on top, which additionally protect the plastic from exposure to the sun and moisture, so it is much easier to care for them.
Plastic sheets also vary in size: width and thickness. The most commonly used plastic panels are 125 mm and 250 mm wide, as they are easier to install. Wider canvases are less flexible, so it is more difficult to assemble a suspended ceiling from them.
The thickness of the panels for walls and ceilings is different. So, for the ceiling, the optimal choice would be panels with a thickness of 6 mm and 8 mm, and for walls - 10 mm and 12 mm. The standard length of PVC sheets is 5.95 mm.
Panels 3 m long are often sold on the building materials market, which means that they are cut into pieces.
Methods of decorating PVC canvases
The presence of a pattern on the plastic sheet indicates that it has been decorated. Decorating plastic can occur in two ways:
- Using thermal film, a specific pattern is transferred to a plastic surface with a hot roller.
- Direct high expansion printing using special expensive equipment. This affects the price of finished canvases. This type of plastic decoration is used to apply shades to it that imitate the color of wood, marble, fabric, etc.
Features of finishing ceilings made of PVC panels
When finishing the ceiling with PVC sheets, only a frame fastening method is used, which makes it possible to hide communications, as well as install any built-in lighting devices in the ceiling.
The ceiling made of plastic panels has a simple design: plastic strips using special fittings are attached to profiles attached with self-tapping screws to the base base of the ceiling.
Therefore, you can assemble such a ceiling yourself.
This ceiling design allows, if necessary, to pull out the plastic sheets and gain access to communication systems, and then easily install them in place.
Metal lathing for mounting plastic panels on the ceiling in the bathroom
Since plastic is the lightest material for suspended ceilings, you don’t have to worry about the ceiling collapsing on your head. To install plastic panels, you can use lightweight profiles, for example, aluminum or even plastic.
Such profiles can easily withstand plastic sheets and high humidity in the room, so they can be used to decorate the ceiling in the bathroom.
But for rooms with a normal level of humidity, you can use wooden profiles with a thickness of bars of at least 5 cm.
To make a plastic ceiling perfectly flat, before installing the lathing, you must correctly mark the area for the suspended ceiling. To do this, you need to measure the height of the ceiling in all corners of the room, starting from the window side, where the ceiling may be uneven due to a large amount of light.
The corner of the room where the ceiling height is the smallest is taken as orientation. From this height, measure down 5 cm and put a mark, which will be the level of the sheathing fasteners for the plastic. The resulting mark is transferred to other walls.
Using a cord, lines are drawn along the marks of all the walls along which the sheathing profile guides will be attached.
If recessed lighting is planned in the room, then after the lattice frame is formed, it is necessary to lay the necessary communications, and only then arrange the panels.
Note
You can place panels on the ceiling in different ways, but it is best to focus on the shape of the room, that is, lay PVC sheets perpendicular to the length of the room. This arrangement of plastic panels will visually expand the room.
The plastic begins to be laid from the far corner of the room. The canvases are stacked tightly one to the other, closing with a lock. In this way the entire ceiling area is covered.
Accessories for plastic panels
To assemble a suspended plastic ceiling, special fittings are required. The fittings, like PVC panels, are manufactured in accordance with the relevant GOST, which proves their safety in use.
To organize a plastic connection you need the following fittings:
- The starting strip is a U-shaped molding , from which they begin to lay the plastic ceiling, that is, they cover the end of the panel with it. When laying plastic panels on walls, the starting strip is used to design openings - doors and windows.
- F-shaped profile - end molding , which is used for decorative design of corner joints, as well as joints of plastic with other materials. They can also be used to decorate window and door openings.
- Docking profile - H-shaped molding , connects the short sides of the panels if the length of one panel is not enough to cover the ceiling space.
- External corner - hides the joints of plastic sheets in the outer corners of the room.
- Inner corner - hides the connections of plastic sheets in the inner corners of the room.
- Decorative corner is a universal corner that is used to seal external joints of canvases at right angles.
- Universal corner - decorative molding , which, due to its ability to bend at any angle, can be used for both internal and external corners.
- A fillet is a ceiling plinth that helps smooth out the transition from the ceiling to the walls and also hides the joints.
- External corner for ceiling plinth - hides the joints between plinths in places of protrusions, beams, columns.
- Inner corner for ceiling plinth - covers the joints of plinths in the inner corners of the room.
- Connecting element for ceiling plinths - makes it possible to connect the plinths together when one ceiling plinth is not enough to finish the entire length of the ceiling.
- Guide rails - create a sheathing for laying plastic panels.
How to use fittings when installing plastic panels
Components for PVC panels are selected to match their color, as well as taking into account the thickness of the plastic sheets. In this case, it is worth paying due attention to the fastening elements for plastic so that the canvases are well attached to the ceiling and do not fall off over time.
Fastening panels using a plastic profile using special clips
The sheathing is made of wooden beams or metal profiles. Guide rails or profiles are attached to the base of the ceiling or wall using self-tapping screws or galvanized nails, with a minimum of 5 cm indented from their edge. Transverse guides are located approximately 30 cm apart. When installing the guides, it is advisable to use a level.
Before laying the first ceiling panel, it must be laid in the starting strip and then secured with self-tapping screws. In this case, it is necessary to ensure that the self-tapping screw does not go too deep into the plastic, as it can damage the panel.
The use of moldings brings not only a decorative effect, but also strengthens the edges of the plastic structure. Therefore, when purchasing high-quality plastic panels, you do not need to skimp on good fittings for their installation.
Source: https://opotolkax.com/montazh/otdelka-i-remont-potolka/furnitura-dlya-panelej-pvx.html
fprofile and scope of its application
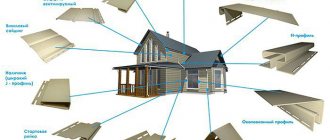
Installing slopes on PVC windows
For complete cladding with PVC panels, various additional elements are used, which help to perform the installation efficiently and correctly. fprofile is one of
of these elements, which outwardly looks like a plank, the cut of which resembles the letter “F”. The ends of the plate are securely fixed in the grooves of the profile during installation. The F profile serves two functions:
- Decorative design of the ends of the trim
- Aligning the common plane
Characteristics and classification of accessories
Before installing the panels, you should decide on the format and number of additional accessories. When calculating, the following is taken into account:
- condition and finishing of surfaces combined with the mounting plane;
- length, width and height of the room;
- method of installing panels on a working plane.
If only one wall is planned to be finished in a room, then the process of installing a decorative coating begins with the installation of a starting profile for PVC panels. Finishing work covering all vertical surfaces eliminates the need to install this element at the beginning of installation. It will be used for the panels of adjacent walls that form the corner transition.
If the room height is more than three meters (the maximum standard panel size), the addition of “height” is made using a connecting element. If the length and width of the area being designed also exceeds the standards of the product range of plastic ceiling plinths, interlocking connections will be needed to cover the joint line.
Depending on the installation method (on the frame or directly on the wall), external and internal corners for PVC panels are selected.
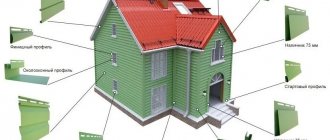
Main auxiliary accessories:
- starting profile, another name is the end element;
- connecting profile;
- end element with corner;
- external and internal profiles-corners;
- rolling (90 degrees) and universal angles for PVC panels;
- ceiling plinth (fillet).
It is worth considering all the advantages and disadvantages of each of these elements.
Start profile
In cross-section, this element represents an unfinished Russian letter “P”, that is, its hidden side is larger than the front side. This format simplifies the installation of the profile on the frame using self-tapping screws and the subsequent insertion of the main decorative element (panel) into the fixing flap.
The end element has good longitudinal flexibility, which makes it possible to compensate for existing deficiencies of adjacent surfaces without damage.
- If installation is carried out on a frame, the profile is fixed in the position of maximum abutment to the adjacent walls, then the forming element of the decorative coating is inserted into it until it stops, maintaining the absolute level at the best possible level.
- Installation on a wall surface using adhesive or foam requires a slightly different approach. The starting profile is installed on the outer joining end of the panel. A binder is applied to the working surface of the main coating element (in a zigzag), capturing the profile. The panel is installed in its final position on the wall, and the end element is immediately carefully adjusted in accordance with the topography of the abutment surface.
The starting profile provides unique opportunities for designing a decorative canvas made of plastic panels. This element can replace ceiling and floor plinths. In rooms with limited volume and large contents, such a device provides a number of tangible advantages. For example, in standard bathrooms of apartment buildings, where the density of installation spaces is calculated in centimeters, the absence of an additional volumetric element that forms the angle between the wall and the floor allows you to install a washing machine or laundry basket close to a vertical surface.
Connecting element
The connecting profile externally looks like two connected end elements with a common internal partition. Used in structures whose linear dimensions exceed the standard length of PVC panels.
When installing on a frame, it is necessary to install an additional metal profile or wooden beam along the joint line. The connecting profile is fixed on it on both sides with self-tapping screws and a press washer. The panels are inserted into the mounting grooves. When finished, the decorative surface is a solid canvas with a plastic strip running along the joint and hiding the joining seam.
Profile with corner
This element in cross-section resembles the letter F. In fact, this is a starting profile, the visible part of which is designed as an inner corner. It is used as a final detail in the design of corner transitions.
It can be used instead of a starting profile if it is necessary to cover a significant gap formed at the junction with an adjacent wall. However, it does not have the flexibility of its analogue and is suitable for work only on perfectly flat surfaces.
External and internal corners
Already from the name itself it is clear that these accessories are used to design internal and external corner joints of PVC panels. They are fastened to the frame using double-sided jointing with self-tapping screws. They create a perfectly straight line for the decorative framing of corners, but on the condition that the surfaces meet strictly at an angle of 90 degrees.
If the working surfaces at the junction form an obtuse or acute angle, the use of these elements is not relevant, since the ends of the panels will not be able to fit into the groove due to distortion and compression, or a gap will form between the outer part of the profile and the surface of the panel. In any case, aesthetic integrity will not be achieved.
Rental and universal corner
The rolled angle has a rigidly specified side position during molding, which is 90 degrees, and a standard length of three meters. These indicators determine and limit the use of the element in places where mounting surfaces meet at right angles.
The universal plastic corner is supplied to the retail chain in rolls, in the form of a tape with a central fold groove. This element accepts any angular shapes specified by the room configuration. Corners of both types are mounted on completed internal and external corner joints of panels, using appropriate adhesives.
Ceiling plinth
The ceiling plinth is mounted on a suspended frame on three sides, leaving the final part open. This is dictated by the practical impossibility of installing the last panel by performing several operations simultaneously:
- slam the lock with the previous element that forms the ceiling;
- fix the transverse ends of the panel in the mounting grooves of the fillets located on opposite walls;
- insert the free longitudinal edge of the panel into the groove of the plinth limiting the working plane.
Only after the installation of the decorative ceiling structure is completed is the missing fillet fragment installed. To do this, the part that forms the receiving groove is carefully cut off, and the plinth itself is glued to the ceiling and wall.
We install PVC panels and profiles
External slopes for PVC windows
To begin with, I will give advice that there is no need to save on PVC panels. This material will last for many years and therefore you should not spare money on a high-quality plastic sheet. Cheap PVC sheets are very soft and one careless movement can make a hole in them.
What do we need to finish the slopes:
- 6 meters of high-quality PVC fabric. If you are worried about the thought: why exactly 6 meters? – then the answer is simple. Panels are manufactured in lengths of 3 and 6 meters - a three-meter sheet may not be enough, but 6 meters is just enough.
- Start and f profile.
- Thermal insulation material for processing window openings, mineral wool is suitable.
- Self-tapping screws for metal - in the popular language “bugs”, “fleas”, “tex”. With their help, the starting profile is attached.
- Screwdriver and construction knife.
After the foam has dried, we attach the F-shaped profile to “liquid nails.”
First of all, we fix the starting profile. The process will not cause any inconvenience, because the windows are installed strictly according to the level - so it is not needed for the starting profile. Using the back side, use self-tapping screws to secure it along the edge of the window frame. The main thing is to trim the profile correctly so that there are no flaws in the corners at the joints. After this, we proceed to install the PVC sheet. First of all, we block the side slopes by inserting the eraser into the starting bar. Don't forget to add a layer of insulation! At this stage, the work also turns out to be simple and does not pose any difficulties.
The use of PVC panels and F-profiles for finishing the external slope
We are slowly approaching the completion of the “difficult” process and are launching our f profile. Carefully cut the strips to the required length and attach them to the plastic with grooves. Some people still resort to using liquid glue and firmly glue the f strips to the wall, but I did not consider this to be the necessary action and abandoned this advice. If you have small gaps somewhere, then white silicone will help with masking.
Profiles for PVC panels. What are PVC panels?
By plastic panels, builders mean a modern finishing material for finishing walls and ceilings. Features of PVC panels combine several advantages at once:
- lightness (the elements are hollow, a standard board 12.5x300 cm weighs only 660 g);
- strength (withstands loads up to 346 MPa);
- almost zero water absorption;
- resistance to any household chemicals;
- antistatic properties;
- easy installation, repair and dismantling of the coating.
The panels combine well with any other types of coatings. They are convenient to use for finishing part of a wall, or for zoning a room by simply changing the color. To make transitions easier and create smooth boundaries between the edge of the panel and the other covering, fittings or plastic finishing profiles are used.
These elements are manufactured in accordance with State Standards, are considered safe to use and are recommended for creating neat joints between adjacent walls, ceilings or floors with vertical surfaces. Among the models of fittings there are profiles for finishing window openings, aesthetically connecting the profiles themselves, etc.
Installation methods
Let's consider the simplest method of fixing F-shaped profiles when finishing slopes. First you will need to secure the starting part. Installation is carried out from the back using special self-tapping screws. The element is attached to the edges of the frame.
The main thing is to trim the structure correctly. This should be done in such a way that there are no significant defects in the corners at the joints. After this, you can begin installing PVC panels. First, the side slopes are covered, and an eraser is inserted into the bar. At this stage, we must not forget about laying an additional insulating layer.
At the final stage, another profile is taken. It is trimmed a little, adjusting to the desired length. After this, the part is attached to the plastic part with grooves.
An installation method that uses special liquid glue is often used. If, as a result, cracks appear in the structure after installation, they can be removed using silicone sealant.
After installation, the part will look like a small and neat corner that hides the joints, while simultaneously ensuring a reliable connection of different or identical building materials.
Basic recommendations for choosing the size of the corner for plastic slopes
The dimensions of the starting profile depend on the parameters of the selected panel. Correctly taken measurements of a window or door, as well as choosing the length of the corner, will allow you to save as much money as possible when purchasing it.
Choose materials for finishing after installing the window, in this case, you will be able to assess the condition of the openings after dismantling. This approach will accurately allow you to choose the type and parameters of the profile for decoration.
When choosing the size of finishing materials, take into account the purpose of the room in which the opening is being made.
If this is a window in the kitchen or a door in the living room, through which friends will often go out onto the balcony, then it will be more practical to install a wide profile. Such a smart solution will make it possible to maintain the aesthetic and neat appearance of the room for a long time.
Do not install wide finishing elements on small and narrow windows; give preference to a thin decorative profile with parameters no more than 15 * 15 mm, it will add elegance and lightness to the interior of the room.
Window profile F-shaped, 2.5 m
Description
The profile is intended for decorative interior decoration during the assembly and installation of windows and installation of slopes. Used to close gaps or fastening elements. Size - 250 x 5 cm.
Characteristics
Product type Slope profile Manufacturer's article 10000477 Type F-shaped Material PVC Color white Length, cm 250 Width, cm 5 For panels thick, mm 10 Weight, g 150 Country of origin Russia Additional information The width of the product is composite - 50 mm (main part profile) + 10 mm (slope) Package dimensions (WxHxD), cm 8 x 250 x 5
Sources
- https://plastokonnik.com/napravlyayuschie-dlya-otkosov-plastikovyh-okon/
- https://delaydachu.ru/steny/f-profil-pvh-dlya-otkosov.html
- https://dekoriko.ru/paneli-pvh/startovyj-profil/
- https://stroy-podskazka.ru/stroitelnyj-profil/kakim-byvaet-f-obraznyj/
- https://LeroyMerlin.ru/product/profil-pvh-f-obraznyy-dlya-paneley-5-mm-18720743/
- https://www.Castorama.ru/profil-okonnyj-f-obraznyj