assets/from_origin/upload/resize_cache/iblock/c0e/600_450_2/c0eb57f0c27ff2069b6ad77d48a5d724.jpg From this article you will learn:
- What is a clean apartment renovation?
- What types of work are included in the final renovation of an apartment?
- What are the stages of final renovation of an apartment?
- What are the features of performing a final renovation of an apartment and choosing finishing materials?
After purchasing a home in a new building, you have to think about renovations that will make the apartment cozy, comfortable and functional. The renovation of the new apartment is being completed with finishing touches. It is carried out after completely completing all preparatory work. The quality and durability of the final renovation of an apartment depends on the correct execution of rough finishing. In our article we will tell you how to make a clean renovation of your apartment so that the result completely satisfies you.
What does a clean apartment renovation mean?
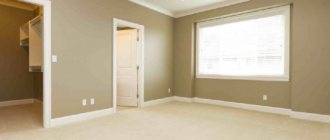
The final renovation of an apartment is also called finishing, since after its completion the renovation can be considered complete, and to move in you just need to bring in the furniture. Finishing should begin only after finishing the rough work. Most modern apartment buildings are rented with the apartment renovated for final finishing. In this case, you are required to make only cosmetic repairs.
This is very convenient and economical: you do not have to spend additional money and look for specialists to install electrical wiring, pour screed and level the walls. The disadvantages of purchasing an apartment with such finishing include the dishonesty of some developers who try to save money and use cheap, low-quality materials.
When buying a home in a new building, the phrase “fine finishing” can be heard quite often. Let's figure out how the final renovation of an apartment differs from a rough one. In the primary housing market, apartments most often have a rough finish. In this case, inexpensive materials are used, the quality of which can rarely be called high. This apartment has bare walls, floor and ceiling. Before moving in, residents will be required to carry out a final cleaning.
Buying a home with finished finishing is undoubtedly more convenient, however, it will cost much more. Renovating an apartment in a new building with a fine finish includes plastering, puttying and other work that allows you to immediately move into the apartment without wasting time, money and effort. It is worth noting that the final renovation of an apartment is a rather arbitrary concept, and each developer may mean by it a different degree of readiness of the premises. Remember: only points recorded in documents have legal force. Therefore, it is important to familiarize yourself with the work performed in the apartment in advance.
To date, there are no clearly regulated standards in the legislation that determine what should be included in the final renovation of an apartment. Thus, the relationship between the developer and the buyer is regulated by the rules of business turnover and concepts adopted in construction.
A person purchasing a home with rough finishing receives a box with bare walls, but all necessary communications and interior partitions must be installed in it.
In an apartment with a rough renovation, the following work must be carried out:
- leveling and plastering of walls;
- pouring screed;
- sewerage installation;
- installation of a heating system;
- holding hot and cold water;
- installation of electrical wiring;
- laying cables for telephone and television networks;
- installation of windows and entrance door.
Renovation in a new apartment with a fine finish includes all of the above items, as well as:
- laying flooring (linoleum, laminate, etc.);
- finishing wall covering (wallpaper, painting, tiles);
- installation of switches and sockets according to the project;
- installation and connection of an electric or gas stove;
- installation of interior doors from materials that do not require painting or painted;
- In multi-storey buildings, the installed elevator must be put into operation.
Since there are no regulatory requirements regulating the list of finishing works, when purchasing a home you should be guided by the project documentation and the share participation agreement, which reflect the list of all work performed and the specification of materials.
We repeat: only the terms and conditions specified in the contract and legally certified are valid. Points agreed upon orally or simply written down on paper cannot be taken into account in the event of legal proceedings.
A fully renovated apartment has many advantages:
- This is the most budget-friendly finishing option.
- Since plumbing, interior doors, sockets and switches are already installed, you can move into the apartment almost immediately.
- For unfussy or budget-conscious people, this is a great way to save money and not have to think about renovations for at least the next few years.
However, a clean apartment renovation also has its disadvantages:
- Carrying out finishing work from scratch is much easier than redoing an already completed renovation.
- It will be impossible to change anything in the rough or finishing.
- All construction defects will be hidden under the final finishing, so you will no longer be able to detect and correct them.
- You may not be satisfied with the standard layout and simple interior design that are standard for all new apartments.
Features of acceptance of an apartment with fine finishing
Work on finishing the premises is one of the most labor-intensive and costly. If you rush to accept the apartment without recording all possible shortcomings and hastily signing the apartment acceptance certificate, you will have to eliminate them at your own expense. Law No. 214 FZ tells how to accept an apartment from a developer with a fine finish. It provides for a special acceptance procedure, which has several stages:
Alert
The shareholder is notified of the need to accept the apartment by mail. The timing and procedure for notification should also be fixed in the contract. If the approximate deadline has arrived, and the developer does not send an invitation for inspection, you must contact the construction company yourself and request to schedule an inspection of the apartment.
Advice to the shareholder! If the developer ignores the requests of the shareholder or unreasonably postpones the inspection period, it is necessary to go to court and demand termination of the contract and the return of the money paid.
Inspection of the apartment
Before starting the inspection, familiarize yourself with the documents for putting the house into operation, which the developer should have ready by the time the apartment is inspected. It is better to inform the developer in advance of your intention to study the documents in writing, so as not to disrupt or delay the inspection procedure. The following should take part in this procedure:
- developer;
- Management Company;
- the shareholder or his representative on the basis of a notarized power of attorney (a lawyer can act as a representative)
Advice to the shareholder! It is in your best interest to invite a construction expert to inspect the property, who will point out violations and monitor compliance with building codes and standards.
Fixing construction defects
A detailed description of the condition in which the apartment should be rented must be contained in the contract; you should take it with you for inspection. During the inspection you should:
- inspect the apartment for cracks in the walls, ceiling and floors;
- check the ventilation operation using a piece of paper or fire;
- check the operation of windows and doors, the operation of fittings, the absence of cracks and damage to double-glazed windows;
- evaluate the quality of wallpaper and floor coverings.
- check the operation of plumbing and electrical appliances;
- compare the actual layout of the apartment with the technical documentation, it is advisable to double-check the area of the apartment.
All defects should be recorded in your notebook in order to later transfer them to the appropriate documents.
Elimination of defects
If defects are discovered, the shareholder has the right to demand from the developer:
- eliminate defects within a reasonable time;
- reduce the contract price by the amount necessary to eliminate them;
- demand that third parties be invited to eliminate defects at the expense of the developer;
The shareholder can choose any type of requirements at his own discretion.
Repeated inspection of the apartment
After the developer eliminates the defects, the shareholder will be invited for inspection again. The procedure in this case will correspond to that described above.
Signing the apartment acceptance certificate
Only after the quality of the apartment and the finishing touches satisfy the shareholder can you agree to accept the apartment, sign the appropriate acceptance certificate and register ownership of the apartment.
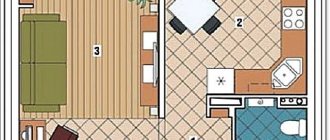
What does apartment renovation include for final finishing?
- Ceiling
Work to prepare the ceiling for finishing depends on the type of coating chosen. Stretch ceilings are the most preferred for installation in a new home. They are not deformed by the shrinkage of the house, which can last from three to five years. Professionals, whose services are not cheap, will prepare the ceiling surface for subsequent painting or wallpapering in several stages. Such step finishing will cost much more.
- Walls
The first thing to do is to camouflage all the shafts, hide the sewer pipes and heating systems. It is important to leave ventilation holes. Brick walls will need to be leveled by applying a layer of plaster. For a more even coating, the walls are plastered, having previously installed beacon profiles. If you do not have experience in the field of such finishing, it is better to invite a master.
Before applying plaster, you should decide whether you need additional sockets and whether all switches are in places convenient for you. In an apartment with heated floors, you should install thermostats and take care of the holes for them.
- Kitchen and toilet
When arranging these rooms, first of all think about whether the counters are conveniently located; perhaps you should move them to another place. The water supply and drainage pipes must also be freely accessible. To install pipes for mixers, you need to drill channels in the wall. Pay attention to the installation of technical boxes. For these purposes, space is usually left in the sewer shaft.
The exhaust vent in the kitchen should be located above the hob where the hood will be installed. To avoid having to install a ventilation duct the length of the entire kitchen, you need to decide in advance on the location of the stove.
- Floor
Before laying the floor covering, it is necessary to level the floor surface. To do this, pour a concrete screed. Before applying a layer of concrete, decide whether you want to install heated floors in the apartment, since they are installed before the screed.
Documentation of the apartment acceptance procedure
A document that reflects the shortcomings of the accepted apartment is called an inspection sheet or a defect sheet - the developer must issue such a paper upon acceptance of the apartment. The more detailed the document is drawn up, the more chances the shareholder will have, in the event of a conflict situation, to defend his rights in court. The defect report should indicate:
- serial number of the record;
- a clause in the contract stipulating requirements for the condition of the apartment at the time of delivery;
- a detailed description of the construction defect;
The act is drawn up in the presence of all participants in the inspection and signed by them. If for any reason one of the parties refuses to sign, this is recorded in the act, after which it is sent to the party by post with notification.
Important. Not signing the apartment acceptance certificate until all detected deficiencies are eliminated is the right of the shareholder. If the developer does not eliminate them within the agreed time frame, he will be obliged to reduce the cost of the apartment by the amount that the upcoming repairs will cost.
So, if the housing does not meet the quality requirements, the equity holder has two options:
- Do not sign the apartment acceptance certificate until the developer eliminates all deficiencies.
- Sign the act, additionally drawing up an annex to it, indicating the acceptance of the apartment with defects, which will reflect in detail all the shortcomings made by the developer.
In both cases, the shareholder will have the right to recover moral and material damage from the customer in court.
What is the procedure for cleaning a new apartment?
High-quality completion of the final renovation of an apartment is possible only if the technology and sequence of each finishing work are followed.
It makes sense to start finishing at the top and finish at the bottom.
Work that involves a lot of dirt is best done at the very beginning. For example, laying ceramic tiles in the bathroom and kitchen. In addition, the plumbing and electrical work must be completely completed.
Then the ceilings in the apartment are completely repaired. It will depend on the type of coating chosen and the technology for its installation.
Following the ceiling, the walls are finished using one of the following methods:
- coloring;
- wallpapering;
- applying decorative plaster;
- laying tiles.
Having completed the work in the upper part, you can begin the floor covering:
- parquet board;
- laminate;
- tile;
- linoleum;
- carpet
And finally, there are the “little things” necessary for comfortable living in an apartment: interior doors, a stove, lamps, household appliances, etc.
Pre-finishing - the golden mean
Many people say that the pre-finishing of an apartment in a new building is a kind of compromise between the rough and fine version. It includes:
- smooth walls without vertical deviations of more than 3 cm;
- floor screed and wall plaster without cracks or voids. In the bathroom and toilet there must be waterproofing under the screed;
- smooth primer on the ceiling;
- all electrics are installed throughout the apartment, there are often sockets and switches;
- there is a ready-made water supply and sewerage system;
- an entrance door, double-glazed windows are installed, and the balcony is often glazed.
The essence of pre-finishing is that the developer completely prepares the apartment for finishing. All you have to do is hang wallpaper, choose ceiling and floor finishes, install lamps and purchase furniture.
Acceptance of the apartment
Before moving in or before starting your own cosmetic renovation, it is important to make sure that the developer has fulfilled its obligations in full. Standard acceptance of an apartment in a new building with pre-finishing should include:
- Checking the finish of walls, ceilings, floors. All surfaces must be smooth, without sudden changes. Even traces from a spatula can prevent you from gluing the wallpaper beautifully, so make sure that there are no bumps, depressions, or scratches of more than a couple of millimeters.
- Evaluation of the installation of heating radiators. Most often, batteries in new houses work well, even if they are not of very high quality. The systems are new and do not need to compensate for low water temperatures or clogged pipes. But radiators must be installed correctly, on a sufficient number of brackets, without distortions.
- No gaps between walls and windows. Their appearance means eternal drafts. Examine glass and double-glazed windows especially carefully. Any damage or scratch is a reason for a claim.
- Engineering Communication. Make sure that the electricity works, ask for a wiring diagram, look at the faucets (for rust or moisture on them), check the ventilation.
Understanding the difference between rough finishing and pre-finishing, you can consciously choose the most suitable option for yourself. And often this is precisely the pre-finishing finishing, because on the one hand it gives freedom of action, and on the other hand it does not require a large number of complex works such as electrical installation or complete installation of plumbing.
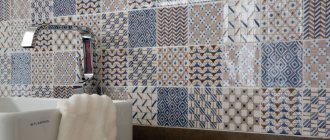
Laying tiles during final renovation of an apartment
Work on laying ceramic tiles can also be classified as a final renovation of an apartment, since this is one of the final stages of finishing. This item also includes grouting the joints between the tiles; this touch is no less important when arranging a bathroom. Such work will leave behind a lot of dirt.
It is advisable to go to a ceramic tile store knowing what you would like the finished room to look like. Thus, when you get acquainted with the store’s assortment, it will be much easier for you to understand how this or that tile model will fit into the concept of your bathroom. You should not buy tiles based on approximate ideas about the size of the room. Precision is especially important if you want to use two or more types of tiles or create a decorative panel.
On the websites of many material manufacturers there are special programs that allow you to depict the design of a room and apply measurements to it in order to calculate the required amount of coating. This will greatly simplify your task. However, if there is no such program, you can draw a plan in a graphics editor or on a piece of paper.
Recommended articles on this topic:
- How to accept an apartment from a developer
- Stages of renovation in an apartment
- Turnkey cosmetic repairs
Using a number of recommendations will save tiles and leave a minimum of pieces. The trimmings that appear during the installation process can be used in the corners of the room.
When laying horizontal rows of tiles, start with a whole one in one corner of the room, then the cut will lie in the corner against the opposite wall. Of course, to do this, you should choose a less noticeable area and estimate which fragment will be on it. It is unlikely that a piece of tile that is too narrow can be cut beautifully and squeezed into a corner. And if the wall is directly opposite the door, such installation can ruin the entire look of the bathroom. In this case, it is advisable to start from the middle of the wall so that you can carefully cut even pieces at the edges.
The installation method is determined by the size of the walls and tiles. Depending on these parameters, laying from the edges or from the center may be optimal.
The cut edge of the tile will be hidden by a solid tile laid from the corner of the adjacent wall. The joining of two scraps can be smoothed by sanding one of them. External joints are hidden behind a decorative corner.
The laying of vertical rows should also be thought out in advance. A narrow section under the ceiling will not look very nice, so it is better to start the row with a solid tile and finish it with a strip near the floor.
Often the bottom row of tiles in the bathroom is completely hidden behind plumbing fixtures and various accessories.
A narrow section laid along the floor will be almost invisible, and the cut edge of the tile will also be hidden. By laying the bottom row of tiles last, you can avoid many problems.
The beginning of a horizontal row also depends on other circumstances: the features of the design project (alternating rows of contrasting colors, the use of friezes, etc.), the location of plumbing fixtures and furniture. So, near the bathtub it is better to place the tiles in such a way that the edge hides the horizontal seam. This will protect the seam from excess moisture and maintain the aesthetic appearance of the installation.
The location of horizontal and vertical rows is also affected by the thickness of the seams between the tiles. At first glance, this may seem insignificant, but on a large wall, decorated with medium-sized tiles, the difference will be very noticeable.
When using small tiles, it is necessary to take into account the thickness of the joints, since in this case it is very easy to make a mistake.
For laying tiles on the wall, joints 1.5–2 mm wide are sufficient. After using grout, the gaps will visually appear even wider.
When drawing up a layout diagram, you must also keep in mind the size and location of decorative elements (friezes, borders, etc.). A carefully thought-out plan will help you avoid mistakes and reduce the cost of purchasing excess material.
Tiles with a 3D design look very impressive. In addition to the bathroom, we can recommend laying tiles wherever needed: in the kitchen, in the hallway, on the balcony or loggia.
What work is included in the final finishing of an apartment in a new building?
The final stage of repair is finishing. Upon completion, you can move into the apartment. We list the main stages of finishing work:
Stage 1. Tile laying work.
Laying ceramic tiles and grouting joints is the dirtiest type of finishing work.
3D tiles in the bathroom look very beautiful. It is chosen for an additional payment.
It is recommended to lay tiles in “passage” rooms and water distribution areas. This is not only a bathroom and toilet, but also a corridor, kitchen, balcony and loggia.
Stage 2. Installation of PVC and MDF panels.
PVC and MDF panels do not require additional paint or varnish. Their installation is the final stage of finishing the wall surfaces.
Stage 3. Putty.
The finishing putty is considered finishing, and the work on the starting putty is classified as roughing.
Stage 4. Wallpaper.
There are many options for finishing the walls. These include wallpapering.
The walls are also finished with materials for painting, Venetian plaster is applied, and sheathed with panels or textiles. Such a wide selection gives unprecedented scope for imagination.
Stage 5. Ceilings.
This includes installation of slatted or suspended ceilings made from PVC or MDF panels, finishing putty and painting work.
Stage 6. Floors. When working with the floor, finishing includes:
- laying laminate;
- linoleum or wood parquet flooring;
- laying floorboards;
- laying ceramic tiles;
- installation of skirting boards.
After laying the floor from hardwood boards or parquet, the boards are sanded and treated with an environmentally friendly paint and varnish coating. These actions are also included in the list of final works.
Stage 7. Electrical equipment.
Only after finishing is completed, a considerable part of the work on the installation of electrical equipment is carried out. For example, after painting and wallpapering the walls, sockets and switches are installed. Therefore, such work requires careful execution.
The same applies to the assembly of sconces and electrical panels. After the painted ceilings have dried, spotlights and chandeliers are installed. And these works are also carried out with care, trying to preserve the beauty of the finished finish.
Stage 8. Heating and plumbing.
When the walls of the bathroom and toilet are finished, plumbing units, such as dryers and faucets, are installed.
On large objects, heating is often installed simultaneously with rough finishing work. Therefore, before finishing, it is necessary to remove the elements of the heating system and reinstall them after completion of the work.
Stage 9. Doors.
The final stage of the entire renovation is the installation of interior doors and trim.
How your apartment in a new building will look after renovation and how long it will remain new depends on high-quality and professionally performed repairs, especially fine finishing.
Options for finishing the ceiling during the final renovation of an apartment
Whitewashing the ceiling
For many years, this type of finishing ceiling repair, such as whitewashing with lime mortar, has been popular.
This option has several advantages:
- environmental friendliness;
- low price;
- Suitable for any interior design.
Disadvantages of whitewashing:
- lack of uniqueness;
- fragility of the coating;
- high absorbency;
- inability to effectively clean and wash the ceiling;
- labor-intensive preparatory work.
Preparing for whitewashing is the most difficult part of finishing the ceiling with lime. The final result directly depends on the thoroughness and accuracy at this stage. The surface needs to be puttyed, plastered and primed before applying the solution. The ceiling must be absolutely flat, without color differences, only then the coating will fit perfectly.
Painting the ceiling
A more modern method of finishing the ceiling repair is painting. The coating can be glossy or matte. Remember that on a smooth surface all defects and irregularities are better visible. The advantage of painting is the large selection of colors. To change the color of the ceiling, just add the appropriate color to the color mixture.
In addition, the use of hand painting allows you to create your own unique design. And a ceiling painted with waterproof paint can be easily washed if necessary, which makes it very practical. The disadvantages of painting, as in the case of whitewashing, include the fragility of the coating and labor-intensive surface preparation. After about three years, the paint will begin to crack. And to prevent this process from starting earlier, it is important to carefully level and prime the surface to be painted.
Wallpaper for the ceiling
The advantages of this method include low cost. However, this is a very complex process. By combining wallpapers of different textures and patterns, you can create an interesting design. Choosing wallpaper for painting in the future will save you from the need to re-paste it; it will be enough to apply paint of the desired shade over the canvas.
There is a special type of wallpaper suitable for covering the ceiling. But it cannot be used in rooms with high humidity levels that are prone to temperature changes, such as the bathroom and kitchen. At the preparation stage, the surface of the ceiling should be leveled so that the wallpaper does not highlight all the flaws.
Liquid wallpaper for the ceiling
This type of coating will help out if you are short of time, since it does not require lengthy preparation.
Finishing with liquid wallpaper is a profitable and convenient way to repair the ceiling in an apartment.
Advantages of liquid wallpaper:
- easy application that does not require special skills;
- wear resistance and durability of the coating;
- resistance to UV rays;
- a variety of design options by mixing colors, shades and textures, applying patterns or highlighting certain areas.
Disadvantages of finishing with liquid wallpaper:
- high cost of materials;
- impossibility of wet cleaning;
- Damaged areas cannot be replaced discreetly.
Pros and cons of finishing
We have already mentioned the main advantage of finishing work - after it has been carried out efficiently, repairs can be avoided at all or completed with minimal labor costs. But we should not forget about an important factor for new buildings – shrinkage of buildings. It’s not for nothing that expensive repairs in new houses are not recommended in the first years after construction - cracks and other consequences of shrinkage may appear on the walls and ceilings. Therefore, an apartment for final finishing is like a temporary design option, which makes it possible to consider all the pros and cons of the room, so that in 3-5 years you can decorate the house at your own discretion.
Disadvantages of finishing work from builders:
- Materials are selected from a low or medium price range and of appropriate quality.
- The design will be as neutral and identical as possible for all rooms.
- If the construction technology of the work was violated during the construction of the house, the defects will soon emerge and require new repairs.
- The cost of finishing work from builders is quite high, although it will be cheaper than hiring a separate team, but much more expensive than doing it yourself.
For example, the price of priming surfaces will be from 50 rubles/m2, wallpapering will cost from 150 rubles/m2, laying tiles will start from 450 rubles/m2, and dismantling an old door and installing a new one will cost about 3,000 rubles.
Note! Most Moscow builders indicate in the contract that finishing work is not finishing work, but high-quality preparation for it (the so-called pre-finishing or final finishing). That is, the surfaces will be leveled, communications will be established, but you will have to do all the finishing work and buy decorative materials for them. But this option will allow you to decorate the room to your taste, without the risk of meeting your neighbors with a copy of your own apartment.
How to choose wallpaper for the final renovation of a new apartment
Wall repairs in a new apartment can be completed by finishing with wallpaper.
The finishing materials market can offer an endless variety of types of this coating to suit every taste and budget, taking into account the characteristics of a particular room. Smooth wallpaper is best glued to a perfectly flat wall surface. Textured wallpaper with a three-dimensional pattern will help hide small defects and unevenness, so it is suitable for any base.
Wallpaper in cool shades will look better in rooms facing the sunny side. Blue, gray, lilac colors can visually enlarge the space, which is very important for small apartments.
Wallpaper in warm colors (yellow, beige, golden) will make a room on the north side more comfortable. Washable wallpaper in bright, rich colors is suitable for the corridor and hallway. The choice of color for the living room depends solely on your taste preferences and the desired interior style; Both light and dark tones look equally good here.
For the bedroom, wallpaper in muted tones is preferable. This room is intended for sleep and relaxation; too bright colors can irritate and interfere with sleep. A good choice would be to decorate one of the walls with photo wallpapers with views of nature.
Be careful when buying wallpaper: all parts of the canvas must be from the same batch so that the tonality is not disturbed. The fact is that during their production, a different amount of paint can be filled into the machine for each batch. In a store, this difference will not be so noticeable, but on the wall it will certainly catch your eye.
For this reason, you need to check the batch number, production date and article numbers of all rolls. This information is indicated on the label included inside each roll.
There are many ways to cleanly repair walls in an apartment. Depending on your wishes, financial capabilities and characteristics of the surface to be finished, you can choose any of them. In addition to wallpapering of various types, decoration with textured plaster, paneling and other materials are popular.
Rules
In this case, you should adhere to basic rules:
- Installing door frames or replacing old ones. This applies to interior and entrance doors. At this stage there is no need to install additional panels and full-fledged cladding, this is already finishing work.
- They check the design project with diagrams of the main work (if all this is available). Then the issue of materials is resolved, which will be considered the final stage. Not only the color, but also the quality of the required material is determined.
- Control of all surfaces - how smooth they are. Control can be done using a regular building level, applying it to the desired surface. If irregularities and differences are observed, they are corrected using suitable material. Only after this is everything treated with a primer.
- Communication systems. When a house is being prepared for finishing, what does this stage mean? This is the dismantling of the old system (if it exists), complete wiring (if it is absent). If renovations are being carried out in an old house, this stage must be included in the project, so the new structure will be more reliable and durable.
- Check the quality of the preparatory work. The possibility of smooth finishing on each surface is taken into account. If deficiencies are found, they must be eliminated.
All these are conditional recommendations, since each project is individual, but the approach remains the same. There are also unbreakable rules. For example, the window openings in the room are glazed and the presence of entrance doors is mandatory. Any surface must be flat. Otherwise, problems cannot be avoided in the future.
It is important that the walls and ceiling are completely ready for finishing and done with high quality. The purpose of each room should not be lost sight of. For example, if this is a bathroom, then you can’t do without waterproofing. This also needs to be taken into account when choosing finishing materials, because the room has high humidity and temperature changes. Parquet and paper wallpaper are not suitable in this case.