June 3, 2020
When carrying out repair work, the question of laying new electrical wiring or replacing the old one often arises. The impetus and main reason for carrying out work can be both the general deterioration of the wires and the increased load on the existing sockets, which can lead to emergency situations. In any case, a modern electrical cable will cope better with the abundance of equipment in the house and the requirements for compliance with fire safety rules than the old wiring from the developer. If you are going to save on the work of a master (and this is a decent amount) and are sure that you can cope with laying the electrical line yourself, then knowledge about the gating process will allow you to avoid possible annoying mistakes. Let's figure it out.
Preparing for work
Before you make a ditch, you will have to go through a complex and routine process consisting of several stages. Failure to comply with or ignore some steps can lead to dire consequences: from a scandal with residents to violation of the integrity of the wall and fines from inspection organizations.
So, first we list the points, then we will analyze each separately:
- We study SNiP 3.05.06-85. This is a set of rules about electrical devices and their use.
- We come to an agreement with the neighbors. Visit all the residents on your floor and the two adjacent ones and coordinate the work time with them. You can use a general chat, but a personal meeting is more conducive to understanding. This is a mandatory requirement! Shredding is a noisy repair work, and legally literate neighbors may demand a fine from you for such work without approval.
- We prepare the room: we calculate the parameters of the grooves and mark the wall with a marker.
It is simply necessary to become familiar with the basic building codes for laying cables, otherwise there will be difficulties not only with the operation of electrical appliances, but also with the sale of an apartment:
- The recesses are parallel or perpendicular to the floor. Oblique lines are allowed only due to the design features of the side surface (for example, an attic).
- Grooving for wiring assumes a straight line. Forming an angle between two points is allowed only once, since multiple kinks in the cable will lead to a violation of the integrity of the insulating layer, and, as a result, a circuit closure.
- On the internal load-bearing walls of panel houses, work is carried out only in the vertical plane.
- There are size restrictions for laying: length - no more than 3 meters, depth - 2.5 cm, width - 3 cm.
- Maintain the required distance from neighboring objects: from the floor slab - 1.5 cm, from the heating radiator and gas pipe - 40 cm, from the floor, ceiling and doorway - 10 cm.
- It is imperative to observe personal safety measures (dust generated during work settles in the respiratory tract and can provoke the onset or exacerbation of an existing disease).
Now let's talk about the neighbors. Living in an apartment building obliges us to follow certain rules to maintain overall comfort. Failure to comply with these rules may result in fines and other administrative penalties. According to the law, noise repair work is allowed to be carried out on weekdays from 08:00 to 22:00 with a break from 13:00 to 15:00. On Saturday you can work from 12:00 to 19:00 with the same break. We rest on Sundays and holidays.
But keep in mind that the “Silence Law” varies from region to region, so before starting work, it is better to familiarize yourself with the legislative norms of your federal district. Sometimes situations arise when the opportunity to work as a hammer drill falls only on a day off. In this case, you will have to negotiate with the residents and ask them to “get into the situation.” Believe me, no one will refuse if both parties are ready to compromise. You can offer the most adamant neighbors a small gift for their patience.
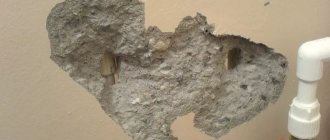
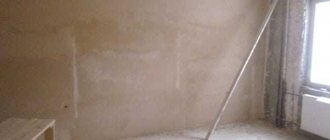
Let's move on to preparing the room. It is very important to make sure that where the walls are being cut, no old cable is passing under the new wiring. To check, use a device that responds to the presence of current at a point by lighting a light bulb, as well as wiring detectors. Next, you need to clean the wall of paint and old wallpaper.
Since the work ahead will be dusty and dirty, cover the doorways with construction film. Use it to cover pieces of furniture (or better yet, take them out of the room altogether) and window openings. Remove all textiles from the room and remove curtains. It is better to spend time and protect the room being repaired and other premises from the ingress of fine particles than to wash the entire apartment later - this is not a task for one day, not to mention the danger to the lungs.
Calculations for channel depth and width will depend on:
- quantity and cross-section of laid cables;
- if you plan to use corrugation, then be guided by its diameter;
- Increase the depth of the furrow in front of the niches for sockets and switches. This will make it easier to install the wire.
When working on a reinforced concrete wall, it is important not to damage the metal reinforcement; it lies at a depth of 4-5 cm. In addition, the reinforcement can ruin your tool. Also take into account the laying of the distribution box: it will take a long time to dig under it. If, at the end of the work, you plan to level the walls with plaster, then you can lay a corrugation in it, then the depth of the groove under it will be small.
We proceed to marking - the final stage of preparation. To do this you will need a bright marker (trust me, a pencil will not work), a tape measure and a quality level.
We draw a route on the wall with marks of switches, sockets, lighting fixtures, and distribution boxes. We photograph the result of the work in good quality so that the diagram can be seen. If you don’t have a camera at hand (which is unlikely), make a sketch on paper. This is necessary so that in the future you can drill a hole in the wall for the dowel without any problems finding the right place. After all, very little time will pass after the repair, and you will no longer remember where the electrical cable runs. And this scheme will allow you not to run around the apartment with a wiring detector before each drilling.
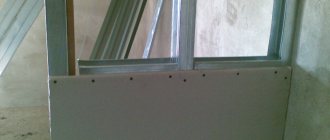
What to do when drywall is already installed
Options for installing electrical wiring in parallel with wall finishing were discussed above. Now let's figure out what to do if the finishing materials are already installed on the walls. First, decide what is between the drywall and the base wall.
The first option is to place drywall on the wall using an adhesive compound. You will need to cut through the finishing surface and then groove the material for the cable installation. After such installation, you will be forced to restore the wall by painting it or wallpapering it.
The second option is simpler. It implies that the sheets of drywall were fixed to a metal profile. However, it is important to know the electrical wiring diagram and where exactly the metal frame is located. If you don't want to damage the front part, try running the wire through the baseboard. Drill a hole for the outlet or switch, then use a regular plumb bob to determine where to insert the cable. Remove part of the plinth, lower the rope along the plumb line, threading it through the hole. Tie a cable to the rope and pull it up. After this, the box is placed using any convenient method, and the cable is pulled to the shield.
Pulling the cable under the installed plasterboard
The third option is when insulation materials were installed between the wall and the gypsum board. To enter the cable, use the steel wire left over after installing the corrugation. If rigid insulating boards are used, then it will not be possible to get out using this method.
Since in any of the above options the cable under the drywall will be located chaotically, it is advisable to install it together with a protective corrugation. An alternative is a wire with three layers of insulation. Finally, be sure to make appropriate changes to the room's electrical circuit.
Chisel and hammer
It is an economical, labor-intensive and skill-requiring tool. People without proper physical training will find it difficult, even exhausting, to tap walls using this tool. In this case, use in large-scale work on a brick or concrete wall is not justified. It can be used when the main work on these surfaces has been completed and it is necessary to refine the unevenness or slightly expand the recess. But when working on plaster, this pair will show its best side, but, again, at short distances. In a word, a chisel is convenient for finishing touches and small details.
Stages of work:
- Using the marker markings, we tap the lateral borders of the groove.
- Under the blow of a hammer, we make a “bottom-up” movement of low amplitude with the working surface of the chisel, as if “picking up” the top layer of plaster.
- Next, using progressive movements, we deepen the groove.
As already noted, the work requires skill: the synchronization of the force of the hammer’s impact and the direction of the chisel’s stroke is important. Otherwise, you risk getting a crooked line.
Cable under suspended ceiling
This option has several fundamental differences from installing wiring in plasterboard walls. The wires for ceiling lights are routed along the top edge of the walls. You need to drill holes in the plasterboard sheets in order to thread the cable through them. Run the cable before the drywall is installed. As a last resort, you can dismantle the sheets to provide convenient access to the space under the ceiling.
Organization of electrical installations under a suspended ceiling
Bulgarian
It is very convenient to use a grinder for cutting walls for electrical wiring. It will perform well on various surfaces: it can handle both concrete and brick. Purchasing a diamond blade makes cutting quality. There are also disadvantages: during the work, a lot of dust is generated, which is difficult to wash, and the impossibility of controlling the cutting depth.
And, if the first can be dealt with using a construction vacuum cleaner, then the second will entirely depend on your skill. By the way, when working with an angle grinder, protective equipment is required: glasses, a respirator and gloves. The technology of work is simple: the longitudinal edges of the recess are sawed according to the markings. Then, using a hammer drill with a spatula attachment, the central part of the furrow is hollowed out. The groove turns out smooth and beautiful.
Hammer
The method of forming a recess with a hammer drill has also proven itself to be quite good. By the way, when using this tool, less dust is generated. To work, you need two attachments: a drill and a spatula. A mark is glued to the drill, moving away from the tip, in order to control the depth of the holes.
Let's look at how to make a groove for wiring with this unit:
- According to the markings, holes are drilled at a distance of 1-1.5 cm from each other;
- the blade attachment is changed;
- in the “no drilling” mode, the “jumpers” between the holes are removed;
- The side bevels are leveled.
By the way, holes for distribution boxes, switches and sockets are also made with a hammer drill. In this case, a special attachment is used - a crown.
It should be noted that the work will be quite long and noisy, and the quality of the grooves is not entirely good: there will be unevenness and chips. However, this is not a reason to refuse to use a hammer drill. All defects can be corrected with plaster.
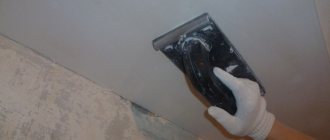
How to seal a groove?
The final stage of work proceeds as follows:
- the grooves must be cleaned of dust; either a construction vacuum cleaner or an ordinary broom will do;
- grooves should be treated with a primer;
- to reduce the level of shrinkage, you can slightly wet the wall near the grooves;
- when everything is completely dry, cables and distribution boxes are installed according to the diagram;
- gypsum plaster is usually used to seal the grooves;
- To prevent the plaster layer from sagging and starting to collapse, you can use a reinforcing mesh.
Finally, let us note again. If you are not sure that you can do all the work yourself, it is better to immediately contact specialists.
The article was written for the site.
Tags:Electricity
Wall chaser
With this electric tool you can professionally make furrows of excellent quality in any mineral substrate: from brick to foam concrete. Many people believe that a wall chaser is a type of grinder. However, it has a number of design features that allow work to be carried out 2 times faster and with a minimum level of dust.
Differences from the grinder:
- It has two parallel diamond-coated saw blades; the depth of the saw can be set independently.
- The stability and accuracy of the tool is ensured by a slide with guide rollers.
- The protection of the surface from damage by the discs and the safety of the worker is ensured by the immersion system: when removing the cutting elements from the grooves, the spring-loaded slides are lowered and the discs become inaccessible for contact.
- Dust absorption occurs in the protective casing and is transferred through the pipe to the collection box of the industrial vacuum cleaner.
The principle of operation of the furrow maker is simple and consists in the fact that the operator sets the required groove depth on the disks and guides the device along the intended line. Then the inside of the gutter is removed with a chisel. The lines are perfectly straight. Buying this tool for personal use is quite expensive, so it is better to invite a professional.
Wiring protection
Modern cable for electrical networks is made of copper and covered with a special sheath. When installing systems under a plasterboard finish, there is a high probability of damage to the wires, since the gypsum boards are attached directly to the perforated frame with self-tapping screws. Thus, it is important to use protective corrugation to eliminate the possibility of damage to the wire by self-tapping screws.
Corrugated tubes are characterized by increased flexibility, so they do not complicate the installation process, providing reliable protection from mechanical stress. This approach eliminates the risk of short circuits. Additionally, such products increase the waterproofing properties of the wiring, which is important when using the network in the kitchen, bathroom or toilet, and also protect the cable from rodents (in private homes).
Installation of wiring under plasterboard in corrugation
Alternative options are polyvinyl chloride tubing and plastic cable ducts. Their protection is slightly better, but the installation process is significantly more complicated. Unlike corrugation, it is almost impossible to bend ordinary plastic.
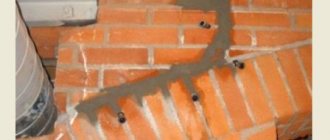
Work in a panel house
Repair work in such a house is complicated by the presence of reinforcement in the load-bearing walls and joints between panels. Any significant violation of the integrity of these elements can lead to the destruction of the wall or cause deformation. Working on a load-bearing wall with reinforcement must be done very carefully, since any exposure of the metal will cause inevitable corrosion. It is for this purpose that the structure is covered with a 2 cm layer of protective concrete. Therefore, if you really want to, you can make a groove no deeper than this size. For this purpose, you can use a hammer drill or wall chaser. The main thing is to set the required depth of the groove.
In addition to load-bearing walls, such houses have internal partitions made of foam concrete. You can work with them with any tool, after first making sure that the old wiring is de-energized.
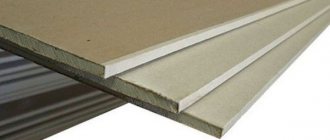
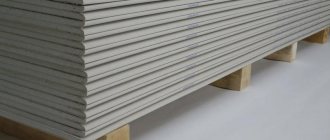
Which cable to choose for electrical wiring under gypsum boards
Finishing in a house or apartment can be done with three different types of plasterboard sheets: ordinary, moisture- or fire-resistant (GKL, GKLV and GKLO, respectively). GCRs are suitable for ceilings and walls: they are inexpensive and look aesthetically pleasing. The main disadvantage is poor protection from moisture, the possibility of smoldering of the internal part with subsequent inflammation and release of toxins. For this reason, when installing hidden wiring, it is important to use gypsum boards.
As for the wire, the VVGng cable is suitable here. The last two letters indicate that the product is non-flammable. When installing the cable under the ceiling and in a free space with a height of at least 15 mm, you can additionally use corrugated PVC pipes. If clearance is limited, pay attention to the VVGng-LS wire, which has double insulation. However, its cost in comparison with conventional VVGng will be 1.5–2 times higher.
Power cable VVGng-LS 3x1.5 with double insulation
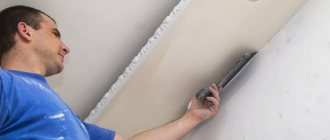
Finishing
After completion of all noisy work, it is necessary to close the highway. There are two options: either the entire wall is leveled with putty, or only the channel itself is closed.
To do this you need:
- clean the groove from a layer of dirt and dust;
- prime, wait until completely dry;
- putty, laying the solution into the channel (to prevent subsidence of the layer, you can lay a reinforcing mesh);
- remove excess plaster and smooth with a trowel.
Errors while performing work
Electrical work always requires special attention. Omissions and bungling can lead to both fire and electric shock. If you are not confident in your abilities, have doubts, consult a knowledgeable person or invite a specialist. But, if your hand is steady and your mind is clear, then boldly move forward.
There are a number of common mistakes that not only a beginner, but also an experienced home craftsman can make.
Let's look at them:
- you need to buy only high-quality goods - as you know, the stingy pays twice;
- take consumables and material with a reserve - possible defects, incorrect calculations, and this can happen at the most inopportune moment: the store is closed, and if it is open, what is needed is over;
- lack of wiring diagram or “by eye” option;
- the groove is too deep - you will have to increase the amount of gypsum mortar;
- ignoring the use of indicators of old wiring - electric shock is guaranteed;
- use a tester to check the presence of a phase when installing the switch - if you break the zero, then there will always be current in the phase, even if the toggle switch is turned off;
- incorrect selection of cable cross-section - will not cope with the load;
- slitting “on an oblique” is prohibited;
- using a hammer drill or wall chaser on an unsuitable surface - for example, drywall or wood. Or a chisel and hammer - on concrete. There is nothing critical about this, but from the outside it looks funny;
- failure to comply with personal safety measures can lead to harm to health;
- Using faulty tools or cheap components for them will lead to premature wear of the device.
Before you start gating, read all the information about the rules for carrying out such work, draw a diagram, make sure that each switch, each socket is present in the right quantity and in the right place. Don't skimp on purchasing quality materials. Purchase consumables with a reserve. Don't forget about your own safety, buy safety glasses and a respirator. Soberly assess your strengths, think about all the nuances of the upcoming work, and only if you are firmly confident that you can handle it, proceed. There is another option: invite a trusted specialist who will do all the necessary work “without noise and dust.” In any case, having information will allow you to control the situation.
Tags:
- electrician
Rate the material: