Corner crack in a gypsum plasterboard wall Cracks appear on walls for various reasons. This could be incorrect masonry, an uneven layer of putty or plaster, incorrect proportions of the plaster mortar used to level the walls, and even failure to follow the rules for drying the leveling putty mortar after its application. Since there are many reasons for cracking, there are just as many solutions to this problem. Our article will answer all questions related to this phenomenon, and you will have the opportunity to study in detail the causes of cracks and options for repairing wall defects.
How to fill cracks on a wall - reasons for cracks
We already know that cracks on walls appear for various reasons, and each individual defect is recommended to be eliminated according to its own specific recipe:
- The most common mistake made by the master is failure to comply with the proportions of the working mixture, foreign impurities in the solution, or adding his own components to the mixture that are not provided for in the recipe;
- The second, no less popular mistake is a poorly prepared surface. Old layers of paint, wallpaper, plaster must be completely removed, leaving no opportunity for the residue to swell from moisture and allow a crack to appear in this place. In addition, the surface must be degreased, leveled and thoroughly dried before applying new putty.
The technology for eliminating defects and preventing cracks from appearing on walls consists of one rule - you must follow all the rules!
Repair technology
Before repairing a crack in the wall, you need to determine the stabilization of the damage. If the split continues, then eliminating the problem will only be a temporary measure. Therefore, it is recommended to carry out repairs only on stable areas.
You can do the test yourself. The dynamics of faults are checked using beacons made of plastic materials, with a special scale or made of gypsum. Stability is indicated by a small cement screed in a damp room or in a dry paper sheet with silicate glue. If the landmarks remain unchanged during the month, then repair work is permissible. Otherwise, you need to wait until the end of the destructive process.
The next step is the choice of restoration filler. The solution to repairing cracks in the wall inside the house can be a repair composition for dry or wet rooms. Outside, only mixtures that are resistant to moisture and frost are allowed.
How to prepare the solution correctly
If the putty for filling cracks is prepared on the basis of an industrial dry mixture, which is sold in construction stores, simply follow the instructions for mixing the liquid composition. For each brand of dry mixture, detailed instructions for preparation and use are written on the packaging. When preparing a homemade putty or plaster solution, the proportions of the components are as follows:
- Portland cement - sand - water. Ratio 1 – 3 – 3 (water is added in small portions);
- Portland cement – sand – water – gypsum. Ratio – 1 – 3 – 3 – 1;
- Portland cement – sand – water – lime. Ratio – 1 – 3 – 3 – 1;
- Portland cement – sand – water – clay. Ratio – 1 – 3 – 3 – 0.5.
You should also follow standard recommendations:
- The container for mixing the liquid mixture must be clean. Absolutely clean;
- The consistency of the correct solution is thick sour cream. The finished putty for cracks should not drip from the trowel - it should slowly slide off the blade;
- The water for preparing the solution can be technical, but it must be clean, free of impurities and dirt;
- Mechanical mixing of the solution is carried out at low speeds of a mixer or concrete mixer;
- After preparing the mixture, it should stand for 1-2 hours, after which it needs to be mixed again, and you can start working;
- After using up a portion of the solution and before adding a new portion, the mixture also needs to be stirred - during the work, the water in the prepared solution could settle and rise up, and the sand could sink down.
Preparing a liquid mixture with your own hands is cheaper, but it is difficult to control the quality of the original components. Ready-made mixtures from well-known manufacturers are obviously a high-quality product that just needs to be prepared correctly. Read on to learn how to prepare a wall for puttying and how to fill cracks in the wall.
When preparing any mortar, it is necessary to add the dry mixture to water, but not vice versa.
How to repair a crack in a wall
When starting repair work, dismantling and removing old wallpaper from the walls, you can find cracks in the walls . This phenomenon is frequent and quite unpleasant. Cracks can be of various shapes and sizes; it happens that one minor crack forms a whole web of small defects in the wall. There are also through cracks (holes). Of course, it is impossible to cover such a wall or cover it with plasterboard if the problem is not immediately eliminated - cracks in the walls, the wall will continue to deform and slowly collapse. How to properly deal with cracks and how to fix them with your own hands will be discussed in the article.
What to do if cracks appear on walls covered with plaster?
Before you start repairing cracks in the wall, you need to know exactly the coating of the wall. Let's take a closer look at the walls covered with plaster. When starting to seal cracks, you need to clean the surface. Using tools (chisels, hammer or hammer) remove the plaster. Then, using a brush, the wall is cleaned of any dust and dirt that has formed, in order to finally remove the debris, the area around the crack is washed with a damp washcloth.
Once the wall is clean, you should begin repairing the crack. A special solution is used for this. Builders recommend using gypsum mixtures, which can be purchased at a hardware store. Having carefully studied the instructions, combine the plaster with water, stir so that there are no lumps, and fill the crack with the solution.
The solution is applied using a spatula. Gypsum tends to expand after drying, so it is necessary to ensure that there is no excess solution in the cracks. If you overdo it with the amount of gypsum, the crack will deepen and a new deformation of the wall will begin. After the cracks are eliminated, it is necessary to let the plaster dry completely, this takes 5-6 hours. After this, use sandpaper to remove the remaining plaster. And enjoy a smooth wall without cracks.
How to prepare the surface
Before filling cracks, the wall should be thoroughly cleaned. Therefore, we will tell you in more detail about preparing the surface for applying a plaster or putty layer. Cleaning the surface may seem like a simple task, but the devil is in the details. Even a small area of old plaster, paint, a scrap of wallpaper or an island with old whitewash can (and will definitely become) your headache if you do not remove them before plastering.
From moisture, from interaction with the components of the new solution, from changes in temperature and humidity conditions, these residues will begin to swell, and this does not always happen immediately. Cracks will appear over time - maybe in a week, or maybe in six months. And while you are wondering where the defect came from, the crack will grow. And you will have to disturb the new decorative finish, pick out a layer of plaster, repair a crack, and then try to disguise your mistakes with wallpaper, paint or some other decorative material. And at the same time, you may not even know why the putty on the walls is cracking. To avoid such mistakes, use our recommendations:
How to remove old coating:
- Water-based paint can be easily removed by wetting the wall with hot water. Remove paint with a hard sponge or brush;
- Oil paints are removed with special remover solutions. The last resort is cutting down the old layer with a punch or removing paint with a grinder;
- Wallpaper can usually be easily removed with a metal spatula. To make the procedure easier, wet the wall with hot water 2-3 times, and after half an hour the wallpaper can be removed even with your hands. Another effective old-fashioned method is to warm up the wallpaper with an iron, and if it has a steaming function, that’s generally great;
- Grease stains, rust stains, and mold are removed with deep penetration solvents and antiseptics.
All procedures end the same way - the wall should be opened with a layer of deep penetration primer. The primer increases adhesion and protects the wall surface from waterlogging, mold and glue stains on the wallpaper. A primer is the only correct answer to the question of why putty cracks when it dries on the wall.
How to eliminate wall defects
When starting a cosmetic renovation in an apartment, first of all, you should take care of the condition of the walls and partitions. It is necessary to eliminate defects such as small and large cracks, potholes, and cavities. The appearance of the final finish directly depends on how the preliminary preparation of the walls was carried out and on the quality of the materials used.
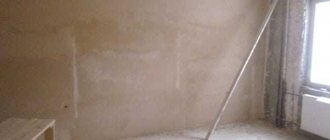
In anticipation of the renovation, you removed the furniture, pictures, lamps, and decorative elements from the walls. The craftsmen removed the old wallpaper - and it turned out that the wall was a sad sight. Plaster cracks, dowel holes, various irregularities.
What if your renovation plan calls for finishing with an elite finish: Venetian plaster or artistic painting? The wall must be perfectly smooth and even. This means that all defects need to be repaired with putty and repair mixture.
How to apply the solution
After cleaning the surface, the wall is puttied or plastered. In any case, it is recommended to apply not one, but two layers of solution - starting and finishing. The first solution is applied to remove severe unevenness and seal cracks. After the starting mixture has completely dried (the layer can be 1-3 cm, and it can take 1-2 days to dry), the finishing mixture is applied. It is fine-grained, almost powdery, and leaves no traces at all when pulling the spatula - the surface turns out perfectly smooth. In some cases (this depends on the skill of the plasterer), the wall may not even need to be sanded.
If you skip the starting layer and immediately plaster the wall with the finishing mortar, then you yourself will create ideal conditions for cracks to appear. And this is one of the reasons and mistakes why the wall cracks when it dries: a dense and thick layer of the finishing coating will quickly release moisture into the concrete or brick, as a result of which cracks will certainly appear.
You can prevent cracks from appearing by simply following these rules:
- First you need to seal cracks, gaps and crevices, deep depressions, and let them dry completely;
- The dry surface is leveled with coarse sanding paper;
- After the island application of the mixture, the layer is applied completely to the wall - this is a leveling layer. It must dry for at least a day; before applying the finishing mixture, the wall can remain slightly damp;
- Next, the wall is opened with a deep penetration primer;
- The wall is finally treated by applying finishing plaster. It must be smoothed out with strong pressing movements - this technique will prevent depressions from appearing on thicker areas of the plaster. This layer must dry completely, so drying time is from 24 to 48 hours;
- Small irregularities are smoothed out with fine sanding paper;
- The last stage is again a layer of primer and drying the wall.
The next day you can apply a decorative coating - glue wallpaper or paint the walls.
How to repair a crack in a wall
How and with what to correct a crack in the wall correctly.
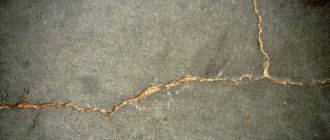
One of the most important problems in apartment buildings and private buildings is cracks in the walls. Because of such cracks, paint very often begins to crack and crumble, wallpaper peels off, and other troubles occur that I would like to get rid of. But cracks occur not only due to builders - this can also happen due to many natural phenomena, such as earthquakes, subsidence of the earth and others. You just need to understand that nothing lasts forever, and the problem should be solved as it arises. But cracks can be very different - be it the initial stage or quite serious damage. But one conclusion should be drawn - it is necessary to repair the crack in the wall as early as possible, so that later you do not have to invest more effort and money in eliminating this problem. It’s better to caulk and seal it “in the first place” than to renovate the apartment later.
How and with what to fix a crack in the wall
You may encounter cracks of completely different sizes and origins.
Perhaps your plaster or putty is simply cracked, but if the brickwork itself has cracked, then this is a more serious problem. But still, you can cope with the first and second options, you just need to know how to do everything correctly, that’s all. Let's try to learn some methods that will help you get rid of existing wall cracks or holes in the wall. The putty mesh will help eliminate the crack in the wall.
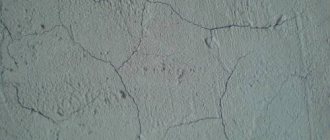
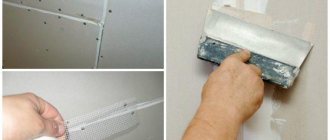
If small cracks have formed on your wall that resemble cobwebs , then in order to cover it up, you may need a primer (see which primer to choose) and a putty mesh. But remember, this option may only be suitable if the cracks do not diverge and the wall has only minor damage. So let's get down to business. First of all, it is necessary to clean off all old building materials and all kinds of debris that is on the surface from the wall. It is important that the wall is perfectly clean. Now that you have done this work, you need to prime the wall with deep penetration soil. After this, glue the reinforced putty mesh over the entire area of the wall. Remember that the mesh should cover the entire area of the cracked wall. After you have applied the mesh, you need to coat the surface with a small layer of putty on top. After complete drying, you need to sand the wall, after which you can start painting or wallpapering. This makes repairing a crack in the wall quick and easy.
If you are faced with such a problem when small cracks appear on the outside of the wall , then you should do the same work as in the previous option for getting rid of cracks, but there is still one caveat - choose Ceresit CT29 for putty.
This putty is designed specifically for outdoor use and does not require sanding, since it itself is reinforced. Moreover, this putty is very resistant to atmospheric influences, as it contains special adhesive additives. Metal mesh for plaster photo.
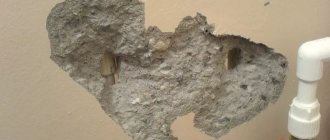
If your wall has significant cracks not only in the plaster, but also in the brickwork , then you should resort to another option on how to repair a crack in the wall, since this problem is already more serious than in previous options. First of all, you need to completely remove all the old plaster from the wall. After you have cleaned the wall, you need to screw a special metal mesh for plaster onto it, and after that apply a new layer of cement-sand plaster. But it is very important to remember that the mesh must be screwed over the entire surface area, thereby preventing the new plaster from spreading, after which it will be possible to putty, paint, and so on.
But it’s worth starting to take drastic measures if the crack in the wall has already begun to spread a little . In this case, you will have to pull the wall together so that it does not begin to diverge further. You need to tighten the crack with special metal plates. But before that, knock off all the old plaster from the wall. You can knock down the plaster not from the entire surface area, but only half a meter on both sides of the crack, since the metal plate is usually attached to one meter. After you have knocked down the plaster, you need to clean the crack from mortars and other debris, then fill it with polyurethane foam. Now you can attach the plate. But there is an important point - when choosing a plate, you should definitely pay attention to the fact that it cannot bend easily, especially since it should not bend by hand - this is important. It is worth choosing a plate that is made of thick and high-quality metal.
The crack in the wall should be tightened in three places, and this is only the minimum. If possible, you can make four or five ties. But if you chose the first option, then the required tie points are:
1. From above, while leaving a little space from the ceiling. 2. From below, slightly away from the floor. 3. In the middle.
You can screw the plates onto the most ordinary self-tapping screws, having previously driven in the dowels, or you can put them on bolts with a nut, punching through the plate. After you have made the screed, you can screw on a special metal mesh and watch how to properly plaster walls with your own hands with a video example, and if you are familiar with this, then get down to business accordingly, because now you will not say that you do not know how to repair a crack in the wall. Good luck!
How to choose a mixture for sealing ceilings and walls
To apply a leveling layer and eliminate cracks, you need to use non-shrinking compounds. Such mixtures have good ductility and are in good contact with the wall surface. Such putties consist of acrylic resins, mineral additives and modifiers to speed up drying. It can be applied to walls made of cellular concrete, brick, stone, and plaster. Recommended for indoor use.
Advantages:
- Good ductility and maximum cavity filling;
- You can add any color;
- Not only cracks are sealed, but also large areas;
- Eco-friendly, odorless substance;
- Withstands shocks and other mechanical impacts well;
- Hardens quickly.
The standard mixture consumption is 10 liters per 20 square meters. Dries in no more than a day, the recommended application layer is 1.5 mm. You need to work with the mixture at a temperature of +5°C / +30°C.
How to properly align corners indoors
Plastering work in a room begins with leveling the corners - this is an immutable rule. How even the corners are laid out determines how horizontally and vertically even the layer of plaster on the wall will be. The initial level is set by a regular building or laser level. It is also convenient to use a water tool - a hydraulic level - but this will require two people.
The laser beam of the level must be directed parallel to the surface of the wall, and a ruler is applied along the angle. The laser beam will show the distance from the actual wall surface to the intended surface. If the difference is 5 mm or more, then it makes sense to plaster the unevenness.
How to apply the solution to internal corners:
- A trowel or spatula with the mixture should be applied to the corner;
- The solution is pressed into the corner by lightly pressing the spatula. The blade must be immediately moved to the side so that the solution spreads over the surface;
- To ensure that the angle is perfectly equal, a corner spatula is recommended for beginning craftsmen - it will make the angle with virtually no intervention from you;
- Simultaneously with applying the solution to the corner, you must immediately lay a reinforcing fiberglass mesh into the solution. It will bind the mortar in the corner with the mixture on the rest of the wall;
- When the mixture in the corner begins to harden, the next layer of it must be applied to the edge of the stack, which will protect the wall.
The outer corner is much easier to align. For this purpose, special perforated corners with a strip width of 1.2-2 cm are sold - metal or plastic. When leveling an outer corner, first apply a small layer of mortar on it, and then embed the corner into the mixture. Horizontal and verticality are checked with a level. Excess mortar is removed or stretched along the wall. After attaching the corners and drying the mixture, uneven surfaces are rubbed down with fine sanding paper.
How to level the walls for wallpaper and painting with the finishing compound?
It can be used to level walls with a skew depth of no more than 5 mm. Otherwise, apply gypsum or cement plaster. It is necessary to use dry mixtures, which can be applied in a layer of up to 5 mm.
- The mixture is poured into a container and mixed with a construction mixer until lumps are completely removed.
- Then leave for 10 minutes and stir again.
- On the wall, using a laser level, markings are made for metal beacons, on which a small amount of the composition is placed.
- The profiles are fixed in increments of 1-1.5 m.
- The solution is basted onto the surface between the profiles, tightened in an H-shaped rule, moving from the lower edge of the wall.
- The resulting bubbles are rubbed with a spatula or a damp sponge, then tightened again with a rule.
- Experts recommend dismantling the beacons. They are pryed with a chisel from the upper end and removed towards you. The seams are filled with putty and rubbed with a spatula.
- The corners are leveled with a corner spatula.
At the leveling stage, it is difficult to obtain a right angle. The problem is solved by subsequent grinding with an angle float.
How to do work without beacons?
Leveling without beacons is allowed with a perfectly flat plastered surface. The composition can be applied in a layer of up to 1.5-2 mm with a wide spatula. Work begins from the corners, which are modeled using a corner spatula or perforated corners.
- the finishing putty is applied to a dry primed surface;
- Using a paint spatula, apply the solution to the inner and outer corners of the walls;
- internal corners are leveled with an angle spatula at 45 degrees;
- using a cross-shaped movement of a wide spatula, the composition is transferred to the surface;
- layers are applied overlapping, avoiding straight seams, starting from the top edge of the wall;
- When performing work for painting or drywall, fiberglass is glued to the surface.
The finishing solution can be applied in a maximum of 3 layers of 1.5-2 mm. The maximum coating thickness does not exceed 10 mm. Each layer must be dried and primed. The average drying speed is 12 hours. 24 hours after drying, the surface is sanded using a grater in a circular motion. This stage can be neglected when preparing the wall for wallpaper.
Recommendations from professionals
try to establish the cause of the formation of cracks - perhaps the problem lies in a defective surface, and not in the technique of applying the material;
- A long crack is sealed with preliminary gating;
- The surface must be thoroughly cleaned of grease, stains, and old decorative layers. The wall needs to be leveled and allowed to dry;
- For finishing putty and filling small cracks, it is better to use acrylic-based compounds. Such mixtures are better tinted, do not shrink, and have good adhesion to other materials;
- Do not clean the wall or cracks on it with a damp sponge or wet cloth - this will only spread dirt across the surface, and even help it get deeper into the concrete;
- If finishing work is carried out with heavy concrete solutions, then it is recommended to level the surface of the wall with fine-grained putty, and not cover it with sheets of plasterboard;
- To prevent cracking, keep away from drafts for 48 hours after the solution has dried.
Recommendations for eliminating cracks on plasterboard surfaces
Cracks on a ceiling made of plasterboard sheets can appear if installation rules are not followed or due to the design features of plasterboard. The most important negative point is the fragility of the material. Therefore, the putty or plaster solution will keep the sheet intact if it is subjected to severe deformation or mechanical stress. A crack will appear at this location and will need to be repaired.
The most common and effective method is to make a chamfer on a crack up to 10 mm deep, and seal the depression using the methods listed above. The chamfer is cut with a knife. But why do such unpleasant moments arise?
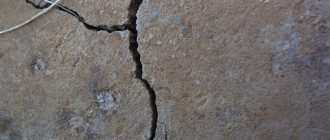
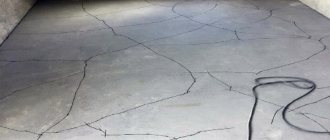
- Over time, the house has shrunk, and cracks may appear not only on the ceiling, but also on the walls;
Crack on the wall due to house subsidence - If the building is located near highways, railways or subways, then vibrations from passing traffic can cause cracks to appear;
- Rarely, but it also happens: earthquakes, explosions, flooding;
- And the last thing, inspired by fashionable trends in redevelopment: when eliminating or moving internal walls (partitions), the reconstruction rules regulated by the architectural service are not followed. Weakened wall structures cannot withstand increased loads and sag, causing cracks to appear in the most unexpected places.
The most likely occurrence of a crack is at the joints of sheets due to incorrect or weakened fastening of gypsum fiber boards or gypsum boards:
- The joints of gypsum plasterboard sheets are not reinforced with a metal profile, sickle tape or special paper tape; Perforated paper tape for gypsum board joints
- The hardware “failed” and got into the loose structure;
- The dowel screw does not expand the cartridge well, which is why the fastening is weakened.
Technological cracks are attributed to the influence of the human factor. In 99% of cases, builders do not follow the technology for installing plasterboard ceiling sheets.