According to the rules, waterproofing of the inspection pit and other underground premises must be carried out in advance - at the construction stage. But what to do if you need to waterproof a concrete building when it has already leaked? In this article we will tell you how to waterproof a cellar at any time during operation.
Concrete and cement concrete buildings have a porous cellular structure. This is why such materials allow a certain amount of moisture to pass through. To counteract this drawback, special concrete can be used during construction, but its cost is very high, and its protective functions weaken over time. Therefore, the best option would be to use waterproofing.
When a viewing hole is made in advance during construction and the material is used from the outer surface, such a structure is more reliably protected from water. But water is water and at some point it will still find a tiny hole, expand it and come out a few meters to the side. In this case, all attempts to protect yourself from it will be in vain.
Waterproofing the inspection pit during operation
Thanks to modern materials, the inspection pit can be waterproofed during operation. If, with the arrival of spring or during heavy rains, the cellar, garage, vegetable pit and other underground rooms begin to flood, and water begins to pour out of the seams and joints, oozing through the walls, filling everything around, the use of roofing felt, caisson, special plaster mixtures and other similar materials will be useless. After all, they all work for pressing, and now they can only be used from the inside, for tearing.
Waterproofing a manhole is very difficult if the surface is wet and you need to create an additional coating on the concrete.
Not all building mixtures can be laid on a wet surface. And this is without mentioning the problems that you can actually encounter when repairing damaged external waterproofing. But in winter or in bad weather such work simply cannot be carried out.
Common mistakes
Various mistakes are often made while performing work, including:
- Lack of tightness, especially in areas of transition between horizontal and vertical sections.
- When using rolled materials, the overlapping areas are not glued, which does not make it possible to obtain a sealed fabric.
- The application of materials is carried out sloppily, with unfilled areas of the surface.
The main reason for all errors is lack of thoroughness and inattention during work.
Waterproofing inspection pit - the best materials for insulation from water
Waterproofing inspection pits, vegetable pits and other underground concrete rooms is best done using penetrating insulation. Such building materials are able to penetrate the structure of concrete and become part of it.
One of the best materials is GS Penetrat. Penetrating waterproofing is not subject to destruction separately from concrete and serves within the shelf life of the concrete itself. GS Penetrat can be used on the outer and inner sides of the surface; it has no polarization direction.
(Before waterproofing the inspection pit, we recommend that you familiarize yourself with the characteristics of the GS Penetrat mixture)
Before applying such material, drying of the surface is not required: the concrete, on the contrary, must be moistened. Being absorbed into concrete, waterproofing becomes one with it, enhancing not only its moisture resistance, but also its strength as a whole. Therefore, GS Penetrat is the optimal material for waterproofing both at the construction stage and during the operation of structures, regardless of whether there is a leak in the room or not.
What if they still get in?
If the waterproofing is unable to cope with its tasks, it means that errors were made during the installation of the protection.
You need to do the following:
Determine the area of moisture penetration.- Inspect the surface of the wall or floor and choose a method of additional insulation.
- Free the external or internal surface from all obstructions (soil, coating or cladding, etc.).
- Apply an additional layer of waterproofing. The application area should cover the problem area by approximately 1.5 times.
If the problem is on a horizontal surface, it is recommended to fill in an additional screed with an intermediate polymer sheet.
Waterproofing an inspection pit with dry mixtures: features of the material’s action
Penetrating waterproofing of an inspection pit is carried out using special dry mixtures. They are diluted in water in small quantities and applied in a short time to a moistened concrete surface. The composition of the mixtures penetrates the pores of concrete, using its capillaries and microcracks, and creates insoluble crystals in them. The wetter the concrete, the faster the mixtures will react with it and crystallize in its structure.
After just a few hours, the protective layer of waterproofing remaining on the concrete loses its relevance and can be smoothed over or removed. This type of waterproofing is quite simple, reliable and economical. When crystallizing inside the material, it squeezes water out of it and prevents it from penetrating inside again.
The same mixtures can be used for waterproofing a garage inspection pit, a vegetable pit and other premises located below ground level, as well as for waterproofing strip foundations, concrete pools, country ponds and other similar structures.
Using penetrating mixtures for waterproofing pits, garages, pools, cellars and other buildings, you can significantly save on labor costs and materials, and the treated structures will last for decades. The mixtures are non-toxic and do not pose a danger if they get into food or drinking water, therefore They can also be used in the construction of wells and country water pipelines.
Additional articles on the topic:
- Damp basement - there is a solution! Floor waterproofing
In our country, it has already become a tradition to repair your car not in a car service center, but in your garage. This is partly correct, because why overpay for repairs that can be done at home. Plus, this kind of “tinkering” with the car allows you to gain new experience, which is especially useful for young drivers.
The vast majority of work that needs to be done during minor and medium-sized repairs can be done with your own hands, without taking the car to a service station and shelling out a tidy sum for simple diagnostics. Often there are breakdowns in a car that require you to crawl under the car. In this case, the inspection hole will be simply irreplaceable.
Types of waterproofing work in a garage basement
- Non-pressure . Protects the basement from floods in the spring, as well as during heavy rains. Bitumen mastic is used for work.
- Anti-pressure . Protects the garage pit from groundwater seepage. For this purpose, a cushion is made from slurry solution, which is laid in three layers, as well as bitumen mastic.
- Anticapillary . Protects against moisture seepage through capillaries inside concrete. Work is carried out to treat seams and cracks using a penetrating mixture or injection solutions.
Special components are added to the concrete solution to increase its waterproofing properties.
- Sealing . Promote the formation of crystals that do not dissolve in water. The components increase the density and extend the service life of concrete. These include resins that dissolve in water, iron, aluminum and calcium salts. In addition, such additives increase resistance to frost.
- Hydrophobizing . These are sodium and potassium soaps of petroleum, fatty and resin acids that dissolve in water. The components themselves do not have water-repellent properties, but manifest their qualities in the process of reaction with cement mortar. Due to a chemical reaction, the components settle on the walls of the capillaries in the form of microscopic droplets and form a hydrophobic coating. As a result, with such contact, surface tension forces push moisture out of the pores. These additives make the structure of concrete homogeneous, pores are reduced, and are evenly distributed in the material.
Specifics of construction and arrangement
If your garage has an inspection hole, then you definitely win over those car enthusiasts who do not have such a device. But there is still one significant drawback - due to the presence of a pit, residual condensation will accumulate in the garage.
Even if you make excellent waterproofing, it still won’t save you. If the car constantly stands above the inspection hole, then there is a high probability of rapid destruction of the bottom by corrosion. Not only the bottom of the car, but also the main structures of the car are exposed to moisture.
Due to the large amount of condensate, the spars can quickly rot. That is why the main recommendation when building an inspection pit is to make a recess on the side so that the machine can be placed above a flat surface, and, if necessary, placed above the pit for subsequent repairs. If the garage space does not allow you to divide it into two zones, then you will need to make a very good waterproofing of the pit.
Before you start building a pit, you must find out at what level the groundwater lies in your area. If the water rises higher than 2.5 m, then a pit cannot be built. If you are just going to build a garage, but have already found out that the groundwater lies too high, then you will have to make a drainage system, thanks to which the water will be drained into a special well or collector. If the water does not rise higher than 2.5 m, then There is no need to make any preliminary preparations.
After the pit is built, it will need to be constantly covered so that the bottom of the car is not constantly located above a source of excessive moisture. It must be kept closed at all times when not in use.
If the summer turns out to be hot, then it is advisable to drain the pit. To do this, you just need to leave it open for a few days. If you live in a house outside the city, and the garage is located on the territory of the house, then do not close it either so that condensation does not accumulate indoors.
Insulation
After waterproofing is completed, insulation can begin. For this purpose you will need sheets of polystyrene foam. They are sold in thicknesses from 50 to 100 mm. The use of such material allows you to reliably protect the garage from temperature drops due to cold air flows from below.
Expanded polystyrene is not subject to rotting and is easy to install, and also has the ability to repel water. It is installed on parachutes (special mounts) or glued to cement.
The mounts are called parachutes because of their shape. They are made from plastic. Parachutes are mushroom-shaped fasteners. They are driven into the walls (into a pre-made hole). The parachutes are hammered through polystyrene foam. A special nail is installed in the fastener to prevent it from popping out.
Polystyrene foam is used not only in the process of insulating walls, but also for doors and flooring. An expanded polystyrene sheet, which is characterized by increased strength, is sometimes placed on the floor. A concrete screed with reinforcement is laid on the insulation. Its thickness usually does not exceed 10 cm.
Planning, counting sizes
The dimensions of the inspection hole depend on the dimensions of the car, as well as the height and build of the car owner. It is not recommended to adjust the width of the pit to the current car, since over time you can buy a new brand that will not fit the dimensions. In order to avoid any incidents with the dimensions, the pit must be made according to more or less standard instructions. The width of the pit should be such that the size of the car's wheelbase, as well as the build of the car owner, is taken into account.
If the car has a more or less standard wheelbase, and the owner has normal dimensions, then the pit should be made standard. The universal width for the pit will be 75 - 80 cm. The depth of the inspection pit should be made in accordance with the height of the owner.
The car enthusiast should be comfortable in the pit, he should fit there at full height, but at the same time it should be possible to reach any structure of the car without much effort. It is best to make the hole 10–15 cm deeper than the owner’s height. Even if you go too far with the depth, you can always put something on the bottom or simply raise the floor.
You need to dig a hole in the center of the garage relative to the entrance. This arrangement will make it possible to perform convenient maneuvers. The length of the pit depends on the length of the machine.
It is advisable to make it 1 m longer than the car so that you can easily go down into the hole and get out of it. If the pit is too short, it will be inconvenient for two people to work in it. It turns out that the universal dimensions for a pit will be 5/0.8/2 (length/width/depth).
Lighting
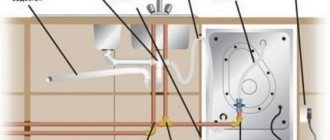
To work in a pit you need lighting. It is necessary to use either a portable lamp or lay wires inside the wall for the lighting device. The voltage is no more than 36 V; at a voltage of 220 W, the wires must be folded into an elastic steel hose. Sockets and switches should be selected in waterproof version UR5 X in accordance with GOST 17677-82E and GOST 14254-80.
Despite all measures to protect against water, it is often difficult to breathe due to dampness in the pit, so ventilation must be done. An elastic air duct is stretched underground and brought out twenty-five centimeters above the surface. Cover the air duct with a lid to prevent contamination. In addition, ventilation allows you to dry both the pit and the garage well on warm days, which is simply necessary for the long-term operation of the structure.
Construction of an inspection pit
The first stage is checking the groundwater level. A case in which drainage needs to be done will be considered. This can be done during the construction of the garage.
To build a pit, you first need to make a pit. Its depth should take into account not only the calculated depth of the pit, but also the thickness of the future floor, the thickness of the waterproofing along with the “cushion”. The pit needs to be made 40 - 50 cm wider than the future pit.
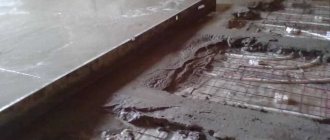
You need to dig a hole with all allowances. You will need to add 10 cm of gravel to the bottom, after which it needs to be compacted. You need to put a 5 cm layer of sand on the gravel and compact it too.
Along the entire perimeter of the pit, you need to make trenches for drainage with a depth of 30 - 50 cm. At the bottom of all trenches you need to place a geotextile fabric, the edges of which need to be wrapped behind the walls of the trenches by 80 cm. Next you need to put a layer of gravel 5 cm deep, after which you need to lay the drainage pipes , namely, plastic or asbestos cement.
Next, you need to put 20 cm of gravel and wrap the resulting structure with the remaining edges of the geotextile fabric. Next, you need to use clay to form the future floor. The clay must be covered with a cloth for waterproofing.
Both roofing felt and plastic film are perfect for this. Then you need to make formwork for the floor, install a frame made of reinforcement or mesh, after which everything will need to be filled with concrete, preferably waterproof. When everything is completely dry, you will need to re-waterproof it.
In order to make normal walls, you can use brick or monolithic concrete.
If groundwater rises very high, then it is better to make monolithic walls. You need to put clay on the walls that will not allow water to pass through. Next, you need to make the final waterproofing, connect it to the floor waterproofing and close all edges, cracks and joints.
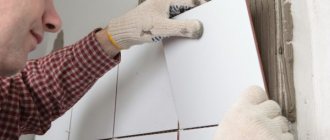
Next, you need to make formwork for the walls, cover them with a reinforcing frame and fill them with concrete. After everything is dry, you can move on to finishing the pit. The walls can be covered with plaster, tiles, fiberglass and other materials.
You will need to make a safety rail over the hole to prevent the car from running into the hole. To form the frame you need to use a 60 mm metal corner.
The length and width of the frame should be equal to the dimensions of the pit itself. The finished frame must be placed on the pit and concreted. You will also need to steal wooden boards that will cover the recess.
You need to take wood at least 40 mm thick. They will need to be adjusted to size and placed on the frame. It is highly discouraged to take thinner boards, as they will simply crack under the weight of the machine.
But a tree 40 or even 50 mm thick will easily support a car weighing 2 tons. To make a better waterproofing of the pit, you will need to lay plastic film on it and press it down with boards. This technique will protect the bottom of the car from the harmful effects of condensation.
To make it easier to use the pit, you can make a special ladder that can be placed against any wall and, if necessary, removed. It is advisable that they be metal, but not wooden, since a wooden staircase will quickly begin to collapse under the influence of excessive amounts of moisture.
Video description
The video shows how to use injection insulation:
Liquid glass
The technology is universal and suitable for concrete, metal and wooden structures. Raw materials have a number of advantages:
- penetrates deeply, hardens quickly and completely fills wall voids, crystallizes from the outside and requires little time and material consumption;
- reduces moisture absorption;
- provides chemical and biological protection of walls.
Standards - guidelines for the builder
Even for building an inspection pit in your own garage, there are your own standards, which are described in special regulatory documents. Before construction, it is better to contact a specialist who will point out all the innovations and changes associated with this event.
Whether or not to build a pit in the garage is your decision. This thing is very convenient to use, but there are quite a lot of difficulties with its construction and protection. Therefore, try to weigh the pros and cons, and then make a decision.
Subscribe to our feeds on Facebook, Vkontakte and Instagram: all the most interesting automotive events in one place.
Was this article helpful?
It is much easier to ensure qualified and timely maintenance of a personal vehicle if you have an inspection hole in your own garage. The small room below the garage floor should be comfortable, dry and well lit.
To accomplish these tasks, construction is carried out in compliance with all building codes, including the rules for installing effective waterproofing. All the troubles and costs of improving the inspection pit as a convenient workplace will more than pay for themselves in the future. Problems with constructing an inspection pit. The main difficulties arising during the construction of an inspection pit. pits are associated with its position below the floor level and all the consequences of this fact. Let us note two main tasks that need to be solved in this situation: The foundation of the inspection pit is close to groundwater. If appropriate protective measures are not taken, such a neighborhood will cause constant dampness, accompanied by the appearance of mold, mildew, and cracks in the enclosing structures of the pit. If the upper boundary of groundwater during seasonal fluctuations can rise above 2.5 m from ground level, then flooding of the pit is possible. The second problem is the temperature difference in the pit and the garage itself.
If the inspection pit is not waterproofed or done poorly, cold damp air rises from the bottom up and condenses on the bottom of the machine, causing it to corrode. And in the garage itself there will always be damp air. There are two options for solving these problems. The first, cardinal one, is to waterproof the inspection pit according to all the rules.
The second method is to place the inspection hole away from the place where the car is parked. In any case, it is recommended to make the inspection hole cover from boards wrapped in plastic film. Materials for waterproofing the inspection hole To waterproof the inspection hole of the garage from the outside and inside, the following materials can be used: Rolled bitumen materials are most often used for waterproofing structural elements of the garage. This is due to their affordable cost. Roofing felt is easy to install and has a service life of 15-20 years.
Euroruberoid is a more advanced and, therefore, more expensive material. It is made of fiberglass or fiberglass treated with modified bitumen. Euroroofing felt has a protective layer of slate or granite on top, and a polyethylene film is glued underneath. A layer of polyethylene film on Euroroofing felt protects this material from gluing in a roll<Modern polymer membranes differ from traditional rolled bitumen materials in their service life, which is practically unlimited.
But the difficulty of using membranes lies in the need to use special equipment and the labor of skilled workers. Membranes are distinguished into single- and multi-layer. The membranes are distinguished by their resistance to mechanical stress, many chemically active environments and substances, the ability to be combined with other waterproofing materials, elasticity and resistance to low temperatures.
This is a reliable, but expensive method of waterproofing protection. The types of membranes can be found in the article “Waterproofing a garage roof - choosing materials depending on the type of roof.” Penetrating waterproofing is one of the most advanced and effective ways to protect concrete surfaces from moisture. You will find descriptions of our most common brands of waterproofing dry mixtures in the article “Measures to improve the waterproofing characteristics of garage floors.”
Such waterproofing mixtures do not require pre-drying of the surface before application. The components of these compositions penetrate deeply into the pores of concrete surfaces, entering into chemical reactions with base substances. In this case, water-insoluble crystals are formed that can block the penetration of water deep into the concrete element. Another modern waterproofing material is a one- or two-component bitumen-polymer composition, conventionally called “liquid rubber”.
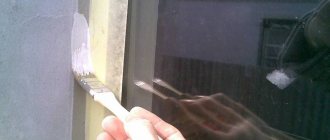
One-component mastic "Slavyanka" is a high-viscosity bitumen-latex emulsion, has the appearance of a pasty mass of various shades of brown. Before use, the mastic is mixed and applied to the surface by hand. As a result of polymerization, an elastic rubber-like continuous membrane is formed, due to the appearance of which this material is called “liquid rubber”.
The first component of a two-component bitumen-polymer mastic is a bitumen-latex emulsion. It is a stable, homogeneous mass of brown color. The second component is calcium chloride in the form of crystalline powder or granules.
This substance is dissolved in water according to the instructions. Technologies for waterproofing the inspection pit, depending on the materials used. After making a pit for the inspection pit, its primary waterproofing is carried out. To do this, it is recommended to coat the earthen walls of the pit with rich red clay on a compacted sand-crushed stone cushion. Let's consider the technologies for waterproofing the internal space of an inspection pit: The process of laying rolled bitumen materials and the consumption rates of penetrating waterproofing various brands are described in the article “Measures to improve the waterproofing characteristics of a garage floor.” Let us dwell in more detail on two methods of waterproofing - using polymer membranes and liquid rubber. Waterproofing work using membrane materials consists of connecting panels with a hot stream of air or a heated wedge.
The membranes are laid on a reinforcing frame made of metal mesh. The material is installed with an overlap; it must completely cover the surface of the walls and floor. This is an effective, but rather expensive method of waterproofing; it requires specialized equipment and workers of certain qualifications. Equipment for applying “liquid rubber” is a pumping system with hoses and a two-channel fishing rod.
A fishing rod with nozzles creates the required ratio of the first and second components. The minimum thickness of the applied layer is 1 mm. In 5-20 seconds, the mastic dries to the touch, and for its complete polymerization it takes 1-2 days, which depends on the thickness of the application, temperature and humidity conditions, and the type of building structure.
Within an hour after treatment with mastic, the surface is able to withstand rain. Liquid rubber can be used to waterproof a floor only if a protective leveling screed is installed. In the case of two-component waterproofing compounds, each of the two pumps is designed to pump one component. To continue the discussion of the topic, write to our website. We will review your comments and additions and, if necessary, continue the discussion. Waterproofing in a garage inspection pit: technologies and materials, 3.0out of 5based on 2ratings
An inspection room is needed in the garage if you plan to repair your car from time to time. It is not necessary to hire specialists for its construction; all the work can be done on your own. Pay close attention to the waterproofing of the pit in the garage. Do the job efficiently, then the garage will not be humid, and the car will not be afraid of corrosion.
Let's figure it out if there is water in the garage pit, what should we do?... Contents: Why is an inspection hole needed? What to do if the groundwater is located high? How to fall asleep? Waterproofing an inspection pit in a garage with your own hands When constructing an object If a garage with a pit has already been built
Which buildings need to be waterproofed?
Protection of underground elements of buildings and structures from moisture is one of the main tasks solved by designers and builders.
First of all, buildings with strip foundations sunk below the freezing level of the soil are at risk.
This is a basic type of foundation that can bear heavy loads. However, in terms of exposure to soil moisture, it is the tape that is at greatest risk.
The taller and more massive the building, the greater the load on its foundation. The occurrence of additional impacts can cause early destruction or deformation of the foundation.
Particular attention is paid to buildings located in areas with significant seasonal fluctuations in groundwater level (groundwater level).
What is the inspection hole for?
Today, many car owners prefer to care for their vehicles and carry out repairs themselves. If you are one of them, then you need your own garage, which will have special equipment. This can be called a viewing hole.
Its construction only seems simple at first. In fact, the work must be carried out in accordance with accepted building regulations.
The recess must be made strictly according to size. The inspection hole is made so that it is light and dry. Protection from groundwater in the garage is a priority for the car owner.
A hole in the garage when there is groundwater can cause problems.
Proximity to such waters often causes constant dampness in the garage. Mold appears on the walls, cracks appear on the floor and walls. When the water rises, the building may be flooded.
There is another problem. It is as follows. When you make an inspection hole, there may be a temperature difference. It will be colder in the recess.
IMPORTANT! In the absence of high-quality waterproofing of foundations and garage pits, cold air will rise. As it rises, it will cover the bottom of the car with condensation, which can cause rust. In addition, the room will be stuffy and humid.
There are two reliable ways to solve the question: “How to make a hole in the garage if groundwater is close?” The first is based on careful waterproofing.
The second involves moving the hole away from the car parking lot. You can choose any option, but it is recommended to cover the structure with boards of suitable size. Pre-wrap them with plastic wrap.
Plastic models
Today, manufacturers of products made from polymer and plastic materials offer ready-made plastic pits for the garage. We must pay tribute to this type of product, which simplified the construction of inspection pits. There are more and more offers on the market every year. There is not only a wide range of sizes, but also a variety of raw materials, and prices vary significantly.
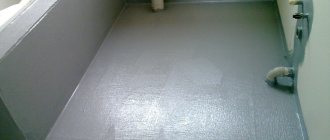
There is no need to waterproof the finished pit. The main thing is to lay a good sand cushion and fill the space between the walls of the dug hole and the plastic product with sand.
When constructing an object
You can do waterproofing yourself, without turning to specialists. Do primary protection as follows:
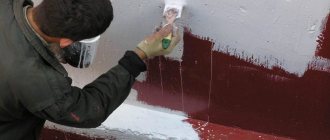
- Pour gravel onto the bottom before starting the concreting process; its layer should be 15 cm. After this, add 5 cm of sand. The pillow needs to be compacted, the layers will perfectly remove moisture. It is recommended to lubricate the earthen walls with greasy clay even before applying the waterproofing material. Red is best suited for this purpose.
There are various materials on the market that are excellent for protecting the recess.
Manufacturers produce bitumen materials in the form of rolls. Cover the shelves and niches that are in the recess with material. Divide the roll into fragments; you need to lubricate all parts with special solvents in advance.
Lay the material so that the sheets overlap by at least 10 cm.
Pay attention to the joints. To glue them together, you need to use a torch, or cover the joints with molten bitumen. Some car owners use solvent for this purpose.
Polymer membranes. They are laid overlapping on the frame, and a metal mesh is used for reinforcement. Cover the entire surface of the pit with material.
The membranes are connected by welding. A hot air stream can be used. Since the method is based on the use of welding equipment, it is better to entrust such work to specialists.
Penetrating materials. Buy a special mixture, mix with water. The solution should be applied to a slightly damp surface of the inspection hole. After crystallization, the pores in the concrete are reliably sealed.
Liquid rubber. Apply the material to a damp surface. This method is suitable if the ambient temperature is in the range from + 10 to + 24. After completing spraying, wait a few hours.
Waterproofing during the construction of a garage must be done in a complex, it must be internal and external. It is important to correctly determine the depth of the pit.
When making calculations, be sure to take into account how thick the preparatory layer will be. The height of the ceiling of the pit is also important.
Dig a pit, taking into account the indentations. Make them at least 1 meter wide.
Level the bottom of the pit, making a slight slope towards the walls from the center. Make a water seal from clay and lay it. The layer should be at least 10 cm, compact the base.
Make drainage trenches to drain water away from the property.
Their depth must be at least 0.5 m. Do not forget that the trenches must be made with a slope. Lay geotextiles on the bottom, position it so that it protrudes a meter beyond the edges of the trench.
Place a 5 cm layer of gravel on the geotextile.
Buy drainage pipes and place them in the trenches. Make a slope of 50 cm per 1 linear meter. To install drainage pipes, buy asbestos-cement products, or polymer or ceramic pipes.
They need to be taken to the place where the water will collect. Cover the pipes with a layer of gravel 30 cm thick. Wrap the “pie” with a geotextile sheet protruding above the trench.
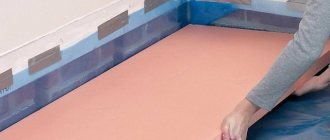
Fill the pit with crushed stone and sand.
Alternate layers, tamping each of them. Sand is needed to protect the waterproofing, because the sharp edges of large fractions can break through it. Place roofing felt on the base, be sure to weld its edges using a gas burner.
Coat with bitumen mastic. Repeat the procedure, laying the material in 3 layers. If groundwater can rise above the hole, then it is necessary to make even more layers.
Prepare the formwork and pour the concrete floor. Use mixtures that contain modifying additives. Watch the video on how to waterproof a pit in a garage with your own hands:
Insulation
After waterproofing is completed, insulation can begin. For this purpose you will need sheets of polystyrene foam. They are sold in thicknesses from 50 to 100 mm. The use of such material allows you to reliably protect the garage from temperature drops due to cold air flows from below.
Expanded polystyrene is not subject to rotting and is easy to install, and also has the ability to repel water. It is installed on parachutes (special mounts) or glued to cement.
The mounts are called parachutes because of their shape. They are made from plastic. Parachutes are mushroom-shaped fasteners. They are driven into the walls (into a pre-made hole). The parachutes are hammered through polystyrene foam. A special nail is installed in the fastener to prevent it from popping out.
Polystyrene foam is used not only in the process of insulating walls, but also for doors and flooring. An expanded polystyrene sheet, which is characterized by increased strength, is sometimes placed on the floor. A concrete screed with reinforcement is laid on the insulation. Its thickness usually does not exceed 10 cm.
Polymer membranes
In the category of roll types, polymer membranes are the most effective material. It is not used as waterproofing as often as roofing felt, only because of its too high cost and complex installation technology. Unfortunately, the use of polymer films will be impossible without experience and special tools.
The most valuable property of polymer membranes is their virtually unlimited service life. Under conditions of temperature changes, high humidity, and exposure to chemicals, this material retains its elasticity and strength. The excellent characteristics of polymer membranes provide the highest level of moisture protection, but too high a price often stops buyers.