When undertaking a major renovation of an apartment, people should start with the proper arrangement of the lower flooring. Before laying a new floor covering, a concrete screed is made. It is impossible to do it without carrying out separate work. After all, waterproofing the floor in an apartment before screeding is an important preparatory stage during renovation. This process prevents moisture and dampness from occurring in the home.
Waterproofing before screeding is a mandatory step
The importance of waterproofing the floor before screeding
Many people believe that waterproofing the floor before screeding is not very important and neglect this stage in the renovation. But with her the house becomes comfortable and cozy. Since it is precisely this that will save your home from excess moisture.
The lack of waterproofing of the floor before the screed will allow dampness to enter your home from the first floors. And for people living on the lower floors and above basements, they simply cannot do without it. After all, all the dampness from the basement will constantly seep into your home. This will cause mold and mildew to grow in your home.
Without waterproofing, all moisture will enter your apartment.
The presence of waterproofing will provide:
- high protection of housing from external dampness;
- good protection for residents of the lower floors from leaks;
- higher strength of the building;
- high-quality application of screed and ease of installation of decorative coating.
Waterproofing should be done not only in damp rooms, but throughout the entire apartment. If you make partial insulation, it will not be able to protect the entire house.
Waterproofing should be done in all rooms for maximum protection
Laying technology
There are several types of floor waterproofing under screed: pasting, coating, plastering, bulk, penetrating, self-leveling and spraying.
If the waterproofing will be installed independently, without the involvement of professionals, then the pasting and coating options are considered the most convenient and easiest to install.
Any waterproofing consists of the following stages: preparation of the base, treatment with a primer and construction of a waterproofing cover.
Features of waterproofing in private houses and city apartments
Waterproofing a floor can be done in several common ways. If this procedure is carried out in rooms where there is no basement, you can build a cushion of sand and gravel.
- A layer of gravel and sand is poured onto the floor.
- All this is being compacted.
- Sand is poured on top.
A cushion of sand and gravel will prevent moisture from entering the apartment.
This cushion will prevent water from seeping out from the soil. But it won’t save you from water vapor. Therefore, additional film insulation will have to be made. And waterproofing the floor in an apartment has a simpler procedure. There is no need to make a layer of sand and gravel. Or you can immediately begin laying the selected waterproof barrier.
When starting to lay the floor hydrobarrier in the apartment, level the surface with building mixtures. Rooms with high humidity levels require additional wall protection.
Before laying the waterproofing, the surface should be leveled
Why is waterproofing needed?
Waterproofing the floor is carried out at the stage of laying the floors and precedes the creation of the screed. The main purpose of waterproofing and screed installation work is to prepare a flat surface for the floor covering, as well as to protect the room from moisture and dampness.
People who do not have sufficient experience and knowledge are strongly recommended to carry out such work under the supervision of professionals or completely delegate this work to them. After all, the price of a mistake can be too high: replacing rotten floors will require not only time, but also financial costs.
Roll waterproofing
It is worth considering that waterproofing measures must be carried out not only in the premises of the house themselves, but also in the basement and basement areas. It is from there that moisture can penetrate along with harmful substances (salts, lime, alkaline-acid compounds, etc.).
Types of waterproofing in an apartment
When making a concrete screed, decide on the type of waterproofing. They are provided by manufacturers in a wide range. These include:
– rolled materials;
– perforated film;
– liquid solutions;
– dry plaster;
– penetrating mixtures.
Penetrating waterproofing in action
Each individual type has its own positive aspects. Depending on the type of waterproofing you choose, the method of its application also depends. It could be:
– spreading;
– spraying;
– pouring;
– smearing;
– gluing.
Each type of waterproofing has its own advantages
When starting to install a hydrobarrier, carefully prepare the surface. Carry out the following work.
- Completely clean the room of dust, dirt and debris and remove all objects and belongings from it.
- Level the surfaces using special mixtures.
- Prepare all the tools you need that will be required in the work process.
Technology for making gravel-sand cushion
- Preparation of the base consists of leveling the soil under the future floor and removing from it the fertile layer containing organic impurities. This is usually done at the stage of site preparation for construction.
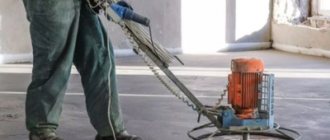
- Crushed stone with a fraction size of no more than 50 mm is poured onto the prepared soil. Backfilling is carried out over the entire floor area. The gravel is compacted and leveled to eliminate large differences in height. The thickness of the layer is at least 0.2 m, and in areas with close groundwater - at least 0.5 m.
Gravel compaction process - Backfill with coarse sand in a layer of 0.1-0.4 m. The sand is spilled with water and thoroughly compacted with a hand roller.
- Cover the gravel-sand cushion with a layer of geotextile. Geotextile strips are glued using a construction hair dryer. Geotextiles play the role of a shock absorber and protect the insulation and waterproofing from damage.
- Foam insulation, for example, polystyrene or penoplex, is placed end-to-end on top of the geotextile. Polystyrene foam is not recommended due to its low mechanical strength.
- After completing these operations, you can waterproof the prepared base with rolled materials or immediately begin screeding the floor.
Rolled waterproofing
Rolled materials perfectly repel water and are often used during repair work. These include roofing felt. But you can accomplish the task assigned to you with the help of modern membranes. This is the most affordable method, characterized by ease and simplicity of operation. To install rolled waterproofing you will need to follow these steps.
- Spread the roll on a horizontal surface in several layers. Don't forget to overlap at the joints.
- The rolled material should extend onto the walls 15 cm from the floor.
- Carefully fold the material into the corners.
- For effective protection, the joints are coated with mastic.
Roll waterproofing is the most affordable in terms of price
Installation of a water barrier for laminate flooring
As a waterproofing layer under the laminate, you can use regular PVC film
Laying laminate flooring, like ceramic tiles, is done on a completely flat surface - a concrete slab or screed, DSP or wooden subfloor.
Laying floor insulation under the laminate is carried out using concrete-polymer mixtures, polymer mastics or roll coatings - the insulation technology is similar and was described above.
As additional protective measures, a PVC membrane is laid on the equipped insulating layer with an overlap of 15-20 cm on the walls. Subsequently, a backing made of foamed polyethylene or cork will be laid on top of the membrane.
Liquid waterproofing in an apartment
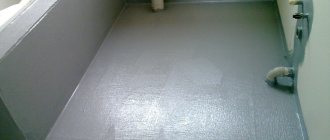
Liquid coating waterproofing is done using mastic or bitumen. The coating mixture is applied in two or three layers. In this case, you do not need to use special construction skills or have professional equipment. Home owners can use both dry mixtures, which must be diluted with water, and ready-made liquid compositions.
Particular attention should be paid to the corners, a lot of moisture collects in them.
- Before starting the work process, remove everything from the horizontal surface.
- Treat surfaces with primer.
- Apply special tape to all corners and joints. This will prevent moisture from seeping into problem areas.
This type of waterproofing does not require special skills.
If you use bitumen-rubber mixtures or bitumen-polymer mixtures as liquid waterproofing, then repair work will delight you with ease and convenience. Liquid coating mixtures do not need to be preheated. And the working process itself can take place at a fairly low temperature. Bitumen pastes will serve as good insulation and replace concrete screed.
The coating mixture must be applied in layers about 35 mm high. This can be done with a brush or roller. But there is no need to try too hard and rub the liquid mixture into the bottom coating. After the first layer has hardened, feel free to apply the second and subsequent layers. Three layers of such waterproofing in an apartment are enough. After the liquid mixture has completely hardened, you can begin pouring the concrete screed. But you can do without it.
How much will you have to pay for materials?
Materials for waterproofing, of course, are not available for free, but among them there are a lot of affordable ones. The purchase of these materials for repairs is quite affordable even for a modest home owner.
Using paint waterproofing
Table. Average cost of some materials.
| Name | price, rub. |
| Hydroisol based on steklohost, 2.5 mm, 9 sq. m. | 400 |
| Uniflex TechnoNIKOL, 3 mm, 10 sq. m. | 1200 |
| Ruberoid, 15 sq. m. | 400 |
| Glassine, 13 sq. m. | 100 |
| Technoelast TechnoNIKOL, 4 mm, 10 sq. m. | 1400 |
| Aquastop - Perfecta, 20 kg (coating) | 650 |
| WaterStop SLIMS, 20 kg | 850 |
| Mastic Flachendicht, Knauf, 5 kg | 1250 |
| Bitumen mastic, 20 kg | 350 |
| Rubber mastic, 22 kg | 1350 |
| Construction bitumen, 25 kg | 600 |
| Bitumen primer, 20 l | 650 |
| Bitumen primer TechnoNIKOL, 20 l | 1800 |
Advice! For reinforced concrete floors in kitchens and bathrooms, it is recommended to use concrete contact and penetrating waterproofing.
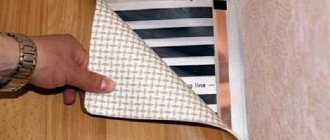
Film insulation and features of its installation
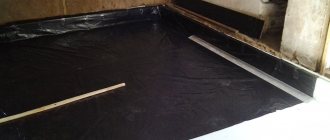
Waterproofing with film is widely used in apartments and houses. It provides a good waterproof coating. The screed will protect the home from steam and excess moisture, and the floors from water leakage.
The film must be laid on the surface carefully so as not to damage it. Waterproofing the floor of an apartment using perforated film is the best and cheapest option. The material itself can be brown, black or gray in color. It should contain many cells. Based on the type of type, waterproofing film is divided into: flat and perforated. Perforated material is more suitable for installation on vertical surfaces.
Film waterproofing should be overlapped
To make the waterproofing layer strong and reliable, fold the film in two layers. It is best to glue the plastic film with construction tape. Before starting work, thoroughly vacuum the room so that there are no sharp objects under the film that could damage it.
If you want to get a surface without seams, paper is placed on the joint of the film and the top is processed with a hot iron. Don't forget to overlap for a better result. After laying the film, a cement-sand mixture is applied to the surface. Don't forget to check the floor level. Once the screed is completely dry, trim off the excess film.
Types of insulation
There are several types of materials for waterproofing under floor screed in an apartment. Thanks to them, not only a protective layer is created from water, but also the floor in the room is properly leveled for further repairs.
- Plastering. This insulation consists of several layers with a total thickness of up to 2 mm and is used in two types - cold or hot. It can be used well in brick and concrete buildings, but is completely unsuitable for wooden floors.
- Painting room. This coating is applied with a wide paint brush until a thickness of 2 mm is achieved. Materials for coating can be bitumen mastics, as well as polymer paints and varnishes. Painted insulation also comes in two types - hot and cold. The cold look is considered the most convenient due to the ease of application and high efficiency resulting from the use of an epoxy-rubber mixture. With the hot method, you have to melt the bitumen, which is not always possible in a closed space.
- Pasting. The essence of such insulation is to attach waterproof rolled coverings to the floor, for example, roofing felt, isospan, techno-NIKOL, etc. The rolled strips are laid in several layers with a slight overlap. To fasten them, use mastic or a gas burner. The latter is used by specialists in the fused method. This insulation is universal and can be used in both concrete and wooden houses.
- Impregnating. It consists of a porous material that is pre-impregnated with astringent moisture-resistant mixtures. These can be polymer varnishes, bitumen resins, and petrolatum. The use of such insulation is recommended by professionals for wooden houses. In this case, it is advisable to impregnate not only the floor, but also wooden pillars with all existing ceilings.
- Cast. According to experienced builders, this method is considered the most durable and reliable. For a protective coating, they resort to a mixture of hot asphalt and bitumen mastic. It is poured in 2-3 layers to a thickness of 10-25 mm. Naturally, this greatly affects the cost of insulation and its weight. Therefore, in order to avoid unforeseen consequences, it is necessary to make all calculations with special care.
- Backfill. Here the name speaks for itself - this is insulation, which consists of bulk materials with increased moisture resistance. For reliability, bicarbonate powder and asphalt insulation must be covered in a thick layer - at least 50 cm, which, compared to other methods, is unrealistically large. However, such a thick pillow has an undeniable advantage - good additional thermal insulation, which is most often used either in the basement or on the ground floor, where the cold is felt most strongly.
- Mountable. The components of such insulation can be different - from profile tapes to plastic or metal plates. They are attached to the floor using special mounting ties.
- Injection. This is one of the best modern and high-tech solutions that creates protection against water by filling all microcracks with liquid material. Thanks to a special formula, the mixture penetrates into concrete and hardens in the form of crystalline formations. At the same time, the integrity of the structure is completely preserved and, moreover, withstands the penetration of moisture under pressure. This insulation also increases the resistance of the floor to aggressive chemicals.
Waterproofing materials
Cost of modern materials
The cost of waterproofing materials may vary. This factor is influenced by the online store chosen by the buyer, the manufacturer and the type of insulation itself. The most affordable in terms of price are: perforated films, membranes and roofing felt. Although they are more difficult to work with. Rolled materials require strong heating, so they require special equipment - a gas burner. And you need to work with the film very carefully so as not to tear it.
More modern hydrobarriers include liquid, dry and penetrating mixtures. They are somewhat more expensive, but are considered effective and versatile. Buyers can find out the specific cost of waterproofing in the price list of the selected online store. Here you can get advice from online consultants. Experienced specialists will help you choose a product, complete the purchase, and select a payment and delivery option convenient for the customer.
The procedure for waterproofing with roll materials
Step 1. The base is pre-prepared and thoroughly dried. Rolls of material are rolled out parallel to each other. The material is partially applied to the walls of the room.
Rolls of waterproofing material are rolled out
Step 2. An overlap of at least 10 cm is required along the longitudinal edges.
The material is laid with an overlap
Step 3. Using a gas burner, the material is heated. This way it sticks to the wall.
Heating the material with a gas burner
Waterproofing material is glued to the wall
Step 4. The side seams are fixed in the same way.
The pieces of material are connected to each other in a similar way.
Step 5. At the end part of the sheets, the material is laid with an overlap of at least 15 cm. The end seams of adjacent rolls must be laid with a spacing of at least 50 cm.
The overlap is measured
Video - Foundation waterproofing
Process and stages of work
But no matter what material you choose, all work is carried out in a certain order.
- First, you need to completely clean the room of foreign objects and objects, remove all dust and dirt from the floor.
- For residents of apartments on the first floors and for owners of mansions, builders advise making an additional cushion of sand and gravel.
- Then the moisture protection you choose is applied to it. Further work depends on what type of waterproofing you choose. If these are rolled materials, then the roofing material must be spread, heated with a special burner and the joints carefully processed. When working with film or membrane, it is spread in two layers and secured with construction tape. Liquid or coating mixtures are applied to the floor according to the instructions and then you have to wait for them to dry completely.
The cheapest waterproofing is roll - A concrete screed is placed on top of the waterproofing, which will dry from two weeks to a month. It depends on its thickness. And only after the cement has completely dried can you begin laying the final floor covering.
Before laying the final floor covering, it is worth applying a primer.
A competent and responsible approach to this work process will show good results. With good floor waterproofing, you don't have to worry about anything. These works will preserve the integrity of the floor covering and prevent dampness, fungi, and corrosion from entering the room. There is no need to skimp on waterproofing. It will fully justify itself during operation.
Types of waterproofing materials and methods of their installation
The construction market offers a wide selection of waterproofing materials. At the same time, in each technological group there is diversity in both price and quality characteristics. Therefore, it is very difficult to make a choice on your own.
Based on insulation technology, all materials can be divided into:
- Rolled ones, which in turn are:
- Pasting - attached to the base of the floor and to each other, with multi-layer insulation, using bitumen mastic;
- Fused when one side of the material is impregnated with an adhesive composition, covered with a protective film. Heating the roll with a special gas burner from the protection side leads to its melting and opening of the adhesive layer;
- Polymer joints are heated with a construction hairdryer and glued together.
- Liquid application materials (coating mastic, liquid rubber, etc.);
- Penetrating primers;
- Dry plaster mixtures of binder type.
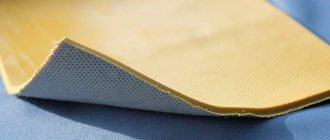
Roll insulation
The presence of many types of roll waterproofing is explained by the large number of combinations between the main layer of material and the types of insulating agent. The basis may be:
- Fiberglass. Budget-friendly in price, it has a short service life;
- Fiberglass. The cost of the material is several times higher, but this is justified by the increase in strength and durability by 5 times compared to the first option;
- Polyester materials. Having the same strength as fiberglass, they are 4-5 times more elastic, which allows them to maintain excellent adhesion to the base of the floor during temperature fluctuations;
- Cardboard. Builders are gradually abandoning such materials when waterproofing the lower parts of a building due to their fragility;
- Foil;
- Asbestos paper. It is practically not used for waterproofing under screed.
Waterproofing layers are applied:
- bitumen:
- butyl rubber (rubber compounds);
- tar.
For example, roofing felt is a mixture of bitumen and construction cardboard. Replacing bitumen with tar produces a material familiar to the older generation - roofing felt. Applying a bitumen layer to fiberglass allows you to obtain waterproofing, glass roofing material, glass felt, etc. Industrial rubber mixtures produce multi-layer, but without a base, hydrobutyl and other materials.
In addition, polyethylene film is classified as a separate group of roll materials. The variety of types of materials predetermined several technologies for their installation.
Pasting method of laying waterproofing
All technologies for laying various types of waterproofing under screed begin with careful preparation of the base. This process is discussed in detail in the work “Preparation of the base for floor screed”, posted here. Therefore, when considering all waterproofing technologies, the initial stage of work will be omitted.
The subsequent work on laying waterproofing with your own hands consists of the following steps.
1. The concrete floor is treated with a primer - a primer for concrete made on the basis of bitumen. This will ensure the necessary adhesion of the bitumen mastic to the base of the floor.
Primer treatment.
2. Damper tape is attached to the walls along the entire perimeter using an adhesive layer or liquid nails. Its purpose is to allow the screed to expand without damage during temperature fluctuations.
Laying damper tape.
3. The rolled material is cut, and along the way it is cleaned of powder and dust. In this case, it is necessary to take into account:
- this technology requires at least two layers of material;
- the material should extend onto the walls by 15 cm (after laying the screed, the excess is cut off);
- overlapped by 15-20 cm;
- in places adjacent to the threshold, leave at least 30 cm so that the insulating material can enter the next room.
4. The cut material is rolled out and left in this position for a day, which will allow you to avoid waves and bubbles when gluing.
5. The next day, the places of contact of the waterproofing material with the base of the floor and walls are treated with bitumen mastic.
Important: cold mastic is applied in one layer 1 mm thick, hot mastic in two layers. The second layer must be applied after 3-4 hours so that the first layer does not have time to dry completely.
6. The first sheet of insulation is laid and carefully pressed against the walls and base of the floor with a rubber wallpaper roller.
7. When treating the base for the second sheet with mastic, also glue the joint on the first sheet, where an overlap is formed.
8. After laying the first layer, it is tapped to identify unglued areas.
9. The resulting waves and bubbles are cut crosswise, leveled, coated with mastic and again attached to the base. The incision areas are dried and coated with mastic. An overlapping patch is applied on top.
10. The second layer is laid in the same order. The only thing that needs to be taken into account is that the joints of the second layer should lie approximately in the middle of the sheets of the first layer.
This method of installing insulation is relatively inexpensive, reliable, has a long service life (at least 18 years), is not damaged when cracks form in the base of the floor, and can be done on your own.
Disadvantages include high labor intensity, long installation time, and a high degree of fire hazard.
Welded method
Waterproofing floor screeds using the fused method is a new, highly effective method of protection against moisture. The material is laid in one layer, and the overlap does not require primer treatment. The first steps of the technology repeat points 1-4, with the exception of sub-point 3.1, the pasting method.
Further work with this type of materials is determined by their structure. Fused waterproofing is based on fiberglass impregnated with polymer materials. The top layer performs protective functions, and the bottom serves as glue. To prevent rolls from gluing, the adhesive base is covered with a special protective coating.
Before installation, the material is rolled again. The protective film is heated with a gas burner until the control mark disappears. As the adhesive layer warms up, the roll is rolled out and laid at the same time.
The surface of the laid material is rolled with a roller to ensure a tight fit to the base, without the formation of bubbles. The second sheet is also overlapped, as in the previous method. The work is done quickly.
This method also has disadvantages:
- cannot be laid on a wooden floor due to possible fire when using an open flame;
- high price of the material compared to roofing felt;
- the work can be performed by builders who have experience in installing insulation in this way;
- The laying technology is designed for 2 people.
Method for gluing joints of polymer materials
This method completely repeats the previous one, with the exception of one thing - it does not provide for adhesion of the waterproofing material to the base of the floor.
The sheets are laid overlapping, and the joints are welded using a special construction hair dryer.
The essence of the technology is clearly visible in the photo.
Important: all rolled materials simultaneously perform the function of sound insulation. The use of other types of waterproofing materials requires sound insulation.
Mastic
Coating waterproofing mastics are liquid insulating materials based on bitumen, rubber, polymers or a mixture thereof. For example, bitumen-rubber, bitumen-polymer, etc. mastics. Apply with a paint brush or roller, similar to paint.
The work is performed in the following sequence.
1. The prepared concrete floor is treated with a primer, preferably the same brand as the mastic. In addition, the walls around the entire perimeter are subject to treatment. The height of the strip applied to the wall is 15-20 cm. A roller and brush are used for application. You will need a brush to work on areas that are inaccessible to a roller, such as the space around pipes, corners, and joints of walls and ceilings. The primer is applied in one layer over the entire surface, without missing spots. Dries in no more than 2 hours.
2. A damper tape is attached around the perimeter of the walls (this operation can be performed before laying the screed).
3. Using a wide brush, roller and spatula (it makes it easier to process the joints between walls and ceilings), apply the first layer of mastic. Work begins with the wall farthest from the exit. All hard-to-reach places are thoroughly coated. There is no need to rub in the mastic by force. Each layer is applied in one direction, at the same time perpendicular to the previous one.
4. The next layer is applied to the previous one after 3-4 hours. If you let the mastic dry, it will polymerize and the next layer will simply fall behind. In total, the insulation is applied 3-5 times. Complete drying of the coating insulation occurs after two days.
The advantages of the method include:
- reliability;
- ease of installation - no experience or many tools and equipment required;
- environmental Safety;
- durability;
- the ability to treat hard-to-reach places.
There are several, but very significant, disadvantages:
- cannot be used in houses with constant vibration - near a highway, railway or construction site - mastic loses its insulating properties;
- insulation is not resistant to sudden temperature changes;
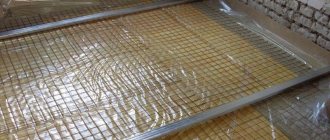
- is easily damaged mechanically, and therefore, when reinforcing the screed with a metal mesh, special polymer gaskets are placed under it.
Important: such waterproofing of the floor under a screed in an apartment is effective in residential premises. In the bathroom, kitchen and toilet there should be a combined method - rolled waterproofing materials are laid on top of the mastic, which gives a 100% guarantee of the quality of the work performed.
Penetrating primers
The introduction of new technologies into production has not spared the construction industry. Penetrating waterproofing is one of them. The essence of the new waterproofing method is to change the physical structure of concrete under the influence of impregnation components.
By reacting with concrete binders, they create a protective film of insoluble crystals that clog all microcracks and pores to a depth of 0.5 mm. In addition to protection from water, such a film increases the resistance of concrete products to aggressive chemicals.
Penetrating waterproofing primer is available in liquid form - "Penetron", "Pronitrate" and in the form of dry mixtures - "Kema". How to waterproof with a penetrating primer?
- The concrete surface is abundantly wetted, but leaks should not be allowed to the neighbors below.
- Dry mixtures are diluted according to the instructions on the package.
- Immediately before applying the penetrating primer, the surface is wetted again.
- The first layer of insulation is applied with a roller or brush.
- After the time specified in the instructions, a second layer of primer is applied to the newly moistened concrete.
- The treated area is covered with plastic wrap or moistened regularly for 2 weeks.
- After complete drying, waterproofing of the wall is carried out along the entire perimeter at a height of 15-20 cm from the base of the floor and joints with mastic using a wide paint brush.
The advantages of the new technology include the fact that the waterproofing protection carried out:
- has no restrictions on service life;
- withstands any mechanical loads;
- has the ability to tighten microcracks that arise during operation.
There are quite a lot of disadvantages:
- impregnating primer is not effective on concrete with a low grade of cement;
- cannot be applied to brick, gypsum and lime plaster, which requires treating such materials with mastic;
- very high price;
- long technological cycle.
Conclusion: the use of penetrating primer in residential construction is ineffective. Penetrating primer was originally created for waterproofing large areas.
Plaster mixtures
Plaster waterproofing mixtures consist of sand, cement and polymer components that provide protection from moisture. Unlike penetrating primer, it can be applied to any building materials:
- brick;
- concrete;
- gypsum and lime plasters.
This waterproofing has a high level of adhesion (adhesion) to the surface and a low coefficient of elasticity, which allows it to be applied in rooms with high temperature differences - from -50 to +70 degrees C.
Work order:
- The mixture is diluted with water to form condensed milk.
- Apply a thin layer to the prepared surface with a spatula.
- After the first layer has dried, a second layer is applied within 15 minutes in the direction opposite to the first.
- The third and, if necessary, the fourth layer is applied in the same way.
- Drying occurs within 2 weeks, but in the first 5-7 days the surface of the plaster must be moistened: every 4-5 hours using aerosol cans (spray guns) for the first 24 hours; 2-3 times in the next 4-6 days.
This technology does not require large financial costs, is performed with one simple tool, has a long service life, and the work can be done on one’s own. The only downside is that it takes a very long time to dry.
We have reviewed the main types of waterproofing. However, there are no less effective, but not very popular types of protection against water - liquid glass, cast (liquid) rubber, bulk polymer mixtures, etc.
Attention: waterproofing the floor after screed is only possible with rolled materials due to the damper tape (neither mastic nor plaster mixtures will adhere tightly to the tape and, therefore, there will be no insulating layer at the junction of the wall and the screed).
FAQ
What density should a waterproofing film have? For high-quality protection from moisture, it is necessary to use a material with a density of at least 200 g/sq. m. Which waterproofing option is preferable for country buildings without a basement? The best choice for a private home would be a cushion of sand and gravel as a base, covered with sheets of insulation and film waterproofing. What is the best way to protect the floor from moisture penetration in an apartment located on the ground floor? A good combination is to use penetrating waterproofing of floors followed by laying roll materials or applying mastic. What is the most effective way to waterproof the floor in an apartment on the upper floors? To avoid the risk of flooding the neighbors below, a double moisture barrier should be placed. Before laying the screed, spread a roll of film and apply coating compounds on top of the concrete floors. On what type of substrate should an impregnating primer not be applied? Impregnating mixtures are ineffective for concrete slabs based on low-grade cement compositions, and are also not suitable for gypsum, brick and lime-plastered surfaces.
Possible waterproofing defects and their elimination
Defects in the waterproofing layer are observed when low-quality materials are used. When carrying out work in violation of the technological process or deviation from the project.
Coating and plastering
Defect. Formation of cracks, delaminations, cavities (round voids).
Elimination. Clean out cracks with a wire brush or scraper. Fill with insulating compound. Compact loose and swollen areas with a tamper. Apply an additional layer of waterproofing to the defective area.
Cast
Defect. Uneven thickness of the insulating layer, swelling, through cracks.
Elimination. Level the surface using additional layers of insulation. Cut out the swellings to the base. Fill the cleaned area with layer-by-layer waterproofing material to the level of the coating. Thoroughly wipe through cracks with mastic.
Zasypnaya
Defect. Poorly executed screed over backfill material.
Elimination. Replace or repair the screed.
Pasting
Defect. Presence of cracks and breaks. Formation of swellings. Peeling of edges from the surface.
Elimination. Clear cracks and breaks, remove defective areas. Seal with new material. Cut the swellings crosswise with a sharp knife. Bend the edges of the cut and clean the area underneath. After applying mastic, glue it in place. Clean the peeling edges, coat with mastic and seal.
Waterproofing with plaster
This is an old method of protecting floors from moisture, but it is still used today as waterproofing mixtures for plaster have improved. Now you can choose a mixture that will contain a high concentration of water-repellent additives, which is ideal for waterproofing. This method is good because with the help of a plastic solution you can quickly and reliably fill absolutely all cracks and crevices, as well as get rid of unevenness. It is convenient to apply it with a spatula or brush.
Waterproofing with plaster is suitable for wood, concrete, stone, tiles, and can even be applied over paint. There is also a backfill mixture for waterproofing, which is considered a type of plaster. It is evenly scattered on the floor, absorbing moisture, it hardens and forms a durable layer.
Important!
It takes at least 14 days for the waterproofing layer made with plaster to completely harden. It is necessary to ensure that it does not dry out, otherwise cracks will form on it. During the first 24 hours after laying the plaster layer, it is very important to moisten it with water every 3 hours; it is convenient to use a sprayer. After this, you need to moisten the layer at least twice a week.
Use of adhesive materials
This method of waterproofing involves laying sheet or roll materials, pieces of which are glued in layers, overlapping, onto a previously cleaned and primed floor base.
There are 3 methods of adhesive waterproofing:
- simple flooring;
- fusing to the surface;
- gluing using special mastics and adhesives.
Many types of modern roll-sheet insulation are already available with an adhesive layer, so they are extremely easy to install. If the use of water-polymer based mastic is required for gluing layers, it is selected so that the melting temperature of the composition is 20-25°C higher than the highest air temperature characteristic of a particular room.
Important
All types of roll and sheet waterproofing are very sensitive to shear, tension and loads in general. Therefore, it is recommended to use it only when protecting rigid structures made of brick, concrete or reinforced concrete from moisture.