Many people want to have modern metal-plastic windows in their home, and many have already installed them a long time ago. But in addition to installing double-glazed windows, you need to take care of finishing the opening. It is decorated with wood, stone, or the concrete surface is simply plastered. The most correct option is to line the opening with plastic and install a PVC window sill. We will tell you the advantages of finishing elements made of polyvinyl chloride, consider methods of installing plastic window sills and provide detailed installation instructions.
The role of the window sill in the window
The original structure of the window sill.
Previously, the window sill board performed the following functions:
- prevented cold air from entering the room through the gap between the window and the opening;
- eliminated the difference between the bottom of the opening and the spacer-mounted frame;
- covered part of the wall;
- collected moisture when the double-glazed windows fogged up.
Over time, the design became:
- decorate the interior of the room;
- serve as a stand for flowers or other interior elements;
- used as a desk in a bedroom or children's room.
- used as a support when hanging curtains or cleaning windows.
In accordance with the functions that the window sill board will perform, the material for its manufacture is chosen.
Distinctive features of plastic window sills
Metal-plastic windows have long gained credibility. They are very popular among consumers due to the fact that they are characterized by high performance characteristics, are easy to install and have a long service life. After replacing the window, the slopes and window sill are immediately installed.
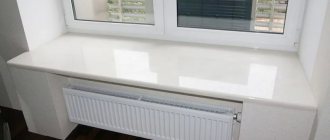
Thanks to the presence of stiffening ribs, the surface of the window sill is very durable
A metal-plastic window is a universal product that can be matched with different window sill options, which are selected in accordance with the stylistic goal. The most common option is plastic products. This design is best combined with the material of a modern window, creating a single composition with it.
The plastic window sill is characterized by distinctive advantages. The product is resistant to moisture, sunlight and temperature changes, and is not prone to rot, mold or corrosion. The surface does not deform and does not change its original shape and appearance. The material is completely safe for human health, is durable (due to the presence of stiffeners), reliable, and resistant to chemical influences. It has high thermal insulation properties, which is due to the presence of air chambers in the window sill structure.
The product is lightweight, which ensures easy installation of the PVC window sill, while it does not shrink during further use. The surface does not require painting or other treatment options to prevent possible rotting or corrosion. She is easy to care for. Plastic window sills are characterized by their low cost compared to other materials.
Despite its advantages, plastic window sills have their drawbacks. If used carelessly, dents or holes may appear on the surface of the product, which is a consequence of the fragility of the product. If there is a glossy coating, scratches may form on it, which will cause an unsightly appearance.
Plastic window sills are resistant to moisture, sunlight and temperature changes
Important! A plastic window sill can become deformed when exposed to high temperatures, so do not place a hot kettle or pan on the surface.
Material selection
Window sills are made from:
- artificial or natural stone;
- composite materials;
- wood;
- polymer materials.
Acrylic-based plastic
Structures made from this material have the following advantages:
- Insensitive to dirt. Acrylic plastic is characterized by a monolithic structure without cracks or pores. Contaminants cannot penetrate into the thickness of the material.
- Resistance to aggressive substances. Use any means for washing.
- Safety. Window sills are often installed above heating appliances. Even when heated, acrylic plastic does not release toxic substances.
- Resistant to sunlight.
The structures come in all sizes and shapes. There are no joints or connections on such products.
The window sill is made of acrylic-based plastic and is resistant to sunlight.
PVC
A plastic window sill is a hollow slab consisting of thin sheets united by stiffening ribs.
The more jumpers, the stronger the product.
Installation of this design helps:
- save money (the cost of PVC is lower than that of wood or stone);
- equalize the service life of the window unit with that of the window sill;
- get a window element that harmonizes with any interior;
- prevent cold air from entering the room;
- perform the installation yourself.
The disadvantages of PVC products are:
- sensitivity to high temperatures;
- low strength.
When used correctly, such shortcomings do not appear.
A PVC window sill is one of the budget options.
Stone board
The advantages of this material include:
- presentable appearance that lasts throughout the entire service life;
- a variety of colors and patterns that help you choose an element that matches any interior;
- high strength (in this indicator, marble and granite are second only to diamond);
- insensitivity to temperature changes, ultraviolet radiation, humidity;
- unlimited service life;
- insensitive to dirt.
Natural stone has disadvantages, which include:
- sensitivity to sharp objects (granite is considered more resistant to damage);
- accumulation of radioactive radiation (it is better not to install stone slabs in radiation hazardous areas);
- high thermal conductivity;
- complexity of transportation and installation;
- large mass;
- high price.
High-strength window sill made of stone boards.
MDF or chipboard
The materials are used as a replacement for natural wood. However, in terms of performance, products made from MDF and chipboard are inferior to all others.
The main disadvantage is destruction under the influence of moisture. The waterproof film does little to protect the chipboard.
It gets damaged quickly. Laminated MDF is considered a more reliable material.
A product made from MDF is not durable.
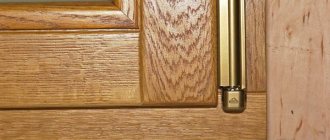
Tree
Natural material is now less often used for the manufacture of elements of window structures.
However, wood has the following advantages:
- safety for humans;
- long service life with proper use;
- good thermal insulation properties;
- originality of texture, the ability to use any decoration methods;
- increased strength.
The disadvantages are:
- sensitivity to moisture (when in contact with water, wood is deformed, so the window sill requires varnishing or painting);
- the need for constant care;
- deformation under the influence of high temperatures (due to this property, it is recommended to install the panels at a sufficient distance from heating radiators).
Oak window sill.
Advantages and disadvantages of PVC window sills
PVC window sills are very popular due to their durability and moisture resistance
The popularity of plastic products is due to the fact that they have many advantages over finishing elements made from other materials. The advantages of plastic window sills include:
- attractive appearance;
- ease of cleaning from dust and dirt;
- long service life;
- high strength due to the presence of stiffeners;
- harmless to health (PVC window sills are made from environmentally friendly and non-toxic materials);
- high moisture resistance.
In addition, when fixing the product, polyurethane foam is used, which prevents the penetration of dampness into the room and, as a result, the appearance of mold in the house.
Plastic window sills also have disadvantages, but they are very few. Thus, PVC plates are susceptible to scratches in case of careless use. You should also not place hot objects on them - this can lead to deformation of the surface and loss of the beautiful appearance of the finishing element.
Required Tools
To work you will need:
- roulette;
- hammer drill for forming a groove in the wall;
- jigsaw, metal hacksaw or angle grinder;
- rubber hammer;
- putty knife;
- foam gun;
- marker or special pencil;
- screwdriver or screwdriver;
- construction knife with replaceable blade;
- rags;
- level.
A level is one of the necessary tools.
What tools and materials will be needed?
Depending on the material of the window sill, the following tools and materials may be needed to install it on a metal-plastic window:
window sill plate;- end caps;
- hammer drill or drill with a set of drills;
- Bulgarian;
- chisel;
- hammer;
- tape measure and pencil;
- level;
- polyurethane foam and a gun for it;
- PVA glue;
- acrylic sealant;
- wooden blocks;
- electric jigsaw or hacksaw.
On a note. For a tighter fit of the window sill to the frame, polyvinyl chloride gaskets, as well as perforated plates for securing the window sill, may be useful.
Preparatory activities
At the first stage, perform the following actions:
- measure the width of the window opening, determine the parameters of the window sill board;
- choose the material for making the window sill;
- form recesses in the wall;
- clean the opening from construction debris and dust;
- cut out the plastic plate according to the markings.
We take the necessary measurements.
Dismantling the old structure
If it is necessary to replace the window sill, the existing board must be removed. At the first stage, the slopes are dismantled.
Further actions are carried out taking into account the installation method of the old window sill block:
- When dismantling a PVC board, the side plugs are first removed. After this, the decorative strip is opened and the joint filled with sealant is opened. Remove foam from the support rails, clean the places where the edges are fixed. After this, you can remove the window sill block.
- When a structure is secured with foam, it cannot be dismantled in a simple way. The board is cut with a jigsaw or angle grinder. After this, the pieces are removed from the fixation sites.
- If a special profile was used during installation, remove the street ebb and unscrew the screws from the mounting bracket.
Removing the old window sill.
Procedure for replacing a plastic window sill
Over time, a PVC window sill may become damaged or lose its original appearance as a result of abrasions and ingrained dirt. In this case, it is important to know how to change the window sill.
Before removing the plastic window sill, preparatory measures are carried out, which are determined by the type of slopes. They can be monolithic, that is, installed using plaster, or panel-based (made of PVC plates or sandwich panels). The window sill is mounted under the slopes, so before it is removed, they must be partially or completely dismantled.
When using plastic slopes, the profile used to frame the corner is removed. Then the finishing panel is carefully opened, for which the sealant seam is first opened. Next, the mounting foam is removed from the plane of the support rails, and the junction of the edge of the structure is cleaned. This is necessary for easy removal of the window sill.
Before removing the plastic window sill, partial dismantling of the slopes is performed
If the slopes are finished with plaster, to replace the window sill of a plastic window, two horizontal lines should be drawn along the edges of the opening with a distance of 25 mm from the top of the window sill. According to this marking, trimming is carried out using an angle grinder with a diamond wheel. The process is carried out with extreme care to eliminate the possibility of damage to the frame. Using an angle grinder, an undercut is made along the plane of the wall, the depth of which is equal to the width of the protrusion of the structure beyond the slope.
Helpful advice! The installation depth of the window sill usually reaches 30-40 mm, so to dismantle the slopes you will need a circle of 180 mm.
Since the slab, with the modern installation method, is not attached to the window frame or stand profile, but is fixed using polyurethane foam, simply tearing off the product will be quite problematic. Before removing the window sill, the structure must be cut into fragments using a jigsaw. If the slab is set on cement mortar, an angle grinder should be used to separate the structure. Next, each element is removed from the seat.
If the window sill was fixed to the delivery profile, then the ebb from the outside of the window is removed. It is necessary to unscrew several screws from the profile.
If the window sill was fixed with foam during installation, tearing it off will be quite problematic
Step-by-step instructions for doing the work yourself
During installation, you must follow the sequence of actions.
Cut the required size and make markings
Plastic panels are cut at home. All other types of slabs are supplied ready-made. Errors in calculations cannot be corrected. If the deviation is greater, install brackets and widen the grooves.
Measurements are performed as follows:
- Determine the distance from the edge of the wall to the frame. 8 cm is added to the resulting value for the panel to exit into the room and be placed under the window frame. It is undesirable to make a protrusion that is too large; this prevents the circulation of warm air. The window sill should cover the radiator by half.
- Measure the distance between the walls near the window and the base of the opening. Add 2 cm to the values on each side. This allows the board to fit into the grooves. 3-5 cm are allocated under the eyes.
Taking into account the data obtained, the plastic panel is marked and excess material is cut off.
We make markings.
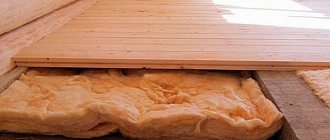
Surface preparation
Polyurethane foam is applied directly to the masonry. Therefore, the opening is cleared of debris and excess material used when installing the window. Under the bottom of the frame, the foam is cut to a depth of 2-3 cm so that the board fits under the structure.
If the distance between the window sill panel and the wall is too small, a channel 7 cm wide and 2-3 cm deep is made in the masonry or concrete. This is necessary to form a foam layer on which the panel will be installed.
We clear the surface of debris.
Support pads, linings and straightening plates: adding rigidity to the structure
To give the block stability, wooden beams or wedges are used.
When making them, take into account that:
- the beam width is at least 5 cm;
- the length of the wedge should be 5-10 cm less than the width of the window sill (the lining should not extend beyond the wall);
- the bars must be installed in increments of 40-50 cm (this rule does not apply to houses with narrow walls; at least 3 elements are placed in each opening);
- Before installing the wedges, the surface is covered with plaster;
- The supports are leveled using a level.
Wedges and spacers for installing the window sill.
Level installation
After preparing the opening, they begin fitting. To do this, the window sill panel is inserted into the grooves of the wall until it stops. There should be no interference at this stage.
After installation, make the necessary slope to facilitate the natural drainage of condensate. To do this, the edge of the slab is slightly shifted towards the floor.
The slope is measured using a building level. Correct installation is checked in the middle and extreme parts of the panel. If deviations are detected, chips are placed under the board. After installation in the desired position, the edges of the window sill are fixed.
Level check.
Foaming boards
At the next stage, the structure must be fixed with mounting foam, uniformly filling the gap. Before spraying, the container is slightly heated. This makes the foam more effective and penetrates into voids better.
A common heating method is to immerse the balloon in warm water.
You can use a heating system if installation is carried out in the cold season. Shake the container thoroughly and begin to fill the space under the panel with foam. There should be no empty seats.
Foaming the space under the window sill.
Loading the structure
Polyurethane foam quickly increases in volume. Due to the expansion of the material, the window sill may move. Strengthening the structure with a load helps to avoid this. To do this, use bricks or jars of water, which are placed on the surface.
Load on the structure.
Installation of plugs
The foam requires at least 48 hours to dry. After this time, cut off the excess material with a construction knife. The ends of the panel are closed with plugs, fixing them with PVA glue.
Installing window sill boards level
The base and slopes are prepared, which means you can proceed to fitting. To do this you will need a building level. Before correctly installing a plastic window sill, pads should be placed on the base. For small windows, two supports will be enough, but for a balcony, at least three should be used. This operation is easy to perform yourself.
The plastic panel is installed on pads
The pads should lie strictly at the level of the window, which will allow you to properly align the plastic window sill before changing it. When everything is ready, you should try on the part in a new place. To do this, we insert a plastic board into the grooves of the slopes. Next, move it all the way. Nothing should interfere with this process.
Next, the installation of the window sill continues to set the optimal slope. This is necessary to remove condensation naturally. It should not accumulate at the base of plastic windows. To do this, you need to lower the edge of the slab, looking inside the room, a couple of degrees. The building level will show how much the slope has changed. To ensure that the opening remains level, you need to check the position at the edges and in the middle.
The slope of the front edge of the window sill is 2-3 mm
The level is adjusted using pads. Without them, installing a new window sill will be very problematic. It is recommended to purchase special plastic elements, but they can be replaced with wooden linings. For work you should use an ax or chisel.
You need to install a plastic window sill with your own hands so that there is no gap between it and the window frame. This is a very important point that should be given close attention. The gap is eliminated with wood chips placed under the product. It is recommended to fix the edges of the panel when the position corresponds to the desired one . Each change must be checked at the building level so that the PVC window sill does not change its position.
Nuances of installation work on the balcony
The installation of a window sill on a loggia is most often carried out at the glazing stage. However, if this does not happen, you will have to install the stove yourself.
Before starting work, purchase corner brackets, which are secured to the parapet with anchors. Metal elements help strengthen the structure and make it more resistant to stress.
The fasteners are installed at a distance of 1 m. Before fastening them, a rope is pulled to help level the structure.
After securing the brackets, proceed to installing the panel. It is secured with self-tapping screws screwed into the bottom of the element. The window sill is treated with a sealant that eliminates gaps. There is no need to reinforce the balcony structure with foam. The plastic panel immediately takes the desired position.
Window sill on the balcony.
How to install a wooden window sill?
Installing a wooden window sill is much more difficult
Before you start working, you should pay attention to the quality of the source material. The window sill board should not contain obvious flaws in the form of chips, knots, or other defects
Moreover, you should use a well-dried board. Otherwise, the latter may crack during operation under the influence of sudden temperature changes and changes in humidity levels.
How to install a window sill in this case:
- The existing base is planed on all sides, after which teardrops are created on its back surface. The latter are small gutters 5-6 mm deep and 7-8 mm wide.
- A felt lining impregnated with antiseptics is placed on the back surface of the board.
- The prepared window sill is inserted into the openings in the wall. The teardroppers are installed on pre-prepared wooden blocks. Structural elements are fastened with nails.
- The edges of the structure are strengthened with gypsum mortar.
Craftsmen who are well versed in how to install a wooden window sill recommend making a fairly impressive slope into the room, which should be about 20 mm. This avoids the accumulation of condensation on the surface of the product and prevents rotting of the material.
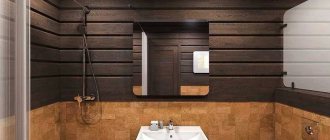
Features of replacement in a wooden house
The installation instructions in this case are similar to those for working in an apartment.
Installation is done as follows:
- The existing wooden window sill is removed and the opening is prepared. The side slopes are trimmed so that the panel takes the desired position.
- Grooves are formed for fastening the plate. To do this, use a hammer and chisel. Sometimes grooves are already present in the walls.
- Install support attachments. They are fixed so that they do not move during installation of the window sill.
- Align the plastic panel. Fix the element and fill the gap between it and the wall with foam. Load the structure, leaving it for 2-3 days. Install plugs.
Fastening a window sill in a wooden house.
Materials often used for window sill construction
Wood is an environmentally friendly material that performs well in any use, including as a material for window sills. Its disadvantage when used in our case is its susceptibility to deformation due to drying out and physical impact.
PVC is the most popular type in modern conditions. It goes very well with plastic windows, which are now used everywhere. It tolerates exposure to sunlight and moisture well, products made from it are not subject to rapid wear and scratches, as well as other damage, and retain their performance qualities for many years. In addition, modern production technologies make it possible to create window sills with a wide variety of textures and design solutions.
Methods for installing window sills
Installation is included in the price of a plastic window and is carried out by experienced specialists. They have a rich list of tools and the necessary skills, but if desired, this procedure can be performed independently. To do this, you should choose an installation method, which depends on the characteristics of the room and the configuration of the window system. In the past, a special solution was used to attach a plastic window sill, but this technology has been replaced by more advanced methods.
Mounting on polyurethane foam
Polyurethane foam can absorb moisture, which leads to its destruction. Before installing a window sill, it is necessary to consider a system of hydro- and thermal insulation. Corrugated cardboard or polyethylene foam is suitable for this. On the window side, a sealant is applied to the end of the strip, which contains substances against fungus and mold. The product is fixed at a slight angle and supported by wooden blocks 40x50 mm.
The bars are positioned sideways, occupying the space between the auxiliary board and the slope. Then wedges are driven under the edges of the bars. If the window sill is made of wood or MDF, then polyethylene foam pads are placed at the points of contact with the wall. After plastering the slopes, the excess parts are cut off. All cavities under the window sill are sealed with polyurethane foam. When the substance hardens, beacons, spacers and other additional devices are removed.
Using fasteners or mounting strips
Fastening a window sill using this method is characterized by a long implementation time, but a high level of reliability. To perform the work you must have some knowledge and skills. First of all, the difficulty arises with counting the clamps and determining their correct location.
Attaching a window sill to a plastic window in a regular room and on a loggia or balcony is practically no different. In an apartment on a high floor, you need to use additional thermal insulation materials that are resistant to strong gusts of wind.
Using Brackets
The bracket is a spring bracket for reliable fastening of window sills. The element is made of polymer materials, the possibility of bending guarantees tight fastening. The plate is attached with a self-tapping screw, which fits into the hole made.
Installation sequence for window sill anchors:
- The bracket is secured to the stand profile with a self-tapping screw.
- The number of plates is determined by the geometric features of the product. On average, 5-7 pieces per 1300 mm length are enough. If the length is greater, then the structure must be reinforced with additional brackets.
- The space under the window sill is filled with a uniform layer of polyurethane foam.
- The window sill is brought into place and snaps into place after light pressure.
- The level is adjusted.
How to seal foam under a windowsill
Foam not only degrades the aesthetic qualities of the window system, but also requires additional protection. The material shows excellent thermal insulation properties, but is destroyed by moisture. You can seal the foam using two methods:
- The trimmed foam is covered with tile adhesive. Before painting the walls, the area treated with glue must be sealed with putty. If there is wallpaper on the walls, then it is better to treat the surface with an acrylic-type primer.
- The second method involves the use of vapor-permeable tape. The product must be cut according to the required dimensions and secured in free space. A decorative cover made of wood, aluminum or PVC is mounted on top of the system.
Each technology has a number of undoubted advantages, but their combination will give the maximum result. The cost of consumables is insignificant, so you can easily use two methods at the same time.
Installing a window sill is a complex process that requires a set of tools, supplies and special skills. Many home craftsmen fix the window sill correctly on their own, and the quality of the result is excellent.
Did you manage to solve your problem using the recommendations from the article?
Yes!
46.83%
No. More answers required. I'll ask in the comments now.
37.24%
Partially. There are still questions. I'll write in the comments now.
15.94%
Voted: 709