In the article we will talk about:
- Preparatory work that will need to be completed before dismantling;
- Correct dismantling of the old window and its structure;
- Installation of aluminum frame;
- Installation of ebbs, slopes and window sills - its constant companions;
- Safe insertion of double glazing;
- Proper window sealing.
In general, about how to properly install aluminum windows with your own hands. Go.
Preparatory work
Before removing the old window, you need to acquire the necessary tools and prepare the window opening. Read below for information on how to do this.
Preparing an old window for work
Before carrying out work, remove the curtains and remove flowers (if any) from the windowsill. Cover the floor and interior of the room with plastic film to protect them from dirt and construction debris. If there is a carpet or other similar items in the room, move them to another room. Next, remove the sashes and slopes from the window.
The initial preparation is complete, it’s time to start removing the old window.
Preparing tools and necessary materials
You will need:
- Chisel or jigsaw;
- Crimper and dowel-nails;
- Hammer;
- Foam;
- Screwdriver;
- Drill and hammer drill;
- Metal drills;
- Anchor plates;
- Plastic or wooden wedges;
- Vapor barrier membrane;
- Thermal insulation sash;
- Aluminum profile, double glazing and other components of the new window.
All items are collected, now it's time to remove the old window.
Sliding systems
It is also worth considering modern aluminum sliding window systems, which are called sliding windows. The movement of the shutters is carried out along roller guides.
Sliding window sashes move using rollers
It is common to produce profiles with several guides, which allows you to install 1 – 5 sashes. The use of aluminum sliding windows is common in small residential premises, on attic floors, on loggias of apartment buildings and country terraces.
Roller mechanisms must be covered with a protective polymer layer
When choosing a manufacturer, you should pay attention to the roller mechanisms they offer . If a polymer shell is used as their coating, then such rollers will last a long time. This is important because the roller system is the weak point of sliding windows and doors.
Dismantling the old structure
The procedure involves removing the old window and sill. Let's look at the procedures in more detail.
Removing an old window
Use a jigsaw to cut several parts of the frame - this will help with dismantling in the future. Then carefully pry up the frame with a crowbar and remove the window base piece by piece.
Advice! It's better to start from the bottom of the window, because... it will be the easiest to pull out.
Removing the window sill
To remove the window sill, use a hammer and, if available, a chisel. During dismantling, support it to prevent it from suddenly falling off.
There is one universal method of removal: cut the window sill in the middle using a jigsaw or saw, and then break it out using a crowbar. You can also use a hammer drill.
Alternatively, you can simply break it off with your hands. But this will require physical training.
Now that the old window has been completely dismantled, you can begin installing the new one. It all starts with installing the base of the window.
After removal, be sure to clean the area: remove construction debris, concrete, glass shards and other items.
Technical features of frameless glazing
Frameless glazing is a sliding system made of transparent, stained or impact-resistant glass. Partitions and frames are not provided. The glass is mounted on metal profile rails. A rubber seal is laid between the doors and the aluminum profile.
The system is lightweight, durable with a glass thickness of 8-10 mm. Although it is not warm. After installation, there will definitely be cracks and gaps due to the impossibility of fitting the glass close to each other.
Professionals consider frameless glazing to be universal. The absence of frames allows the room to be heated by the sun and muffle noise from the street. Although the temperature on the balcony is unlikely to rise by more than 2 degrees, unlike outside. This option is suitable for gardeners who want to grow plants.
For frameless glazing, tempered thick, durable, impact-resistant glass with round ground edges is used.
The advantages of this glass:
- withstand high loads;
- inability to get hurt.
This option is suitable for dark rooms when you want to add sunlight. But it involves the complete demolition of the parapet. This means that we are talking about reconstruction and you will have to contact the relevant services to obtain permission.
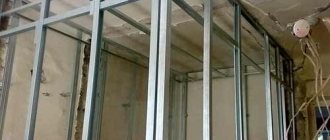
Installation of aluminum frame
Usually the frame arrives without glass, but with fittings. If you received the frame in a fully assembled state, remove the glass unit from it before installation, otherwise it will seriously interfere with installation.
Also, do not forget to check that you have prepared the window opening for installation: cleared it of debris and, if necessary, leveled it.
The installation of aluminum profile windows is divided into 2 stages: frame alignment and alignment. Let's look at each step in more detail.
Frame alignment
Before installation, make sure that the distance between the frame and the sides of the window opening is about 5 mm - then you will not have to waste additional anchor plates when attaching the frame.
The installation sequence itself includes 6 steps:
- The frame is carefully inserted into the opening; if necessary, it is leveled with wedges.
- Then it is covered with a special thermal insulation film - in the future this will protect the aluminum from freezing.
- After covering with film, a vapor barrier membrane is additionally applied to the frame to cover the installation seam.
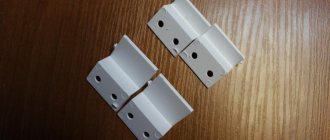
- Anchor plates are attached to the window and then placed on wedge spacers. Then the plates are secured to dowel nails.
- Foaming is in progress. If you want, after the foam has hardened, you can remove them, and then re-foam the place from which you removed them.
- Excess foam is cut off.
Frame alignment
Important! When leveling, do not bend the profile under any circumstances, and maintain a distance of 5 mm. You can use wooden wedges - this way there will be less risk of damaging the metal.
The above instructions are also suitable for installing aluminum windows on a balcony.
Installation of a sliding system
Installing a sliding aluminum window structure has some nuances. The window frame must be installed in the same way as a traditional plastic window.
To install the guides, you need to use a tape measure to measure the horizontal parameters of the frame . Then guides of the required length are made by cutting them in accordance with the obtained dimensions. The cut areas must be processed using a file. The guides are attached to the window frame from below and above using screws, observing a step of 30 cm.
First, attach the guides to the frame
Then the window sash is assembled:
- a double-glazed window is placed in the sash;
- rollers are fixed on both sides of the lower sash, maintaining a distance of 5 cm from the border of the sash;
- a schlegel is attached around the perimeter of the sash - a seal in the form of a brush;
The seal is fixed around the perimeter of the sash - the sash is installed first from above, then from below;
- The movement is adjusted using the adjusting screw, which is located on the bottom of the sash.
Window sill installation
Installation of an aluminum window sill is not much different from its plastic counterpart - place it under the frame, insert it into a special groove, align it and use polyurethane foam to “fit”. After installation is complete, you can use silicone sealant and go over the seam.
By the way! It is better to install it at a slight slope - this way less moisture will seep in.
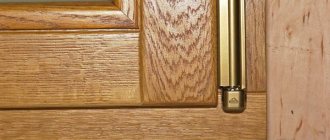
Cases when it’s time to contact specialists to adjust the fittings
- The window does not close tightly; you have to apply force when closing it;
- When opening or closing windows, you hear extraneous noise: creaking, clicking, etc.;
- Hinge malfunction;
- Condensation appeared on the windows;
- The geometry of the window is broken, the distortion is visible, the sashes are sagging, etc.
If you notice any irregularities in the window design, do not hesitate to call specialists, they will make adjustments and, if necessary, replace fittings.
Company employees will determine on site which element needs repair. After this, a comprehensive adjustment of the window fittings and lubrication of the rotating mechanisms with a special aerosol is carried out.
Adjusting window fittings in summer - winter mode
In principle, the only thing that can be done without turning to specialists is to adjust the sash pressure for winter or summer. The only tool you need for this is a hexagon. The first step is to determine the places where the vestibule will be strengthened or weakened.
After this, you need to find the trunnion closest to this place. It has a pressure indicator (dot or notch). To switch the window to winter mode, turn the trunnion with a hex key, the notch should be towards the room; for summer mode, the notch on the trunnion is turned towards the street.
In conclusion, we remind you once again that manufacturers of windows and window fittings recommend that you do not carry out the adjustment yourself, but contact specialized companies. And remember, if your windows are under warranty, service is carried out by the company from which the windows were purchased.
Video: How to adjust the sash pressure density
- Window fittings G-UWindow fittings from the German company Gretsch-Unitas (GU) can be installed in almost any window.
- Window fittings - hinges As a rule, fittings for wooden windows are non-metallic or metal.
- Fittings for Roto windows The service life of the windows depends on the fittings that come with wooden windows.
- Winkhaus fittings Winkhaus window fittings began their life more than 100 years ago. In the distant
Installation of double-glazed windows
To install, you will need glazing beads and a rubber mallet to attach them. Carefully install the glass unit into the frame and secure with glazing beads.
After this, insert the sash - first onto the lower hinge, and then onto the upper one. After this, you can additionally check and, if necessary, adjust the fittings. If everything is in order, the installation of the double-glazed window can be considered complete.
Formally, the window itself is also ready for use, but there are still 2 final steps left: installing slopes and sealing the window.
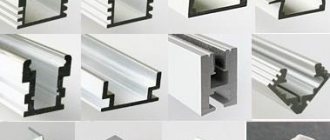
Types of window profiles
Modern industry offers a wide selection of windows made using innovative technologies and from the most advanced environmentally friendly materials. The most popular of them are: wood, plastic and aluminum.
Wooden windows are much more expensive than plastic and aluminum ones, they are less reliable, and their service life is shorter. Therefore, products made of plastic and aluminum profiles are more in demand among the population. If the question arises about installing new windows, first of all you need to analyze what is better - aluminum or plastic windows, and compare their strengths and weaknesses.
The choice will also depend on where the structure is supposed to be installed and what result the customer expects from its installation. A comparison should be made between aluminum and plastic windows. The necessary information is presented below.
Window sealing
After installation is complete, check all areas for drafts or unclosed seams. If you find it, use polyurethane foam or sealant. After this, check the fittings and set them up (if you haven’t done so before).
Done, your aluminum window is installed! By the way, sliding aluminum windows are installed in exactly the same way, except that rollers are screwed to the sash, which will help the window move left or right.
Laconic design
Aluminum, due to its natural properties, retains its aesthetic appearance for a long time.
Manufacturers paint aluminum profiles in various colors using three methods:
- Anodized method. Mostly it is gold, dark brown or natural color. The oxide layer on the metal surface completely eliminates the ingress of air, while providing reliable protection against corrosion.
- Powder coating. This method involves allowing the painted coating to dry under high temperatures. Thanks to this technology, a profile painted using this method is more resistant to mechanical damage and corrosion than an anodized one.
- Profile lamination with plain and decorative films. This method is a very beneficial design move. Films for lamination have the same properties as for PVC profiles. In this way, not only windows are painted, but also doors. Thanks to this, it is possible to supply windows and doors in the same color scheme, which means maintaining harmony between the interior and exterior of the house.
Adjustment cost
For those who need window adjustment, the price of the service is as important as the professionalism of the craftsmen. The cost depends on the following factors:
- complexity and type of work performed;
- the need to replace broken fittings with new ones;
- urgency and duration of work.
The price for window adjustment is affordable and acceptable for a wide range of consumers. You can find out more about the cost of this service by calling our representative at any convenient time.
Is it possible to adjust a casement window with your own hands?
Some people prefer to do without the help of specialists and fix problems on their own. Is it possible to adjust aluminum windows yourself? If you have the necessary skills and tools, then yes.
Do-it-yourself adjustment of aluminum windows may include the following steps:
- If the hinges and latches do not work correctly, it is necessary to provide these fittings with a sufficient amount of special lubricant. To prevent the recurrence of this problem, the window mechanisms should be lubricated at least 2 times a year.
- If the sash is sagging, you should first remove the decorative trims from the hinges using special tools. Then you need to tighten the bolts well. Such adjustment of the window sash is carried out according to instructions, which you can download on the Internet at specialized sites.
- If the handle breaks, you should perform the following actions: rotate the decorative plate located under the handle, thereby providing yourself with access to the screws. Then you need to remove the broken handle, replace it with a new one and securely fix it using special tools.
Tools needed to clean windows
Before you start cleaning, you need to wisely choose tools that will not harm the glass. It is wrong to believe that only a rag is needed. There is a standard glass cleaning kit. So, to save time on cleaning and avoid redoing the same job twice, you will need:
Soft sponges
The surface of the sponge should not contain hard elements. Otherwise, you risk scratching the glass and ruining its appearance forever. The larger the sponge size, the more convenient and faster you will cope with cleaning. The latest innovation is melamine sponges, which gently and carefully remove dirt.
Basins with water
You will need two basins. The first is diluted with detergent, and the second is filled with clean warm water to wash off the foam. Clean water will have to be changed several times after use.
Mop with brush
This simple device will help you get to hard-to-reach contaminants. If you want to make the task easier, there are magnetic brushes on sale that allow you to clean the glass on both sides at the same time. Both of its parts are connected by a magnet, which allows it to adhere firmly to the glass. And special pieces of felt remove stubborn dirt.
Rags
Like buckets, you will need several of them. Use a rag soaked in the solution to wipe off stains and dirt, then remove the stains with a dry cloth. The most popular cloth is made from synthetic suede. The porous fabric perfectly absorbs excess moisture and does not leave lint behind.
Ladder
If a mop and brush did not help, then a stepladder will come to the rescue. Ask your loved ones to back you up, and your windows will shine like new.
Rubber scraper
Another important device. Soft nozzles quickly remove dirt and do not scratch the glass
If you are eliminating the consequences of repairs, the scraper will instantly remove cement stains and layers of lime dust from the glass.
Advice!
Use wipes to clean your monitors. You can also use dishwashing sponges to clean plastic windows. They will erase all the dirt and will not leave cracks into which dust will then get clogged.
Gloves
When using chemicals, it is advisable to protect the skin of your hands. Gloves are selected by size. It is better to give preference to rubber products.
Washing vacuum cleaners
Washing windows yourself on upper floors is quite dangerous. To avoid wasting energy, use a washing vacuum cleaner. It will not only collect all the dirt from the windows, but also the remaining moisture.
DIY glass cleaners
If you are not a supporter of chemistry, then prepare the solution yourself at home. Then you will no longer have any unnecessary concerns about harm to your health.
In 1 liter of water you can dilute:
- 2 tsp. vinegar;
- 100 ml alcohol;
- 4 tsp corn starch;
- dishwashing liquid.
All these methods are safe and time-tested.
Homemade glass cleaners can not only cope with their main task, but also leave a pleasant aroma in the room.
Peel the lemon and place it in a jar. Pour in vinegar and close the lid tightly. The solution is left for a week. After the expiration date, filter, getting rid of the zest, and begin washing. The liquid is stored for a long time, and when used it is diluted in a small amount of water.
Windows that are too dusty will be transformed by a starch solution. A tablespoon of powder is diluted in 1 liter of water and stirred. Using a spray bottle, treat the glass, and then remove the excess with a dry cloth.
Another reliable remedy is black tea. 3 tablespoons of vinegar are diluted in 1 glass of tea. A rag is soaked in the solution and the windows are washed.
How to glaze a balcony yourself
A glazed balcony will not only expand the space of the room, but also protect the additional area from exposure to bad weather outside and reduce heat loss in the room. To decide on the direction of work, you need to know what types of glazing in an additional room exist and what type your balcony is.
Choosing a glazing method
For cold type glazing, single glasses framed with lightweight window frames are used. An inexpensive do-it-yourself glazing option, suitable only for summer time, is made with an aluminum profile that does not load the support.
When choosing a warm glazing option, you will have to install double frames with special plastic inside the profile. This design reliably protects from the cold from the street, but has a high cost and greater weight.
The French type of glazing is made with windows with transparent mirror glass. Frames made of high-strength glass are installed along the perimeter of the balcony space along the entire height. The solid glass sheet creates a stunning viewing effect.
Important. For comfortable use of the balcony at any time of the year, the space should be protected from condensation. They implement the task by using high-quality insulation with double sealing, as well as the presence of an adjustable ventilation system.
Which double-glazed windows to choose?
- Plastic structures with single glass for low-budget reconstruction are considered to be the most convenient for installation on a balcony. The option of massive windows with the installation of double-glazed windows is more expensive.
- Lovers of antiquity prefer double-glazed windows framed with wooden frames. Massive structures made of natural wood look good, but have a significant drawback - the need for careful maintenance.
- An aluminum profile can be considered a current option for glazing loggias in old houses. Installing a light frame on the balcony base slab and parapet will not greatly load the weakened ceiling.
Are there any disadvantages?
There are some disadvantages. 2 points push buyers away:
- High price - this is due to the complex and expensive process of producing windows from high-quality aluminum profiles.
- Thermal conductivity - it means that the room quickly heats up in hot weather, and instantly cools down in cold weather. The issue can be resolved - you can correct the situation with heat-insulating inserts, but this will still increase the price.
Once you weigh the acquisition cost against the obscenely long service life, the issue of shortcomings becomes irrelevant.
Operating rules
Proper operation can reduce the risk of breakage of aluminum balcony windows. When using the design, you must adhere to the following list of rules:
- To move the sash along the guides, you need to hold on to both vertical posts. When the structure is moving, you must not leave your hands between the sashes, and when closing, do not leave your hands between the sashes and the guide profile, as this can provoke a traumatic situation.
- Before sliding the window, you should make sure that there are no foreign objects in the guides. The presence of pieces of ice, stones and other small particles that get under the roller mechanisms and the lower part of the sash can cause the frame to rise and fall out.
- It is possible to prevent unwanted fogging and the formation of ice during the cold period if, when opening a window in a room facing the balcony, you simultaneously open the sash of the balcony glazing system by 10-15 cm. If you do not move the structure on the balcony, the warm air will be converted into condensation, which will lead to icing of the glass.
- The sashes must be opened and closed without sudden movements, which can lead to shock loads, disruption of installation adjustments, and mechanical damage to individual elements.
- If it is necessary to remove a sliding aluminum structure, it is better to use professional help, since this procedure is highly complex. Otherwise, there is a risk of breakdown of the structure or its individual mechanisms.