What you need to know if you decide to install a mosquito net yourself
To ensure that the mosquito net is installed correctly, you will need professional advice:
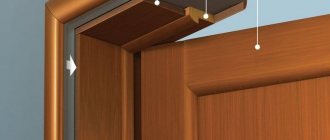
- the mesh is attached to the window from the outside using special upper and lower fasteners, which are sold complete with it;
- so that insects cannot penetrate the cracks between the mesh and the window, it must extend onto the frame;
- You can find out the size for ordering the mesh in this way: by measuring the height of the light opening, add 4 centimeters to it, and do the same with the width.
Main types of mosquito net designs
Depending on the design features, the following types of mosquito nets are distinguished:
- Frame. The most common type. There are two versions of frame-type mesh – “anti-cat” and “anti-dust”. The main difference between the “anti-cat” and the standard version is a stronger mesh that effectively resists cat claws. “Anti-dust” is distinguished by smaller cells measuring 1x0.25mm. Even the smallest particles of plant pollen and dust do not penetrate through them. This option is simply irreplaceable for allergy sufferers.
- Rolled. The main advantage of this type of mesh is ergonomics and compactness. If necessary, they can be easily and quickly rolled up. There is no need to remove the roll mesh for the winter. It is enough to roll it up into a roller shutter and leave it on the window.
- Sliding. Mainly used on balconies and loggias. Their design includes guides and rollers, the main purpose of which is to move the web. Nets of this type have one significant drawback: their installation is not possible on all window structures.
How to measure a plastic window for installing a mosquito net?
Design features of mosquito net
Before proceeding with the installation of the product, it is important to obtain a complete understanding of the design of the mosquito net. The main elements can be identified as follows:
- profiles: frame, corner and impost;
- connecting corners;
- fastening cord;
- plastic and metal holders – 4 pieces.
In addition, you will additionally need special fittings for attaching mosquito nets and the necessary tools.
Using such a product, you can forever forget about harmful and annoying insects, as well as the use of fumigators and repellents, which are not entirely beneficial for the human body.
Mosquito net design
Attention! For a mosquito net to truly be an effective insect repellent, it is important that the product is installed correctly, without any deformation.
Installation Instructions
To install the mosquito net yourself, prepare the following tools:
- screwdriver or drill;
- thin drills;
- rivet tool;
- screwdrivers;
- ruler, roulette.
Fastening elements are supplied as part of the design kit. But you need to specify this when ordering and check before purchasing the products.
Installation on metal brackets from the inside
This method of attaching the mesh to a PVC double-glazed window is considered the simplest and safest. Using aluminum rivets, the hooks are attached to long strips.
- Hold the product by the side handle and place the top bracket behind the window trim.
- Lift the net all the way up, hook the lower hooks onto the protrusion of the frame.
- Place the mosquito net down to the very end and align it with the window opening.
Install the mesh and secure it to the brackets
Securing the canvas from the outside
This method is reliable, and with this fastening you will not damage the rubber seals. But do not forget to follow safety rules, because you will have to lean out of the window to screw the corners.
- Secure the bottom brackets with self-tapping screws. They should be located 20 mm from the edge of the window opening.
Secure the brackets with self-tapping screws
- Measure the height of the mesh and add 10–15 mm to the resulting figure. Mark the points where the top brackets will be mounted.
- Screw the corners so that they are at the same distance in relation to each other and the boundaries of the window opening.
- Now install the mosquito net: slide it into the upper fastener until it stops, insert it into the lower corners, and lower the product into place.
Install the frame with the mesh into the fasteners and secure it
Video: how to install a mosquito net on the corners
Installation on plunger mounts
If mounting on conventional brackets is not possible, this method is used. As a rule, the protective grille may interfere. Or there is not enough space on the frame to accommodate the staples. Since the plunger mesh should be placed inside the opening of your window, and not overlapping, measurements are taken in strict accordance with the perimeter of the frame.
- Prepare a space for the pins in the mosquito net frame. Drill 4 holes with the same diameter as the threads on the pin. After this, expand the holes in the outer walls of the profile to the size of the tip, which extends.
Make a hole in the frame of the mosquito net for the plunger
- Insert the pins with the springs into the frame and tighten them with the tips. Try on the mesh in the opening, opposite the areas where the plungers go out, put marks.
- Drill holes to install mating pin sleeves. Stick a brush seal onto the mesh profile.
- Place one side of the mesh using the plungers into the response holes. On the opposite side, squeeze out the two tips, insert the mesh into the opening and fix it.
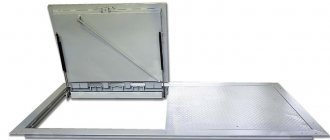
Rolled mesh (roller shutter)
The most effective way to protect against insects and dust from the street. The system is mounted above the window.
- Free up the mounting area: remove the plastic or aluminum frame from the mesh.
- Having attached the net to the window, mark the place where you will screw it and secure it.
- Open the covers on the slats to access the fasteners.
- Mark the installation locations along the entire perimeter of the window frame and install the strips as evenly as possible. Tuck the mesh under them, and then fasten the plank covers back.
Installation of the rolled mesh begins with mounting the box on the upper window frame
Video: how to attach roller mosquito nets
Requirements for mosquito nets
The main task of such nets is to create a barrier to the path of insects from the street to the apartment. Based on this, window and door openings of housing for protection against mosquitoes were previously equipped with any mesh material that was suitable at first glance - gauze, tulle, gauze fabric, fine-mesh steel construction mesh, etc. However, it soon became clear that due to certain factors these materials lose their functionality and require repair or replacement.
Some functions of mosquito net devices
To choose the right fabric for mosquito protection, we list the necessary characteristics that it must have:
- the optimal combination of mesh size and the thickness of the base material - creating a barrier in the path of insects while allowing the unhindered passage of air and maintaining sufficient transparency for viewing;
- strength - the ability to withstand random mechanical impacts and wind;
- moisture and heat resistance, ultraviolet resistance - the material preserves the strength characteristics and geometry of the canvas under the influence of atmospheric moisture, summer air temperature and sunlight;
- antistatic properties - to prevent clogging of cell openings with dust attracted by static electricity;
- ease of daily care to maintain the necessary sanitary and hygienic condition;
- safety – absence of harmful emissions into the air.
Based on the above requirements, not all mesh materials are suitable for durable and effective equipping of window and door openings with protection against insects: gauze quickly becomes dirty, stretches and impairs visibility, uncoated steel wire mesh rusts, and fine-mesh nylon mesh accumulates static electricity and becomes clogged. dust. These materials can only be used for a temporary solution to the problem, and for high-quality furnishing of housing with mosquito protection, special fine-mesh mesh canvases are used.
Advantages of using such structures
The main advantages of a mosquito net include some parameters of this design:
- Mosquito nets are very convenient to use. The products are very easy to install and also quickly and easily removed.
- The mesh can be washed with regular soap and a sponge.
- The design looks elegant and neat, so the interior will not be spoiled.
- The mesh perfectly protects the room from the penetration of various insects and even from raindrops. At the same time, the product does not obscure the view from the window and does not interfere with the flow of fresh air.
- The design is quite durable, since the frame includes metal elements and fiberglass.
- The material does not deform and does not fade in the sun.
- The mesh is very compact and if not needed, it can be stored in any convenient place.
Types of mosquito nets
The type of design of the product will help you figure out how to install a mosquito net on plastic windows. Only if you have an idea of what type of mesh was purchased will it be possible to correctly assemble and install the structure.
The main types of construction are as follows:
- Frame is the simplest and most affordable. The mesh can be removable and extendable. This option is perfect for installing a mesh in a room where there is no need to constantly open the window. If the mesh is large, then an additional reinforcing bar must be mounted in the middle of the structure.
- The plunger mesh refers to frame structures. The product is not attached to special corners, but is immediately mounted in the window opening.
- Design with fasteners in the form of Velcro or tape. This option is also the simplest and is mounted on the inside of the window sash, which makes it easy to remove in the future.
- A type of balcony mount that is the size of a standard door and is fixed on hinges. When the door opens, the mesh opens along with it. When closed, the structure is fixed using special magnets.
- Rolled mosquito net, which is one of the new products in this area. The design includes a special guide profile and a mesh fixed in a roll. There is a bar across it that works on the principle of flying. When open, the mesh is located in a box under the door. This type of construction is suitable for large window openings and glazed balconies.
- A pleated mesh, outwardly similar to a roll structure, but differs in that it moves horizontally, at the same time gathering into an accordion. The mesh can be additionally decorated with various patterns and decorative details.
Plunger fastening of mosquito net
Velcro mosquito net
Rolled mosquito net
Types of fastening frame mesh
Most often, it is frame mosquito nets that are installed. There are two ways to attach them: Z-shaped brackets and rods (plungers).
Different ways to install a mosquito stack
When mounted on brackets, they are mounted on the street side. In most cases, this is convenient and, if circumstances permit, this installation method is chosen. The dimensions of the mesh must be larger than the light clearance of the window sash: the frame is inserted from the outside.
When using plungers, the mesh is also attached behind the glass, but the clamps themselves (rods) are located on the side of the room. This device is convenient on the first floors: it is impossible to remove the mesh from the outside. When installing a mosquito net on rods, its frame must be equal to the size of the light opening. You can’t do it with millimeter precision, but to ensure there is no gap, a brush is attached around the perimeter. It prevents insects from getting in.
View of the installed mosquito net on the rods from the street
How to measure a window for an order
Quite often, a frame with a mesh is ordered from a company, and it is installed on the windows yourself. When ordering, you will be asked to indicate the dimensions of the light opening. The required measurements are taken with the sash open. You measure the distance from one rubber seal to the other: width and height. Measure in several places, write down with millimeter accuracy. The accuracy determines how well the grids will fit your window.
How to measure a window when ordering a mosquito net
Watch how to measure windows to order mosquito stacks in the video.
What you need to know
When ordering or purchasing a mesh for a window, you need to pay attention to its characteristics. Firstly, it is available with different cell sizes: from 0.6 mm to 1.2 mm. The smaller the gap, the less likely it is that an insect will “leak through” and the less fluff there will be. But with high density, air also passes poorly, which can be critical in the southern regions. Therefore, the optimal option is somewhere in the middle 0.8-1.mm.
The mesh is also available from different materials:
- Cotton. Cotton thread has high UV resistance. Its fleecy structure increases the “retention” ability: insects do not crawl through such a mesh. But since the fiber is natural, it reacts poorly to moisture, is often affected by mold and rot, and therefore is rarely used.
- Polyester. The most common material. It is quite strong and durable, although it has a low price, but does not have any special properties.
- Nylon. A special anti-allergenic mesh is made from nylon. It is produced using a special technology with complex weaving. Due to this, it even traps dust and pollen. Such nets are often called “anti-dust” or “anti-allergy”.
- Fiberglass. It is considered optimal because it has high transparency: when using such grids, the degree of illumination almost does not change. At the same time, its strength is very high - even comparable to the strength of metal. An anti-cat mosquito net is made from fiberglass, which can withstand the weight of the animal and does not tear under the claws.
If no special properties are needed, choose the usual one - made of polyester. Sometimes they may ask what color mesh is needed. The most invisible to the eye is gray, so that’s what you can order.
The nuances of attaching a mosquito net
Installing a mosquito net on doors and windows made of plastic is not particularly difficult, however, when performing this work, you will need to take into account several important points at once. To fasten the structure, you can use one of four existing fastener options:
- Plunger mounting is the most expensive, but also the most reliable. This option perfectly resists the influence of external factors. Externally, the plunger is a long metal part that can be adjusted in length. Additionally, special springs are used. With the help of such fastenings, the mesh can be easily and quickly removed and then put on again. This installation option is suitable for any type of window.
- The least reliable type of fastening is considered to be the “flag” option. In this case, special plastic hooks are used for fixation. Unfortunately, in strong winds such a mesh can easily break off.
- Metal corners are also a reliable fastening that fits tightly to the frame. The products have additional fixation from inside the room.
- The most popular type of fastening is plastic corners. They are placed on the outside, while maintaining the design of the window. The mesh can be easily removed if necessary, and the entire structure does not interfere with the normal closing of the window.
"Anti-dust"
Today, allergies are a fairly common phenomenon among different segments of the population. Therefore, for such cases, you should think about yourself by installing an anti-dust mesh. This product is created from a dense material that traps even the smallest particles. True, this is where the disadvantage comes from - rapid contamination. However, it is very easy to clean. First, the surface is washed with a warm soapy solution and then wiped with a soft, dry cloth.
Such a mosquito net does not deteriorate the appearance of the window, and at the same time allows the sun's rays to pass through well. And its main disadvantage is the high price. Otherwise everything is very decent.
The procedure for installing a mesh on a plastic window
Installation of the structure can be done by yourself. To correctly carry out all the necessary work, you should use the attached instructions and the first thing you need to do is assemble the protective product.
Attention! Even before assembling and purchasing the mesh, you will need to take measurements of the window opening so that the purchased product meets these parameters and can be fixed.
Most often, the size should correspond to the overall dimensions of the window opening. This can be checked by opening the sash and measuring the opening.
First, we prepare the frame, for which we cut the frame profile strictly according to the size of the window opening. Additionally, a crossbar can be installed to add rigidity to the structure. Here it is extremely important to take into account the ratio of the height of the opening to its width. The lower and upper parts are reinforced with a special profile - impost, made of aluminum. This increases the strength of the product and guarantees long-term preservation of its qualities. Once the profile is ready, you can use the corners to assemble the frame. As a rule, corners are made of durable PVC, which protects the structure from deformation and makes it more stable.
Assembling the mosquito net frame
At the next stage, the mesh is pulled onto a special fastening cord, which is fixed from the inside into the frame opening. As a result, the fabric is securely stretched and can be finally secured. After this, special metal elements in the form of an angle profile are installed on the frame, which is necessary to fix the canvas in the window opening. At the final stage, two special handles are attached to the mosquito protection, which will allow you to securely fasten the mesh to the window.
For the process of installing a mesh with plastic fastening, it is necessary that the structure is already assembled. It is important to consider here that the width of the finished protection should be 2 cm wider than the window, and 3 cm higher. The stack itself must include a special set of fasteners - two upper and two lower. The fasteners are fixed on the frame and screwed. It is important to follow the installation sequence, since you will first need to secure the lower parts, and then determine where to place the fasteners in the upper part. In this case, the mesh is inserted into special grooves and then simply pulled to the frame without the use of additional means of fixing the web.
Homemade mosquito nets: saving to the fullest
If you calculate the cost of all spare parts and take into account the time lost on purchasing and assembling them, the benefit is dubious. They still sell components to you at a higher price than to companies. It can only be useful in the sense that after self-assembly you can easily repair it yourself.
However, there are several very inexpensive options for homemade mosquito nets. They are made using a frameless principle and are mounted directly on the window. There are two ways to install this:
- Velcro is a knitted tape that consists of two parts - a tape with hooks and a counter with a rough surface. The mesh is cut out a little larger than the light opening, the counter part is sewn to the mesh, and the part with hooks is attached to the frame around the perimeter of the window with an adhesive layer.
- On the sealing cord. It is inserted in place of the standard seal. To do this, remove it (pry it up and pull it out), stretch the mesh over the opening, and press the cord into the groove. The principle is the same as when installing a mesh in a frame.
For the second way to make a budget mosquito net yourself, watch the video. The idea is great, the costs are minimal.
How to make mosquito protection yourself
If you want to save on the work of craftsmen, you can assemble the mosquito repellent element with your own hands. You will have to buy parts for assembly.
What you will need:
- MFP2 profile. The frame is assembled from it.
- MFPI mullion profile plus two fasteners. Will be needed if the protection height is more than 1 m.
- Mesh fabric.
- Sealing cord.
- Corners, metal or plastic.
- Pens.
- Hidden screws.
Assembling the frame
It consists of four profile fragments and four corners. Sections of the required size are cut, taking into account that they will be attached to the corners. For this, 20 mm are removed from the width and length.
The parts are sawed off, the edges are cleaned until smooth. The elements are laid out on a flat basis, with the grooves facing up. Fold them into a rectangle. Holders are placed in the corners. Their grooves are also directed upwards.
Connecting the elements is not easy. They fit tight, but that's normal. You won't be able to insert it manually. They are carefully knocked down with a hammer. To avoid damaging the plastic, a lining is used. This could be a block of wood, a piece of chipboard, etc. The assembly accuracy must be controlled. Angles are only 90°. The slightest distortion will create cracks that will become gateways for insects. If necessary, an impost is attached to the holders.
Stretch the mesh fabric
First it is cut out. The workpiece is made 4-5 cm larger than the frame. Otherwise, it will not be possible to pull it tight. The frame is laid on a flat surface, and a cloth is placed on top. It is pressed into the groove with a seal, thus securing it to the part. Start from any corner or from the middle of the narrow side. They move alternately in one direction or the other.
It is quite difficult to insert the sealing tape into the groove. In workshops, a special roller is used for this. At home, you can make your task easier if you take any rounded object. These could be scissor rings, a screwdriver or a knife handle. Before inserting the canvas into the groove, straighten it and pull it slightly.
In the process, thin plastic handles are put in place. Such models are tucked under the cord along with a mesh base. More reliable ones are placed on the frame and secured with self-tapping screws. You can see an alternative option for arranging protection against insects in the video.
Do-it-yourself mosquito net: we assemble it ourselves
As you understand, you can assemble the frame and stretch the mesh yourself. All components can be purchased from companies that sell spare parts for plastic windows. The following components will be needed:
This is what the frame for a mosquito net looks like in a semi-assembled state
- profile for mesh frame MFP2;
- impost profile (transverse partition with a mesh height of more than 1 m) MFPI and two fastenings for it;
- mesh fabric;
- corners for assembly;
- sealing cord (rubber or even woven);
- handles - 2 pcs;
- self-tapping screws with a countersunk head with a drill, dimensions 3.9*16 mm;
Frame assembly
The frame consists of two long profile sections and two short ones. They are connected to each other using corners. They can be plastic (cheap but short-lived material) and metal, painted with white or brown paint (to match the profile).
They also often install an impost - a jumper, which is installed approximately in the middle of the long side. It increases the rigidity of the structure and prevents long profiles from “playing”.
The lengths of the profiles must be cut taking into account the fact that they are assembled into corners. Therefore, 20 mm is subtracted from the width and length of the light opening (how to measure as described above) - this is exactly the length that is replaced by the corners.
Saw off two sections of the required length from the profiles. It is better to cut with a hand saw for metal - you get a more even cut with almost no burrs. It is brought to smoothness with a file or sandpaper. Then on a flat surface - more conveniently on a table, laying the profile with the grooves up, fold the rectangle, insert the corner holders - the grooves are also up. In the photo, the grooves are directed downwards, but this is inconvenient - you then have to turn the frame over.
We assemble a frame from profile sections and corners
If the corners and profiles match normally, they should be inserted tightly. Very tight. It won't work to put it in place with your hands. You will have to tamp it down, and in order not to damage the plastic, use a lining - a wooden block or a piece of chipboard, as in the photo.
How to assemble a frame for a mosquito net for windows
When assembling, also check the corners. They must be strictly 90°, or the frame will be askew, and there will be cracks into which mosquito flies can crawl. After the rectangle is assembled, we install the impost. We saw it off 2-3 mm shorter than the resulting width of the frame, insert holders on both sides, and secure it to the frame in the groove.
Impost and holder
Stretch the mesh
We spread the mesh over the assembled frame. It should be 3-5 cm larger than the frame on each side: this will make it easier to tighten. We take the cord and press it through the mesh into the groove. You can start from one of the corners, or you can from the middle of the short side, alternately moving to the right and then to the left.
The cord goes in quite rigidly; in workshops it is rolled up with a roller; if it is missing, you can use any object with a rounded surface. The handle of a stationery or kitchen knife, the holder of a screwdriver, the handle of scissors, etc. will do. While straightening the mesh, insert the cord.
Types of handles: plastic and with a metal base
Installation of handles
Having reached the installation site of the impost, we install the handles. Usually they are thin, plastic, inserted into a groove under the mesh, then pressed with a cord. There is a second type of handles - they are denser, sometimes with a metal base, screwed onto the profile with self-tapping screws, but after the mesh has been stretched. If you have a choice, take metal ones or at least plastic ones, but thick ones. The plastic ones are very flimsy and often break.
If during the process the mesh lies crooked, the cord can be pulled out by prying it with a screwdriver or something similar, straightened, and rolled up again. Having finished stretching, check the width and height of the frame at several points. If there are deviations somewhere, it means that the mesh is stretched too tightly in this place. It is loosened by pressing a little with the palm of your hand near the frame. If it is not possible to equalize the width, the cord is hooked and pulled out at some interval. Having equalized the width, holding the mesh, tuck it in again.
You can pry off the sealing cord with a screwdriver
If all the dimensions match, you can cut the cord, tuck in the tail, then walk along the profile again, checking that the seal fits evenly. Now the protruding edges can be trimmed. This is usually done using a stationery knife. That's it, the mosquito net has been assembled with your own hands, you can start installing it on the window.
An example of assembly can be seen in the following video. This is an advertising video: the company sells ready-made kits for self-assembly. The process is not detailed enough, but it can be considered in general terms.
Options and making a mosquito net yourself
If you plan to make a mosquito net yourself, you often use ready-made solutions for self-assembly. The kit for the frame structure includes a set of fasteners, a honeycomb fabric, a seal, a profile, and handles. It is also important to make a structure with your own hands based on a cable channel. To economically install a window system in a private home, it is easy to make a frameless version of the mosquito net.
Tools and materials
To assemble a mosquito net from a purchased kit, you will need the following tools:
- electric drill;
- screwdriver;
- hacksaw for metal;
- tape measure, mounting knife.
The finished set includes:
- frame profiles – 3 pcs. 1.5 m long;
- impost – transverse profile – 75 cm;
- bracket for impost – 2 pcs.;
- corners – 4 pcs.;
- mesh – 1.6x0.8 m;
- rubber cord – 4.6 m;
- handles – 2 pcs.;
- self-tapping screws
The kit is completed with brackets of different lengths for mounting the product on the window frame.
Preparatory work
At the beginning, measurements are taken, taking into account that the quality of a homemade anti-mosquito depends on the accuracy of the parameters of the window opening. If the skylight width is 445 mm with a height of 1250 mm, the correct frame dimensions will be calculated as follows:
- 445-40=405 mm;
- 1250-20=1230 mm;
- The length of the impost corresponds to the width of the opening - 445-30 = 415 mm.
The measurement formula is universal; you can insert the current parameters of the light block and calculate the dimensions of the planned frame for the grid.
Stages of manufacturing and installation of frame sashes
The measurement results are transferred to the profile and blanks are cut in the form of long and short profiles plus an intermediate element - an impost. Next comes the stage of assembling the frame and fixing the cellular fabric using a sealant:
- assemble a rectangular frame using connecting corners;
- fix the brackets and install the impost, aligning it in the center;
- the mesh is applied to the frame from the side where the groove is, and starting from the corner, it is pressed in together with the sealing cord;
- in the process of fixing the mesh into the frame, insert the handle into the groove and press it with a cord;
- Then the fabric is tensioned, pressing the seal along the perimeter of the structure. At the end, cut off the excess sealant and honeycomb fabric.
Hanging a mosquito net on the balcony door
The balcony anti-mosquito panel should open in the opposite direction from the door. Typically, plastic doors on the balcony turn inward. In this case, the measurement for the mesh is done from the outside. Add 15 - 20 mm to the height and width of the opening. Thus, the external dimensions of the MS are determined. A frame with a cellular fabric made to these dimensions is installed as follows:
- hinges are attached to the side of the frame with self-tapping screws;
- MC is leaned against the doorway from the outside. Using a screwdriver, attach the hinges to the door frame;
Loop for mosquito panel
- on the opposite side the receiving elements of the latches are screwed, and on the mosquito net the second parts of the locks are screwed;
- screw two handles on both sides of the mosquito screen.
Additional Information . In addition to the required fittings, a plastic door closer can be installed on the balcony protective panel. The device will automatically close a door that is accidentally left open. The mechanism is attached at the top to the door block and connected to the MS through a system of levers.
Balcony closer MS
How to put a mesh on a plastic window
It’s good if the mesh was ordered along with the window structure. But this doesn't always happen. The easiest way is to order the production of mosquito protection from a company specializing in the installation of window systems. They will need measurements.
Take measurements
- Open the door completely.
- We measure the width of the opening from one seal to the other.
- Similarly, we measure the height of the opening.
In order not to make a mistake with the sizes, we be sure to measure in several places. There may be slight differences. We record the obtained values with an accuracy of millimeters.
Select mounting method
An important point: the choice of fastening. Plungers, also known as rods or brackets, are placed on the frames. The last option is much more common. In this case, the mosquito is placed on the outside of the window. It is inserted into brackets shaped like the letter Z. A significant drawback is that the product can be easily removed from the street. Therefore, such fasteners are placed above the first or second floor. On the lower ones, meshes are installed on the plungers. They are also attached from the outside, but the rods that fix the product in place are located on the side of the room. Thus, it is impossible to remove the protection from the outside.
The difficulty is that the frame must exactly replicate the light opening. This is almost impossible to do; small gaps always remain. Insects can use them. Therefore, a special brush is attached around the perimeter of the frame.
A mosquito net made to specified dimensions is given to the customer along with fastenings, which he will install himself. Let's look at two possible options.
Sequence of work for a Z-shaped bracket
The kit includes four brackets. Two of them with a shelf side of 25 mm, two with a side of 40 mm. The larger ones are placed on top. To work, you will need a drill, a 2 mm drill, a screwdriver or just a screwdriver, two self-tapping screws with a screw for each bracket.
- We open the door. From the outside on the bottom of the plastic frame we put 30 mm down and draw a line. We will install brackets along it.
- From there we set the height of the mosquito up, add 18 mm, and draw a line. If it is possible to work outside, the easiest way is to attach the part to the marked bottom line, marking the top edge. Add an allowance, draw a second line.
- We outline the areas where we will attach the brackets. We retreat 10 cm from the edge of the light opening to the left and right. We put marks.
- We apply fasteners to the intended point so that the edge of the shelf is on the line. Mark where the holes should be. We do the same with each bracket.
- We drill holes. We install the brackets and secure them with self-tapping screws.
All that remains is to install the anti-mosquito cloth. They take him by the handles, turn him slightly to the side, and lead him out the door. Then they are inserted into the upper brackets and leveled. Lift it up, insert it into the lower fastenings, and lower it a little.
Sequence of work for corners
The installation of a mosquito net on a plastic window is also done on the corners. Like brackets, they are attached to the outside of the window frame. Larger fasteners are installed on top and smaller ones on the bottom. The elements are secured with self-tapping screws. The marking and installation process is very similar to that described above. There is only one difference. The clamps “hold” the mosquito by the corners, so precise marking is required.
The lower and upper boundaries are outlined similarly. Then determine the middle of the opening. Half the width of the mesh part is set aside from it to the right and left. The distance between the inner centers of the corners will be equal to the width of the mosquito net plus 0.2 or 0.3 cm for free fixation. Installation of the frame in the corner mounts is carried out in the same way as in the brackets.
We figured out how to attach a mosquito net to a plastic window. This is not at all difficult, especially if you order a product according to your dimensions from a company specializing in the production and installation of window systems. All that remains is to install protection that will block the path of annoying insects.
Installation of a frame with cellular fabric on Z-shaped brackets
The metal clamps with their profile resemble the Latin letter Z. The height of the lower overlays is 2.5 cm, and the upper elements are 4 cm. This is necessary so that the frame can first be inserted into the upper openings of the brackets, and then lowered into the lower grooves.
Type and position of Z-brackets
Step-by-step instructions for installing MS on Z-brackets
Attaching curved brackets to the outside of your home will require some skill. If the window openings are located above the 1st floor, then it is better to entrust this work to specialists. Installation of the mosquito net on the brackets occurs in a certain order.
- First, fasten the clamps at the bottom of the window frame with self-tapping screws.
- From the shelves of the lower brackets, measure the height of the frame vertically on both sides of the block and make marks.
- 20 mm above the marks mark the position of the shelves of the upper brackets.
- The fasteners are screwed in with self-tapping screws.
- The mesh is taken by the handles with both hands and taken out of the opening, unfolded and inserted into the upper brackets. Then strictly vertically lower the MS down until it stops at the lower shelves of the brackets.
- When dismantling the mesh, proceed in the reverse order.
Methods for installing mosquito repellent devices and necessary accessories
Let's look at how to install a mosquito net on a plastic window yourself if the protective device is ready or semi-ready (mesh canvas with Velcro).
On plunger pins
The plunger fastening is considered the most reliable and therefore is used more often than other methods. To install the plunger pins, you will need to drill holes in the window frame with a drill. This must be done carefully so as not to damage anything. The pins are then screwed into the frame of the mosquito control structure and into the window.
Fastening the frame with a protective mesh to Z-shaped brackets
For this method of installing a sash with a mesh, metal fasteners of a Z-shaped configuration are used, and the elements of the upper location differ from the lower brackets in the size of the pressure shelf.
Z-shaped brackets and their location on the window block
This method of attaching frame mosquito protection is also quite reliable, but the location of the clamps must be precisely adjusted to the height. In addition, it is sometimes necessary to glue additional gaskets into the brackets to ensure a tighter fit of the sash to the block.
Installation begins by fastening the lower clamps with self-tapping screws at a distance of 25 mm from the lower edge of the window opening. Then the height of the frame is set upward from the brackets and another 12-15 mm is added to the risks, after which the upper Z-elements are mounted, which for aesthetics should be located exactly opposite the lower ones.
Z-clamps: lower and upper (with technological gap)
As can be seen from the figures illustrating the plunger and two subsequent methods of installing mosquito shutters, the dimensions of the protective frames of the rod fixation with the same dimensions of the window opening will differ to a smaller extent, which must be taken into account if a decision is suddenly made to change the mounting option.
Linking the size of the mesh sash to the dimensions of the opening, depending on the method of installing the protection
On hinges
Most often, products are attached to special lashes. The fastening process is carried out in several stages:
- installation of mesh fastenings on the window frame;
- marking the places where the second loop elements will be attached;
- installation of a mosquito net;
- attaching the fastener.
Among the advantages of hinge fastening is the ease of installation and dismantling of the mesh.
Fixing frame protection to corner stops
This method of fastening is a variation of the previous one and differs from it in the location of the brackets and, accordingly, in their design.
Installation Methods
Method 1. On hinges
There is probably no clear answer to the question of how to attach a mosquito net to a plastic window. There are several fastening systems, and each has both advantages and disadvantages.
The first and obvious installation method is to install the mesh on hinges:
- For this technique it is necessary to make a structure from a special profile. On one side of the frame there are hinge groups (two or three, depending on the height), and on the opposite side there is a latch retainer.
Swing design
- When installing, place the stack on the outside of the frame and mark where the hinges will be located.
- Then we use self-tapping screws to install the mating parts of the hinges on the frame.
- We put the structure on the hinges and fix it with a rod.
- We put a latch on the response element and close the mesh, marking where the latch will be located.
Latch attachment
- We install the latch on the frame, fixing it from the outside with self-tapping screws.
It is very convenient to use such a product: if necessary, the mesh simply swings open on rotating hinges and the opening opens. But there are some restrictions:
- Firstly, dismantling the product for the winter is labor-intensive - you need to disconnect the hinges, which is not so easy to do.
- Secondly, such structures cannot be used on windows with installed external bars - there will simply be nowhere to open the grid.
- From personal experience, I’ll add one more nuance: with a side wind directed along the wall, the latch can open, and then the mesh swings open. As a result, the sailing canvas sometimes breaks off its hinges.
Method 2. On pockets
Simpler, more reliable, but at the same time slightly less functional fastenings for mosquito nets on plastic windows are the so-called “pockets”. They are plastic structures that are fixed to the corners of the mosquito net frame.
Installing pockets is extremely simple, but there is a little trick to it:
Set of pockets for installing parts
- Fastening is best done before the frame is mounted in the opening. This way we will be able to perfectly align all the details, otherwise we will have to fix the design “by eye”, which often leads to mistakes.
Installing the bottom pocket is a simple process
- We start installation from the bottom pair. To do this, we take two pockets with low front sides and secure them with self-tapping screws so that the upper edge of the mosquito frame profile coincides with the upper edge of the window frame itself.
- After this, we insert the mesh into the lower guides, and then carefully lift it so that the lower edge of the frame extends beyond the front walls of the pockets. Now we mark the position of the upper edge of the frame on the upper transverse part of the window frame.
Photo of a properly secured top pocket
- We install a pair of pockets equipped with larger sides so that the raised mesh fits freely into the resulting groove (we make a larger margin of about 3 - 4 mm). This, on the one hand, ensures reliable fixation of the structure in the installed position (i.e. when it rests on the lower pocket), but at the same time makes it possible to remove the mesh from the grooves.
After installing the window in the opening, the mesh is placed in the pockets very simply:
- first we insert the frame into the upper pockets until it stops;
- then press the bottom edge of the frame against the window;
- and place it on the supports of the lower pockets.
Of course, it takes longer than with hinges, but removing the mesh is much easier.
Method 3. On the “flags”
Another fastener for mosquito nets on plastic windows is the so-called flags. They are not very convenient to use, but they take up the least space:
Plastic flag
- The flag is a miniature part: either a Z-shaped plate made of thin metal, or an L-shaped rotary element made of dense PVC.
- Metal flags are most often placed directly on the profile frame (it must be aluminum, since the self-tapping screw comes out of PVC immediately). Plastic products are attached to the frame, close to the edge of the mesh installed in the opening.
- To attach one frame you need 4-6 flags.
- The flag works very simply: we turn each element using a self-tapping screw as an axis, and press the flag to the frame. Thanks to this, the mesh is fixed in the opening at several points.
Metal flags on a frame
- If necessary, the structure is removed according to the same scheme: we turn the flags so that they become parallel to the frame parts, after which we remove the product.
When turning the flags, the bridge must be held by the handles, otherwise it will simply fall out.
However, this mount has a significant drawback: it is inconvenient to rotate the flags due to their small size, in addition, both plastic and thin metal do not last long. And the self-tapping screws that secure the fasteners to the mesh frame also sometimes come loose. In general, this is an option for those who remove the mesh from its fastenings at most once a year.
Method 4. Velcro
Frameless insect screens also exist, and what’s more, they’re not difficult to use. As a rule, a pair of Velcro is used to attach such a structure:
- one is fixed on the window;
- and the second is sewn or welded around the perimeter of the mesh fabric.
There is a simpler option where the mesh is attached directly to the adhesive tape on the window, but it seems less reliable to me.
Gluing Velcro
The installation instructions for the product will be as follows:
- We thoroughly wash the window intended for installing the mesh, removing dirt and greasy stains (they form where we touch the plastic with our bare hands).
- Before attaching the mesh, wipe the window dry.
- Remove the protective tape from the Velcro, exposing the adhesive layer.
- We apply the product to the window and press it firmly, trying to paste the tape correctly the first time, without folds or “waves”.
- After the Velcro tape is glued, we attach the mosquito net to it. This product holds up well and can be removed in just a few seconds.
Using a frameless option
The disadvantage of this method of fixation is not the highest reliability: no matter how high-quality the Velcro is, in terms of fixation strength it is still inferior to mechanical fasteners.
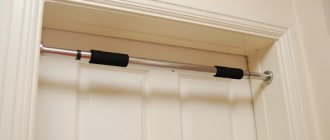
Movable mesh doors on guide rails
Movable panels with anti-mosquito fabric are installed to protect openings with sliding glazed frames. Modern plastic sliding systems are equipped with factory-made MS. The protective screens have rollers in the upper and lower transverse bars of the mesh.
Movement of the MS along an additional guide rail
Step-by-step instructions for installing a movable mosquito net
If the sliding window system has been installed for a long time, you can make a movable frame with a mosquito net yourself. You need to do it like this:
- Sections of the cable channel without covers are glued to the window sill and ceiling close to the guides of the sliding system. To do this, it is better to use Liquid Nails glue.
- You can make a mosquito net yourself or order it according to the measurements of the window opening. The frame can be made of wooden slats with a width equal to the groove of the cable channel;
- An adhesive tape is glued or stapled onto the vertical elements (it is used in wardrobes and is commercially available). The brush seal is needed in order to eliminate the slightest gaps on the sides of the mesh;
- For ease of handling, handles are screwed onto the vertical bars of the mesh;
- Carefully bending the sides of the guides at the top and bottom, insert the mesh into the channels. The protection is installed and ready for use.
- In order not to deform the plastic box each time, you can install spring-loaded rollers, which are mounted in the doors of sliding wardrobes.
Fastening the mesh sash with plungers in the window block
Fastening a mosquito net (MS) using movable rods is a reliable option for fixing the protective sheet. A plunger is a movable metal rod supported by a spring. Installation of the MS occurs as follows:
- in the side ends of the plastic frame of the mesh, two holes are drilled on each side;
- The MS is inserted into the opening, and marks are made in the window block through the holes with a marker;
- In the center of the points, recesses are drilled into which mating sleeves are inserted. They must fit tightly into the block array. Before installing the mosquito net, they can be coated with glue.
- plungers are inserted into the mesh frame with their sharp ends facing outward, and handles are screwed to their reverse ends;
- a sealing cord is glued along the perimeter of the mosquito frame from the inside;
- place the mesh by pulling the plungers by the handles. Then they are released so that the ends fit into the sleeves.
Installing the plunger
Attention . In some cases, spring rods are inserted only on one side, and fixed rods are placed in the opposite bar. This makes it possible to easily install the MS yourself without involving others.