Assembling and installing a door frame is a monotonous task that requires precise calculations and actions. One small mistake can cost you days of work or even the purchase of a new box. There are 2 main types of door frames: with and without a threshold. Recently, the second option has become more popular. In addition to the slats themselves, the boxes have several holes and fastening devices. The most important are door hinges, which perform a load-bearing function. Manufacturers have several options for boxes in terms of readiness for quick assembly and installation. The assembly itself comes in 3 main types: baguette joint, tenon (ridge) and right angle. The second option, in a broad sense, implies a labor-intensive and complex process, while the others leave the opportunity to do everything from start to finish with your own hands and without much difficulty. To understand how to assemble a door frame, you need to know the nuances of taking measurements, preparing parts and fastening them.
Components and equipment of the door frame
The door frame is 2 vertical beams installed on the sides of the opening. The elements are complemented by a top attached to the upper part of the passage and a threshold located below. The latter may be absent due to the characteristics of the flooring or personal preferences. The door frame is supplied with additional timber. Its task is to thicken the box, which is necessary in some situations.
Platbands are also attached to the door frame to decorate and hide flaws. They are mounted to the box with small nails with small heads, from the side of two adjacent rooms. The door frame is complemented by a slot for the lock tongue. It is decorated with a counter plate with the required holes. The frame also includes hinges for installing and controlling the canvas. The frame of a double-leaf door requires slots for the lower and upper fixation of the leaves.
Dismantling
If the doors are not installed in a new room, but the structure is replaced. Then you can install the door frame yourself only after the old one has been removed. The door frame is dismantled in the following order:
- The platbands are removed and the elements of the box are disassembled.
- Fasteners and anchor bolts are unscrewed.
- The strength of the opening is checked and, if necessary, it is strengthened.
It is worth disassembling the door frame very carefully so as not to damage anything and thereby increase the amount of installation work in the future. If it is necessary to replace the door frame, it is recommended to dismantle it in advance so that there is time to prepare the opening. It is almost impossible to remove the door frame without damaging it. Therefore, after removing old components, you will need to install new ones.
Material selection
It is selected taking into account the weight of the canvas. It is the door frame that will take the entire load - from the doors and its own weight. The stability margin must be large. The materials most often used are wood, microwood fiber (MDF boards), and metal. Preference is given mainly to wood.
The material is popular due to such qualities as strength, naturalness, environmental friendliness, presentable appearance, ease of processing and processing. However, most of the nuances depend on the specific type of wood. It is preferable to make frames of interior doors from pine. The frame of the entrance doors needs to be made stronger. Common oak is suitable as a raw material. Door frame parts are also sold ready for assembly. After purchasing them, all that remains is to install them.
One of the most popular materials, common oak, also has other names:
- petiolate;
- summer;
- English.
What will you need?
Installing interior doors requires not only a careful approach, but also the use of high-quality auxiliary tools. To perform such tasks you will need the following standard set of products:
- Saw. It should be sharp and have small teeth, which will prevent chipping on the surface of the box.
- Drill and set of drills. The type of tool depends on the wall material to which the frame will be attached. It is important that the drills can drill holes in brick, concrete, etc. In some cases, you may need a hammer drill and several drills.
- Screwdriver and attachments for a certain type of fastener.
- Tape measure and pencil for marks.
- Level.
- Fasteners In most cases, you will need several wood screws, as well as wall plugs. Sometimes special anchors can be used.
- Polyurethane foam.
- Spacer elements. They are needed to fix the box in the opening. Often wooden wedges are used for this. Therefore, you need to stock up on wood, from which you can subsequently form several similar products.
This list is not universal, as it depends on the type of door frame and the method of its installation.
How to take measurements correctly
Removing dimensions from a door frame is done in 2 ways: by taking the dimensions of the opening and the parameters of the door leaf. In the first case, 3 indicators are measured. The height and width of the passage, the thickness of the wall on all three sides (right and left sides, top) are measured. You also need to measure the diagonal, since this indicator acts as a control during the manufacture of the door frame. The thickness of the box depends on the walls. The second option involves taking dimensions from the door.
First of all, the sides are measured, and 5 cm are added to the results, and then the threshold, taking into account allowances. It must be remembered that there should be a gap of 2-3 mm on both sides between the closed door and the leaf. The margin between the wall and the frame is ideally 1 cm on each side. This place will be filled with polyurethane foam. Thus, the door frame is made 2 cm narrower than the opening.
Preparatory work
Preparatory work for replacing interior door frames consists of several stages:
- the doorway is measured;
- the door block is selected;
- materials and tools are purchased;
- the old box is dismantled;
- a new door frame is being assembled.
Taking measurements
To take measurements, you should have a tape measure, a sheet of clean paper and a pencil (pen) at hand. Measured:
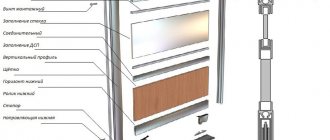
- opening height - the distance between the floor and the ceiling (position 1 in the figure);
- width (2) - the distance between the side elements of the opening;
- wall thickness (3);
It is also noted in which direction the doors will open. The height is measured along both side slopes. The smallest value is taken. The result obtained is also rounded down to the nearest centimeter. The width is measured in several places (see diagram) - only in panel houses the width of the opening is the same along the entire height. As in the case of height, the size of the narrowest part of the opening (indicated by a green line in the figure) is taken as a basis.
Box selection
When ordering a door block, you need to remember that there is a direct relationship between the width of the doorway and the width of the door leaf - this is the main indicator in door sizes. For example, in an opening 93 cm wide, it is even theoretically impossible to insert a door with a leaf of 90 cm. For doors with a leaf of 70 cm, the opening will be too wide. The ideal option is an 80-centimeter canvas.
We will summarize the dependence of the door leaf on the size of the doorway in a table.
Doorway width, mmDoor leaf width, mm
| 670 — 700 | 600 |
| 770 — 800 | 700 |
| 870 — 900 | 800 |
| 970 — 1000 | 900 |
From the given figures it is clear that with the lower value of the opening width (67 cm, 77 cm, etc.), it will be difficult to push the door frame into the doorway - there is only 10 mm left (60 cm panel + 6 cm, 3 cm each each, racks).
It is most convenient to work when there is a gap of 3 cm on each side between the wall and the box.
For information: the frame and the door leaf do not have to be made of the same material. For the box, it is preferable to buy timber made of natural wood, and MDF canvas covered with eco-veneer.
Required Tools
You will need tools such as a spatula, hammer, chisel, drill, saw, level, tape measure. A spatula is necessary for applying and leveling plaster when finishing a doorway. A hammer will be needed to adjust the elements of the side of the frame and fix the trim. A chisel is used to remove material when cutting into door hinges. A drill is needed to drill holes: in the wall for subsequent installation of opening details and in the canvas for fittings. A saw will be needed to cut parts of the box, platbands, and extensions. In the case of metal elements, it is replaced with an angle grinder. The correct position of elements horizontally or vertically is determined using a level. A tape measure is used as the main measuring device. In the process you will also need a plane, a square, a screwdriver, a pencil, and a construction knife.
Additional accessories:
- wire cutters;
- construction mixer;
- plaster trowel;
- jigsaw
A little about the types of interior doors
The construction market is replete with offers. Interior doors are no exception. Choose whatever your heart desires, within your pocket. But don't rush into buying. It is necessary to take into account the specific layout of rooms in a house or apartment, the size of the doorway, and the specifics of opening doors. Interior doors are:
- swing single-door or double-door;
- sliding compartments (built into the wall or on top of the wall);
- harmonic;
- secret.
Each has distinctive features and requires an individual approach to installation and fittings. Handles can be installed on the surface of the canvas or recessed inside; rotary or push.
There are different hinges for different types of interior doors. Most often they consist of two parts: one is attached to the canvas, the other to the vertical post of the box.
Swing double door design.
A system of upper/lower guides is provided for compartment interior doors. Knowing the features of installing different types of doors, doing everything yourself will not be difficult. Now let's talk about everything in order.
Box assembly options
There are not many of them. Basically, only three are distinguished: using a tenon joint according to the tongue-and-groove principle, using baguette fastening (at an angle of 45°) and connecting elements at a right (90°) angle. In the mid-price category, door frames are usually sold disassembled; like semi-finished DIY products.
The box consists of 3 profiled wooden blocks, covered with a film in the color of the door or veneer. Vertical bars usually have a length of 210-220 cm, horizontal - 100-110 cm. Preparedness for installation varies among products from different manufacturers. Some of them have boards already cut at 45°, taking into account the size of the canvas, and are completely ready for assembly. However, most door frames are sold unprepared.
Before starting assembly, it is necessary to carry out a number of preparatory measures:
- All parts are placed on the floor, separately from each other.
- The goods are inspected for completeness.
- Parts of the product and fittings are checked for defects. After installation, faulty items cannot be returned.
Baguette connection
First, two vertical beams are taken. If the door leaf has a length of 2000 mm, and the finishing coating is 30 mm high, then the length of the short side of the block should sum these indicators (2030 mm), and with the clearance between the finishing coating and the door, the final result will be 2040-2045 millimeters. A mark is placed on the inner surface of the beams according to the required length of the door. Then the excess is cut off at an angle.
On the inside, the cutting angle should be 135°, which is the same as -45° on the outside. The two vertical boards must be the same length. The same actions are performed with a short bar for horizontal placement. In this case, you will need to cut on both sides. You need to make sure the sizes are correct. Before performing the work directly, you need to carefully double-check the measurements.
The clearance between the frame and the door should be 3 mm.
Tenon connection
This option implies the presence of grooves in the vertical planks and tenons (ridges) in the horizontal one. When folded, a hole for a self-tapping screw passes through these alternating elements. With enough experience, you can make this tongue-and-groove system yourself. For this you will need construction timber; MDF materials will not be suitable. Regardless of whether you purchased semi-finished boards or made them yourself, measurements are first taken to process them to the required length.
The doorway is measured in several places. The result less is taken as a basis. You need to know the dimensions of the door itself and add gaps for its movement, 3 mm on both sides is enough, but you can increase the figure to 5 mm. At the top of the vertical planks, grooves are made for connection to the horizontal bar. The length of the latter is calculated taking into account these recesses. The difference in the thickness of the timber and the size of the groove should be subtracted from the width of the entire box.
Right angle
This is the easiest option for DIY assembly. This method involves removing the box porch from the vertical posts of the assembled frame to the thickness of the vertical beam. The horizontal board is sawn smaller, taking into account the thickness of the vertical ones. All prepared elements should be placed on the floor. All parts of the frame are connected with self-tapping screws. Each side requires 2 pieces. The corner joints of the structure are connected with fasteners; 2 screws are needed for each corner.
In frames sawn at 90 degrees, they are screwed in at the same right angle (at 45° - at an angle also 45°). To maintain the parallelism of the vertical posts and the correspondence of the distance between them, the door should be placed on the not fully assembled frame as it will stand, and the gaps should be secured with wedges. Narrow holes are also created to prevent the wood from cracking. The caps of the fasteners should be inserted into the material.
I washed down the box elements at an angle of 45º
To connect individual elements of a box with a round cross-section, their end parts are cut at 45º. To make the same cut, you need to use a special miter saw or miter box.
If you don’t have a special tool, you can use a protractor and a ruler to cut the workpieces to the required angle. Markings are first applied to the end part of the beam with a simple pencil, then the workpiece is cut along the lines.
When connecting two workpieces together, the screws are screwed in at an angle.
Step-by-step master class for installing a box without a threshold
You will need:
- Apply marks.
- Cut the workpieces.
- Mill the space for the hinges.
- Assemble the door frame.
- Mount it in the opening.
First of all, markings are drawn on the material for subsequent sawing. This is a very important step, because with a slight deviation the workpieces may turn out to be unusable. In order for the door to last the entire promised period, it is important to make the hinges correctly. If you have a manual router, then it is necessary to ideally set the width and depth of the cut, taking into account the parameters of the door hinge.
Before assembling the door frame, it is recommended to drill narrow holes in the places for the screws. This technique significantly reduces the likelihood of damage to the integrity of the product. The parts of the box are assembled very carefully: even minimal deviations are unacceptable. At the same time, considerable effort is required to ensure reliable results. The door frame should be installed without haste. The process uses small elements to pre-fix the frame. The side gaps are filled with polyurethane foam.
Marking and cutting workpieces
The marking of the upper part of the door frame is done as follows: a block is placed on top and marks are applied with a gap of 2-3 mm. You can use packaging cardboard for the template. Its thickness is perfect for this. Marks can also be made with a pencil with a sharp end. As for the width of the door leaf, 6 mm is added to it. The door frame boards are cut on a machine according to the marks made. If they are veneered with natural material, then problems may arise when cutting.
Natural veneer reaches a thickness of 1 mm, which means that when cutting, the board will stick with such a slope into the guide. Using a sharpened chisel, a strip of rolled veneer is removed from the cut areas. This ensures a perfect cut and a tight fit between the parts of the box. Next, the transverse blank and two sidewalls are sawed. The dimensions should be checked several times to ensure that the box is not too short; if this happens, you will need to start all over again with new materials.
Milling for hinges
A correctly seated hole ensures that the hinge is positioned correctly on the door. Accordingly, the door will function properly and will last no less than it was originally designed. When drilling a hinge, it is necessary to maintain the required depth, maintain the distance from the horizontal and vertical edges, keep the drill perpendicular to the part, and work carefully near rounded edges - they can easily get damaged.
It's good if you have a manual milling cutter. It is useful in many cases. On the tool, you will need to set the width of the sample, taking into account the corresponding parameter of the loop, as well as the depth, based on its thickness. The machine must be placed on the box board to mill the seat according to the marks. Roundness is removed from the corners using a chisel. Extreme caution is important during work. The workpieces should not be allowed to crack.
Box assembly
Before attaching the hinges, it is better to drill holes in these places with a diameter smaller than that of self-tapping screws. Thus, the likelihood of cracking the board will be reduced to a minimum. Now you can begin assembling the box. Self-tapping screws must be inserted at right angles to the surface of the cuts. You will need to ensure that the self-tapping screws do not overlap the technological grooves. The elements must be precisely aligned, avoiding general displacement, since it is very difficult to correct such a defect.
To make the connection easier, it is better to make narrow holes at the very beginning. When performing assembly, you need to carefully, but at the same time connect the parts as tightly as possible. Otherwise, the self-tapping screw may turn in the first before it begins to screw into the second element - as a result, a gap will appear. Assembly is carried out on a horizontal surface, preferably on the floor.
Installing a frame in a doorway
The frame is carefully placed in the opening and secured for a while with pieces of cardboard or foam. Then the building level checks the correct position of the box from the hinge side. You need to adjust the gaps and strengthen the structure using wedges. They can be made from leftover beams. Wedges are installed under the hinges. One more is scored into both upper corners.
The verticality of the frame is checked with a level. The box is mounted through holes for screws. When aligning the sidewalls, the horizontality of the upper jumper is checked. If the floor is not perfectly level, this must be taken into account in advance, and then everything will be installed correctly. During installation of the box, to ensure the stability of the elements, you will need to foam them a little. Shortly before this, it is necessary to clean the surfaces from dirt and dust and spray them with water, because the adhesion coefficient of polyurethane foam to wet surfaces is much higher.
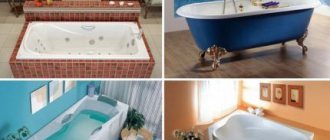
Features of installing a box with a threshold
Such a frame is required for bathrooms and toilets and to a lesser extent for other rooms. The floor level in bathrooms is often higher than that of the adjacent room, so installing a box with a threshold is necessary, among other things, to protect against water getting on the parquet, linoleum or other covering. Fastening the parts of the box to the threshold should be done with galvanized self-tapping screws. The gap for opening the door leaf is made an additional 4 mm larger than that of the option without a bottom strip.
Door frames with a threshold are more durable, so they can be installed in places where there is a high level of vibration, for example, next to railway tracks. Installing a frame with a bottom strip may be required in rooms with high levels of noise pollution. In addition to the soundproofing function, the threshold can act as a seal: prevent the outflow of air and, as a result, heat loss.
Advantages of door frames with a threshold:
- partially solve the problem with drafts;
- protect from dust and smoke.
Useful tips and mistakes to avoid
Due attention should be paid to fastening the door frame on the side where the door is hung. You should not increase the number of screws or dowels more than two, because the entire load will be transferred through the hinges. No matter how many screws are attached between them, they will not change anything. There will only be extra holes in the box, sometimes very noticeable. Fastening hardware can be hidden. It is only necessary that they are securely installed. Even the most minor fluctuations must be corrected immediately.
The fact is that foam holds lateral load well, but is practically useless when compressed. It is not a problem if some of the fasteners are longer than necessary and come out slightly on the wrong side. This will not affect the strength of the fastening. If no cracks have formed on the frame, then everything is in order, all that remains is to slightly disguise the defect if it catches your eye. However, it may not be visible at all.
If the box is made of natural wood, then the screws are used with large pitches, and if they are made of microwood fiber, with small pitches.