Almost all private houses have their own basement or cellar. If the entrance to it is in the floor, then you will need to make a floor hatch into the basement. How to make such a hatch largely depends on the structural features of the lift and its location. Creating a basement hatch with your own hands involves making drawings, selecting and purchasing materials from which the structure will be created. The basement hatch, first of all, must be completely safe and convenient to use.
Features of the hatch device
A basement has many benefits, including acting as storage space and allowing the ground floor floor to retain heat better. The main disadvantage is the high cost of creating a basement, so most home owners make an opening in the floor and install a floor hatch in the basement with their own hands.
To install a hatch, you need to think through all the stages of work.
The features of making an opening in the floor allow you to save a lot, but to successfully complete the project you need to think through all the details in advance:
- Develop a detailed drawing.
- The choice of installation location is also of great importance. Furniture or other objects should not prevent the lid from opening freely.
- Set the optimal size. In this case, the internal opening should not be less than 75x75 cm.
- Select materials that can make the structure strong enough, but not heavy, and also fit into the interior.
- Select the best option for sealing and thermal insulation of the lid. An insulated hatch into the basement will not allow cold air to enter the house even in winter.
Often hatches are equipped with a lifting basement mechanism, which ensures smooth movement and allows you to fix the cover in one position. In addition, an electric drive can be installed on the hatch, which will not allow animals or small children to enter it.
Principles of working with a signal receiver
Most receivers can only register one remote control.
The Came, FAAC, Nice systems work on this principle. An attempt to encode a second remote control will result in the first remote control becoming useless and stopping responding to commands. But there is also a definite plus in this. If the old remote control is lost, there is no need to erase it from the receiver's memory. As soon as you write commands to another device, the first one will be erased on its own. Also, you do not need to open the cover of the electric drive every time if you need to fix the next remote control. However, the vulnerability of the systems is unpleasantly surprising - if a knowledgeable person holds the remote control in his hands for 10 seconds, during this time he will be able to steal the signal.
You can eliminate or minimize the percentage of theft and propagation of the signal from the remote control that opens the gate by installing a more professional level receiver. Company name GANT, Professional model. You can purchase a domestically produced Doorhan system. Experts call the disadvantages of these systems:
- limited number of devices recorded in the receiver - from 25 to 128 pieces;
- the need to open the cover when programming each unit.
But you will be sure that no one will be able to multiply the signal on the sly from you. This unit is suitable for large enterprises and parking lots where many cars are parked. Regarding cost, the Professional and Doorhan systems win here too. They are 2 or even 3 times cheaper than their Italian counterparts.
What materials are basement hatches made from?
There are many materials available for making a hatch. Their choice largely depends on the overall interior of the house and the flooring. With the right selection of materials, you can make a hidden entrance to the basement that will not disturb the overall appearance of the room.
In this video you will learn how to make a hatch:
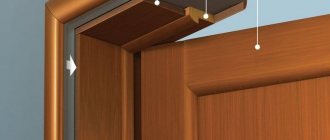
Hatch to the basement made of wood
If the flooring consists of a wooden board, then it is recommended to use wood to disguise the entrance to the basement. In addition, with its help, the load on the entire structure will be significantly less. If the hole itself measures 80x80 cm, then the lid should be slightly smaller. This will ensure that the cover rests freely on the floor.
Important! It is also necessary to leave gaps of 4-5 mm between the floor and the lid. This will ensure free air circulation.
The manufacture of a wooden structure is carried out according to the following algorithm:
- Nail 4 timber supports, on which the lid will then rest, to the rough flooring from the basement side.
- Prepare wooden blanks 79 cm long from wood for the floor and slats.
- Cut a square 79x79 cm (should be 10 mm smaller than the hole itself).
- Treat all wooden parts with drying oil or another substance that can protect the material from moisture and fungus.
The height of the hatch should be equal to the final and rough coating, which is achieved through multi-layering. This design is usually lightweight, so it can be attached to regular hinges.
Metal hatch
Making a metal structure is much more difficult, but it is more reliable and durable than the previous version. To make it you need:
- Cut the lid from a sheet of steel with a thickness of at least 3 mm.
- Weld the corners from the inside of the steel around the entire perimeter.
Important! Using a corner, you can make stiffening ribs into which insulation can then be installed.
- Clean all welds.
- Place insulation, the size of which should not be larger than the corner.
- Lay the steel sheet overlapping and bend the edges using a mallet, secure to the corners with self-tapping screws.
Next you need to install the frame. To do this, you need to cut the corners according to the dimensions of the hatch opening. The corners need to be welded together, and then attached to the concrete base using anchors. A small strip of insulation needs to be secured along the protruding edges of the frame. At the very end, secure the lid.
This hatch is much more practical
Hatch for tiles
If you are installing a hatch under the tiles, you will need to initially create the necessary markings. The hatch into the subfloor itself does not fit on the tile, but is created in conjunction with it, that is, you will need to make a metal frame that will fall below the level of the floor surface, and install the material itself on it.
The creation of the hatch follows the standard plan, with one exception: the lock must be hidden and have no protruding elements.
Briefly, the process looks like this: a metal base is created, tiles are laid on it, taking into account the coincidence of the floor elements adjacent to the hatch.
Most often, accurate calculations are used before work. This will help avoid inconsistencies and shortcomings.
Interesting Facts
In addition to their main purpose, curious players have invented several original ways to use hatches in Minecraft!
- Components of drawbridges, all kinds of traps, mechanisms (systems for issuing trolleys).
- Interior details in the form of designer tables, folding stands and bar counters.
Creating a retractable mechanism
The retractable mechanism is often used when arranging floor hatches. To create the mechanism you will need a small space under the floor, as well as a list of materials:
- steel sheet 2 pcs. thickness 5 mm;
- set of metal rollers;
- steel rods;
- compact electric motors – 2 pcs.;
- current source and electrical cable;
- switch with three positions.
The retractable mechanism is easy to use, but its creation and arrangement should be carried out by a person with experience in such work.
Each type of hatch has its own nuances
Conclusion
As you can see, the instructions for making hatches of various designs and equipment are not very complicated. It should be remembered that a reliable support should be made from below for the lid, which will be able to withstand not only its own weight, but also the weight of a person standing on it.
In the case when this design has an electric drive, the current-carrying wires are laid from the inside. This will help avoid accidentally breaking them. You can learn more from the video in this article.
Source
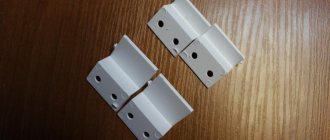
Types of hinges for manhole cover
Hinges for a basement hatch are an important element that must be selected with special care. When installing the entrance to the basement, the following types of loops are used:
- Invoices. They are attached with one side to the hatch cover, and the other to the floor or wall. The cost of hinges can vary significantly depending on the degree of reliability and decor. The most expensive are forged hinges.
- Hidden. They are mounted in the covering itself or in the internal frame, which allows for a tight fit of the cover to the floor. This mechanism will allow you to completely hide the hatch from prying eyes.
- Pantographs. With their help, the hatch smoothly extends first upward and then to the side. Regardless of the thickness of the material used, the edges of the lid easily emerge from the ceilings.
- Gas shock absorbers. With their help, you can easily lift the lid and lock it in the required position. This mechanism allows you to lift heavy wooden or metal doors located horizontally without much effort.
- With drive. Allows large and heavy manhole covers to be opened or closed freely. Most often used in the manufacture of metal structures. In turn, the drive mechanism is divided into retractable and retractable. The choice depends only on the wishes of the master himself and the available space.
The choice of loops must be made depending on the load that will be placed on them. In addition, do not forget about the need for backlash and corrosion protection.
Values
Block ID
Java Edition:
| Name | Identifier |
| Iron hatch | iron_trapdoor |
| Oak hatch | oak_trapdoor |
| Spruce hatch | spruce_trapdoor |
| Birch hatch | birch_trapdoor |
| Jungle hatch | jungle_trapdoor |
| Acacia hatch | acacia_trapdoor |
| Dark oak hatch | dark_oak_trapdoor |
Bedrock Edition and Java Edition 1.12:
| Name | Identifier | Numeric ID |
| Iron hatch | iron_trapdoor | 167 |
| Oak hatch | oak_trapdoor | 96 |
| Spruce hatch | spruce_trapdoor | ? |
| Birch hatch | birch_trapdoor | ? |
| Jungle hatch | jungle_trapdoor | ? |
| Acacia hatch | acacia_trapdoor | ? |
| Dark oak hatch | dark_oak_trapdoor | ? |
Block states
Main article: Block states
| Name | Meaning | Description |
| facing | north south west east | Which way will the hatch open? |
| half | top bottom | Determines which side of the hatch (top or bottom) will cover the block on which it is located. |
| open | true false | true if the hatch is open. |
Step-by-step instructions on how to make a basement hatch with your own hands
Before starting work, you should develop an exact layout of the hatch, taking into account nearby furniture or passages. It is best to arrange the entrance to the basement during the construction phase of the house itself.
If the structure is small, it is recommended to use boards up to 4 cm thick, which must be covered with plywood that is resistant to moisture. If it is expected that the structure will be subject to increased load, it is recommended to use solid timber to make the frame.
Important! A few days before starting work, it is necessary to treat all wooden elements with drying oil, antiseptic or hydrophobic impregnation. Only after complete drying can you begin to assemble the hatch.
When making a similar structure from metal, it is recommended to take sheets of steel with a thickness of 3 mm and the same corner. To isolate the basement from the living space, it is recommended to insulate it with a sheet of foam plastic.
When making a wooden structure, you must follow the step-by-step instructions:
- Nail a frame made of 4 bars to the subfloor.
- Assemble a blank from boards and plywood, the size of which is 10 mm smaller than the selected one.
- Install hinges or shock absorbers on the basement side.
- Cut out a hidden handle.
- Screw the cover at an angle of 90° and check the operation mechanism.
Hidden hatches made of wood should be made multi-layered. To do this, it is recommended to cover the first and outer layers with moisture-resistant plywood, and fill the padding along the edges of the sheathing and the internal space with insulation. It is imperative to leave a gap (10 mm).
Metal elements are easier to make yourself. This requires:
- Cut doors that will fit the selected dimensions.
- Weld the corners around the perimeter of the hatch. If the structure is large, then it needs to be fixed in the internal part.
- Lay polystyrene foam, the thickness of which will not exceed the height of the corner.
- Secure the insulation using a thin sheet of steel and self-tapping screws.
- Weld and secure the metal frame with an anchor.
- Attach reinforced hinges with a closer to one side of the frame, and a small strip of insulation to the other.
Don't forget to follow the steps for installing the hatch
Important! All parts made of metal must first be coated with anti-corrosion agents or paint.
If the concrete floor is being laid at the same time as the entrance to the basement is being installed, then in order to bring the hatch level with the floor, you need to slightly recess the frame by 1-2 mm.
Precise adherence to the markings is required for hidden installation. On metal parts, it is necessary to prepare holes for fastenings in advance with exact dimensions. In the case of wooden hatches, it is necessary to make holes 0.5-1 cm smaller than required, since the fibers may swell.
The last stage is installation. To do this, you need to place a bar under the end of the cover; its height will be equal to the gap that needs to be left. Fixation is carried out only with the lid open 90°. Upon completion of work, it is necessary to check the operation of the mechanism. When jammed in any area, it is necessary to shift and twist the hinges.
Cellar mold
Products with a round shape or with rounded edges are mainly used for external entrances. For the basement, a square shape is often used, which gives the element maximum rigidity.
It is easier to select finishing materials for this configuration and fasteners can be placed in any order.
There are also rectangular hatches, which make it possible to install the cover along the wall, providing a convenient descent into the cellar.
We recommend watching a video on the topic:
In addition, lifting and lowering various loads with such a hatch creates more free space and does not restrict movement.
General design requirements
Despite the fact that the main goal of decorating a crawlspace in the attic will be to give this structure a more aesthetic appearance, there are a number of requirements that will need to be taken into account when choosing a design option. There are not too many of them and following these recommendations will not be difficult:
Where the hatch is installed is of great importance. If this is a technical room, then no special decorations will be needed, but if the passage to the attic space is organized from the kitchen or other living part of the house, you will have to create a beautiful design. In addition, this design often includes a retractable ladder and should also be easily accessible when the door is opened.
Before starting work you must purchase:
Preliminary actions
Before manufacturing and installing the hatch cover, you must perform the following steps:
- It is necessary to secure metal corners or wooden blocks along the edges of the hatch. They will serve as lid latches and will prevent it from falling down.
- It is advisable to make a metal grate made from pieces of reinforcement. It is needed so that insulation can be placed on it in winter. The grille can be mounted on hinges or made in the form of a removable structure.
- The perimeter of the hatch should be lined with strips of door seal or felt. This will help create a more airtight structure.
Making a plug
After the preliminary work has been completed, you can begin making the plug. To do this, you need to adhere to the following algorithm of actions:
- From the material chosen as the basis for the hatch, we make two identical square-shaped sheets, the size of which will correspond to the future cover.
- Next, we make the door frame, which, to give greater strength, must be reinforced with transverse inserts.
- If wood is chosen as the material, the surface of the parts must be impregnated with antiseptic substances. This is done so that the increased humidity inside the cellar does not spoil the hatch and leak into the room.
- We attach one of the sheets to the frame from below, eliminating all the roughness of the structure.
- We fill the empty cells with insulation, making the layer as dense as possible.
- We install the second sheet on top of the finished structure and securely fasten them.
Remember: the plug must be durable and withstand a lot of pressure. Otherwise, it may become deformed and break, resulting in injury or injury.
Installing hinges
Selecting hinges for the cellar lid:
- Overhead loops. The cheapest and easiest option.
- Hidden loops. Due to their design, they are mounted directly inside the hatch or in the ceiling. Their use allows you to install the door in the same plane with the floor, making it invisible to strangers.
- Pantographs.
- Hinges equipped with a drive that allows you to open and close the hatch automatically. They are used in cases where the hatch covers are too heavy and it is difficult for a person to open them on their own.
- Closers.
If the hatch cover is small, two hinges are installed on it, which are located closer to the corners of the structure. Large hatches are reinforced with a third hinge, which is attached in the middle.
The standard kit that you need to purchase to fully fix the cover will look like this:
- A set of hidden hinges (right and left), which are equipped with special brackets for attachment to the shock absorber.
- Shock absorbers of the required size.
- Fasteners.
- Hatch lock.
You can purchase a lifting mechanism for basement hatch covers in the store
This set of parts can be purchased in one set at once in specialized stores.
Installation of handle and sealing
The handle for the cellar lid plays an important role, and when purchasing it, the following nuances must be taken into account:
- You cannot install a regular door handle on the hatch. The fact is that it will protrude above the floor surface and can be easily caught on when walking. This is against safety regulations and will result in hazardous situations.
- For our purposes, hidden cellar handles made of galvanized steel are perfect.
- For removable hatches it is necessary to make two handles on the sides. This will make it easy to lift the cover and replace it if necessary.
After installing the handles, you need to take care of sealing the hatch. This is necessary so that odors and dampness do not penetrate into the main room. The standard sealing option is to use door seal or felt. Strips made from this material are attached along the contour of the hatch and ensure not only the tightness of the room, but also muffle the sound of the lid closing. If the entrance to the cellar is located on the street, the door must be lined with polypropylene.
Hatch design
You need to know the basic dimensional parameters and features of the mechanical device.
These options include:
1. Dimensions:
- external - common around the perimeter;
- landing - installation hole in the underground;
- light clearance - the clear size of the opening;
- door size.
2. Design:
- frame made of steel angle with seal;
- prefabricated metal hinge for fastening the door;
- welded metal cover with an internal tray and an outer steel rim around the perimeter;
- latch lock;
- gas stops with lock.
For silent closing and sealing, a seal is placed around the perimeter of the frame, inserted into grooves or glued. The door of even a small metal hatch is quite heavy; pneumatic shock absorbers greatly facilitate the process of use. On the lid there is a welded pallet with additional stiffening ribs. The base for the floor covering or insulation is installed in it. On the surface there are holes for removable handles.
The thickness of the metal is calculated depending on the expected load. Products are painted with powder paint with the addition of polymers. More expensive models can be made of stainless steel, aluminum, and brass. Recently, composite materials have been used for small hatches.
Installation nuances
The frame is installed until the final concrete screed is poured; it must be level with the floor. It is first necessary to decide on the model of the revision design.
Sequence of work:
- The opening is being prepared. It is better to adjust the size of the entrance to the underground using a metal profile.
- Installation of the hatch under tiles and other coverings is carried out after the rough screed, taking into account the rise to the finishing level.
- Secure using fasteners such as dowels or long self-tapping screws.
When purchasing an entrance to the basement, take into account:
- Overall dimensions of stored items. If there are large barrels in the cellar, then it is necessary to take into account that they need to be lifted and sanitized periodically. The opening is especially carefully calculated when it comes to installing technical equipment that needs to be serviced and its individual elements replaced.
- The environment in which the hatch or massive inspection entrance is operated. For a wet basement, it is better to choose materials that are not susceptible to corrosion. Good sealing is needed if the underground is located in a residential area to prevent odors from leaking out.
- Load on the surface of the cover. Garage, technical hatch should be more durable.
- Type of floor covering, its thickness.
- The physique of the owners of the house.
- Price.
Manufacturers and cost
1. One of the leading companies in Russia is Praktika. She patented the design of invisible hatches for Portal series tiles with a hinged system. They are made of steel coated with metal powder paint. When you press the built-in button, the hatch, equipped with a shock absorber, opens easily and effortlessly. It is enough to slightly pull it towards you. The Praktika-yug company produces inspection hatches for the basement, which do not require preliminary preparation of the base for the final decorative coating.
3. The Revizor factory produces hatches with pneumatic cylinders, reinforced with zigzag stiffeners, and a rubber seal. Thanks to this mechanism, they can be used in wet rooms (swimming pools, baths). One- and two-door revisions can withstand increased loads.
4. The Diva company produces a wide range of products from small hatches to non-standard large-sized models with several opening doors, which can be equipped with electric drives.
Manufacturers produce structures of non-standard sizes, according to special projects.
| Company | Material | Dimensions, mm | Price, rub |
| Revizor | Aluminum, galvanized steel | 600 x 600 | 9 660 |
| 700 x 800 | 14 350 | ||
| 900 x 900 | 14 230 | ||
| 1100 x 1100 | 18 440 | ||
| LLC Diva | Steel, powder coated | 600 x 600 | 6 600 |
| 700 x 700 | 8 550 | ||
| 800 x 600 | 8 550 | ||
| 900 x 700 | 9 450 | ||
| 900 x 900 | 10 350 | ||
| 1200 x 800 | 11 550 | ||
| Design and production company Praktika | Painted steel profile | 692 x 692 | 9 950 |
| 692 x 992 | 11 100 | ||
| 792 x 792 | 10 600 | ||
| 892 x 892 | 11 300 | ||
| 992 x 992 | 11 950 |
Before buying a hatch, read the information about the device, manufacturers, and materials. It is better to decide on the model at the design and construction stage so that it corresponds to the overall dimensions of the basement and its purpose.
Construction nuances: designing the door
At the stage of developing the location of the cellar lid, the following factors need to be taken into account:
- The entrance should not be located next to the wall, so that there is room for the sash to swing open.
- If you plan to install an underground floor in the kitchen, then the hatch is placed where the kitchen unit will not be located. It is important that when the lid is open, it does not touch furniture or other decorative elements.
- The basement under the house must be equipped with a reinforced door that can support the weight of a person.
- The optimal dimensions of the cellar and entrance should correspond to the dimensions of the owners.
Using the above recommendations as a basis, you can build a comfortable basement that will last a long time, providing a comfortable descent down and climb up.
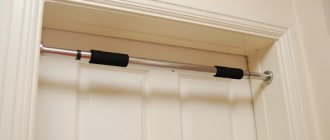
Choosing a location for the attic entrance
Sometimes the staircase to the attic space is made permanently, in which case you need to make sure that it does not create inconvenience , but more often a manhole with an extension or retractable ladder is used. Folding staircase constructors, which unfold only when the entrance is opened, have gained particular popularity.
Before making a manhole, you need to decide on the design ; it must match the design of the room where it will be located. The lid should open well and freely. Please note that the entrance may require insulation.
When installing a manhole, it is unacceptable to remove part of the supporting structure; this leads to a decrease in the strength of the entire ceiling.
When choosing a material, they are usually based on design and financial capabilities.