During a major renovation of an apartment in a new building, it is recommended to carry out work from top to bottom: ceiling, walls, floor. If a screed is needed, it is done first, then the same plan is followed. But if suspended ceilings are installed, the progress of the repair may be disrupted due to the peculiarities of such finishing. This article will talk about what, according to experts, you need to do first.
At what stage of repair are suspended ceilings installed?
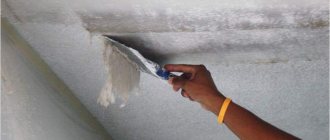
The peculiarity of PVC films is that they are easy to damage with a sharp object. Cleaning canvases can also be difficult, especially from glue or putty. This explains the specific procedure for carrying out repairs. Before installing a stretch ceiling, you need to carry out the following work:
- lay electrical wiring;
- do all the rough operations associated with a large amount of construction waste, otherwise some of the dust will settle on the surface of the ceiling and spoil its appearance;
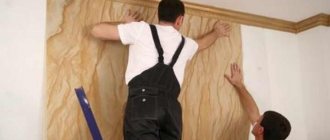
- plaster the walls or cover them with plasterboard.
When installing combined structures made of gypsum plasterboard and PVC film, work begins from the ceiling. More construction waste and dust are generated during the installation of suspended structures. Additionally, putties are used - the risk of damaging the wall finish increases.
Note! The wardrobe is installed before the ceiling is stretched. This is due to the fact that the profiles are attached to the upper base of the furniture. But there are other ways to combine a suspended ceiling and a built-in wardrobe.
It is better to lay linoleum or laminate on the floor last - these are dust-free processes. Such coatings can be damaged by trestles, stepladders, or a heat gun. If the installation is carried out in a house with a finished floor, then a dense material is placed on top - for example, cardboard and film as protection from mechanical damage and dust.
If the floor is to be tiled, then it is better to install the ceiling after - this is correct. Ceramics are not afraid of high temperatures, but when cutting, a fragment of tile can jump off and damage the PVC film. Parquet is also laid before installing the stretch ceiling. When sanding wood, dust is generated that settles on the canvas.
Classic solution: first glue, then stretch
Often, inexperienced craftsmen prefer to move from the bottom up - from the walls to the ceiling. This solution has a significant advantage: since suspended ceilings are installed without the use of glue or water, there is no chance that dirty splashes will leave stains on the walls. In addition, there is no risk that you will pierce the canvas with a careless movement when aligning the sheet of wallpaper along the joint between the wall and the ceiling.
It is worth preferring the classic order (first paste the wallpaper, then finish the ceilings) when using wallpaper for painting. It is easy to stain the ceiling canvas during the painting process.
Another argument in favor of this solution comes from the field of economics: if the film or fabric used to decorate the ceiling is damaged when wallpapering, it will have to be completely replaced. Such a replacement will be expensive, and the amount of losses will be 1.5–2 times greater than when replacing a stained or damaged sheet of wallpaper. Therefore, the more expensive finishing material should be installed after the cheaper finishing is installed.
The third argument concerns the possibility of reducing the time spent on repairs. Once the walls are finished, you can do the ceiling. Another optimization opportunity lies in the fact that less careful adjustment of the wallpaper sheets in height is allowed. The uneven top edge of the covering will hide the baguette used for stretching ceilings.
The procedure for performing work using classical repair technology
The procedure in the classic implementation looks like this:
- The rough finishing of the walls and ceiling is carried out: irregularities are eliminated and a primer is applied.
- Sheets of wallpaper are glued onto the primed walls.
- Horizontal lines are drawn along the walls. A laser level can help you do this quickly, but you can get by with a plumb line, a building level, and a tape measure.
- Holes are drilled along the line and a baguette is installed.
- The stretch ceiling sheet is attached to the corners and then heated with a heat gun.
- The straightened canvas is tucked into a baguette.
After installing the ceiling, the baguette will firmly press down the top edge of the wallpaper. This will ensure a perfectly smooth border between the wall and the ceiling, but in the future it will become more difficult to remove the wallpaper when replacing it.
Why is this option not ideal?
Despite all the advantages of classical technology, there are strong arguments against it:
- To attach the baguette, you need to drill into the walls. Dust from concrete or brick will be very noticeable on light-colored wallpaper. Cleaning the walls after installing the molding will not be easy.
- To warm up the canvas, a heat gun is used, which creates a stream of hot air. Its temperature reaches +80°C. This heat often causes newly pasted wallpaper to peel off from the walls. This danger is especially high for heavy, dense varieties.
- Vinyl wallpaper is often deformed when exposed to hot air.
- When the canvas is tucked into a baguette, it is easy to damage the wallpaper with careless movement of the tool.
The main disadvantage of classical technology lies in the different service life of wall and ceiling coatings. If the stretch fabric or film lasts 15–20 years, during this time you will have to re-glue the wallpaper at least 3 times. Therefore, you still have to master the technology of neat wall finishing.
Is it possible to glue wallpaper before installing a stretch ceiling?
Different experts will give different answers to the question of when it is better to install suspended ceilings - before or after wallpapering. There are many who support the idea that the first step is to decorate the walls.
Let's note a few advantages:
- you don’t have to carefully measure the wallpaper and start a new roll if 1-2 cm is missing: the unevenness of the top edge is hidden by the tension system;
- there is no need for a complex, even cut under the ceiling plinth;
- the risk of damaging the ceiling is reduced, since metal spatulas and knives are not used near the film;
- the canvas does not get dirty with glue and primer.
When deciding whether to make wallpaper or a suspended ceiling first, you must take into account the disadvantages of the method:
- contamination of wallpaper with dust during drilling, especially if the walls are made of red brick;
- the likelihood of peeling and deformation of sheets, since the temperature in the room when the heat gun is operating reaches 60 ° C and above;
- Workers sweat due to high air temperatures and handprints will be left on the finish.
Selection of materials
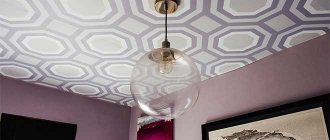
First, let's define what a stretch ceiling is. Stretch ceilings are made from different materials and come in various modifications. They can be either seamless knitted fabric or PVC vinyl film. The main textures that are most popular are glossy, matte and satin. Accordingly, ceilings are made of fabric or film, and are attached to the walls using a profile. If we talk about choice, I personally prefer film (PVC) ceilings, because such ceilings, unlike fabric ones, are easy to clean, they have a variety of color shades, and are simply cheaper. In addition, only film ceilings are glossy. And I really love glare in the interior. Film ceilings have only one disadvantage - they do not allow air to pass through at all. Therefore, they should be used with caution in rooms with high humidity.
Variety of PVC ceiling colors
One of the advantages of the design is the improvement of room acoustics. In addition, the ceiling canvas can withstand heavy loads - about 100 kg per square meter. If a flood occurs from above, the ceiling will simply stretch, and after removing the water it will return to its previous shape.
Wallpaper is also a canvas that is rolled into a roll. Wallpaper comes on different bases: paper, polymer, non-woven, fabric, and combinations of these materials are also found. They can be patterned or plain, uniform or combined, and, as a rule, perform decorative functions.
The biggest drawback of wallpaper is its fragile material. No matter how the sellers convince us that vinyl and textiles are strong materials, wallpaper still breaks. Wallpaper fades in rooms exposed to the sun and does not have any sound insulation. They do not hide the unevenness of the walls at all, and even emphasize them. Wallpaper is easy to damage, it quickly loses its decorative appearance and looks sloppy. Wallpaper absorbs odors and accumulates dust on the surface, which is very difficult to remove. They are subject to mechanical damage. They are difficult to remove if you decide to change the interior of your room. However, wallpaper is still the leader among the finishing materials used to decorate walls. First of all, this is due to their relative affordability, as well as the ease of wall decoration.
Is it possible to stretch the ceiling before wallpapering?
This method is convenient because it saves time: you don’t have to wait for the glue to set and the wallpaper to dry. But before installing the ceiling, the surface of the walls should be completely prepared - leveled and puttied.
Advantages:
- the wallpaper will not become contaminated with dust, since all the processes of stretching the canvases are carried out with bare walls;
- It will be easier to change the wallpaper in the future.
Flaws:
- materials used for suspended ceilings can be easily damaged by sharp objects - knives, spatulas, which are necessary when wallpapering;
- It is not always possible to trim the roll carefully, and the joint looks untidy;
- There is a risk of staining the canvas with glue.
When the suspended ceiling is installed, proceed to wallpapering. Before starting work, remove the masking tape from the edge of the ceiling system - this can be done without the help of specialists. Painting tape is glued to the canvas. It can then be easily removed without leaving any traces.
It is better to carefully trim the wallpaper not on the wall, but at the cutting stage.
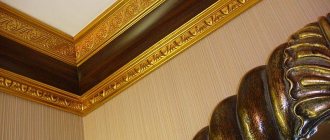
You can also glue wallpaper, adjusting it to the ceiling molding. The order of work in this case is as follows: first the tension structure, the baseboard, painting it (if necessary), then the wallpaper. The baguette will give you more room to maneuver between the walls and the problematic PVC film. At least the wallpaper will be trimmed under the baseboard, and not under the ceiling itself.
Read more: How to glue wallpaper with a suspended ceiling
If glue or paint does get on the canvas, they should be immediately wiped off with a lint-free cloth or sponge moistened with glass cleaner. Minor damage to the film that occurs during the work is sealed with tape and specialists are called. Sometimes the coating can be repaired without replacement.
We do the opposite: the pros and cons of the option
An alternative technology assumes that the repair is done in the reverse order: first the suspended ceiling is installed, and then the wallpaper is glued.
The procedure is as follows:
- The rough finishing of the walls and ceiling is being carried out. It is done in the same way as for repairs according to the classical scheme.
- Guides are attached to the walls and leveled.
- Stretch the fabric, secure it in the baguette, and put decorative moldings and plugs in place.
- Sheets of wallpaper are glued to the walls, carefully adjusting the top edge so that there is no gap between it and the baguette.
This is a slightly more labor-intensive method, since the wallpaper will have to be tried on several times to achieve a perfectly smooth edge. But when drilling the walls, there will be no traces of concrete or brick chips left on the wallpaper.
Combined method
This is the best option, but also the most difficult. Here the disadvantages of the first and second methods are leveled out. The process is quite labor-intensive, but it reduces the risk of damage to both the canvas and wallpaper.
The work order is as follows:
- Level the walls.
- Install profiles, mortgages and other elements of the tension structure.
- Wallpaper the walls.
- They stretch the ceiling.
But neither ceiling makers nor finishers like this option. The former have to go to the site twice, the latter do not want to interrupt work and wait for the installation of the canvas to be completed. And as a result, complex teams began to appear, with which it is possible to resolve the issue with both wallpaper and ceiling at once.
Joint preparation work
Before installing a suspended ceiling after wallpaper or before wallpaper, you must:
- Remove previous finishing materials - usually paint, plaster or wallpaper.
- Treat the surface of the walls with primers with antifungal properties.
- Repair cracks and other minor defects.
- Apply putty and plaster to the surface.
After the preparatory work, installers must calculate the parameters of the future ceiling structure, and repairmen must measure the walls and determine the list and quantity of required building materials. Further rough work involves attaching the baguette to the base, performing sound insulation and installing a metal structure.
Next, first glue the wallpaper and then the suspended ceiling, but only after the walls have completely dried. The edges of the wallpaper near the baguettes must be carefully trimmed using a utility knife. This is done before installing the canvas so as not to accidentally damage it. Walls with wallpaper pasted are allowed to dry completely.
Only then do they begin to build the tension system. Craftsmen must install lighting fixtures on the ceiling and mount the panel on a pre-assembled structure. But it is impossible to guarantee that in the process of performing the work they will not accidentally damage the canvas or stain it.
How to protect wallpaper during renovation
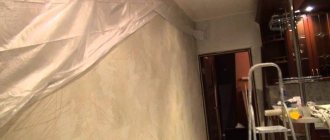
If the ceiling is installed after repairing the walls, use a masking film. It is glued under the expected line of the future mounting profile. The material has electrostatic properties and sticks to the wall. After installing the structure, the film is easily removed.
Helps keep the vacuum cleaner clean. They turn on the device together with the hammer drill, bring the tube as close as possible to the drilling site and try to collect all the construction dust before it settles on the surfaces. But this method will only protect against strobe.
Advantages and disadvantages of each method
The primary wallpapering and subsequent formation of ceilings is used by finishers. Their point is supported by the economic advantage: the first material is at risk of contamination and in some cases must be replaced. Therefore, expensive products are installed last - fabric or PVC film will cost almost 2 times more.
The advantages of this sequence are presented:
- preserving the ceiling base from accidental damage with a knife or spatula when cutting the upper section of the trellis;
- no possibility of fabric contamination with adhesive solution, liquid wallpaper, various paints (when using canvases for painting), solvents;
- the top of the canvases is closed with a baguette, which increases aesthetics;
- the ability to continue work immediately after the completion of the previous operation.
Workers may have difficulty neatly trimming the tops of the blades when replacing them. Every careless movement can damage the stretched film.
Cons include:
- dust getting on the wallpaper while drilling holes in the walls, a hammer drill with a construction vacuum cleaner does not solve the problem completely, dirt will be present in smaller volumes;
- the likelihood of damage to wall panels when tucking the ends under the baguette;
- loss of the original appearance of vinyl strips due to elevated temperatures caused by the constant operation of a heat gun;
- forced break for one calendar week - if you glue wallpaper.
Some wallpaper may fall off when the temperature in the room changes. The adhesive base, under the influence of a heat source, changes its original molecular structure and ceases to perform its main function.
Accidental tearing of the fabric
For installers, the priority becomes the initial formation of the ceiling structure, and only then - updating the walls. These conditions also have their positive and negative aspects:
- due to the lack of wall coverings, it is possible to get rid of dust and dirt that arose during drilling holes intended for attaching the molding;
- there will be no consequences from a functioning heat gun and high temperature;
- You can immediately start gluing the trellises.
A serious disadvantage is the problem of contamination and damage to the ceiling canvas during wall finishing. The issue is associated with significant material losses.
Examining the arguments presented does not provide a complete picture of the risks and benefits. Issues are resolved on the spot; for each case, it is necessary to make a choice according to the prevailing conditions.
Swollen canvases after a heat gun
Sequence of repairs when finishing with other materials
Let's consider the sequence in which the other stages of repair with a suspended ceiling should take place.
Painting
This is the same dilemma as with wallpaper. You can either worry about finding a comprehensive team, or think about protecting surfaces. More often than not, finishers will insist that the walls need to be painted first.
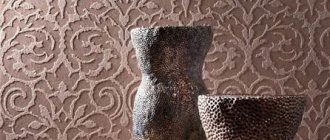
Decorative plaster
This coating is applied before installing ceilings. In this case, the degree of relief is not important. However, the surface of the plaster should be protected from dust generated during drilling using the above methods.
Tile
And there is no consensus on when to lay the tiles - before or after. We will tell you the pros and cons of different sequences, and the owner makes the decision based on his situation.
Tilers, of course, will suggest tiling the walls in the bathroom first. In this case, the tiles are laid to the entire height of the walls. There should be no voids behind it, otherwise cracks may form when drilling to install the profile. To prevent the tiles from splitting, drill at low speeds with a spear-shaped carbide drill or with a diamond coating.
Or a gap of 5-10 cm is made between the ceiling and the upper level of the tile. Craftsmen are afraid of cracks, and leave this area free of ceramic tiles. However, the profile into which the canvas is tucked has a U-shape. The resulting protrusion may cover the technological gap, which will complicate installation.
Or you can go the other way. The wall is not tiled close to the ceiling, but with an indentation of 5 cm. The remaining space is filled with plaster flush with the tiles. The mounting profile is installed 1-2 cm above the tile. A tension system or plinth will subsequently cover the plastered area.
The order of work can be any, if the master is confident in his abilities and has excellent command of the tools. Fears are usually associated with the risk of damaging the coating that was installed first. Therefore, if in doubt, carefully select specialists, invite the best, or at least get advice from them.
Sequence options
Convenience, cleanliness or speed of repair depends on the correctly selected algorithm of actions. Property owners have to choose between three popular technologies. Each type has advantages and disadvantages that are worth knowing about.
Preliminary preparation
Repairs begin with pre-treatment of the ceiling and walls. If the partitions are not prepared for construction work, then even elite trellises will not look good on them. A room with uneven and unplastered surfaces looks sloppy. Under the wallpaper, especially smooth ones, the slightest depressions and bumps are visible.
Tensile structures are installed for 10-20 years. To prevent whitewash or wallpaper remnants from falling off the old ceiling, the space must be prepared. Professionals advise completely removing old materials and leveling the area above the head with gypsum putty.
Mold often appears under the finish. Fungi appear under film sheets and under rubber-based trellises.
Humidity during wallpapering can cause a problem. To prevent infection, we recommend treating all surfaces with a construction impregnation with antifungal properties.
Rough processing of partitions Source potolok-exp.ru
Wallpaper first
But this option is more suitable for beginner home craftsmen.
pros
It has one advantage, but a very significant one: you don’t have to adjust the wallpaper to the joint with the ceiling and trim off the excess with the risk of damaging it. You may not even reach the very top a little. Subsequently, the edge will hide under the fasteners and will be perfectly smooth.
Installation of a plastic plug around the perimeter of the coating
It is this moment that often becomes decisive when choosing, first, suspended ceilings or wallpaper.
Minuses
If you choose this option, you will have to put up with some inconveniences.
Namely:
- The ceiling cornice will have to be installed on top of the wallpaper. This limits the choice of installation methods and increases the likelihood of staining the walls with glue.
- When removing old wallpaper during the next renovation, it will need to be trimmed along the baseboard or removed along with it.
- After pasting the walls, you need to wait 5-7 days so that the glue is completely dry and the wallpaper does not fall off from the hot air flows when the ceiling is stretched.
Advice. Regardless of whether you first chose a suspended ceiling or wallpaper, trust the installation of ceilings only to experienced craftsmen. They know perfectly well what to do in this or that case, and how to get out of any non-standard situation.
Which installation method to choose
The specifics of the process depend on the geometry and architecture of the room, the number of corners, protrusions, and lamps. On average, it takes 2-4 hours to improve an area of 15–20 m2. Each lamp takes 20 minutes to install. When finishing multi-level structures with numerous local lighting, it takes 8–10 hours.
Harpoon method
This installation method is most often used.
The technology is based on fastening aluminum or polymer baguettes around the perimeter of the walls. Installation of the structures reduces their height by 4 cm. After tensioning, the profiles are hidden under the coating, and the remaining small gap is closed with a removable insert. When drilling numerous holes for dowels at a distance of 15-20 cm, concrete dust is formed.
If the walls are already covered, use a hammer drill with a vacuum cleaner, which absorbs small debris, and cover the walls with film and newspapers. It is worse if the walls are built of red brick. Colored dust is difficult to clean from wallpaper with embossed or embossed prints. When stretching the PVC film, the room is heated with a gas gun, only then the ends are fixed to the profiles.
To avoid excessive dust, we recommend using either a hammer drill with a vacuum cleaner or a construction vacuum cleaner while drilling.
If work is carried out 1-3 days after pasting, the paper may become deformed. When choosing harpoon technology, the process stretches over time. Technical work and canvas preparation takes up to a week. During this time, the glue dries thoroughly.
Harpoonless
Unlike the first method, the second does not require preliminary measurements and cutting, or heating the room. The coating is adjusted to the dimensions by installers during the process. The principle is based on stretching the film, like an embroidery hoop, fixing the edges between the slats. The technology is ideal for designing figured multi-level ceilings.
An alternative wedge method involves fastening the edges with cone-shaped elements or driving glazing beads into the grooves. This is an economical design option, but not the best. It is only suitable for installation of Russian-made Deskor canvases. The technology has a significant drawback - the film often sags during operation.
The most common types of ceiling mounting.
Features of installing fabric sheets
Due to affordability, PVC film is often chosen for decoration. The use of fabric sheets up to 5 m wide, made of heat-shrinkable polyester with polyurethane impregnation, simplifies installation. Workers operate using simplified technology:
- bring the material;
- a frame is installed around the perimeter 9 mm from the ceiling;
- with a certain tension, tuck the fabric into the profile;
- The edges are snapped together with the proprietary Clipso system.
The clips secure the canvas tightly. The absence of a gap eliminates the need to insert a decorative insert to mask construction flaws.
Fabric stretch ceilings with wallpaper look expensive and stylish. The only drawback of such coatings is the limited color range. The scarcity of shades is compensated by applying designs using photo printing. Although they are much more expensive than PVC film, the ease of installation and texture make it worth the expense.