When performing renovations in an apartment, you should never neglect the preparatory work. Preparing the surface for a suspended ceiling will guarantee the quality and long service life of the canvas. Thanks to competently carried out work, the canvas will not sag in the future, condensation and other defects will not appear. Before installing a stretch ceiling, be sure to carry out work on the electrical wiring, install doors and windows, treat the base and level the walls. Let's consider all stages of preparation in detail.
Strengths of suspended ceilings
Stretch ceilings have long ceased to be perceived as a luxury and are widely used for the design of new buildings. The fact is that after construction, the house may continue to shrink for several years, which leads to cracking of the floors. If you use a regular screed to decorate such a building, over time you will have to spend additional money on eliminating defects that appear due to shrinkage. The rough surface hidden under the tension membrane is absolutely not visible, which makes it easier to prepare for the installation of suspended ceilings.
Stretch ceilings have the following advantages:
- Protects against flooding. One of the biggest problems with apartment buildings is the possibility of flooding from above. If you install a suspended ceiling, it can create reliable protection from water flowing from above. The strength of the film allows you to hold up to 200 l/m2 of liquid. In the future, the water accumulated inside the canvas is simply drained, and the canvas itself is cleaned. As a rule, after such incidents, the membrane is able to continue to please the eyes of its owners.
- Practicality. By installing a suspended ceiling, it becomes possible to place lighting fixtures in any convenient place. Wiring and other communications are completely hidden under the surface of the canvas.
- Resistance to moisture. Stretch PVC ceilings are allowed to decorate rooms with high levels of humidity. The membrane material does not deteriorate and does not become a breeding ground for bacteria and fungus.
- Resistant to combustion. Modern tensile structures are classified as fireproof. They contain no toxic components.
- Durability. During operation, the tension fabric is not in danger of yellowing or sagging. Despite prejudices, the surface strength is quite good. Carelessly throwing objects or hitting a champagne cork usually does not leave visible marks on it.
- Ease of preparing the ceiling for a suspended ceiling.
- Space saving. Unlike other suspended ceiling systems, the frame of tension structures has a height of only 2-3 cm, which has virtually no effect on the overall height of the room. This makes it possible to use them in ordinary apartments.
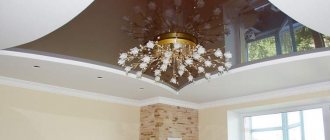
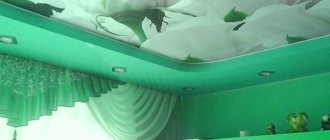
- High decorative characteristics. With the help of a glossy effect, the ceilings are given an extraordinary mirror surface, which contributes to the visual expansion of the space. Classic interiors are usually equipped with matte products. Externally, this finish is similar to traditional whitewash, but has a more modern look. At the same time, rigor and consistency are maintained. If the task is to make fundamental changes to the interior, it is recommended to use metallic stretch ceilings.
- Possibility of drawing and printing. The theme of the images can be anything. In this way, you can decorate both the entire surface of the canvas and its individual sections. This could be a view of a cloudy sky, constellations, fairy-tale characters, etc.
Gallery
Preparing the base ceiling
This process includes three main steps:
- Checking joints;
- Elimination of defects;
- Prime the base ceiling.
The base ceiling does not require plastering or painting before installing the tension structure, and all irregularities and imperfections in the base will simply be hidden behind its opaque surface. However, before installation, you should still wash off the old whitewash and paint so that they do not crumble onto the canvas in the future, and then apply a layer of primer to protect yourself from problems in the future.
Vacancy of premises
The optimal conditions for any ceiling decoration are a completely free space in the room, which makes it possible to reach any area of the ceiling without interference. In this case, installation work will proceed very quickly. Therefore, it is recommended to start the procedure on how to prepare a room for suspended ceilings by removing furniture, household appliances, decorative items and indoor plants. The same applies to all wall cabinets, shelves and paintings. If problems arise with removing particularly large pieces of furniture, it is recommended to group them in the center of the room, covering them with plastic wrap.
It is advisable to install a sliding wardrobe in the process of preparing the room for a suspended ceiling, equipping its surface with a special fixing strip for the canvas. As for delicate floor coverings, it is advisable to install them after installing the ceiling system. If the room already has expensive laminate or parquet, thick cardboard is laid on top of it. This will protect the varnished surface from damage by the legs of a stepladder or goat.
Useful tips
Knowing some little tricks will help you get the job done more efficiently and quickly.
- If you stain surrounding objects with primer, immediately wipe it off with a damp cloth. Once dry, stains will be more difficult to remove.
- Also, wash rollers, brushes, and ditches immediately after work.
- Cover your head with a headscarf, Panama hat or cap, and wear gloves on your hands.
- To speed up the drying process of the material, use a heater or household dehumidifier.
- When priming the ceiling for painting, use a roller. The brush will leave hairs and streaks on the surface that will show through the paint layer.
- A piece of tape will help you check if you did a good job. It will fall off from a poorly treated surface, but will stick to a high-quality coating.
Alkyd
Used on metal and wooden surfaces. Certain varieties are suitable for fiberglass and tile. But alkyd primers cannot be applied to plaster and drywall.
Acrylic
They do not smell and dry quickly. Such primers are suitable for surfaces made of brick, concrete, wood, and fiberboard. This is an ideal whitewash primer for ceilings: penetrating deeply into the porous structure of the lime, it binds chalk particles and improves adhesion to subsequent layers.
Mineral based
Cement or inclusions of quartz sand (concrete contact) act as a binder. For indoor use only. They fit well on expanded clay and gas silicate blocks, brick, concrete, and plastered surfaces. Due to their rough structure, they are not suitable for subsequent painting and wallpapering.
There are also universal formulations. They are suitable for any type of ceiling work and are available in the form of dry mixtures or solutions, completely ready for use.
READ Do I need to putty drywall before laying tiles?
Floor slab
The procedure for preparing a ceiling for a suspended ceiling requires the following operations:
- Check the joint areas of the ceiling panels.
- Eliminate unevenness and other defects.
- Impregnate the slabs with primer.
The base for the suspended ceiling will be completely covered with canvas, so the above procedures are purely advisory. Since the ceiling will not be painted, it does not need to be leveled, which usually takes a lot of effort and time. The same applies to any stains and traces of flooding: all these defects will not be visible after the installation of the structure is completed.
Many apartment owners still try to prepare the ceiling for a suspended ceiling as it should be, including cleaning the old finish and priming. Regarding the question of whether it is necessary to prime the ceiling before the suspended ceiling, this procedure allows you to subsequently avoid the shedding of whitewash or putty on the inner surface of the membrane. Falling large pieces of plaster sometimes damage the PVC film.
Why is preparatory work needed?
Stretch ceilings are PVC film stretched over a special frame. It makes it easy to hide all the imperfections of the ceiling. There is no need to make the surface perfectly smooth before installing it. However, in order for the finish to last for many years and not lose its aesthetic appeal, it is necessary to carry out preparatory work before starting installation.
The ceiling surface must be cleaned and cracks sealed. Otherwise, crumbled particles of plaster, paint or wallpaper residues can damage the canvas or significantly reduce its service life . It is also very important to create conditions that do not allow fungi and mold to develop.
Note! Installation of suspended ceilings should be done last. When all finishing work associated with the formation of dust or the appearance of an unpleasant odor has been completed.
Electrics
When planning the preparation of the ceiling for a tension system, it is necessary to calculate in advance the number of lamps and determine the place and height of their attachment. This will allow you to immediately close this topic and not return to it after tensioning the membrane. It is recommended to choose incandescent lamps no more powerful than 60 W, and halogen lamps - 35 W, because The film surface does not tolerate local heating well.
As for energy-saving and LED lamps, there are no power restrictions. At the same stage, a drawing of the location of lighting fixtures is drawn up and all necessary communications are laid on a concrete base. In addition to laying electrical wiring, it is necessary to consider the location of ventilation grilles and other engineering elements. It is important to understand that this type of finishing excludes the possibility of access to the ceiling space during operation.
Priming technology
Ceilings are primed in the following simple sequence:
- Brush over corners, joints and hard-to-reach places. The product is applied with smooth but strong movements. If the primer is not absorbed, the adhesive film will peel off over time.
- Then apply the base coat with a soft bristled roller. Ceiling tiles need to be well wetted, controlling the amount of mixture so that there are no puddles.
- The first layer is allowed to dry, after which the second is applied.
We answer questions from readers: How long does it take for the primer to dry on the ceiling? A thin layer of material dries from 2 hours to a day, depending on the brand of material. To avoid mistakes, check the drying time on the packaging and repeat the procedure again, now applying the material perpendicular to the first layer.
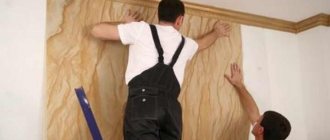
Walls
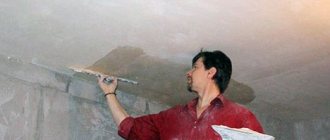
Preparing a room for suspended ceilings involves completing all dirty and wet work before installation begins: cleaning the walls of old paint, putty and wallpaper, as well as priming. If this is not done, the resulting working dust will settle on the surface of the canvas. As for wallpaper, it is better to stick it after installing the stretch ceiling, because... Fastening the mounting profile is accompanied by the appearance of dirt.
Tips for preparing walls:
- The nuances of the work largely depend on the type of finishing coating. If you plan to wallpaper, then cleaning the walls from the previous finish is enough. Plastering work and laying liquid wallpaper will require complete exposure of the base to the panel or brick. During the procedure, it is necessary to remove all screws and nails.
- To eliminate unevenness and differences, it is cheapest to use plaster, starting putty or alabaster. When sealing very deep cracks, gypsum is used, which is subsequently covered with several layers of plaster mixture. Between individual applications it is necessary to take sufficient pauses to allow the solution to dry. To eliminate deep holes, use a cement-sand mortar in a ratio of 1:3 or dry plaster. As an additional reinforcement, it is better to glue a plaster mesh.
- After laying the leveling layer, a continuous putty is carried out, the task of which is to eliminate minor defects. The surface then acquires the necessary solidity. The putty is sold in a dry and prepared state. Dry mixtures are an order of magnitude cheaper than ready-made ones, and their preparation boils down to thorough mixing with clean water. The entire cooking process is carefully described in the instructions on the package.
- Puttying is carried out from corner to corner using a small and wide spatula (the small one acts as a spatula for applying the mortar). By changing the angle of the large spatula, you can adjust the thickness of the layer. It is more convenient to start work from the bottom of the wall, gradually moving upward. For wallpaper, a two-layer putty is usually required; for painting, a three-layer putty is required. Before applying each next layer, a pause is made to allow the previous one to dry completely.
- After the putty has dried, the surface of the wall is sanded using painting sandpaper No. 120.
- To secure the surface and remove dust, use a deep penetration acrylic primer. It is most convenient to apply it with a wide brush or roller. If there is traces of mold on the wall, it is recommended to use a special antifungal solution.
There is a recipe for homemade primer. It contains carpenter's bone glue (500 g), copper sulfate (100 g) and laundry soap (one piece). After boiling water, throw all the ingredients into it (the soap needs to be grated). The resulting mixture is boiled for 20 - 30 minutes, then filtered and cooled. A simple brush will do to apply the primer.
Material options for lining a rough ceiling with wooden beams
If you plan to frame the ceiling along wooden beams, then most often the owners use gypsum plasterboard sheets and lining. But if the rough covering is made of good quality boards, you can do without decorating the surface.
Wooden boards, plywood - the price of materials is affordable, you can choose plywood from $20 (RUR 1,300) per sheet, and solid boards from $85 (RUR 5,500) per m3. When choosing boards for hemming that you plan to leave without a finishing coating, you should pay attention to the quality of the cut - cutting without fallen knots or black spots will look more aesthetically pleasing on the ceiling.
Important! The boards for cladding must be well dried, then they should be treated with a fire retardant, impregnated against rot, bugs, moisture and dried again. Insufficiently dried material will lead to failure - the board will lose shape and the geometry of the ceiling will be disrupted.
Materials and tools
The materials you will need are a 25 mm thick board, screws or nails with a pin length of 45-55 mm, and skull blocks. But the insulation is selected according to the characteristics of the premises. Most often, mineral wool is used in wooden houses. The sheets are already sold with a foil insulating layer that reflects heat back into the room. Also, the elements have a stable shape and are convenient for display alone.
Advice! When sheathing the ceiling with plywood, you will need a frame, for which you need to buy a beam or rail with a cross-section of 40x40 mm.
Important! When considering options for how to hem the ceiling in a private house without forming a frame, pay attention to the boards. They can be mounted on a supporting base without lathing.
Technology of hemming the ceiling with boards
To make a rough ceiling made of wood, you should choose a cladding option - below or above the beams. The algorithm is simple - first, boards are nailed, then layers of heat, hydro, and vapor barriers are laid.
And now in more detail how to fix the boards on the joists:
How to make a rough ceiling higher than the beams:
All that remains is to lay insulating materials on top of the boards and sew up the entire surface. You can consider an option in which the board is laid out on top of the cranial block. Here both the beams and the cranial block remain visible - it looks beautiful, but you will have to choose high-quality timber and decorate it with protective varnish.
Plywood ceiling lining technology
When considering how to line a ceiling over wooden beams, many owners prefer sheets of plywood. The material is durable, and if you need to clad ceilings in damp rooms, choose moisture-resistant plywood - it costs a little more, but can withstand significant changes in humidity. Before work, a frame is formed onto which sheets of plywood are fixed.
The work algorithm is as follows:
Important! Technical gaps between sheets of plywood are necessary to compensate for expansion of the material when moistened and heated.
After the ceiling is hemmed, a vapor barrier membrane can be laid on the top side of the ceilings on the thermal insulation, and then a subfloor.
Marking
To fasten the tension fabric, a frame made of aluminum or plastic profile is used. It is installed on the base floor or wall using dowels. Therefore, after completing the preparatory activities, the base of the suspended ceilings is marked for installation of the profile. The minimum distance from the frame cut to the concrete floor is selected - 60 mm. This will make it possible to avoid a noticeable lowering of the ceiling.
Multi-level structures will require markings for each level separately, with strict adherence to geometry. A building or water level is usually used for checking. The multi-level design provides for an increase in the distance from the rough ceiling under the suspended ceiling: the exact dimensions depend on the shape and number of levels. In this case, reasonable limits must be observed: it is not recommended to lower the total height below 240 cm. It is allowed to operate tension systems in rooms with temperatures from 0 to +50 degrees. As work progresses, it is recommended to create a sealed mode in the room, since installing PVC film will require raising the temperature to +40 degrees.
Installation of additional sound insulation
Preparation for the installation of suspended ceilings, if necessary, may include the installation of soundproofing material and insulation. For these purposes, it is recommended to choose mineral wool in the form of sheets. It is secured with plastic umbrella dowels on the concrete floor.
For information! The tension fabric made of PVC material acts as a vapor barrier.
Acoustic (perforated) or fabric coverings require the installation of additional vapor barrier, since they differ in vapor permeability. After all the preparatory measures have been completed, the decorative covering can be stretched.
Helper tools
When working with a dry mixture, take care of a container for diluting the composition with water and mixing. If the primer is already ready, then you will need a cuvette into which liquid is poured in small portions. To handle corners and joints you need a paint brush.
It doesn’t matter at all which roller you use to apply the primer to the ceiling; it’s convenient when there is a telescopic handle. With it there is no need to go down and up the stepladder. The handle length is set to a comfortable length and the work is performed from the floor. A stepladder and a vacuum cleaner will also come in handy when working.