Often, people underestimate the preparatory work, paying maximum attention to the decorating process. However, there is no point in buying expensive finishing materials if you have not prepared the ground properly. Decorating rooms always starts with the walls. They need to be aligned and preferably as well as possible. Of course, there are some finishing materials that hide minor imperfections in the walls, for example, decorative plaster or thick wallpaper, but you still need to prepare the base for them.
Regardless of what finishing option you choose for interior walls (paint, wallpaper), you need to achieve maximum loyalty from your walls. When the walls are even and smooth, then the work will be built much better in the future. Today we will talk about cement putty - a material that is used to level walls.
Types of cement putty
Since cement-based putty is quite widespread, manufacturers of building materials divide the products produced in this segment into the following types:
- Facade. Used for exterior finishing work.
- Thermal insulation. This putty is used for thermal insulation work in combination with other insulation products.
- For interior work. Accordingly, it is successfully used for interior decoration.
In terms of their structure, cement putties consist of cement, as well as polymer additives and mineral fillers. This composition makes the consistency of the putty convenient for work, and the finished surface is perfectly smooth and has a high degree of strength.
Accordingly, depending on the composition and purpose, cement putties are divided into 2 types:
Starting. It has a coarse-grained structure and can be used to hide significant unevenness, seal cracks or crevices on walls and other surfaces. It contains quartz sand, therefore, cement putty for initial treatment can be applied in a layer of up to 2 centimeters - you must agree, such a thickness will certainly mask almost any imperfections without loss of properties.
Finish. It also contains sand, but of a very fine fraction, which will not allow it to be applied in a thick layer. Yes, this is not necessary, the finishing mixture is necessary for finishing the surfaces to the smoothest possible state; it does not cover up unevenness.
It largely depends on what kind of cement was used to make the putty: it will have a gray or white tint. White mixtures are made from white cement, the cost of which is much more expensive than usual. Putty on the simplest, gray cement, looks similar in appearance to light cement mortar.
In what form can you buy cement putty?
Another classification of cement putties is directly based on the sales format of the product. Here, like many other analogues, there are only two options:
- Dry putty mixture
This putty is sold in bags or bags, depending on the amount of material. Its convenience is that you can buy a large volume much cheaper than ready-made putty, and also: you can mix as much product as you need. Also, it is the dry mixture that can be diluted to the ideal consistency - for each master it can be different, which is easier for him to work with.
- Ready-to-use putty
It is sold already mixed, in a “wet” form, packaged in plastic buckets of various weight categories - but not more than 5-6 kg. Of course, such a product is convenient to use because you simply open the lid of the bucket and you can start working, but on the other hand, such a mixture dries out faster and cannot be used again. Also, “wet” cement putty cannot be applied thickly in one layer, because it shrinks and in this case, cracks will form after drying. In general, this format of putty is best suited if there is a need to seal small cracks and the surface to be treated is not too large.
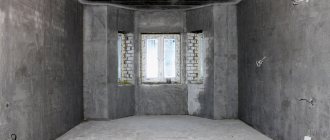
Leveling the camp using beacons
If your walls are quite crooked, it makes sense to use beacons. Metal beacons are attached to cement mortar and pre-set strictly vertically. Use a good bubble level to ensure the beacons are aligned correctly.
After the mortar used for installing the beacons has completely dried, you can proceed to filling the space with cement mortar. This way you will get strictly vertical, even walls.
Pros and cons of cement putties
Like any finishing material, cement putties have their advantages and disadvantages. To successfully use this putty, it will be enough to know about them and apply the product accordingly to avoid trouble.
Pros:
- Easy to use. Cement putty, properly prepared from a dry mixture or already purchased ready-made, has a soft consistency and is easy to apply. Even an amateur in finishing work can work with it, not to mention those who have experience of this kind.
- Strength of cement. Cement, from which the putty is actually made, is one of the most durable and strong materials for sealing cracks and irregularities. The finishing layer obtained after drying will last unchanged for many years. It is well suited for uneven surfaces, as it can level out large differences - up to 15 millimeters it is quite capable.
- Cement putties are not afraid of frost, heat, and moisture. They are suitable for rooms without heating, bathrooms, kitchens, garages and at the same time, bedrooms and living rooms.
- Price. The cost of cement putties, along with their reliability, also guarantees their popularity in the finishing materials market. Since the main ingredient - cement - is not expensive, the putty itself is quite affordable for everyone.
The advantages are quite significant, which is why cement putties are mass produced and also purchased in large quantities.
Minuses:
Large granular structure. Even finishing putty made on a cement base has some graininess - this is due to the properties of its main component - cement, as well as quartz additives. That is, even the most expensive and high-quality cement putty will not leave behind that ideal smoothness that, for example, gypsum putty can provide.
There is no ideal whiteness. Even those putties that are made with white cement have a yellowish tint after drying. This finish is not suitable for painting, but if you plan to wallpaper the room, then in this case the shade is not a hindrance.
An important nuance: cement putties cannot be mixed with dyes, varnish, adhesives or anything else. If something accidentally gets into the finished mixture, it is unsuitable for use.
How to make cement putty with your own hands?
Finishing materials can be purchased at any hardware store. But you can make it yourself. The mixture contains the main components:
- binders - use polymer materials;
- fillers - use means that separate the putty into gypsum, acrylic, cement;
- coloring pigments.
Cement putty made at home allows you to save your budget. To prepare the mixture, use one of two proven recipes:
- Washed quarry (river) sand in an amount of 10 liters is mixed with cement M400-500, PVA glue is added in an amount of 2 liters. The mixture is poured with 5 liters of water and mixed well with a construction mixer. The consistency of the finished mixture should resemble thick sour cream. This putty has increased adhesion.
- PVA glue is mixed with water 1:1, a dry mixture of M400-500 cement mixed with alabaster is added in a 1:1 ratio by weight. The solution is mixed and used immediately after preparation.
To prepare a high-quality mixture, it is recommended to follow a few simple rules so that the result does not disappoint later. To prepare the mixture, use only clean water without impurities, as well as clean containers. The components are selected finely ground, the mixture is thoroughly mixed until a homogeneous composition is obtained. During the mixing process, the proportions are observed. The prepared solution is applied immediately after preparation, as it sets quickly.
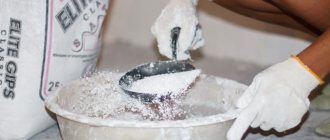
Making putty from dry powder?
Since this particular format of cement putties is most in demand, before starting work, you need to take care of obtaining the correct mixture, ready for work. The algorithm is not complicated:
1) Fill a bucket or basin one third full with clean water. For cooking, you need to use only plastic containers - a bucket, a basin. Fill the container one third with clean water at room temperature.
2) Apply dry putty. In terms of quantity, try to roughly follow the manufacturer’s instructions on the packaging, but they are not always accurate.
3) Stir the mixture. Mix well, for example with a spatula, trowel or small spatula. After the mixture has become homogeneous, you need to beat it thoroughly with a construction mixer or using a special attachment - a mixer for a hammer drill.
In general, the putty is ready, but before starting work, check that the consistency is correct: when applying the product to the spatula, it should not flow from it. If the consistency is liquid, add a little dry putty; if it is too thick and sandy, then, on the contrary, you need to add water. If there are lumps, the mixture is not mixed well enough and you need to continue this process.
Important: the finished cement putty dries in approximately one to two hours, depending on the volume. Therefore, when planning finishing work, try not to mix a lot of product at once; it is better to prepare the next portion if necessary. When mixing for the first time, make a note of the proportions of water and dry powder you used - this will help you prepare subsequent portions of putty with exactly the same consistency.
Preparing the surface for applying putty
The surface must be firmly bonded, dry, grease-free, and free from dust and paint coatings. All steel elements in contact with the plaster must be protected from corrosion.
Unstable bases must be reinforced with a primer or primer specially selected taking into account the absorbency of the base.
It is important to note that the base should not be wetted before applying cement plaster.
Under optimal conditions (e.g. low air humidity, temperature around 20 ° C) lime finish on new cement or cement-lime plaster - at least after 14 days.
- If polyester resins and other modern additives are added to the composition, the period is significantly reduced.
- But this should already be looked at on the packaging or the manufacturer’s website. Adverse weather conditions increase the drying time of the putty.
Work with putty
Cement putty is a very difficult material, and has its own characteristics in operation. To avoid troubles after the finish has dried, the following points should be taken into account:
1. Use of reinforcing mesh when applying starting putty in 2 or more layers. If you have to start finishing very uneven surfaces, and you need to apply starting cement putty in two or more layers, then make sure in advance that you have a reinforcing mesh - it needs to be laid between the layers to avoid cracking after drying.
2. When using finishing putty in 2 or more layers, you must wait for the first layer to dry completely and apply a primer. If you need to apply two layers of finishing cement putty, then you just need to wait for the first layer to dry completely before applying the second. This time will be approximately 12 hours. Also, many experts recommend that before reapplying the finishing putty, prime the first layer with a deep penetration primer - this will allow the last layer to adhere more firmly to the surface.
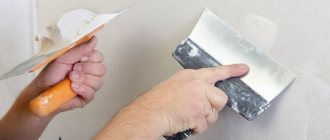
3. Hold the spatula correctly when applying cement putty. To carry out finishing work, you will need a simple spatula - for walls, ceilings and other flat surfaces, as well as a corner spatula - for finishing corners. It is best to apply cement putty with a large (about 40-50 centimeters) spatula, and then level it with it, holding the tool at an angle of about 30o to the surface. Upon completion of finishing work, metal spatulas must be washed with running cold water, otherwise the cement putty will harden and ruin the tool.
4. Surface cleaning. Completely dried cement putty must be cleaned using a special metal float and sandpaper.
In general, there is nothing difficult in working with cement putties, and, knowing their features, it is quite possible to carry out the starting and finishing finishing yourself. To apply these putties you do not need any special tools: the most common metal spatulas are sold in any store. Putty is not capricious in its work; even a non-expert in construction work can handle it; all you need is accuracy and the desire to get an even and beautiful finish.
Preparation of putty mass
Loose cement plaster should be mixed according to the instructions on the packaging. The mixing ratio is usually about 8 liters of cold water for every 20 kg of product.
The mass should be mechanically mixed slowly 10 minutes after combining the mass with water and use cool water for mixing. Unlike gypsum topcoat, cement topcoat can be prepared 3-4 hours before application to achieve optimal consistency.
When applying the final coating to the finished mass, you can constantly add new dry product and add water to maintain the appropriate consistency of the product.
Tools:
- Trowel or spatula;
- Bucket;
- Mixer or drill;
- Mixer attachment for drill.
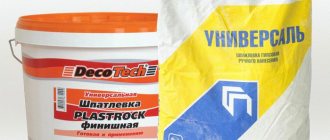
Brief overview of cement putty manufacturers
There are quite a few manufacturers of cement putties, but we can still highlight the most popular brands:
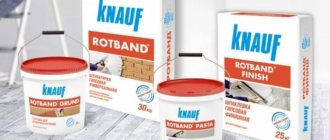
Vetonit VH
Finishing putty on white cement. Sold dry and suitable for exterior and interior decoration. Perfect for rooms with high humidity levels, swimming pools, bathrooms. For external use, this putty is suitable for finishing plinths, fences, and facade work.
This material is a joint production between Finland and Russia. Thanks to high-quality raw materials and careful control during production, cement putty of this brand has established itself as a reliable and profitable product.
Bolars waterproof
Cement putty made in Russia. The product is a starter product and is suitable for the initial treatment of uneven surfaces. Can be used for both external and internal work. Resistant to low temperatures. For interior decoration it is used for bathrooms, kitchens, as well as rooms with a high level of load - corridor, hall, living room. It is popular due to the fact that it can be applied in a thick layer - up to ten millimeters, which means it can level large differences in the surface at a time.
Kreps VL white
Cement finishing putty is also of domestic production. Moisture and frost resistant, has excellent strength characteristics. Can be used for manual and machine application. The maximum layer thickness is three millimeters, in some cases - with partial application - up to five millimeters. It is in great demand due to the most comfortable price-quality ratio.
Ceresit CT 225
Facade finishing putty based on gray cement. The main area of application is exterior decoration, but can also be used in “wet” rooms. It contains a special reinforcing fabric, which makes the dried layer of putty as durable as possible and resistant to cracking. Resistant to any weather conditions. Produced in Russia.
Main advantages
Cement stands out for its strength characteristics; it helps strengthen the base and protects it from external influences. To improve the properties, other elements are added to cement putty, which makes the composition even better. Among the advantages of choosing this type of putty are the following:
- A good indicator of water resistance, which makes it possible to use in rooms with high humidity, for facade cladding;
- When used for exterior finishing, resistance to other natural factors to which the surface is exposed is also noted. Frost resistance, resistance to ultraviolet radiation and others;
- Environmentally friendly, the composition does not harm nature and the human body;
- The ability to apply a layer of up to 0.2 mm, which helps to obtain good smoothness on the base. Yes, gypsum or polymer types of putty can create up to 0.1 mm, but the version made from cement is distinguished by its high level of surface leveling;
- Does not shrink;
- Low cost.
Cement stands out for its strength characteristics; it helps strengthen the base and protects it from external influences.
Recommendations for use
Before use, the putty must be thoroughly mixed.
To work, you will need a putty composition, narrow and wide spatulas. The application technology is quite simple, but requires some experience.
Preparation of composition and base
The wall and ceiling are cleaned of dust and dirt , if necessary. Then the surface is primed. If the room is damp, it is recommended to use antiseptic primers.
The putty is diluted with water in the proportion specified in the instructions. Do this immediately before work, as the solution dries quickly.
Application technology
For large differences in height, the material is applied in broad strokes.
If the surface is smooth and the cracks are small, do it in small portions and in different directions. The nature of the surface is taken into account. If the wall is smooth, the starting putty is applied according to the rule. Apply with a wide spatula in large portions. The movements are sweeping and wide, but they must be applied while maintaining the same angle.
If there are many defects, first evaluate the wall using a level. Cracks, chips, and depressions are outlined with a pencil. These areas are puttied first. Then, as in the first case, large portions are applied and distributed over the surface.
Consumption
Material consumption depends on the layer thickness and filler fraction . Fine gypsum plaster is economical: 500 g are required to cover 1 m² of surface. To cover the same area with putty paste, you will need at least 1.7 kg. But this composition is applied in a thick layer and reliably masks cracks and chips.
Wallpapering after puttying
If, after applying the starting putty, you plan to glue wallpaper and you do not want to work with the finishing solution, then you should purchase wallpaper that is not too thin - its density should be sufficient. In this case, there is no need to work with the finishing mixture.
You need to know when working with various solutions:
- Cement based material. Even when dried, it has a dark color, which will not only be noticeable through wallpaper made of thin material, but will also change its shade.
- Polymer and gypsum materials. You can safely glue any wallpaper on them, since the color of the decor will not change.
- Coarse material. A rough surface will not add beauty to thin wallpaper, and there will be problems when gluing it.
If you planned to paint surfaces, then you simply cannot do without using a finishing compound.
Application technology
Apply the mixture onto a primed base.
The method of applying cement putty mixture is no different from the technology of wall putty with other compounds. All work consists of several stages:
- Preparing the base. The wall should be cleaned of external contaminants - dust, oily stains. You also need to remove loose fragments of the base. Existing cracks are expanded with a spatula and thoroughly cleaned.
- Primer. After this, the entire surface to be treated is primed. The primer composition is applied in two or three layers, each of which is applied no earlier than after the previous one has dried.
- Tools. To apply the solution to the wall you will need a wide and narrow spatula and grout.
- The prepared solution is taken from the container with a narrow spatula and distributed along the entire length of the wide spatula. Then, with wide, sweeping movements, it is applied to the wall. A narrow spatula is used to seal cracks and crevices. After the mortar applied to the wall has slightly hardened, it is leveled using metal grout. To find out whether it is possible to apply a cement composition over gypsum, see this video:
Cement putty is an excellent choice if you want to get a durable coating that is resistant to moisture and physical stress for interior and exterior walls. Its excellent technical characteristics have led to a wide range of applications in finishing works, both as a starting and finishing composition.
Making at home
You can do the putty yourself. This allows you to save money, especially when you need very little putty and the materials for its production are at hand.
Advantages of this material:
- Ease of manufacture.
- Low cost.
Low price is a serious argument. The simplicity of production is also captivating, and there is no need to go to the store. The reasons for preparing such material are as follows:
- You don't need a whole bag since there won't be much work involved.
- You don't want to pay extra money.
- The materials for its manufacture are available.
In order for the putty to turn out to be of high quality and not fall off immediately after application, no less high-quality source materials are needed. It is necessary to strictly adhere to the technology of its production, observing the required proportions. There are a lot of recipes for preparing this material, we will give only two of them.
Gypsum-chalk mixture
This putty is made using plaster and chalk. It will be suitable for interior work only in dry rooms. Its main drawback is that it hardens too quickly. That is why it should be prepared in very small quantities and used immediately . To work you will need:
- 2 parts chalk.
- 1 part plaster.
- Wood glue.
This mixture must be very carefully added to the prepared two to five percent solution of wood glue and mixed thoroughly. The material is ready for use.
Oil mixture
This option is used for processing wooden surfaces that are exposed to sudden temperature changes: wooden window frames, facade cladding, etc. Given the ease of manufacture and low cost of materials, many consumers make this material themselves.
Have to take:
- 2 kg chalk.
- 1 kg of drying oil.
- 0.1 kg of drier.
Mix and put the mixture on fire. Bring to a boil, set aside. When working, use the material warm.