Scorching sun rays or severe frosts can greatly interfere with maintaining a comfortable environment in the apartment.
Special films for windows can completely or partially cope with these problems.
Having chosen the appropriate option from a variety of products, the owner of the house thinks about how to stick the material.
There are many nuances when carrying out installation work with film. Studying such subtleties, as well as becoming familiar with the features of dismantling the coating, is mandatory to obtain the desired effect.
Coating features
Basically, everyone knows only the tint film, which appeared a long time ago. However, manufacturers are coming up with more and more options that can not only change the decorative side of the glass, but also serve as reliable protection. Another advantage of this product is the ability to glue the material yourself, which helps to economically upgrade windows and other glass surfaces.
Many are highly durable, practical and sustainable. But to get all these positive properties, you should know how to properly stick the film on glass.
Many are highly durable, practical and sustainable.
Which film to choose
Due to affordability and ease of installation, when choosing a protective film, it is the needs of the window owner that come to the fore - it is better to immediately purchase the necessary resource, so that later you do not have to re-enrich the store and suffer from replacing the coating.
The protective, matte and sun-protective versions presented above have their own sets of characteristics that make the product unique. But decorative representatives stand apart, they serve no purpose other than adding joy and mood to the house and its residents.
Sun protection
Such options look good in those regions where there is a frequent presence of clear and warm sun - one that can cause damage to wallpaper, linoleum, parquet, curtains and furniture by fading (ceramic tiles will not be affected).
Under what conditions can it be used?
Before gluing the film material to the glass, you should understand for what reasons the coating can be used. The possibility of coating is not limited to gluing on windows; there are options for other products:
- The adhesive material on the double-glazed window is used for tinting, sun protection and heat insulation, and is used for decorating windows;
- For glass partitions, improves appearance;
- For gluing doors to windows, you can use products with sandblasting or a stained glass look. Thus, you can easily combine the doors with the new interior;
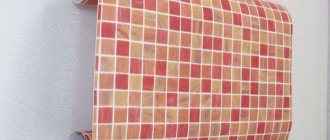
- Material for a sliding wardrobe, you can decorate the cabinet doors with a variety of designs, and it is not necessary to glue them onto glass, perhaps just onto canvas to create an addition to the design;
- A similar simple transformation of glass tables and other surfaces that people want to change without major expense is possible.
The possibility of coating is not limited to gluing on windows.
Select the film and glue it to the window
You can now find several types of window coverings in the store, and each of them will serve a specific purpose. In total, three main types can be distinguished.
Protective
This film is designed to make the glass stronger and at the same time darken it. It is well suited for those whose apartments are located on the first floors. This way you will save your home from prying eyes and protect it.
Matte
It is mainly used for interior doors and partitions. But it can also be used on a window. For example, for windows in a bathroom or toilet. In addition, it also has the ability to reduce the intensity of sunlight.
Sun protection
Usually it is made with a mirror effect to minimize the penetration of sunlight into the apartment and heating. On hot days it will be a good addition to light curtains or blinds.
The main advantage of such a film is that it does not darken the glass and does not reduce visibility from the inside, while it is no longer possible to see what is in the room from the outside.
Material characteristics, advantages and disadvantages
Whether it is worth using self-adhesive or another film for a glass surface can be understood by understanding the characteristics of the material, its pros and cons. The following positive properties of various films are highlighted:
- Helps prevent room heating in hot weather;
- In cold weather, the opposite effect will occur, heat will not escape, the window will retain heat longer;
- Serves as protection against fading of objects from exposure to ultraviolet radiation;
- Does not attract dirt, there is no need to frequently clean the surface, such as curtains;
- The presence of different colors and patterns, which helps to choose the product to suit the interior of the room.
There are also negative sides:
- Some films are thin and fragile, which can lead to defects when installed on a surface;
- If you buy a low-quality film, you may encounter the problem of difficulty in removing it from the surface, which leads to damage to the window itself;
- You need to try hard to glue the material without bubbles.
The presence of different colors and patterns, which helps to choose the product to suit the interior of the room.
Mirror sun protection film.
It is used as universal protection against ultraviolet rays or the glances of random passers-by. When choosing a mirror film, you must remember that during the day the mirror effect of the tint film is much higher than in the evening. During the day, it is almost impossible to see anything outside the house, but in the evening, when it gets dark, and the lights are on in your house, you can be seen. When choosing a sun protection film, you can also kill two birds with one stone if you choose a thicker film. It will give your glass more strength and even after a strong blow the glass will most likely remain intact. This property can be used to protect a child's room. By placing a durable film in a child’s room, you can be sure that while playing, children will not break the glass, and it will not crumble into pieces, which means the children will not be harmed.
It's comfortable! Also, those who like to grow flowers on windows will not need to rearrange the plants to protect them from direct sunlight.
Necessary tools for gluing the film
In order not to be distracted from work, you should prepare all the necessary materials and tools in advance; the process should be completed in one go. Then it will be possible to obtain a coating that will not have any flaws. For gluing you will need:
- Roulette;
- An even strip of plastic or wood of appropriate length;
- Sharp stationery knife/scalpel;
- Spray gun;
- Water;
- Liquid soap;
- Lint-free rags;
- Soft spatula;
- Hot air device – hair dryer.
In order not to be distracted from work, you should prepare all the necessary materials and tools in advance.
How to properly apply sun protection tape
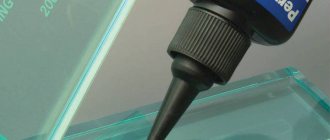
All the necessary tools First, let's collect all the tools that we may need: - the sun protection film itself for tinting; – a spray bottle with soapy water (soap solution); - stationery knife; - scissors; – scraper; – a clean microfiber cloth; – window cleaner;
Soap solution. It's easy to prepare a soap solution. Just dilute 3-4 drops of any detergent in half a liter of water!
Preparing the surface
The first step is to clean the window of all excess and wash the glass. It is best to glue windows on a sunny summer day, when the glass is warm. Please note that the room temperature should not be lower than 4 and not higher than forty degrees. It is also desirable that the humidity in the room be 20 percent or higher.
Then, using a plastic scraper, you need to clean the glass from heavy dirt. Walk carefully around the edges of the window, as a rag will not remove stubborn dirt.
Note! Make sure that there are no lint, hairs or other debris left on the surface of the window!
To save material, measure the width and height of your window. Cut the film to the required size using scissors or a stationery knife.
Helpful advice! When cutting out the tint film, do not forget to leave an allowance of half a centimeter on each side (or maybe a little more); after gluing, the excess can be trimmed off.
Now let's begin the process of window covering.
It is important! The film is glued to the inside of the room.
To begin, thoroughly wet the surface of the window with soapy water from a spray bottle.
We remove the protective layer from the film and also moisten it with water to temporarily neutralize the adhesive layer. This is done so that if the film is glued by mistake, it can be aligned if necessary.
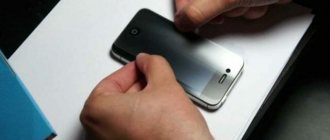
Carefully apply the film to the top edge of the window and smooth it smoothly with a scraper. We recommend that you first press the top of the film and then run the scraper down the middle of the window. And then from the middle, with smooth movements towards the edge of the window, squeeze out the water from under the film. Pay special attention to the edges, as this is where air bubbles most often accumulate.
If the film accidentally sticks incorrectly, you can carefully lift it and re-stick it again. Now that everything is glued, when all the water has been carefully removed from under the film, you can trim off the excess pieces of film around the edges.
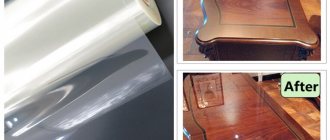
We enjoy the result!
So it became:
And so it was:
How to glue stained glass film to glass
If a stained glass type is chosen, it is recommended to proceed in stages to obtain the desired result. How to stick stained glass film on a window will be discussed below. The instructions include preparation, gluing, removing bubbles and the final stage.
If a stained glass type is chosen, it is recommended to proceed in stages to obtain the desired result.
Stage No. 1: preparing the glass surface
You should prepare a solution of soap and water, which is sprayed over the base. If there are other stickers on the coating, they can be removed with a utility knife; you need to act carefully. Then the window is wiped until dry, and the solution is sprayed again.
You should prepare a solution of soap and water, which is sprayed over the base.
Stage No. 2: film preparation
The surface is measured, and the film is cut according to the obtained parameters, while the film is cut in both width and length by 2.5 centimeters. This distance is necessary to remove the protective coating from the film. It is necessary not to leave a crease on the film product.
The surface is measured and the film is cut according to the obtained parameters.
Stage No. 3: gluing the film onto the glass surface
The material should be glued to a damp glass surface, so you can spray it again with a solution of soap. Afterwards, the finished piece of film is taken by the corners and carefully glued to the surface on top; as long as the moisture remains, it is possible to adjust its location.
The material must be glued to a damp glass surface.
Stage No. 4: removing bubbles and remaining water
Now the surface of the self-adhesive film is sprayed and rolled over the coating with a rubber tool to remove all bubbles. It is important to remove everything. In order to avoid the film picking up in corner areas, wipe it with a lint-free cloth.
Water bubbles are not as noticeable as air bubbles, so you should carefully examine the surface.
In order to avoid the film picking up in corner areas, wipe it with a lint-free cloth.
Stage No. 5: final work
To finish how to glue stained glass film, use a scalpel or knife to trim off the excess. A visual inspection of the coating is also carried out to identify the presence of bubbles. Leave the window for 12 hours so that the film sticks well.
Do not touch the material during the drying period - 12 hours.
Leave the window for 12 hours so that the film sticks well.
Let's start working with self-adhesive film
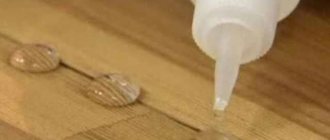
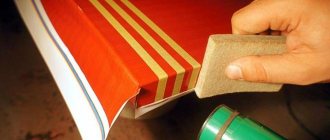
- The first and most important stage is surface preparation. It can be anything, for example, doors or walls, furniture or glass. The base for pasting must be thoroughly and conscientiously cleaned of any contaminants. An impeccable version of the prepared surface looks like smooth varnished boards. If this is not your option, then a rough, uneven or porous base must be primed with varnish or wallpaper glue.
- cutting the self-adhesive film is the most crucial moment. The convenient scale printed on its reverse side greatly facilitates the cutting process. In order to start work, you need to carefully cut the material into even pieces of the required length, preferably with a margin.
- To avoid mistakes when gluing the film, you must carefully read the recommendations on the protective layer. It shows in detail the stages of working with this material. First of all, you need to separate the protection from the paper. Calmly and carefully apply the decorative design to the base on which you want to glue and press the adhesive edge to the surface. So with your first hand, gradually removing the paper layer, stick the image completely. With your second hand, carefully press down the already pasted part, getting rid of air bubbles.
It is important to remember that if, when gluing the decorative material, you did something wrong, then until the picture has set, you have a chance to do it all over again. After complete attachment, which usually occurs within a few hours, nothing can be done.
Removing film coating from glass
The film material is not durable, and after a few years it is necessary to replace it with a new one. To make the process go quickly and without flaws, choose one of the options described below:
- Using a sharp tool, you need to remove the film from the corner, then carefully pull it;
- Heat the surface to 40 degrees and remove the coating;
- Using a product containing ammonia, spray the surface. The substance promotes the removal of the film.
The film material is not durable, and after a few years it is necessary to replace it with a new one.
Film care
Following all the rules and recommendations for gluing film is only half the battle. It is very important to properly care for the film after gluing the window. Here are some tips: – during the first month after gluing, try not to wash the window; – even after a month, you should never wash the film with window cleaning products containing ammonia. – we also do not recommend that you use hard sponges, as they can easily damage the thin layer of film; If you need to get rid of heavy dirt, use a rubber spatula!
How to hide a crack in glass with stained glass film
If cracks appear on the glass surface, you can cover them with stained glass film. First, adhesive tape is applied to this area on both sides, and then the standard stained glass film is applied, this way it will be possible to quietly eliminate the defect.
If cracks appear on the glass surface, you can cover them with stained glass film.
Window tinting in the apartment
Window tinting for residential and commercial properties is becoming an increasingly popular way to protect against prying eyes and the elements.
In addition, this is a great opportunity to solve a number of other problems while spending a minimum of time and money.
The simplest and most popular way to tint windows is to paste double-glazed windows with special films. Moreover, there are several types of such films. So which one is best for home use, and which one is best used in an office? Let's try to figure it out.
Common mistakes
Novice craftsmen often make mistakes when gluing film coating. In order not to repeat the mistakes of others, you need to know them. The material cannot be glued to cold glass; the temperature must be at least +5 degrees, but not higher than +40.
You must first get rid of dust in the room; small particles quickly settle on the surface and this will lead to unevenness. Measuring the blade incorrectly can result in a gap that will stand out greatly. Strong tension on the product or poor quality ironing.
You must first get rid of dust in the room; small particles quickly settle on the surface and this will lead to unevenness.
Covering the window sill with self-adhesive film
When the preparation is complete, proceed to the process itself.
Prepare for work:
- Selected self-adhesive;
- Knife, scissors;
- Long ruler, tape measure, pencil;
- Rags, sponge, rubber spatula.
The crucial moment is to cut out the film correctly. Ideally, this should be one piece with correctly cut corners and smooth edges. If you are in doubt about the calculations, then first make a pattern on paper and try it on the windowsill.
When cutting, take into account the height of the ends and the slight bend under the window sill board. If everything is perfectly marked, you can transfer the drawing to self-adhesive film. Lay it face down; on the wrong side there is a lined grid with a pitch of 10mm for ease of cutting.
Transfer your pattern to self-adhesive paper, lightly tracing the contours of the pattern on it. If you have a film with an imitation or pattern, then try to orient it so that the pattern is equally symmetrical on opposite slopes.
If there are several windows in the room, it would be correct to cut out canvases that are identical in symmetry. The self-adhesive film for window sills has been cut, the preparation has been completed, and you can begin the main process.
If this is your first time encountering this task, then before laminating the window sills, slightly moisten the base with water or a slightly soapy solution. I'll explain why. Then the film will not stick “tightly” to the surface, and it can be corrected, slightly shifted, eliminating the distortion.
Separate a piece of protective paper from the self-adhesive film by 5-10 centimeters to fix its initial location on the base. Place it on the window sill at its base and begin smoothing from the center to the edges, pressing the film well.
Peel the backing off the film in small sections and stick these sections onto the surface. And so the entire workpiece, the ends and folding under the window sill base. If there is a displacement, correct it, since you glued the film to a damp surface.
Smooth with cloths and a rubber spatula. Inspect the finished product for bubbles. They can be easily eliminated by piercing them with a needle and pressing to release the air. Usually the difficulty arises when you laminate the corners, but since you have everything cut out in advance and cuts are made at the folding points, there should be no problems.
Removing the film
When replacing the film, the question arises of how to quickly remove the self-adhesive film. The simplest method is to wet it several times with hot water, then the adhesive component will soften and easily come away from the base. Using a spatula, start removing the film.
An ordinary hairdryer can come to the rescue, as it heats the surface in a dry way and helps remove the self-adhesive. Warm up the area, and, lifting the film, pull it towards you, then the next area. Remove any remaining adhesive with alcohol or solvent.
This is how simple a self-adhesive film for window sills can transform its design. The main thing is accuracy when working, accuracy in measurements and adherence to sticker technology, then the quality will be at its best.
How to remove self-adhesive film
Remove the film after its service life has expired, having previously warmed the surface or soaked it with special means. Typically, chemicals are chosen that will cope with the removal of glue. These can be solutions for cleaning stoves, tiles, dishwashing, etc. You can use plain hot water with added sugar syrup.
Remove the film after its service life has expired, having previously warmed the surface or soaked it with special means.
The article described in detail how to glue film to glass; the work is not difficult, but it is important to be well prepared. Then the film coating will please the eye and transform the appearance of windows or other glass objects. Afterwards, removal will also not be difficult.
When may dismantling be required?
The need for dismantling may arise for various reasons :
- there was a desire to change the color of the coating;
- there is no longer a need;
- the glass needed to be replaced.
Regardless of the reason, before dismantling, you should study the features and subtleties of this process.
Adaptations
The following tools may be required during dismantling::
- stationery knife;
- scraper;
- hard brush;
- construction hair dryer;
- scotch.
You will also need water with detergent and a cloth.
Procedure
The film is removed as follows:
- Pry up the edge of the film. This can be done using a regular or stationery knife, but there is a risk of scratching the glass. To pry it off safely, you can use tape, gluing it around the perimeter of the glass unit. However, this method may not work if the material has dried strongly to the window.
- Remove the film. Having lifted the edge, you need to slowly pull it towards yourself, helping with a scraper, until the window is completely free. If a break occurs, you need to repeat the procedure from the first step.
- Get rid of glue . To do this, you will need a stiff brush and a soap solution: two tablespoons of crushed laundry soap per liter of hot water.
You can make installation easier using a hair dryer. At a distance of 30-40 centimeters, you need to direct a stream of hot air onto the glass to soften the coating. After this, it will be much easier to pry and remove it.
Possible difficulties
the old coating leaves many small sticky spots , which are difficult to get rid of exclusively by mechanical means. In such cases, you will have to turn to solvents:
Medical or technical alcohol. Not a very effective method, but still allows you to cope with minor stains.- White Spirit. When using it, it is mandatory to use a protective mask and gloves.
- Schumann for glass ceramics. A powerful product that will certainly deal with glue residue. Protection is also required, and it is not recommended to leave liquid on the plastic.
After treating the window with chemicals, it must be thoroughly washed with a standard soap solution.