When constructing or renovating a private house, structures made from plasterboard sheets are often used. Depending on the initial conditions and final goals, they can be mounted on structures made of various materials, and one of the possible and most commonly used options is a frame structure made of metal profiles.
Metal profiles for plasterboard can be used when installing structures of various types and purposes. In private housing construction, plasterboard profiles are usually used for the following purposes:
- forming frames for suspended ceilings;
- wall cladding;
- construction of double-sided partitions;
- arrangement of niches for compartment doors.
There is a wide range of metal profiles of various types and sizes on the building materials market, shown in Table 1.
Table 1. Types and designation of metal profiles for plasterboard structures
| Designation | Name |
| Mon (UW) | guide profile |
| PS (CW) | rack profile |
| PP (CD) | ceiling profile |
| PNP (UD) | ceiling guide profile |
| PA | arched profile |
| U.A. | reinforced profile |
| U | Y-shaped profile with flanges |
| Elastic tire | |
| PU | corner profile |
| PM | beacon profile |
The metal profile for plasterboard is made from rolled galvanized steel 0.4-0.7 mm thick by rolling through a profile bending machine, which forms stiffening ribs and perforates mounting holes simultaneously giving the product the required shape, and the zinc coating provides long-term protection of the product from corrosion.
PN (UW) – guide profile
It has a U-shape and is used in the frames of partitions and cladding as a guide element or a jumper device paired with a rack profile, in compliance with the appropriate standard sizes (the same back width).
Table 2. Guide profile dimensions
| Product marking | Metal thickness, mm | Back width, mm | Shelf height, mm | Standard product length, m |
| Mon (UW) – 50×40 | 0,4 – 0,6 | 50 | 40 | 2,6; 3,0; 4,0 |
| Mon (UW) – 65×40 | 65 | |||
| Mon (UW) – 75×40 | 75 | |||
| Mon (UW) – 100×40 | 100 |
For greater convenience and ease of installation, some manufacturers can make the back perforated for future attachment points.
Types of profiles for drywall.
Metal profiles are made from galvanized sheet metal using the cold rolling method. Such profiles are durable, rigid and light. Zinc has anti-corrosion properties, which makes the profile almost eternal. According to the main characteristics, profiles for plasterboard are divided into main (PS or CW, PP or CD) and guides (PN or UD, UW).
The main profiles are designed for heavy loads and serve as a load-bearing base for fastening plasterboard sheets. You can recognize them by their appearance, or more precisely, by their C-shaped appearance with curved edges.
Profile guides are used as horizontal guides into which the main profiles are inserted. These profiles are also used as a basis for screwing sheets. They have a U-shape.
Characteristics of the profile for plasterboard:
CD profile (PP profile) - used for the manufacture of the main frame of suspended ceilings, but in some cases it is also used for wall cladding. There are lengths: 2750, 3000, 4000, 4500 mm. The most popular sizes (length): 3000, 4000 mm. Profile size: 60x27 mm.
UD profile (PN profile) - used for the manufacture of suspended ceiling structures, in some cases used for wall cladding. Serves as a guide for the CD profile. There are lengths: 2750, 3000, 4000, 4500 mm. The most popular sizes (length): 3000, 4000 mm. Profile size: 28x27mm.
CW profile (PS profile) - used for the manufacture of partitions and wall cladding. Serves as vertical posts. In the back of each profile there are holes in the shape of the letter H, which allow installation of utilities (electricity, telephone...) inside the partitions. There are lengths: 2750, 3000, 4000, 4500 and 6000 mm. The most popular sizes (length): 3000, 4000 mm. Profile size: CW 50 - 50x50 mm; CW 75 - 75x50 mm; CW 100 - 100x50 mm;
UW profile (PN profile) - used for the manufacture of partitions and wall cladding. Serves as a guide for the CW profile. There are lengths: 2750, 3000, 4000, 4500 and 6000 mm. The most popular sizes (length): 3000, 4000 mm. Profile size: UW 50 - 50x40 mm; UW 75 - 75x40 mm; UW 100 - 100x40 mm;
There are also curved CD profiles ( arched profile ): concave and convex, for the manufacture of curved structures (mainly arched). Standard radii and lengths:
| Concave | Convex | ||
| Radius, mm. | Length, mm. | Radius, mm. | Length, mm. |
| 500-1000 | 2600, 3100,4000 | — | — |
| 1001-2000 | 2600, 3100,4000 | 1001-2000 | 2600, 3100,4000 |
| 2001-3000 | 2600, 3100,4000 | 2001-3000 | 2600, 3100,4000 |
| 3001-4000 | 2600, 3100,4000 | 3001-400 | 2600, 3100,4000 |
| 4001-5000 | 2600, 3100,4000 | 4001-5000 | 2600, 3100,4000 |
| > 5000 | 2600, 3100,4000 | > 5000 | 2600, 3100,4000 |
Types of drywall.
Depending on the properties and scope of application, plasterboard sheets are divided into the following types: GKL (regular plasterboard sheets) - gypsum plasterboard sheets, used mainly for interior decoration of rooms with dry and normal humidity (rooms, halls, kitchens...) Cardboard color: gray. Lettering color on the back: blue. GKLV (moisture-resistant plasterboard sheets) – plasterboard sheets with increased water-repellent properties, used in rooms with dry, normal, humid and wet humidity conditions (bathrooms). Cardboard color: green. Lettering color on the back: blue. GKLO (fire-resistant plasterboard sheets) - plasterboard sheets with increased resistance to open fire, used in rooms with increased fire hazard (attics). Cardboard color: gray. Lettering color on the back: red. GKLVO (moisture-resistant and fire-resistant plasterboard sheets) are plasterboard sheets that have the properties of GKLV and GKLO. They are used in rooms with increased requirements for fire resistance and water repellency. Cardboard color: green. Lettering color on the back: red. The most popular are, of course, gypsum boards and gypsum boards. Plasterboard sheets also differ in the type of longitudinal edge, the designation of which is written on its back side.
The length of plasterboard sheets varies from 2000 to 4000 mm in increments of 50 mm. Width 600 and 1200 mm. Thickness 6.5; 8.0; 9.5; 12.5; 14.0; 16.0; 18.0; 20.0; 24.0; mm. The most commonly used sizes are: length 2500, width 1200, thickness 12.5 (wall) and 9.5 (ceiling).
Accessories for profiles.
Two-level CD profile connector - used to connect CD profiles at different levels, in mutually perpendicular directions (crosswise). Supplied unfolded, before installation it must be bent into a U-shape. It is fixed with two self-tapping screws, one on each side.
Single-level CD profile connector (crab) – used to connect CD profiles at one level, in mutually perpendicular directions (crosswise). It snaps onto the profile and, with a load of over 20 kg/m2, is fixed with self-tapping screws, one in each hole.
Direct hanger – used for fastening the CD profile. Attaches directly to the supporting base (ceiling). Before attaching to the profile, the suspension should be bent into a U-shape. It is fixed with two self-tapping screws to the CD profile, on each side of the suspension. The standard length is 125 mm, but some private manufacturers produce different lengths: from 75 mm to 300 mm. The bearing capacity of direct suspension is 40 kg.
Anchor suspension (suspension with traction) - used to attach the CD profile to the load-bearing base. It is inserted into the profile, the rod is threaded through the holes in the spring. It is used where the standard length of direct suspension is not enough. Pull length: 250, 500, 1000 mm. The load-bearing capacity of the anchor suspension is 25 kg.
CD profile extension (longitudinal connector) – used to lengthen (build up) the profile. Inserted from the end of the profile with the “horns” facing up. For additional rigidity and load-bearing capacity, one screw is screwed into each edge of the extension.
Corner connector for CD profile - used to connect the profile in a single-level suspended ceiling system, instead of the “crab” connector.
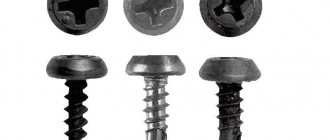
Fastening elements for plasterboard structures.
The most common and undisputed leader in terms of consumption is a TN25 (popularly called a 3.5x25 mm self-tapping screw , or a self-tapping screw for hot metal ). Used for attaching plasterboard sheets to profiles.
Self-tapping screw LN 9, 11, 16 (piercing) and LB 9, 11, 16 (drilling) - used for connecting profiles to each other, fastening straight hangers, connectors, extensions... The number next to the name means its length: LN9, respectively, 9 mm; LN11 – 11 mm, etc.. A huge disadvantage of these self-tapping screws is their small size, which makes twisting difficult, and the protruding head, which prevents the drywall from fitting evenly to the profiles.
The best type of connection is a self-tapping screw with a press washer , which can be used for both piercing and drilling. Its length is the most varied: from 9 mm to 100 mm (and maybe more). I would recommend taking 14-16 mm long, piercing ones, as they will suit you for all types of connections.
For fastening UW, UD profiles to walls, any self-tapping screw with a nylon or plastic dowel is suitable. For fastening to monolithic bases, I personally use a “ dowel with an impact screw, a fungus side ”, as in the photo.
For fastening to horizontal bases (ceiling) direct suspension, anchor suspension... it is best to use a ceiling dowel (wedge anchor) , because Unlike plastic, it does not dry out and is not subject to corrosion, therefore, it will last you forever. Length from 35 mm. (and in general, always use metal fasteners to attach a plasterboard structure to the ceiling, there will be fewer problems in the future)
For fastening to hollow structures, there are a huge number of both metal and plastic dowels. You can see some types in the picture. Where to apply which one depends on the type and depth of the void.
Tool.
Today, there are quite a few types of tools to facilitate the assembly and sewing of plasterboard structures, but most of them are professional tools, which are not advisable to buy in order to make a couple of ceilings and sew up a couple of walls. So I’ll describe the most necessary tool, without which you shouldn’t even start assembling. Hammer drill or impact drill - used for drilling holes for fasteners.
Screwdriver with bits (cordless or mains-powered) – used for fastening gypsum boards and twisting profiles. An ordinary drill with low speed can replace a screwdriver.
Hydraulic level or laser level - used for marking horizontal lines for subsequent fastening of profiles. If you have the means, it is better to buy a laser level; it will make your work much easier.
Cord breaker (painting thread) - used when marking to beat off a perfectly straight line on a wall or ceiling.
Knife with retractable blades - used for cutting plasterboard sheets.
Drywall planer - used for sanding the end of a plasterboard sheet after cutting. It can also be replaced with sandpaper attached to a block.
- Next entry: Installation of spotlights.
PS (CW) – rack profile
It has the shape of a square letter “C” and is used as vertical posts for plasterboard partitions and wall cladding. Mounted in pairs with a PN profile of the appropriate size (same back width). The choice of dimensions should be made based on the width of the structure (affects the width of the backrest) and its height (the length of the profile from floor to ceiling without joints).
Table 3. Rack profile dimensions
| Product marking | Metal thickness, mm | Back width, mm | Shelf height, mm | Standard product length, m |
| PS (CW) – 50×50 | 0,4 – 0,6 | 50 | 50 | 2,6; 3,0; 4,0 |
| PS (CW) – 65×50 | 65 | |||
| PS (CW) – 75×50 | 75 | |||
| PS (CW) – 100×50 | 100 |
The back may have holes for utilities, and the shelves may be embossed with stripes or dots for centering the screws when screwing in and marking when installing gypsum boards (depending on the manufacturer).
How to choose a profile for gypsum boards
In a more or less large hardware store or even on the market there are profiles for drywall of the same type and length, but with a significant difference in price. The cost may differ by two times, and sometimes more. Moreover, the most expensive are usually Knauf, the cheapest are unnamed China, the middle range is domestic manufacturers.
In addition to the type and size of the profile for drywall, you also need to choose the thickness of the metal and the manufacturer
Metal thickness
The difference will become clear as soon as you pick up the profile. Some are strong, rigid, made of steel with a thickness of 0.5 mm, 0.55 mm, 0.6 mm and more. Others are made of such thin metal that they change their geometry even if the profile is lifted by one edge.
With this parameter everything is more or less simple and clear. The thicker the metal, the stronger and stiffer the profile, but the price is also higher. It is optimal to create partitions with standard wall heights to take profiles with a metal thickness of 0.5 or 0.55 mm. If possible, you can take 0.6 mm.
The dimensions are standard, but the weight of the same profile may be different - due to the different thickness of the metal from which it is made
It makes sense to take a greater thickness of metal only if the height of the partition is large - the load will be more significant and additional strength will not hurt. But in this case, you need to look at what will cost less - a profile for plasterboard made of thicker metal or more often installed racks and crossbars. You just need to keep in mind that racks are usually installed in increments of 60 cm - so that the joint of the gypsum board sheets falls in the middle of one of the rack profiles. When reducing the pitch, you need to achieve the same thing - the joint of the drywall sheets should not hang in the air. So it will be possible to install them only after 40 cm. So the seam will also be on the profile. But this is too many racks and is unlikely to be cheaper. In general, you do the math.
Manufacturer's choice
Choosing a manufacturer of drywall guides is both simple and difficult at the same time. All experts unanimously say that the best are Knauf. They always correspond to the stated parameters and have an ideal geometry: the racks fit perfectly into the guides, do not dangle or push them apart. In general, working with Knauf drywall profiles is easy, simple, and work progresses quickly. But these are precisely the most expensive of the entire range. Despite this, the advice is this: if you have no experience working with drywall, it’s better to buy Knauf.
This is a screenshot with prices for drywall profiles from one of the online stores
There are several Russian companies in the middle price range. These are Giprok (Giprok) and Metalist. There are also regional little-known campaigns. It depends on your luck. Trust your feelings and feedback. It is not always possible to rely on the words of sellers. Domestic manufacturers have good batches, and sometimes unsuccessful ones. In most cases, there is a problem such as a mismatch in the sizes of the rack-mount PS and the PN guide profiles. The posts must fit exactly inside the guide. In order for the stated width to be, for example, 50 mm, the actual width should be 1.5 mm less. Problems arise with the accuracy of observing this difference. In addition, the declared thickness of the metal must be checked (with a micrometer). In general, you will be able to save money, but you will waste a significant amount of your nerves and time.
GIPROC has this option.
Giprok has a profile with a corrugated surface. All sides of the profiles - both the back and the shelves - have extruded “pimples”. They increase the rigidity of the profile. This is true - the design is more rigid. But the connection of the racks and guides turns out to be more clumsy - due to the mismatch of the “pimples”, they do not attract closely like smooth metal walls. There is a second point - structures made from such profiles creak more. With all this, such profiles cost a little less than Knauf, but they are more difficult to work with. In general, it's up to you.
PP (CD) – ceiling profile
It is used for installation of suspended ceiling frames and wall cladding. The shelves and back of this profile have longitudinal embossing in the form of three stripes to center the screws and increase rigidity. Fastening to supporting structures is done using hangers, for installation of which the edges of the ceiling profile are bent inward. Installation is carried out in tandem with the ceiling guide profile.
Table 4. Ceiling profile dimensions
| Product marking | Metal thickness, mm | Back width, mm | Shelf height, mm | Standard product length, m |
| PP (CD) – 60×27 | 0,4 – 0,6 | 60 | 27 | 2,6; 3,0; 4,0 |
Fasteners for plasterboard systems
Self-tapping screw TN 25
To securely attach drywall to metal surfaces, use self-tapping screws with fine threads of type TN25 (25 mm long). If the sheathing is in several layers, then use self-tapping screws 35 - 40 mm long. To attach the gypsum board to the wooden sheathing, use self-tapping screws with a wide thread pitch 35 mm long.
Self-tapping screws LB 9, 11, 16 and LN 9, 11, 16
Attaching a direct hanger, extending and connecting various types of profiles under drywall requires drilling screws of the LB 9, 11, 16 type. Piercing screws LN 9, 11, 16 are also suitable. The numbers indicate the length of the screw in millimeters. The smallest drilling screw LB 9 is 9 mm long. All small fasteners have a drawback - they are difficult to tighten. And the cap protrudes greatly and interferes with the adhesion of the drywall.
Self-tapping screws with press washer
It is more practical to use universal self-tapping screws with press washers, which can be used on any surface. They are made of both piercing and drilling types. The length varies from 9 to 100 mm, sometimes more. The most popular sizes are 16 and 14 mm, which can be used almost everywhere.
Self-tapping screws with nylon dowels
To attach guide profiles for plasterboard type UW or UD to the wall, it is best to use plastic dowels.
Wedge anchor
It is convenient to attach direct or anchor suspensions to the ceiling using special wedge anchor fasteners. It is resistant to corrosion, does not dry out, and therefore lasts an impressively long time. There is no need to save money when making a ceiling. The fasteners must certainly be metal and durable. In addition, you can use a ceiling dowel.
Dowel nail
If we attach the frame (hangers and guide profiles) to load-bearing elements made of concrete, brick or blocks, then we take special dowels. Suitable plastic fasteners with a mushroom head, 6 mm in diameter and 40 - 60 mm in length. They can be driven directly with a hammer. Before work, you need to stock up on various types of fasteners in order to be able to connect any parts, for example, hollow ones. When using instead of rod hangers, take TDN anchors or their equivalents.
PNP (UD) – ceiling guide profile
Serves as a guide and holding support for the PP ceiling profile both when installing suspended ceilings from gypsum plasterboard, and when covering walls with plasterboard sheets. Mounted in tandem with a ceiling profile.
Table 5. Dimensions of the ceiling guide profile
| Product marking | Metal thickness, mm | Back width, mm | Shelf height, mm | Standard product length, m |
| PNP (UD) – 28×27 | 0,4 – 0,6 | 28 | 27 | 3,0 |
For convenience, some manufacturers can produce a ceiling guide profile with holes in the back for future mounting points.
Selecting a metal profile for a gypsum plasterboard frame
What is it Types Manufacturers How to choose
Rare renovations inside an apartment are completed without drywall. With its help, you can bring to life various design ideas from interior partitions and arches to multi-level ceilings. All these structures are mounted on a lightweight, durable metal frame made of profiles. It is difficult for someone who is faced with this task for the first time to immediately understand the variety of their types. We will tell you what sizes and types of profiles there are for drywall, and for what purposes it can be used.
PA(CD) – arched profile
Used to make structures with radial bends. It is made on the basis of a PP profile with the formation of flat sections 150 mm long at both ends. When making an arched profile from a ceiling yourself, you need to cut the shelves of the product into sectors, and then bend them in the desired direction with the required radius.
Table 6. Dimensions of the arched profile
| Product marking | Metal thickness, mm | Back width, mm | Shelf height, mm | Standard product length, m | Minimum bending radius, mm |
| PA(CD) – 60×27 convex (external) | 0,4 – 0,6 | 60 | 27 | 2,6; 3,0; 4,0 | 1000 |
| PA(CD) – 60×27 konkav (internal) | 500 |
Tips for choosing quality fasteners and profiles
Before purchasing, check that the profile elements are level, of the appropriate size and that the galvanized coating is intact. When wondering how to choose a profile for drywall, remember that its thickness less than 0.55 mm is not allowed. Do not forget that not everything that is sold on the market and in stores meets the standards.
There are the following types of marriage:
#1. The metal is not thick enough - this is a big drawback. After all, then during operation the screws scroll, as the thread quickly breaks off. The easiest way to check the thickness is with a tool (vernier caliper). If you don’t have it at hand, then as an option, you can compare profiles from different manufacturers.
#2. Traces of rust should definitely alert you. Once the corrosion process has begun, it will continue to continue. And one more thing: if a pack of profiles shines from abundant lubrication, then this is a bad sign. Most likely, the seller tried to disguise the fact that the coating was of poor quality.
#3. Incorrect rolling is visible almost immediately - just pull out a separate part from the pack. If you look at it lengthwise, you will notice that the entire profile is twisted, and its shape, to put it mildly, is far from ideal. You definitely need to refuse the purchase, otherwise you will be tormented by posting profiles. By the way, when they are stored incorrectly, similar problems also arise - the parts bend and become deformed.
#4. Inaccurate dimensions are one of the most unacceptable types of defects. Especially if the starting profile has a shelf height that is less than necessary. And it’s inconvenient to work, and the frame will turn out so-so. For smooth parts of the CW type, the shelf height must be exactly 5 cm, and for corrugated Gyproc-Ultra PS a slightly lower value is allowed. And even if the dimensions of the drywall profile are slightly smaller than necessary (2.48 m instead of 2.5 m, as some manufacturers do), this should not be allowed.
#5. If the notch is made too rarely or too weakly, it will be difficult to screw in the screws. They dance on the surface for a long time, refusing to go to the right place. And if the ribs of the CD profile shelves are too large, then the LN screws are also not easy to screw in. Their sting invariably ends up on inclined planes.
#6. When purchasing fasteners, we check the tip - to do this, you can even try screwing a couple of self-tapping screws into the metal. Visually check to see if the package contains fasteners with a broken tip or metal residues. Check the heads too - they should have clear slots, well cut. Otherwise, the bit will not stay on the screw. A defective spline may be due to poor quality casting or metal clogging it. There should be no traces of rust.
#7. Never take a profile with burrs - all your hands will be cut up. A very dangerous and sharp thing.
#8. Check the plastic plugs on the dowels. If there are a lot of sagging on them, then it is difficult to push such plugs into the hole. The plug holds weakly in the hole and does not open well.
UA – reinforced profile
Used to form the frame of reinforced suspended ceilings. It can also be used as part of structures for fastening door and window frames, wall decoration, for placing wiring and communication lines, as well as installing partitions with special requirements and increased height. It is distinguished by increased metal thickness in the product and increased shelf height.
Table 7. Reinforced profile dimensions
| Product marking | Metal thickness, mm | Back width, mm | Shelf height, mm | Number of rows of notches in the back, pcs. | Standard product length, m |
| UA – 50×40×2 | 2,0 | 50 | 40 | 1 | 2,6; 3,0; 4,0 |
| UA – 75×40×2 | 75 | 2 | |||
| UA – 100×40×2 | 100 | ||||
| UA – 125×40×2 | 125 | ||||
| UA – 150×40×2 | 150 |
Additional components
To increase reliability, reduce work time and fix basic parts, auxiliary products are used:
- UA profile. This is a special reinforced version for installation in areas where doorways are planned to be located. The main dimensions of the parts are close to PS and PN, but the thickness is 2 mm.
- PU. Corner element with multiple perforations. Protects external and internal joints of slabs and sections, well suited for forming smooth arch edges. An alternative is PU plaster, which allows you to hide more significant defects.
- PM. Beacon profile. It can act as a rigid fragment when laying drywall with glue on a very uneven base.
Although manufacturers claim that the UA profile is quite reliable, experienced craftsmen prefer to mount a standard rack profile into which a wooden beam is placed; in addition, it is easier to attach a door frame to the beam.
Accessories for convenient and quick installation:
- Direct suspension. U-shaped element or pawn (pawn). The part is so named because of the shape it takes before being fixed to the posts. It plays the role of holding PP; the hangers are fastened through internal or external holes.
- Crab. CD connector. Purpose – joining two jumpers at the same level. To do this, the product is put on the stand, after which the interlocking parts are adjusted. An alternative for more complex areas is a two-level connector.
- Anchor suspension. This fastening fragment is used in cases where the standard profile for laying plasterboard is located at a considerable distance from the ceiling surface. The “head” of the suspension is securely fixed between the ribs of the PP, and the rod (rod) is mounted to the base.
- Extension. A standard element that allows convenient joining of two profiles. The part is placed inside the CD so that the protrusions are directed upward; fixation occurs through the mounting holes.
Direct suspension is considered the most convenient and, accordingly, popular; the crab is expensive, so it is replaced with trimmed CD profiles, and the extension and anchor suspension are narrow-profile fittings
There are also more highly specialized components, but they are used by professionals for complex installation work.
U-shaped profile with flanges
Used for installation of ceilings, partitions, attics, and wall cladding. The U-shaped profile is used in cases where it is necessary to reduce the installation distance to a minimum when attaching plasterboard sheets.
Table 8. U-profile dimensions
| product name | Metal thickness, mm | Back width, mm | Product height, mm | Standard product length, m |
| U-shaped profile with flanges | 0,6 | 98 | 15 | 4,0 |
Manufacturers of drywall profiles
Profiles for plasterboard partitions are produced by the main plasterboard manufacturers Knauf and Giprok.
The profiles from both manufacturers have the same basic design. The profile for plasterboard partitions is a U-shaped or C-shaped, long metal profile made from 6 mm (for Knauf) and 5 mm (for Giprok) tape using the cold rolling method. The profile has one shelf and two walls (photo).
Giprok profiles have both walls and bases with a unique corrugated coating, patented UltraSteel technology. The official name of the profiles is Giprok, Giprok – ultra.
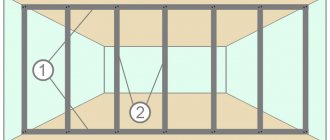
To better understand the designs and purpose of profiles, let’s look at examples of plasterboard structures, starting with the partition.
Elastic tire
An elastic tire is used when installing gypsum boards in the space between the ceiling and the roof structure, with a small installation height, when installing cladding on wooden slats or brickwork.
Table 9. Elastic tire dimensions
| product name | Metal thickness, mm | Back width, mm | Product height, mm | Standard product length, m |
| Elastic tire | 0,6 | 60 | 4,0 |
Procedure for installing a frame for a wall
- To sheath the wall, it also needs to be marked. To do this, draw lines for the UW guides, using a level. The width of the marking line is calculated based on the thickness of the profile and the thickness of the plasterboard sheet.
- Further along the wall, one of the guides is attached to the ceiling with dowels.
- Then, using a plumb line, the installation location of the second guide is determined on the floor. Two points are marked exactly under the ceiling guide and a line is drawn through them for the second guide profile.
- To install rack-mount CW, markings are also made in increments of 40 - 60 cm. Markings are applied on the ceiling guide and vertical lines are marked on the wall with a plumb line. The profiles should be positioned so that the joints of the plasterboard sheets are exactly in the middle.
- Along the vertical markings, straight 60x27 hangers are attached to the wall with dowels. Rack-mount CWs will be attached to them, the ends of which should be inserted into the guides. The step of fastening the suspensions along one line is 50-60 cm.
- Supporting profiles are mounted between the floor and ceiling guides. They are fastened to the guides using crabs. In addition, the supporting profiles are attached to the hangers. It is important to ensure that the position of the profile is strictly vertical.
- When the vertical sheathing is ready, cross members are installed to strengthen the structure. Their arrangement is similar to installation on the ceiling, but the gap between them is 60 cm.
- Now the finished frame can be sheathed with plasterboard sheets, screwing them with self-tapping screws for plasterboard. The caps are deepened into the sheet by 4 mm. The installation step of the screws is about 10-30 cm. The sheets are attached along the profile from bottom to top and top to bottom. In order to give mobility to the structure, a gap of 1 cm is provided between the gypsum board and the floor and 0.5 cm between the gypsum board and the ceiling. The seams are puttied (we can recommend an excellent putty for joints, Knauf Fugen), and the gap from below is closed with a plinth.
- The walls are treated with putty only after the ceiling. First, using reinforcing mesh, the seams at the joints of the drywall are sealed and then the entire wall is puttied.
PU – corner profile
It is designed to protect the outer corners of plasterboard partitions and cladding, and the plaster layer from mechanical damage. The profile has an acute angle (85°) and perforation along the entire length of each shelf. Putty penetrates into the holes of the shelves, which ensures strong adhesion to the surface of the corner. Made from galvanized steel or aluminum.
Table 10. Corner profile dimensions
| Product marking | Metal thickness, mm | Shelf width, mm | Material | Standard product length, m |
| PU20×20 | 0,22 – 0,25 | 20 | aluminum | 2,5; 3,0 |
| PU25×25 | 0,4 | 25 | Cink Steel | |
| PU30×30 | 0,4 | 30 | ||
| 0,5 | ||||
| PU35×35 | 0,5 | 35 |
Materials: what are profiles for gypsum plasterboard made from?
Profiles for drywall of any type are made of steel and aluminum. Steel ones (regular or galvanized) are more common, since aluminum ones, although they have excellent characteristics, are very expensive.
These are the main types of profiles for gypsum boards
Steel can be ordinary or with a protective layer - galvanized. Conventional ones - made of black steel - have a lower cost and are suitable for rooms with normal operating conditions. They are used to make suspended ceilings, walls and partitions, arches in living rooms and corridors. In rooms with high humidity - bathrooms, kitchens, etc. - it is better to use galvanized steel or aluminum.
Additional accessories for fixing drywall.
In order to assemble the sheathing, you will need auxiliary parts:
- Two-level connector for CD profile. This part is sold in an unfolded, flat form and before starting work it needs to be bent in the shape of the letter P. It is used to connect rack-mount parts perpendicular to each other.
- Single-level connector for CD profile or “Crab”. They connect perpendicular CD profiles in exactly the same way. If the load is more than 20 kilograms, then you will need two self-tapping screws for fastening. Otherwise, the seals are simply bent.
- Direct suspension for a rack (supporting) profile. This is a bracket, the standard length of which is 12.5 cm. It looks like a strip of aluminum or galvanized steel with holes. Withstands loads up to 40 kilograms. It is attached to the wall with two dowel nails, then the edges are bent and the frame parts are already attached to them.
- Anchor suspension for ceiling carriers. Often called suspension with traction. Replaces the part described above if it is not long enough. Used on horizontal surfaces, for ceilings, for example.
- Extension. Needed to connect two carriers to each other. It has tubercles on the sides, this indicates where the profile joins. There are also two holes for screwing in self-tapping screws.
- Corner connector. It connects elements that do not form a cross. You can do without a connector. Cut the flanges of the profile that needs to be connected so that a tongue is formed, and screw it in place with self-tapping screws.
Recommendations
Despite the fact that the dimensions of the profile components are usually standardized, it is worth making a set of profiles to obtain a metal frame from the range of a single manufacturer. Otherwise, there is a risk of encountering certain inconsistencies, or more precisely:
- Various parameters of width, length and profile depth.
- Metal thickness.
- Qualities (properties).
At the same time, the risk of installing a metal structure with reduced strength will significantly increase. This can affect the finished work result. When choosing the thickness of the sheet, you should think about the fact that the thicker the metal, the stronger the structure will be, but the cost will also increase. For this reason, experts advise optimizing all data and parameters, and also choosing metal 0.05 cm for the ceiling and 0.06 cm for the walls. The thicker the metal, the better the design. An economical option using thin steel may not withstand significant loads.
If you plan to mount something too heavy to the walls, you should make sure in advance that the profile is durable. To do this, you should try to bend it by hand. If the product is easily accessible to you, it is not the best choice. Rigid profiles may bend a little, but they should definitely retain their shape. You can buy it in a trusted store with an ideal reputation. The shape of the metal profile will also matter, and this is even more true for the rack profile, which is equipped with curved ends and special ribs in order to enhance strength. Each manufacturer adheres to a specific product design, and therefore it is worth paying attention to such properties. A metal profile made of corrugated steel is much more reliable than its counterpart made of smooth materials, and the price will increase by 25%.