It is classified into the following types:
- standard: made from walnut, oak, cherry and other types of trees,
- special: varieties of rare and valuable tree species are used for production,
- root sections of tree species unsuitable for furniture production, but with an interesting pattern and texture (for example, eucalyptus or myrtle),
- exclusive: has a non-standard texture or size.
The material can be peeled, sawn and planed. The latter has greater value and practicality and is used most often in the furniture industry.
Most often, veneer is glued onto MDF, for example, onto wall or facade panels. Doors made of natural veneer also look stylish.
This material has an aesthetically attractive appearance and can be glued to any wooden surface. At the same time, the price of the material is quite affordable, so without any special financial costs you can transform the interior of an apartment or country house.
The advantages of veneer include:
- durability,
- moisture resistance,
- environmental friendliness,
- strength.
It is impossible not to note the affordable price of this material with high aesthetic qualities and practicality. That is why it is chosen for finishing furniture, doors and other interior items at home.
Let's look at how to properly glue veneer so that it lasts a long time and the surface acquires a beautiful new color.
VIDEO ON THE TOPIC
What glue to use to glue veneer
When working with veneer, it is important to carefully prepare the surface. If it is coniferous material, remove the resin with a knife and treat the area with acetone.
It is also necessary to remove any knots and irregularities, get rid of greasy stains, chips and cracks. To obtain a smooth surface, it is sanded and primed.
The optimal moisture content of veneer should be about 8-10%.
To work with veneer, it is recommended to use contact adhesives that are optimal for surfaces with low absorbency. The principle of their operation is simple: the solvent evaporates from the composition and the polymer hardens. The result is a strong adhesion of surfaces.
Since veneer is a porous material, the glue must be thick and viscous enough so as not to seep through the pores. It is important that the composition does not contain water-based solvents, otherwise the veneer will absorb moisture and swell.
When using the “tuck-in” gluing method using a hot iron, you can use PVA if the surface is flat. PVA glue is non-toxic, safe, easy to apply and reliably glues wooden surfaces.
To work with more complex elements, it is better to use professional solutions, for example, Titebond for wood. The glue is one-component and moisture resistant.
Provides strong adhesion, resistant to high temperatures and solvents. It is not abrasive and does not damage the surface of cutting products.
When asked whether it is possible to glue veneer with epoxy resin , experts answer positively. Hide and polyurethane adhesives are also suitable, the choice of which is very large in stores.
Let's glue the veneer onto the base step by step - use an iron and glue
- The first thing to do is prepare the surface as described above. It should be smooth and clean.
- The next stage is veneering using an iron and a damp cloth. If the veneer has a layer of glue under the protective film, you need to remove the film and rub the material in with an iron. If there is no adhesive layer, you will have to apply it yourself in a thin layer.
- When it dries, you can start gluing it to the surface. To do this, place the material with the adhesive side down and make smooth movements with a hot iron along the fibers from the middle to the edges. The temperature of the iron should not be too high so that there are no burnt spots left on it.
- The glue protruding along the edges is removed with a rag. After completing the process, you need to tap the surface; if a ringing sound appears, this area must be ironed again.
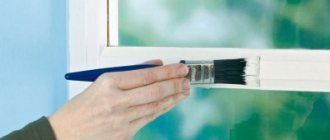
- The glued veneer is treated with varnish or stain to protect it from external influences.
How to glue veneer to plywood
Many people are interested in how to glue veneer to chipboard or plywood. It is easiest to work with flat surfaces, for example, a coffee table without protrusions or other shaped elements.
To finish it with veneer, you will need:
- sheet of white paper
- iron,
- thin cutter,
- sandpaper,
- glue,
- wooden block.
Select several sheets of plywood in width and length, preferably with a small margin. Veneer can be simple or figured. In the first case, the fibers are arranged in parallel; in the second, the pattern is more varied, and you can experiment with it.
Apply a thin, even layer of glue to the table surface and to the veneer sheets.
Place the sheet of material in the desired place and iron it with a heated iron. To avoid burning the veneer, use a white sheet of paper as a layer between the material and the iron.
Pro Tips:
- Do not use scissors; the material may crack.
- Use carefully dried wood and veneer for work so that cracks do not appear on the surface.
- Position the finishing material so that the direction of the grain of the workpiece and the veneer coincides.
- Minor errors can be corrected by selecting inserts that match the pattern and color.
The WoodNeva company offers residents of St. Petersburg and the region veneer from European oak and other tree species - beech, white ash, as well as American walnut veneer. The thickness of the material is 0.6 mm, 1.5 mm, 2.5 mm, width - from 140 mm, length - from 2500 mm. We offer quality products, help you make a choice, and arrange delivery.
Surface preparation
- The door leaf is removed from the hinges. If the hinges are old, you will need a pry bar. Self-tapping screws can be easily unscrewed with a screwdriver.
- The door is placed on the floor or on an installed platform, which can be two chairs. The fittings are removed.
- After removing the handles, decor, and hinges, you can begin to clean the base from the old paint layer. It can be removed with a hair dryer, iron or metal spatula.
- If you are going to paste over a new canvas made of coniferous trees, then you need to remove the resin and knots from it with a knife, and then treat the area with acetone.
- The cleaned surface is leveled. Existing protrusions are sanded with sandpaper. Cracks, chips, and pits are filled with a mixture based on wood glue. This way you can restore door leaves made of stacked solid wood, chipboard, and MDF.
- After sanding, the base is primed.
To protect the floor from contamination, it must be covered with oilcloth or a piece of polyethylene.
Preparatory stage
Before starting work, it is necessary to prepare the workpiece and finishing material:
- To obtain a smooth surface, the veneer must be leveled.
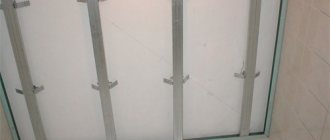
- Lay the material flat, moisten it with a paint brush, cover it with a sheet of plywood, and press it down with a weight until it dries completely.
- Determine the dimensions, apply to the veneer, leave allowances of 50 mm on each side. Adjust the drawing.
- Cut the piece using a saw or plywood cutter.
- Prepare the surface of the product, remove the old coating, fill cracks and scratches, dry, and clean with a grinder or sandpaper.
- Wipe the surface with acetone or alcohol to remove grease.
If you plan to cover the door leaf, remove it from the hinges, place it on stools, and remove the fittings.
Preparation and cutting of material
In construction stores, wood sheets are sold in rolls. Before you start cutting, the roll needs to be rolled out and straightened. Straightening is carried out by wetting with further placement under a press.
The operating principle is as follows:
- rolled out the roll;
- moistened it generously with a damp cloth;
- Lay a layer of plywood or drywall and press down.
When the roll is flattened, they proceed to cutting.
- Measurements are taken from the prepared door leaf.
- The measurements taken are transferred to the wood sheet with a 5 cm gap added on each side. The stock helps to avoid problems with incorrectly taken measurements.
- You can cut the canvas with a plywood knife or a plunge-cut saw. The smoothest cut will be made with power tools. But you cannot work with scissors; they can lead to cracking and damage to the material.
If, on the contrary, you need to make a single structure from several sheets, you can connect them with gummed tape, having previously selected a pattern on the front side. The tape needs to be passed both along the joints and perpendicular to them. The connected structure should extend 7-10 cm beyond the veneered base.
Veneering: types
There are several main types of veneering, let's take a brief look at them.
— Hot veneering. With this method, the veneer is glued to the base using adhesives. The most accessible method for home conditions, it will be discussed in the article.
— Cold veneering. Here the veneer is pressed onto the base. We are talking about pressing machines or screw clamps, which not every home owner has.
— Membrane veneering. An industrial method used for veneering complex surfaces. Membrane veneering is based on vacuum joining of veneer and boards - both smooth and textured.
Which glue is better
Door panels are glued with compounds for poorly absorbent surfaces. The principle of operation of such products is that the solvent evaporates from them, and the remaining polymer adheres to the base.
Since veneer has a fairly high porosity, the glue must be viscous and thick to prevent seepage into the pores. The composition should not contain a water-based solvent, since such a component can be absorbed into the material, which will lead to its swelling.
For complex structures, professional wood mixtures are chosen, for example, Titebond. This is a one-component composition that is resistant to moisture, high temperatures, and solvents. Provides reliable grip. The composition does not contain abrasive particles and does not damage the treated base.
You can glue veneer at home using epoxy resin-based compounds. You can buy glue based on mezdra or polyurethane. Such products have good adhesive characteristics and a high level of reliability.
The choice of veneer glue depends on the amount of work. For minor repairs, a can of PVA is enough. For complete cladding, special products are better.
When working, you may encounter the following problems:
- If the glue is liquid, seepage onto the surface is observed. The ability to remove a defect depends on the type of glue.
- Uneven application leads to peeling. Lift the peeled fragment, coat it with glue, level it, and dry it.
- Insufficient adhesive or careless cleaning of the surface may cause bubbles to form. Cut the veneer, being careful not to damage the design, inject glue using a syringe, and iron it.
Most errors are associated with improper surface treatment or insufficient glue.
How to glue veneer
There are three main gluing methods.
Whichever method is used, after the mixture has completely dried, you need to cut off the allowances and lightly sand the surface with No. 3 sandpaper. Then it is opened with colorless furniture nitro varnish, which dries quickly. The parts can be used no earlier than one day after veneering.
Cold contact method
The most difficult method of gluing to a prepared surface. To glue the veneer, you will need contact adhesive. The main problem of the method is that the glue sets quickly, and any inaccuracies in placement or defects in the contact of surfaces cannot be corrected after adhesion.
If the surfaces are placed correctly, then for reliable coupling they need to be given a strong pressing force. Immediately after the materials come into contact, they should be pressed with your hands for a few seconds or placed under a press. This method is better for gluing small bases.
Recommended brands of adhesive composition
To glue the material, use the following veneer adhesives:
- PVA - used for fixing flat surfaces.
- Tightbond is a professional solution that is highly resistant to moisture.
- Epoxy resin - used to bond plywood and thin wood.
What mistakes are often made when working like this?
The most popular mistakes made by craftsmen when gluing
When fixing veneer, inexperienced craftsmen often make mistakes such as choosing the wrong adhesive composition, violating the technique of using the substance, and neglecting to prepare the surface for fixing.
What to do if the veneer comes off
Peeled veneer on furniture is smeared with glue and rubbed in with a piece of flannel. It needs to be folded in several layers and a block of dense wood placed inside. Lapping will not harm the varnish coating.
Sometimes the veneer peels off, completely exposing the base. To correct the defect, after gluing the remaining veneer and grinding it in, the open area of the base is puttied and then tinted with stain. The stain is matched to match the coating. The restoration is completed by applying several layers of varnish.
I veneered the acoustic cabinets from MDF. I glued it with PVA (Slovenian). The first attempt was a complete failure. I applied glue only to the box, but thicker. Then I pressed it down with laminate and loaded it with about 100 kg. The following happened. The veneer began to expand, and partially already stuck. And it turned out into a small shallow wave. I had to rip everything off. There are no photos of the first process.
The second one worked more or less, but I’m not very happy. I applied glue to both surfaces, waited 10 minutes, then smoothed it with an iron and a block. There are videos and photos!
I will try other ways. Maybe contact glue?
Why veneer furniture?
Two main points can be highlighted.
Firstly, the price
. You can veneer a pine table with your own hands, “turning” it into oak, and the appearance will hardly be inferior to real oak. But the price will be much lower. And if you remember that it does not dry out, does not deform, and is not affected by moisture and temperature, then you should seriously think about whether it is worth spending money on furniture made from valuable wood?
Secondly, wide design
. Do-it-yourself veneering allows you to turn a tattered window sill into a new one, and a boring cabinet into a completely new item in the Art Nouveau style without much expense, just by applying veneering.