The most inexpensive way to insulate and soundproof building structures is to finish with foam plastic boards. The material is also used for decoration in the form of tiles, baseboards and other elements. Often there is a need for precise adjustment, for which the slabs have to be cut. It is difficult to do it smoothly and without debris. Let's figure out how and what to cut polystyrene foam at home to get the best result.
What are foam boards
Expanded polystyrene, this is the second name for foam, consists of air bubbles enclosed in a plastic shell. They are glued together and form a mass with low density. Air in each slab of material is about 95%. That is why the material retains sound and heat well. But at the same time it crumbles, breaks and bends when mechanically damaged, cannot withstand high temperatures, and is easily flammable.
Despite this, expanded polystyrene is widely used as an insulator. In addition to good insulating properties, it is easy to install. Light weight with significant dimensions facilitates installation and does not load the building structure. The slabs are not afraid of high humidity; insects and microorganisms do not settle in them. However, almost all technical liquids, including acids, alkalis, solvents and some types of adhesives destroy the structure of expanded polystyrene.
Instagram promstroipenoplasty
Instagram polistirolbetontsentr
Preparing the base for installation
Before gluing the tiles, you need to pay attention to preparing the ceiling surface:
- It must be cleaned from the wallpaper using a spatula, and it must be washed to remove any whitewash.
- Putty can correct imperfections in the ceiling surface; The putty will dry after 12 hours.
- Antiseptic primer improves tile adhesion: a special compound called concrete contact is used for concrete;
- Buy glue; for example, mastic (in buckets) attaches well to flat ceiling surfaces.
- For uneven ceilings, gypsum-based putty is used for gluing.
How and how to cut polystyrene foam so that it does not crumble
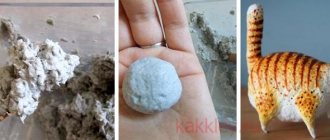
The structural features of the material explain the difficulties when cutting it. The plastic bubbles are not tightly connected to each other; when pressed, they break off quite easily. During the cutting process, a lot of them appear. The balls separated from the base become electrified, which makes cleaning much more difficult. Sometimes the consequences of cutting foam products cannot be eliminated for several days.
This must be taken into account when choosing a method and tool for cutting foam.
What tools are used for cutting
- A sharp thin knife, for example, a stationery knife.
- Hacksaw for wood or metal.
- Angle grinder, also known as grinder.
- Soldering iron.
- Thin metal string.
- A professional machine or its homemade equivalent.
- Thermal cutter.
The choice of tools is determined by the volume of work to be done and the degree of their accuracy. Thus, the use of cold devices ensures that the material will crumble to a greater or lesser extent. Heat tools provide an even cut without debris, but their price is high. Not everyone can buy them for themselves. Let's figure out how to work with different tools.
Cutting without thermal aids
If you don’t need to cut out a complex shape from polystyrene with your own hands or make a figured cut, you can safely cut it with a knife or cutter. The main thing is that the length of its blade is greater than the thickness of the plate. Otherwise, the cut may turn out lumpy and crooked. When joining insulation, cold bridges are formed in these areas, which will reduce the quality of insulation. Therefore, the best tool for cutting plates up to 40 mm thick is considered to be a regular stationery knife-cutter.
Instagram grosshaus
Instagram krasnaya133
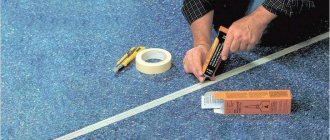
For cutting thicker slabs, use a hacksaw. To work, in addition to the tool, you will also need a long metal ruler or a straight line, a marker and a tape measure.
Correct work process
- Place the plate on a solid base. So that she doesn’t “play” on it.
- We carry out markings. We measure using a tape measure and use a ruler to mark the line where we will cut.
- It is advisable to warm up the blade a little, so it will cut better. We press the guide to the intended line and make a cut. If the layer is too wide, make a cut on one side, then turn it over and make another cut exactly opposite the first. Then, with a sharp movement, we break off the plate.
Some craftsmen recommend periodically sharpening the knife; it becomes dull very quickly during the cutting process. Cutting polystyrene foam with any type of hacksaw is no different from working with a cutter knife. It is important that the length of the blade exceeds the thickness of the plate, and that the saw teeth are as small as possible. You need to move the canvas very smoothly, trying to avoid jerking. Otherwise, a lot of foam sawdust will form.
Sometimes a grinder is used. It cuts accurately and quickly, but leaves a lot of debris. For work, it is better to choose a disk with fine teeth, but this does not prevent sawdust. Sharp parts rotate at high speed, which explains significant destruction of the material structure. Much depends on the craftsman, but more often than not the cut ends up torn. An electric jigsaw gives a similar result.
Instagram leaderstroyinstrument
Instagram bosch_go
The straightest cut will be given by a string for cutting foam. This is an ordinary wire, with a diameter of no more than 0.5 mm. Handles are attached to its ends. Two people take them in their hands, set the string on the intended line and smoothly grind the material, adhering to the markings. As the metal moves, it heats up and melts the plastic in the cut area. Therefore, the edge can be cut smoothly with a minimum amount of debris. True, this takes a lot of time.
How to cut polystyrene foam with thermal instruments
For straight cuts, a knife or saw is sufficient, but they will not be able to make curved cuts. They are performed with special equipment, the operating principle of which is associated with heating the cutting blade. Electrodes are connected to it, to which voltage is applied at the moment of activation. The cutter heats up and easily melts the foam, cutting out the specified shapes or lines. Such machines are used by professionals. Buying a professional device for cutting foam plastic for one-time use is not profitable. If possible, it is better to borrow or rent it. But most often homemade devices are used at home. With their help, cutting is carried out with nichrome wire on a machine or with a self-assembled thermal cutter. They also use a regular soldering iron, the tip of which is flattened or a small blade is attached to it.
In any case, first mark the plate. Then turn on the device and wait until the cutter warms up. After this, they carefully move it along the intended line, performing an accurate and even cut. The easiest way to do this is with a thermal cutter, more difficult with a soldering iron. To get it right, it is advisable to practice a little with the device on defective or unnecessary pieces of material.
Instagram nadegniy
Instagram konovalova_mn
Cutting foam with a knife
To cut sheets up to 5 cm thick, it is optimal to use a construction or stationery knife, whose blade length allows you to cut through the insulation in one pass.
A suitable option is to use a tool with a retractable cutting element. The cutting process itself should be performed when laying the sheet on the edge of a table or other similar work surface. When carrying out work, the cutting edge of the tool should be located as close as possible to the reference plane. Before cutting, the blade should be sharpened using a polishing wheel or, if possible, replaced with a new one if necessary.
The cut part of the foam plastic board must be held to ensure that the insulation is not damaged under load. To obtain an ideally high-quality cut when carrying out work, the tool must be moved with little effort in the direction away from you, and when moving in the opposite direction, the movement of the cutting element must be done “idle”. If the slab is cut on a work table using a shoemaker's knife, then the blade should move in the opposite direction so that it moves from the far edge of the sheet towards itself.
Note! You should avoid cutting thin foam plastic while hanging and in a vertical position, since in this form the likelihood of it breaking significantly increases and the cut area will be uneven.
Methods for cutting sheets
The thermal knife heats up to 600 °C in just 10 seconds. However, this tool is quite expensive, so it doesn’t always make sense to buy it.
The way out in many cases will be a device for cutting foam sheets, made independently. It is probably somewhat cumbersome, but if you have the necessary components, it is absolutely free and always available. And if you have to do large-scale work, for example, you have ahead of you the insulation of a huge house that you built for your large family, then the question of how to conveniently cut the foam, and even a lot and quickly, will not come up throughout the entire event, no matter how small it is it took a long time.
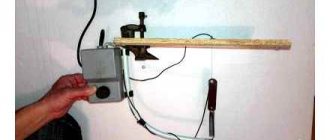
In order to assemble a cutter for foam plastic, you will need a tabletop, a pair of springs, M4 screws and 28 mm long stands, as well as a nichrome thread, which will act as a cutting tool. First, we make two holes in the base, press the posts into them, and cut a small groove at the base of the screw head, thanks to which the thread will be securely fixed in the given position.
When everything is assembled, we attach the string to the screws, but since it can sag during heating, it should be connected through springs, then the thread will always be in a tense position. The power source is connected to such a device using ordinary twists. This way you can make a homemade and very effective foam cutter, while spending a minimum of effort, time and money.
Area measurement
To calculate the required amount of material before gluing the ceiling tiles, you need to determine the area to be decorated. Remembering the school mathematics course, the ceiling area can be determined by multiplying the length by the width. If the room is of a non-standard shape, take a sheet of paper and diagram the ceiling on it. We divide it into rectangles and calculate their area, then calculate the area of the remaining pieces.
To calculate the amount of materials, you need to find out the area of one tile and divide the total area of the ceiling by this figure. If the number you get is, for example, 80, this does not mean that this is the exact number of tiles you need to purchase. Increase the number by about 10%.
Adhesion patterns
There are various methods for installing ceiling tiles.
Classic method
Pasting begins in the middle part, in rows, perpendicular to the walls.
When gluing tiles, they are applied offset (as when laying brick). Rows start with half a tile from the previous row. As a result, the ceilings become lighter and airier.
Oblique (diagonal method)
To lay tiles this way, markers are made in advance along the diagonal markings on the ceiling, but diagonal gluing requires high tile consumption, so there will be a lot of leftovers.
- Visually, the diagonal placement of tiles (with a diamond) looks chic.
- The diagonal placement of tiles should start near the chandelier.
- It is necessary to make the correct installation so that all panels follow the lines exactly.
Diagonals are usually drawn and marked with threads. The diamond can be positioned so that it is at forty-five degrees. Join all subsequent elements evenly.
Chess method
The materials must be purchased in two different colors; the advantage of this type of pasting is the concealment of uneven ceilings.
Snake style
The materials are also purchased in two contrasting colors, which are laid out in the shape of a snake. You can purchase plain tiles and paint them once the installation is complete.
Placing tiles on the ceiling
The tile should be covered with adhesive around the perimeter, and not its entire surface.
- Before pasting, draw markers to make it easier to attach.
- Further gluing means that the subsequent tile must be attached to the end of the element that is already attached to the ceiling.
- If the patterns are on the surface of the plate, they must be combined and joined.
- You need to adjust the template and only then glue the plates.
Once the installation process is complete, you can continue painting the ceiling. In order to properly coat the tiles with paint, you will need to work with a foam roller.
Painting should be applied in several layers. To ensure that the paint applies smoothly and effectively, it is necessary to apply a primer after applying it.
Useful tips
- When purchasing tiles, carefully check the quality of the tiles.
- Make sure the ceiling panels match each other. Just add a column for this.
- Tiles with a complex pattern require a corrective pattern, so they should be purchased with additional margin for cutting.
The ceiling is an integral part of the design of every room. However, when choosing materials for design, you should focus on adjusting style, heat resistance, installation.
The ceiling panel is made of wood, fiberglass, alloys, and expanded polystyrene. Polystyrene tiles are made using a special technology that allows you to decorate them with ornaments
Precautionary measures
When cutting foam, protect your respiratory system and eyes to prevent dust from entering. When using thermal methods, carry out work exclusively in the open air or in well-ventilated areas: polystyrene foam emits vapors and particles that are harmful to the respiratory system.
So, choosing the right and sharpened tool, properly securing the material during work and observing some simple conditions will help you make an even and high-quality cut with a minimum amount of debris.
Step-by-step instructions for making a cutter
First we need to decide on the tools and materials that we will need to create the cutter. The list of required materials includes:
- A sheet of chipboard or other dense base, approximately 600 by 400 millimeters . The size can be changed, it will depend on the size of the sheets you are going to work with.
- A flat wooden strip, about a meter long.
- Material for legs: 4 caps from plastic bottles, a piece of lath or other material.
- Nichrome wire, approximately 0.4 mm . You need about half a meter, but it is better to buy with a reserve.
- Tension spring. It is for tension, not compression. Such a spring cannot be found everywhere.
- 10-15 screws.
- Wires, crocodiles for fastening them.
- Computer power supplies and cable for it.
Now let's move on to the tools that we will need to manufacture and assemble the structure. These include:
- Drill or screwdriver;
- Jigsaw or hacksaw for wood;
- Screwdriver;
- Pliers;
- Drill for screw diameter.
Prices for popular drill models
Drill
Required tools and materials
Polystyrene foam is a lightweight material that can be cut using a variety of tools. In some cases, the accuracy and cleanliness of the cut is of no small importance. These properties can be achieved using the following tools:
- an ordinary sharp knife;
- small stove or hacksaw;
- strong string;
- knife with thermal effect;
- thermal cutter;
- cutter with laser beam.
Each builder has his own preferences regarding the choice of one of the tools. All tools allow you to process foam plastic efficiently and form an even line. Foam plastic has low resistance to mechanical stress - this should not be forgotten when choosing a tool.
Can I stick tiles on wallpaper
The question of whether I can stick tiles on the wallpaper on the ceiling excites many who will be doing renovations. Of course, it is best to stick to a completely flat and clean ceiling surface, but if the wallpaper is well preserved, you can attach the sticker to the ceiling.
Sticking tiles onto paper wallpaper is the easiest way. If the wallpaper has a texture, a sort of three-dimensional image, gluing can become more difficult.
- Many experts note that the ceiling panel on the wallpaper can be pasted.
- There is also no need to stick ceiling panels onto liquid wallpaper.
- Sealing is best done in the warm season, so it is best to glue the tiles to a paper base.
- All loose parts must be cleaned with a spatula. Paint them or wallpaper, but the surface must be level.
It is also worth priming the ceiling cover and letting it dry completely before applying the ceiling panel.
Putties
When gluing, not everyone is able to correctly form the gaps between the tiles, which need to be filled hermetically.
Mopping should be done every month to clean the tiles.
Care
Knowing how to properly glue tiles is not enough; it is also important to properly care for them. In order for the coating to remain in its original condition for as long as possible, it is necessary:
- Clean the tiles monthly using a vacuum cleaner or brush;
- do wet cleaning with a mop;
- remember that the best cleaning agent in this case is dishwashing liquid; do not purchase caustic substances for cleaning the ceiling;
- do not skip areas with three-dimensional patterns; you need to go over them with a soft cloth soaked in a cleaning solution;
- After cleaning, wipe the coating dry using paper napkins.
Any smart owner can easily handle gluing ceiling tiles. Following the recommendations will definitely lead you to excellent results. And proper timely care will allow you to be proud of your work for many years.