Working with any finishing material requires knowledge of its proper processing. This avoids serious problems that can delay cladding processes and lead to product damage. Due to its increasing popularity, it is necessary to take into account the features of gypsum fiber boards. The greatest difficulties can be caused by trimming sheets; the procedure has its own nuances.
What is the material
GVL is an abbreviation for gypsum fiber or gypsum fiber board (both options are correct). It is often compared to drywall, but, unlike it, it has high performance characteristics, since it is not covered with cardboard on both sides. According to the technology, up to 80% of the mixture is gypsum, the rest is loose cellulose fiber, which is obtained from paper. The desired shape and uniform structure is obtained through pressing.
Due to the fact that no binding chemicals are added to the product during production, the material is completely safe for health. In addition, the sheets are hygroscopic, which allows you to maintain a certain microclimate in the room: at high humidity, the plate absorbs excess, and at low humidity it releases it.
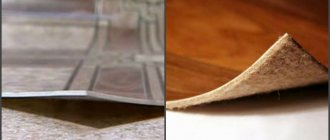
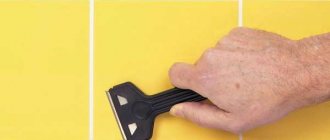
The density of gypsum fiber sheets is significantly higher than that of gypsum plasterboard, so cutting the material requires a special approach
There are two main types of products: standard sheets of GVL and GVLV (moisture-resistant material, which is obtained by adding hydrophobic substances to the mixture).
Gypsum fiber has high strength, so it is more difficult to cut than drywall. But, unlike gypsum plasterboard, gypsum board does not have such plasticity and is not able to bend. This must be taken into account in order to cut the product correctly and without damage.
How to cut Knauf superfloor. Advantages of GVL flooring
Traditionally, concrete screed or wooden covering laid on a joist structure was used for flooring. Both methods have significant disadvantages:
- Cement screed has considerable weight, and it takes several weeks to dry completely. Ceramic tiles laid on such a base are not appropriate in all rooms.
- Wooden floors can dry out over time, leading to cracks or unpleasant squeaks. In addition, they are susceptible to rotting and exposure to various microorganisms.
Installing floors using GVL has many advantages over traditional methods:
- There is no need for careful preparation of the subfloor associated with mixing or applying various solutions.
- The assembly of a gypsum fiber board coating can be carried out even in a cold, unheated room. The only condition for the microclimate is the absence of high humidity.
- Installation of such a floor does not require special construction skills and will not take much time.
- Any flooring material can be laid on GVL to create a finishing surface: linoleum, laminate, parquet or carpet.
- You can begin using the floor immediately after laying the gypsum fiber boards.
The base obtained using GVL complies with all building codes, is resistant to fire and is environmentally safe. It is not as massive as a cement screed, which is important for installing floors in old houses or balconies. And it is less susceptible to defects after a certain period of time, when compared with log wooden floors.
GVL also has certain disadvantages:
- During the process of unloading, carrying and installing gypsum fiber boards, some care must be taken, since the material is quite brittle.
- GVL used for flooring, for example, moisture-resistant “Knauf Superpol” 1200 x 600 x 20 mm, have considerable weight, about 20 kg.
- The fairly high price is noted by many ordinary people as a serious drawback of this material. But if you calculate all the costs of installing a cement screed or a wooden floor, take into account the work of specialists, who are often impossible to do without, and the loss of time, then this drawback will not be so significant.
Choosing a tool for cutting slabs
The processing of gypsum fiber boards should be approached responsibly and cutting devices should be selected with special care. If you find the best option, the process will not take much time.
List of tools for use at home:
- A hacksaw designed to work with such material. Equipped with specially shaped teeth located at a certain angle. This makes it possible to saw slabs without a lot of dust.
A thin gypsum fiber sheet can be cut with a standard hand saw for drywall; for thicker material, a special tool is required, for example, hacksaws for foam and aerated concrete are excellent - Construction knife with a sharp and strong blade. Cutting with such a tool will require much more time and effort: the sheets are quite fragile when bending, so the fault line must be highlighted much more strongly. It is advisable to use a knife when a perfectly smooth edge is not required or there is no time for rework.
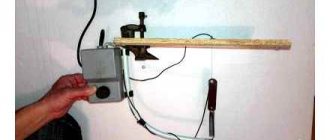
Construction knives for dense materials should have a powerful, reinforced handle, but much faster and with less labor, such products open with a “hook” with transverse reverse sharpening - Bulgarian. This device is one of the most effective. Allows you to cut a large amount of material in a short time. But work should only be carried out in a separate, well-ventilated room. The fact is that during the process a lot of dust is released, which settles on all surfaces and makes the event difficult. It is also necessary to prepare a respirator and safety glasses.
On a note! If a grinder is not available, a circular saw is used as an alternative. But both options can only cut in a straight line.
It is convenient to work with a grinder with a diamond blade or a circular saw, but when dissolving it produces too much dust - Jigsaw. For large-scale work, it is recommended to provide the possibility of connecting to a vacuum cleaner that is capable of capturing fine suspended matter. The presence of a simple dust collector will not protect you from dust. It is necessary to work in a protective mask and goggles. It is important to choose the right file: options for wood with a small tooth have proven themselves well, but you are allowed to experiment with this.
It is possible to cut gypsum fiber board with a jigsaw, but for such work high-strength blades with a medium tooth are used.
You can also cut gypsum board with other tools: for example, a regular hand hacksaw for wood. But the result will not always be necessary, so you should proceed from the specific situation.
Like GVL Knauf putty. Make a frameless installation
Stages of laying gypsum boards on the floor
The frameless method is rarely used for gypsum plasterboard sheets, but for indoor walls, plasterboard boards are the most preferable option. Installation using this method is carried out in the following sequence:
- If the walls are uneven up to 4 mm, the sheets must be glued directly to the wall surface using gypsum putty, which is applied in longitudinal layers in a fairly thin layer around the perimeter of the GVL board, after which the sheet is glued to the wall.
- If the unevenness is 4-20 mm, the sheets are laid using a special glue such as Perflix. The composition is applied to the GVL surface in the middle and along the perimeter of the plate in increments of 30-35 centimeters.
- If the unevenness is very large, from 20 to 40 mm, installation will be more difficult. First, with your own hands, using a special glue, 100 mm wide gypsum plasterboard strips are glued to the surface of the walls, and only then the slabs themselves are glued to them with gypsum putty.
READ How to Correctly Cut Ceiling Plinths in Corners
Installation using the frameless method proceeds as follows:
Drywall fastening diagram for glue.
- Installation should be carried out before laying the finishing floor. The room temperature should be from 10 ° C. The sheets themselves should be stored before work in the room where the installation will be carried out for two or three days. Humidity and temperature must be maintained throughout the installation period; For very wet rooms, such as bathrooms, it is better to use plasterboard moisture-resistant boards.
- If necessary, the walls must be prepared and cleaned of remnants of the old coating. If the surface is layered, measures should be taken to strengthen it. The wall is putty, it must dry, after which you can begin installation.
- After finishing the putty, the verticality of the walls and the presence of burrs must be adjusted according to the level of the structure (this depends on the choice of installation method). The surface is marked with the location of the plates. If necessary, the walls are treated with a primer.
- GVL plates are cut out, holes for switches and sockets are cut out in them. The height of each piece should be such that there is a gap of 8-12 mm at the bottom. After installing large slabs, small sections are installed at the bottom to close the gaps. For safety reasons, the sheets can be attached to the wall surface using self-tapping screws.
- GVL boards are glued to the wall using special compositions in accordance with the chosen method. This is done using a calibrated notched trowel; after applying the mixture, the sheet is leveled with a hammer. If any furniture is planned to be installed on the wall surface, then glue must be applied to the entire surface of the gypsum board.
How to cut a GVL sheet
To cut gypsum fiber board with your own hands, you need to follow simple instructions depending on the method.
Construction knife
Scheme of work:
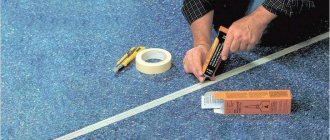
- The sheet is laid on a flat surface, and extremely precise markings are carried out.
- To cut material with such a tool, it is necessary to provide a stop. To do this, a straight wooden slate or ruler is aligned exactly along the line and a knife is repeatedly drawn along the marked border. Keep in mind that the recess should be about 2/3 of the thickness of the product. Otherwise, there is a high risk of getting an edge that is too uneven.
- A beam is placed under the cutting line or a smaller part of the slab is lowered from the elevation and broken off.
To make a cut with a clean edge, you need to go at least 2/3 deeper into the sheet; Alternatively, you can cut through the slab on both sides, but the main thing here is that adjacent grooves coincide clearly, otherwise you will end up with a step
Electric tool
Algorithm of actions:
- Marking is being carried out.
- The slab is placed on a raised platform, which should provide a free cut, taking into account the immersion of the disk or saw. If cutting is done in the center, then both halves must have stop points.
- The tool should move with slight pressure.
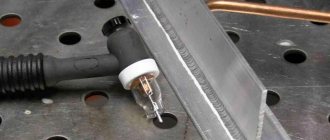
To cut a closed window on the plane of the sheet, it is necessary to drill a hole inside the future window, with a cross-section of at least 10 - 12 mm, through which the jigsaw blade will enter
. If it is necessary to make a cutout inside the sheet, preliminary drilling will be required. After marking the required boundaries, a hole is made within the resulting figure. It should allow free immersion of a jigsaw or hand tool.
Gypsum fiber cutting process
With any cutting method, you should remember to be careful and careful when handling gypsum fiber boards. If you decide to use cutters or a special hacksaw to carry out the work, then you need to proceed as follows:
- We make the necessary markings on the GVL sheet.
- We apply an even strip to the marking line. You can also use a rule.
- We carry out the knife as many times as necessary so that the depth of the cut is at least 2/3 of the thickness of the sheet.
- We place a strip under the cut line.
- Gently break it with a sharp upward movement.
Before cutting, it is better to additionally watch a video on how to properly cut a sheet.
GVL has smooth edges and there are usually no problems with joining. But if for a number of reasons there is a need for minor adjustments, then a roughing plane is suitable for this purpose.
But the most convenient way to make a fold is with a shoe-cutter or chisel. For large volumes, you can use a milling cutter. A 3–4 mm groove cutter will allow you to complete the necessary work in 2–3 passes.
Adding beauty to the walls - finishing the surface
Before finishing, the surface is prepared with the main purpose of sealing the joints. They, as well as the internal corners, are reinforced with special paper tape. Some craftsmen do not recommend reinforcement. A little universal putty is applied to the seams, tape is applied on top and pressed in a little.
After drying, the seam is covered with a layer of putty and leveled with the base. The heads of the screws must be puttied too. Aluminum perforated corners are attached to the outer corners with putty. Then this place is also leveled and reduced to the level of the main plane.
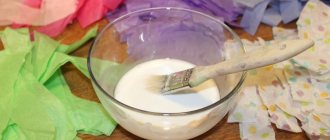
Now the putty is prepared in a plastic bucket with a mixer and applied to the surface. A day later, when the putty has dried, they begin to grout the walls with an abrasive mesh or sandpaper. The abrasive material is fixed in special graters. Its grain size depends on the finishing material. For painting, an abrasive of at least size 240 is suitable; for thick wallpaper, 60 is sufficient.
Remove dust with a damp cloth and prime with a roller. The walls are ready for finishing. You can cover it with wallpaper - from paper to textile or tile it. All paints are acceptable except those made with lime, which contain silicates.
Many people believe that gypsum board is some kind of gypsum board and try to cut it using ordinary household knives. It is unlikely to be possible to do this in the case of GVL for completely objective reasons.
Main types of dowels for drywall
A self-tapping dowel is a self-tapping screw that is screwed into drywall. These dowels come with or without a drill end and can be made from TT22 nylon or DRIVA metal.
This dowel is very well suited for fastenings in single-layer or multi-layer plasterboard sheets with an insulating or decorative coating on the other side.
You can choose the length of this dowel so that it does not protrude from the other side of the plasterboard partition.
Another advantage of this dowel is that you do not need to drill a preliminary hole for it; this dowel already has a thread and is easily screwed into drywall with a regular screwdriver or even a screwdriver. Easy and quick with a screwdriver.
If the thickness of the plasterboard sheets is more than 15 mm, then it is still recommended to drill a preliminary hole.
| Dowel DRIVA | Dowel TT22 | Dowel TNF/-W |
DRIVA metal dowels with a drill at the end are generally a convenient thing - they simply screw in and hold tightly. This dowel can be installed using a regular bit for any screwdriver. The DRIVA dowel, made of metal with a drill at the end, is also suitable for stronger gypsum fiber boards.
Dowel TNF/-W butterfly
when secured in drywall from the reverse side, when the self-tapping screw is tightened, it opens up like a butterfly and forms a stop. This universal dowel, through screwing in the screw, receives maximum expansion in the gypsum board, and to prevent it from turning in the hole, a special cuff is made.
Requires pre-drilling. The maximum thickness of the item to be secured is 5 mm.
Dowel MOLLY umbrella
and in fact the same operating principle is similar to an umbrella. These dowels have ready-made fastening hooks or rings.
| Dowel MOLLY | The umbrella dowel is very suitable for plasterboard ceilings. Opening up in the empty space behind the sheet with its shoulders, the dowel distributes the load over a large area, which makes it possible to hang a normal chandelier. |
The use of special pliers speeds up installation.
It is held in the structure due to the effect of the expanding console. Requires pre-drilling and can be used not only for drywall, but for fastening work in any hollow structures.
GVL grout. Sealing drywall seams: steps and nuances
Sealing drywall joints is a pressing problem in interior decoration. This material is widely used for leveling the surface of walls and ceilings, as well as creating suspended ceilings and partitions, but inaccurate joints of sheets can affect the appearance of the finish. Only knowledge of the principles and rules of preparation for finishing can give the room the desired attractiveness.
Why seal seams?
The joints of drywall sheets are a problem area. Difficulties may arise during installation:
- The ends may crumble and break due to mechanical stress.
- The edges of the sheets at the junction are subject to deformation (bend).
- When temperature changes, it changes its width, which leads to the appearance of cracks in the finish and swelling of the edges of the sheet.
- The unsealed gap allows moisture to accumulate, causing staining and peeling of the finish, as well as the formation of mold and mildew.
- Inaccuracies in the joint make the surface of walls and ceilings uneven.
Thus, the lack of proper sealing of the gaps between the sheets of drywall leads to damage to the finishing coating, gradual destruction of the material itself, and deterioration of its appearance. It is important to properly seal joints when preparing the surface for painting.
Sealing drywall joints includes several requirements:
- Correct installation of drywall. The precise location of the profiles and the rigidity of the frame play a primary role. The joint must be in the middle of the U-shaped profile area (i.e., the edges must rest on a rigid platform), and the sheathing must have sufficient stability. Otherwise, the edges of the sheet will be deformed, and the seam will diverge due to vibrations of the coating.
- Reliability of drywall fastening. The seam will diverge due to insufficiently strong fastening of the sheets to the frame profiles.
- Alignment accuracy. Any steps at the joint worsen the condition and quality of the seam.
- Width. The gap at the joint should not exceed 7-10 mm. A wide seam is more difficult to seal.
- Presence of chamfer. It is necessary to increase the area in the joining zone and improve adhesion. Standard sheets with high-quality factory bevel. Do-it-yourself finishing is necessary after cutting drywall.
These requirements oblige the seal to be carried out reliably and efficiently. Without it, it is impossible to ensure the attractive appearance and durability of a plasterboard structure.
Necessary materials
Sealing drywall seams can be done using the following materials:
- Paper tape. It is a reinforcing strip made of high-strength paper with fiber additives. The tape has a longitudinal groove to ensure an even bend when finishing corners. To increase the reliability of the primer, perforated versions are available. Well-known brands of paper reinforcing tapes are Knauf, Sheetrock, NextBuild.
- Serpyanka. This is a self-adhesive tape in the form of a mesh of synthetic threads. Its main advantage is ease of use. Disadvantages - insufficient strength, tensile elongation, tendency to crack. Serpyanka is used mainly for longitudinal seams.
- Putty. Two types of putty are used - starting and finishing. The first type is necessary to fill the gap, and the second to align the joint. The most famous is gypsum putty, sold in the form of a dry mixture. In particular, high-quality material is manufactured by Knauf. Modifications of Uniflot have polymer additives that make it possible to increase the moisture resistance of seams. Knauf Fugen putties are manufactured specifically for drywall.
- Primer. A deep penetrating acrylic type primer is suitable for drywall. It is usually a white or colorless liquid that can be applied in a thin layer with a brush or roller. High-quality primers are produced by Knauf - Tiefengrunt (for preparation for painting, wallpapering), Betokontakt (for tiles). You can also use other materials - Ceresit 117, Universal.
Universal
Due to its design, a universal knife or a mounting knife allows you to work with gypsum boards at any stage. Its handle is ergonomic, it fits easily and comfortably in the hand, and the rubberized plastic body makes using the knife comfortable. Manufacturers present two options for fixing the blade: screw and using a spring. The blade blade is made of high quality steel and has no sectional cuts. This increases the reliability and durability of the knife.
The mounting knife package may include additional elements:
- spare blades;
- a latch for attaching to a trouser belt or trouser belt;
- built-in compartment with spare parts.
All these factors make the use of a universal knife convenient, comfortable and suitable for daily work.